Duet3D Logo Duet3D
    • Tags
    • Documentation
    • Order
    • Register
    • Login

    Help needed with Duet 3 6hc TMC5160 StealthChop config

    Scheduled Pinned Locked Moved Unsolved
    Tuning and tweaking
    16
    86
    12.8k
    Loading More Posts
    • Oldest to Newest
    • Newest to Oldest
    • Most Votes
    Reply
    • Reply as topic
    Log in to reply
    This topic has been deleted. Only users with topic management privileges can see it.
    • fractalengineerundefined
      fractalengineer
      last edited by

      @empi00 @Touchthebitum

      I mean guys did u try the settings that were advised? What were the results?

      Railcore II ZL

      Touchthebitumundefined cjackson234undefined 2 Replies Last reply Reply Quote 0
      • dc42undefined
        dc42 administrators @danym21
        last edited by

        @danym21 said in Help needed with Duet 3 6hc TMC5160 StealthChop config:

        As second what I do not understand is why is there a big noice change between the speed 119mm/min and 121mm/min on 0.9° motors.
        When you check my first post you can see that M569 say´s the change should be at 110.3 mm/sec

        The calculation of the speed for changeover form stealthChop to spreadCycle is not exact, because the timing is done by a 12MHz oscillator inside the TMC5160. The tolerance of that oscillator is +/- 4.2% at 50C. I suspect that there is also an element of rounding error when tpwmthrs is low.

        Unfortunately I don't have time to look at this again at present, but one of my colleagues will.

        Duet WiFi hardware designer and firmware engineer
        Please do not ask me for Duet support via PM or email, use the forum
        http://www.escher3d.com, https://miscsolutions.wordpress.com

        1 Reply Last reply Reply Quote 0
        • Touchthebitumundefined
          Touchthebitum @fractalengineer
          last edited by

          @fractalengineer

          I tried various values on V, H and M915 but without big changes on noise...

          Sparkcube XL V 1.1 300x300x190, Radds, Raspberry, Keenovo silicone bedheat 220v, Big Booster Extruder, DIY building
          BLV Cube 665mm Direct Drive with Duet3/SBC (RPi 4) Mosquito Magnum/Bond Tech Extruder/Vanadium Nozzle, Keenovo silicone bedheat 220v

          1 Reply Last reply Reply Quote 0
          • dc42undefined
            dc42 administrators
            last edited by dc42

            Did you adjust the homing procedure to meet the stealthChop tuning requirements, as I explained in a previous post?

            btw in the imminent RRF 3.2beta you will be able to read out the values of the PWM_SCALE and PWM_AUTO registers, to see the result of stealthChop tuning.

            Duet WiFi hardware designer and firmware engineer
            Please do not ask me for Duet support via PM or email, use the forum
            http://www.escher3d.com, https://miscsolutions.wordpress.com

            Touchthebitumundefined empi00undefined 3 Replies Last reply Reply Quote 0
            • Touchthebitumundefined
              Touchthebitum @dc42
              last edited by Touchthebitum

              @dc42
              Not yet, do you mean adding gcode : G4 P50 ?

              Sparkcube XL V 1.1 300x300x190, Radds, Raspberry, Keenovo silicone bedheat 220v, Big Booster Extruder, DIY building
              BLV Cube 665mm Direct Drive with Duet3/SBC (RPi 4) Mosquito Magnum/Bond Tech Extruder/Vanadium Nozzle, Keenovo silicone bedheat 220v

              dc42undefined 1 Reply Last reply Reply Quote -1
              • dc42undefined
                dc42 administrators @Touchthebitum
                last edited by dc42

                @Touchthebitum said in Help needed with Duet 3 6hc TMC5160 StealthChop config:

                @dc42
                Not yet, do you mean adding gcode : G4 P50 ?

                I mean make a very small movement (1 microstep is enough) to power up the motors using e.g. G91 G1 H2 X0.02 G90, then the G4 command, then the homing move. The TMC5160 datasheet is quite definite about needing the correct tuning procedure.

                Duet WiFi hardware designer and firmware engineer
                Please do not ask me for Duet support via PM or email, use the forum
                http://www.escher3d.com, https://miscsolutions.wordpress.com

                dc42undefined 1 Reply Last reply Reply Quote 0
                • empi00undefined
                  empi00 @danym21
                  last edited by

                  @danym21
                  Matching qoute well our stories!
                  Tried also with just the frame and nothing else on the rack.
                  No MGN Rails, No X/Y/Z Axis assembled.
                  And still the same.

                  The motors are "shaking" a lot when you but them just on the floor.
                  I am limited in time today, but when i will find some, i will post the Videos etc, what i made the last 2 weeks here.

                  1 Reply Last reply Reply Quote 0
                  • dc42undefined
                    dc42 administrators @dc42
                    last edited by

                    PS - I've also considered whether a better tuning procedure might be:

                    • Home the printer in spreadCycle mode (you could reduce motor current for this if you find it noisy)
                    • Restore motor current to 100%
                    • Switch to stealthChop
                    • Pause (to satisfy the tuning requirements)
                    • Make a normal move away from the endstop at moderate speed (to satisfy the tuning requirements)

                    Duet WiFi hardware designer and firmware engineer
                    Please do not ask me for Duet support via PM or email, use the forum
                    http://www.escher3d.com, https://miscsolutions.wordpress.com

                    Touchthebitumundefined 1 Reply Last reply Reply Quote 0
                    • Touchthebitumundefined
                      Touchthebitum @dc42
                      last edited by

                      @dc42
                      Ok, so we would have config.g with Stealthchop settings and homingx.g with anothers for example ? Which one has priority ?
                      If I'm wrong, what would be the strategy ?
                      Thanks

                      Sparkcube XL V 1.1 300x300x190, Radds, Raspberry, Keenovo silicone bedheat 220v, Big Booster Extruder, DIY building
                      BLV Cube 665mm Direct Drive with Duet3/SBC (RPi 4) Mosquito Magnum/Bond Tech Extruder/Vanadium Nozzle, Keenovo silicone bedheat 220v

                      1 Reply Last reply Reply Quote 0
                      • dc42undefined
                        dc42 administrators
                        last edited by dc42

                        I found time to do a little more work on this. I find that even in spreadCycle mode, with interpolation to x256 enabled the motors are very quiet, although I can just hear them around the speed that i think corresponds to mid-band resonance. So for these tests, I reduced microstepping to x8 and disabled interpolation.

                        These are the conditions you need for the drivers to run in stealthChop mode:

                        1. tpwmthrs low enough for the speed you are using. This is set by the M569 V parameter. Lower values increase the speed at which the driver will switch over to spreadCycle. M569 with just a P parameter will translate the existing tpwmthrs to mm/sec belt speed for you.

                        2. thigh low enough for the speed you are using. This is set by the M569 H parameter. The units are the same as for tpwmthrs. M569 with just a P parameter will translate the existing thigh to mm/sec belt speed for you.

                        3. tcoolthrs low enough for the speed you are using. This is set by the M915 T parameter. The units are the same as for the M569 H and V parameters. Although M915 with P and/or axis parameters sets the value correctly, there is a bug in firmware 3.1.x when you use M915 with just a drive and/or axis parameter. The bug is that the value reported as "coolstep" should be the existing T parameter, but isn't. The value of tcoolthrs defaults to 2000, which is usually too high if you want to use stealthChop. The reason it is this high is to allow stall detection to work. Stall detection is not compatible with stealthChop on the TMC5160.

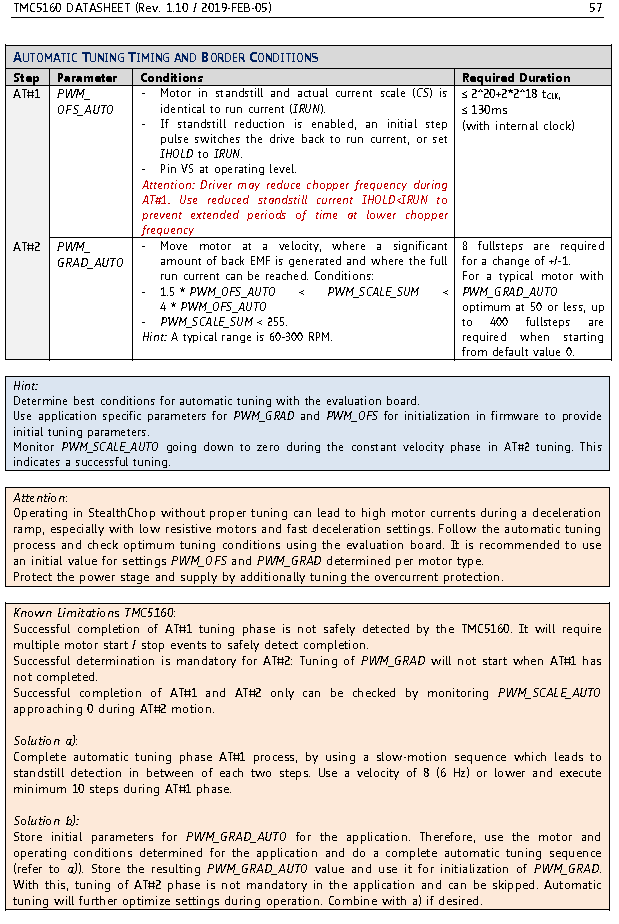
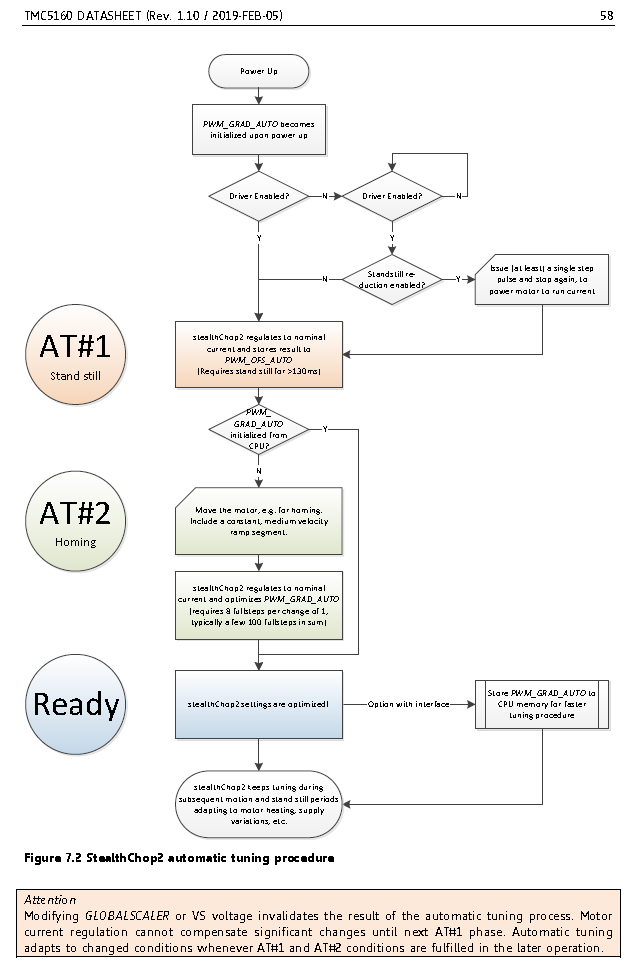
                        4. You must execute the proper tuning sequence after switching to stealthChop. This means: apply motor current, pause for more than 130ms, then execute a move at reasonable speed. Here is an extract from the TMC5160 datasheet:

                        649b8670-d92b-4211-a9b5-b1e4d682eaf2-image.png

                        a5c6ed4e-2fce-4e22-8631-f27e3da0961e-image.png

                        1. You must enable stealthChop using M569 P# D3.

                        2. stealthChop cannot function properly at speeds high enough that it can't supply as much current as it wants to to the stepper motor due to insufficient power supply voltage.

                        So to use stealthChop, I suggest you set tpwmthrs, thigh and tcoolthrs all to the same value, for example:

                        M569 P0 D3 H50 v50
                        M915 P0 T50

                        You can send M569 P0 to see what belt speed the H and V parameters correspond to. What you are satisfied that you have the threshold high enough, execute the tuning procedure. If necessary, you can execute a very short move (just 1 microstep is enough) to power up the motors at the start.

                        In principle you could use different values of thigh and tcoolthrs so that at speeds too high for stealthChop you still use coolStep, however i'm not sure that there are any speeds at which coolStep provides any advantages over stealthChop.

                        If you are using stall-detect homing, then in the homing file you must increase the M915 T parameter to a value that corresponds to a speed below the speed of your homing move. [I have not yet checked whether you also need to switch to spreadCycle mode explicitly]. After homing, reduce the M915 T parameter again, then execute the tuning procedure.

                        HTH David

                        Duet WiFi hardware designer and firmware engineer
                        Please do not ask me for Duet support via PM or email, use the forum
                        http://www.escher3d.com, https://miscsolutions.wordpress.com

                        Tinchusundefined 1 Reply Last reply Reply Quote 0
                        • Touchthebitumundefined
                          Touchthebitum
                          last edited by

                          It is incredible what this TMC5160 driver can do according to the datasheet.
                          https://www.trinamic.com/fileadmin/assets/Products/ICs_Documents/TMC5160A_Datasheet_Rev1.14.pdf

                          Sparkcube XL V 1.1 300x300x190, Radds, Raspberry, Keenovo silicone bedheat 220v, Big Booster Extruder, DIY building
                          BLV Cube 665mm Direct Drive with Duet3/SBC (RPi 4) Mosquito Magnum/Bond Tech Extruder/Vanadium Nozzle, Keenovo silicone bedheat 220v

                          1 Reply Last reply Reply Quote 0
                          • N3XT3Dundefined
                            N3XT3D
                            last edited by

                            I am thinking of buying the Duet 3 board. Does activating stealth chop now work without any problems?

                            Phaedruxundefined 1 Reply Last reply Reply Quote 0
                            • Phaedruxundefined
                              Phaedrux Moderator @N3XT3D
                              last edited by

                              @N3XT3D See the conditions listed by DC42 above

                              https://forum.duet3d.com/topic/16297/help-needed-with-duet-3-6hc-tmc5160-stealthchop-config/40?_=1598907951085

                              That is still and likely always going to be the case.

                              Z-Bot CoreXY Build | Thingiverse Profile

                              1 Reply Last reply Reply Quote 0
                              • danym21undefined
                                danym21
                                last edited by

                                at the moment I don´t have time to test again. But the homing sequence didn´t help yet, only adding stepper dumper to isolate the frame from the motors has helped for me. However, this reduce the print quality.

                                I read in a post on facebook that useing 1.8° stepper motors instead of 0.9° helped.
                                I ordered some more motors to test, maybe the moon motors are not the best for the Duet board. I don´t know what the problem is. But I´m not alone with this problem.

                                1 Reply Last reply Reply Quote 0
                                • N3XT3Dundefined
                                  N3XT3D
                                  last edited by

                                  I really like the Duet boards, the build quality and firmware are great. But if an SKR board with TMC 2209 drivers manages to be that quiet, I don't think that should be a problem with the Duet. The Stealth Chop 2 function is the same. It is crucial for me that my printer should be quiet. So if nothing can change in the current situation, at least that's how I understood it, it will probably not be worth switching to the Duet 3 board for me. Please correct me if I have misunderstood or told something wrong.

                                  Phaedruxundefined 1 Reply Last reply Reply Quote 0
                                  • Phaedruxundefined
                                    Phaedrux Moderator @N3XT3D
                                    last edited by

                                    @N3XT3D I think the biggest factor will be the motors.

                                    It's also my understanding that stealthchop isn't really intended for 3d printer use at all, but in the right situation and expectations it can work.

                                    If there's a secret to it, I don't know what it is though.

                                    Z-Bot CoreXY Build | Thingiverse Profile

                                    1 Reply Last reply Reply Quote 0
                                    • dc42undefined
                                      dc42 administrators
                                      last edited by dc42

                                      Both TMC5160 and TMC2209 have stealthChop. It's a little more complicated to configure on the TMC5160 because that chip also has coolStep. Also, stall detection doesn't work in stealthChop mode, so you have to switch to spreadCycle while doing stall detect homing.

                                      TMC2209 is a little different because it doesn't have coolStep and because stall detection only works in stealthChop mode.

                                      In both cases there are some limitations:

                                      • stealthChop doesn't work well at high speeds. That's why there is a changeover speed defined. Above that speed, the driver switches over to spreadCycle. Unfortunately there is a jolt when that happens. The higher the changeover speed, the worse the jolt.
                                      • stealthChop can't react quickly to changes in load. So if your printer is executing a travel move and the nozzle hits a blob or overhang, it is likely to skip steps if the driver is in stealthChop mode.

                                      The TMC2130 drivers used on the Prusa Mk3 with the Einsy board are similar to the TMC5160 drivers but without external mosfets. Prusa defines two printing modes: fast and quiet. My guess is that in quiet mode, they reduce the speed of travel moves so that the drivers can operate in stealthChop mode throughout.

                                      So my suggestion is to use one of the following configurations:

                                      1. StealthChop changing over to spreadCycle a very low speed. Compared to running in spreadCycle always, this reduces standstill noise with some motors.
                                      2. StealthChop changing over to spreadCycle at a little over your normal maximum printing speed. It will switch to spreadCycle for travel moves, except very short ones. This will only be viable if the jerk at switchover is tolerable.
                                      3. Limit your travel speed so that you can keep the printer in stealthChop mode always.

                                      Duet WiFi hardware designer and firmware engineer
                                      Please do not ask me for Duet support via PM or email, use the forum
                                      http://www.escher3d.com, https://miscsolutions.wordpress.com

                                      rothundefined 1 Reply Last reply Reply Quote 0
                                      • N3XT3Dundefined
                                        N3XT3D
                                        last edited by

                                        @dc42 First of all, thank you very much for the detailed answer.

                                        Then I probably misunderstood that in principle. I thought you couldn't activate stealth chop at all. Unfortunately I can hardly assess how loud this jolt is. My wish would be to be able to print up to 100mm / s (maximum) in the steahlthchop and to be able to switch to the spreadcycle for the travel speed.
                                        Does the jolt depend on the Coolstep function? Or to put it another way, would this jolt also occur with the TMC 2209 drivers under the same conditions? I tried to find a couple of videos on Youtube that have a Duet 3 board built in to get an impression of what they sound like, but you can't find anything useful.

                                        Because with my printer with Duet 2 Wifi I have the problem that the printer without a stepper motor damper for X and Y is not acceptable because of the noise. I already reported on this in this forum. Here is the video too.

                                        https://www.youtube.com/watch?v=jcsMTAzeeRE&t=2s

                                        From this state I would like to turn off without "cheating" with the dampers. Otherwise I love the board and really don't want to leave the Duet boards. Therefore the consideration of switching to a Duet 3 board.

                                        danym21undefined 1 Reply Last reply Reply Quote 0
                                        • dc42undefined
                                          dc42 administrators
                                          last edited by

                                          Those motors in the video sound much noisier than normal, as if you don't have interpolation enabled. What microstepping settings are you using?

                                          The jolt when switching modes applies to the TMC2209 as well. From the TMC2209 datasheet:

                                          As a first step, both chopper principles should be parameterized and optimized individually (SpreadCycle settings may be programmed to OTP memory). In a next step, a transfer velocity has to be fixed. For example, StealthChop operation is used for precise low speed positioning, while SpreadCycle shall be used for highly dynamic motion. TPWMTHRS determines the transition velocity. Read out TSTEP when moving at the desired velocity and program the resulting value to TPWMTHRS. Use a low transfer velocity to avoid a jerk at the switching point.
                                          A jerk occurs when switching at higher velocities, because the back-EMF of the motor (which rises with the velocity) causes a phase shift of up to 90° between motor voltage and motor current. So when switching at higher velocities between voltage PWM and current PWM mode, this jerk will occur with increased intensity. A high jerk may even produce a temporary overcurrent condition (depending on the motor coil resistance). At low velocities (e.g. 1 to a few 10 RPM), it can be completely neglected for most motors. Therefore, consider the switching jerk when choosing TPWMTHRS. Set TPWMTHRS zero if you want to work with StealthChop only.

                                          Duet WiFi hardware designer and firmware engineer
                                          Please do not ask me for Duet support via PM or email, use the forum
                                          http://www.escher3d.com, https://miscsolutions.wordpress.com

                                          1 Reply Last reply Reply Quote 0
                                          • N3XT3Dundefined
                                            N3XT3D
                                            last edited by

                                            I used 16x micro stepping with interpolation. The change to 1.8 ° stepper motors brought some improvement, reducing the motors to 1A as well. The motor dampers made the printer quieter, but the vibration in the motor is so strong that you can even see it in the printed part.

                                            This is my config.g

                                            ; Configuration file for Duet WiFi (firmware version 3)
                                            
                                            ; executed by the firmware on start-up
                                            
                                            ;
                                            
                                            ; generated by RepRapFirmware Configuration Tool v2.1.4 on Sat Dec 28 2019 21:53:43 GMT+0100 (Mitteleuropäische Normalzeit)


                                            ; General preferences
                                            
                                            ; Aktuelle Duet Wifi Firmware Version: 3.1.0 - Stand: 17.05.2020
                                            
                                            ; Paneldue Information: Hardware Version: Panel Due v3.0a - 57600 baud - aktuelle Version: 1.24 - Stand: 11.05.20
                                            
                                            M575 P1 S1 B57600														; set Panel Due Baudrate to 57600
                                            
                                            G90																		; send absolute coordinates...
                                            
                                            M83																		; ...but relative extruder moves
                                            
                                            M550 P"XY Cube"															; set printer name


                                            M667 S1																	; select CoreXY mode


                                            ; Network
                                            
                                            M552 S1																	; enable network
                                            
                                            M586 P0 S1																; enable HTTP
                                            
                                            M586 P1 S0																; disable FTP
                                            
                                            M586 P2 S0																; disable Telnet


                                            ; Drives
                                            
                                            M569 P0 F3 S1															; physical drive 0 goes forwards - Changed TOFF for reduced motor noise F4 is default
                                            
                                            M569 P1 F5 S1 															; physical drive 1 goes forwards - Changed TOFF for reduced motor noise F4 is default
                                            
                                            M569 P2 F3 S1															; physical drive 2 goes forwards - Changed TOFF for reduced motor noise F4 is default
                                            
                                            M569 P3 S1																; physical drive 3 goes forwards
                                            
                                            M584 X0 Y1 Z2 E3														; set drive mapping
                                            
                                            M350 X16 Y16 Z16 E16 I1													; configure microstepping with interpolation
                                            
                                            M92 X200.1 Y200.1 Z1600.00 E412.493								; set steps per mm
                                            
                                            M566 X500.00 Y500.00 Z30.00 E400.00										; set maximum instantaneous speed changes (mm/min)
                                            
                                            M203 X12000.00 Y12000.00 Z150.00 E2100.00								; set maximum speeds (mm/min)
                                            
                                            M201 X2000.00 Y2000.00 Z100.00 E5000.00									; set maximum accelerations (mm/s^2)
                                            
                                            M204 P1000 T2000														; set accelerations of printmoves to 1000 and for travelmoves to 2000 (mm/s^2)
                                            
                                            M906 X1600 Y1600 Z1600 E1600 I30										; set motor currents (mA) and motor idle factor in per cent
                                            
                                            ; M593 F32																; Set Dynamic Acceleration to cancel ringing at 48 Hz
                                            
                                            M84 S30																	; Set idle timeout
                                            
                                            M671 X30:270:30:270 Y270:270:30:30 P0.7									; Define Bedleveling screws, 0,7mm pitch


                                            ; Pressure advance
                                            
                                            M572 D0 S0.07															; Pressure advance - 0.113


                                            ; Axis Limits
                                            
                                            M208 X-11 Y0 Z0 S1														; set axis minima
                                            
                                            M208 X306 Y321 Z500 S0													; set axis maxima


                                            ; Endstops
                                            
                                            M574 X1 S1 P"xstop"														; configure active-high endstop for low end on X via pin xstop
                                            
                                            M574 Y2 S1 P"ystop"														; configure active-high endstop for high end on Y via pin ystop
                                            
                                            M574 Z1 S2																; configure Z-probe endstop for low end on Z


                                            ; Z-Probe
                                            
                                            M558 P1 C"zprobe.in+zprobe.mod" H3 F100 T12000 I0 B0					; set Z probe type to unmodulated and the dive height + speeds - A5 S0.02 optional fuer multiprobe selbsttest
                                            
                                            G31 P500 X-2 Y-16.4 Z3.05												; set Z probe trigger value, offset and trigger height - 3.05 for CFK; 3.02 for Buildtak; 2.724 for Powdercoated Springsteel; 3.152 for ALU -  Wert kleiner wird Abstand Größer.
                                            
                                            M557 X30:270 Y30:270 S40												; define mesh grid


                                            ; Heaters
                                            
                                            M308 S0 P"bedtemp" Y"thermistor" T100000 B3950 A"Druckbett"				; configure sensor 0 as thermistor on pin bedtemp - A"Printbed"
                                            
                                            M950 H0 C"bedheat" T0													; create bed heater output on bedheat and map it to sensor 0
                                            
                                            M143 H0 S100															; set temperature limit for heater 0 to 100C
                                            
                                            M307 H0 A154.1 C2269.2 D1.0 V24.0 B0 S1.00								; disable bang-bang mode for the bed heater and set PWM limit
                                            
                                            M140 H0																	; map heated bed to heater 0
                                            
                                            M308 S1 P"e0temp" Y"thermistor" T100000 B4725 C7.06e-8 A"Nozzle"		; configure sensor 1 as thermistor on pin e0temp - A"E3DV6 Hotend"
                                            
                                            M950 H1 C"e0heat" T1													; create nozzle heater output on e0heat and map it to sensor 1
                                            
                                            M143 H1 S280															; set temperature limit for heater 1 to 280C
                                            
                                            M307 H1 A368.0 C157.4 D3.7 V24.0 B0 S1.00								; disable bang-bang mode for the nozzle heater and set PWM limit


                                            ; Fans
                                            
                                            M950 F0 C"fan0" Q250													; create fan 0 on pin fan0 and set its frequency
                                            
                                            M106 P0 C"Bauteil Lüfter" S0 H-1										; set fan 0 name and value. Thermostatic control is turned off
                                            
                                            M950 F1 C"fan1" Q500													; create fan 1 on pin fan1 and set its frequency
                                            
                                            M106 P1 C"Heatbreak Fan" S1 H1 T45										; set fan 1 name and value. Thermostatic control is turned on


                                            ; Tools
                                            
                                            M563 P0 D0 H1 F0														; define tool 0
                                            
                                            G10 P0 X0 Y0 Z0															; set tool 0 axis offsets
                                            
                                            G10 P0 R0 S0															; set initial tool 0 active and standby temperatures to 0C


                                            ; Limit axis movement
                                            
                                            M564 H1 S1														; movements only work with homed Axis; H1 = forbid movement of axes that have not been homed; S1 = limit movement within axis boundaries


                                            ; Custom settings are not defined
                                            
                                            M912 P0 S-4														; Set correction for CPU Temperature


                                            ; Miscellaneous
                                            
                                            M911 S23 R28 P"M913 X0 Y0 G91 M83 G1 Z1 E-1 F1000"				; set voltage thresholds and actions to run on power loss
                                            
                                            1 Reply Last reply Reply Quote 0
                                            • First post
                                              Last post
                                            Unless otherwise noted, all forum content is licensed under CC-BY-SA