Bed mesh - 1st test after installed rails
-
I have a 4mm bed plate I have yet to use... I put it on top of the glass, and it isn't able to get less then .1xx mm variance...
Mesh

Flipped it over, and checked mesh again.
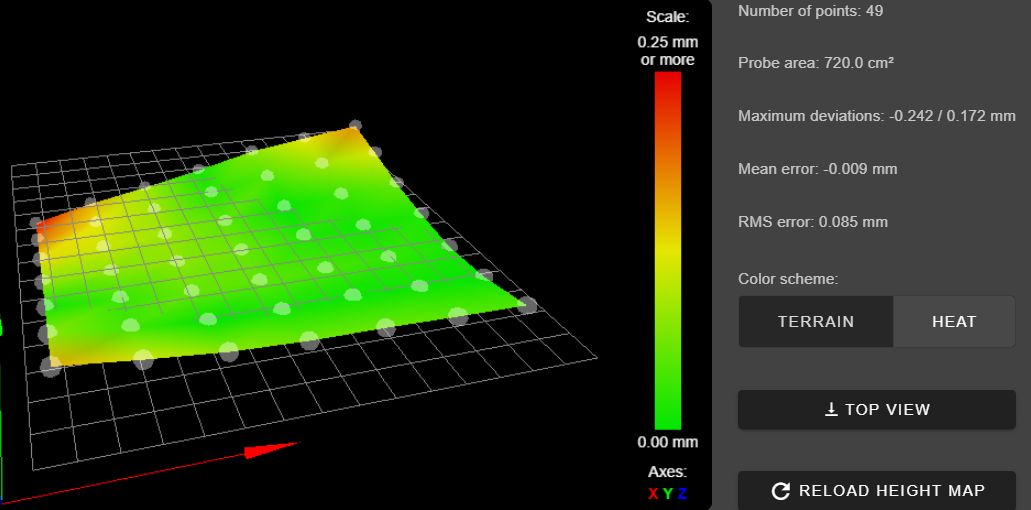
Going to let it cool, and heat up. Then going to run mesh again on this metal plate.
Curious to see if the bowls again, facing up or down. (metal causes the direction, or it goes away from the heat). -
How is your bed attached? You're using 3-point leveling, but is the bed itself attached to a frame that's connected to independent Z axes by four screws? If so it's possible that the bed is twisted via the attachment to the frame. Were you able to find straightedge to check that visually?
If it's not that, still possible that your rails are ever so slightly out of parallel. Depending on the other mechanics, in particular the torsional rigidity of the X axis, it's completely possible to have smooth travel if the rails have a slight twist with respect to one another. You could loosen the screws and shim one end to evaluate.
-
You are correct and I had forgotten to reply. The bed is attached to a frame and the frame is attached to the 3 motor/screws for auto bed leveling. The mounting method seems to not be easy to get perfect and, I am guessing because of the heat/cool cycling isn't consistent. After noticing this, I tweaked it so it is better, but many times I find the back to be lower then the front (not as much of a twist) and other times I still see a twist. It seems as if I do auto bed leveling and then auto bed compensation, it's "good enough" to not be a problem. I have seen some people with my printer remove the frame all together, and not sure what parts I would need or if I could even get their method working with my setup. (Heated bed may be to big etc...). But it is something to look into.
Thanks for the feedback!
-
Which printer design is it? I've got a BLV cube I'm working on adding a 3-point kinematic bed to.

-
@whopping-pochard
Yes. That is what I want to do!
I have a RatRig V-Core, I upgraded to a v2 last year and just upgraded it to a Pro. So it looks very close to what you have in the picture.I have a Keenevo heated pad on the back of a 3mm steel bed, with glass on top. I have a 4mm bed I am not yet sure how I will use (replace the 3mm or just put on top). Also have a magnetic printing surface I would like to use but I don't yet know how I want to use the bed/glass to permanently attach the magnetic to the glass or metal just yet....
Saying that, Keenevo suggests you sandwich the heated pad between two sheets of metal... Not sure if I would want to do this just yet because of how I need a flush top to the entire bed (glass reaches corner to corner) and would need bevel our screw hole and currently only have 3 (or 4) mm to work with.If you have any prototype versions your working on already another public design I should look at. I wouldn't mind printing parts and trying it out.
-
Sweet! I'm remixing from this mod: https://www.thingiverse.com/thing:4163121
I'm changing the parts to print better without support and to incorporate some additional features, like emergency endstop switches on each Z. I'm also changing the bed design -- the remix I'm basing from uses the frame-and-bed system, which does give you bed leveling but, as you know, doesn't really take advantage of the kinematic restraint. So I'm using a Railcore aluminum bed as the bed structure, and securely attaching each of the three mount points to a short piece of 2020 to act as a thermal barrier to the printed support. Each support has a different magnetic mount coupled to a magnetic ball, allowing for 3-, 4-, and 5-axis movement, respectively.
Hope it works.

-
@whopping-pochard
All of the Amazon links don't seem to work. Where did you get all the parts? -
I happened to have some of the rectangular magnets, but I just searched for the large countersunk and disc magnets to fit the dimensions of the parts.
Having tried them out, though, I've decided to redesign those parts around different magnets. With the magballs you're not taking advantage of most of the flux in those really large flat magnets (the holding power for the big flat one is really poor), and there's no reason to have so much available travel—a 350 mm aluminum plate should expand ~ 0.5 mm. So I'm redesigning those parts around 1/4" thick x 3/4" diameter magnets from kjmagnetics.com.
-
@whopping-pochard
I recently put a thick thermal (heat sink) pad under the glass, and it helping.
I still want to remove that frame and attach the 4mm bed directly to the rails... so still interested in your progress.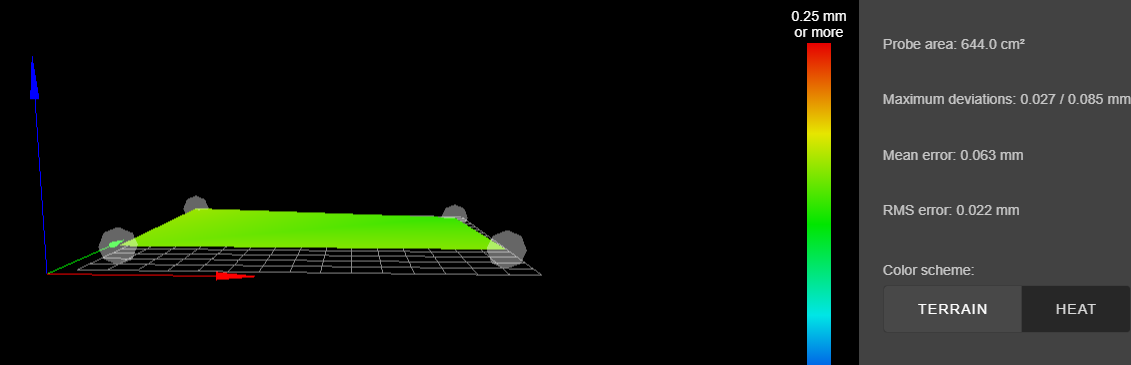
-
@BlueDust wow! That is a flat bed! Nice!
I’ll keep you posted! Waiting on a few more parts to come in before I can assemble everything and see how it works.