Repair needed on heater port for Duet3D
-
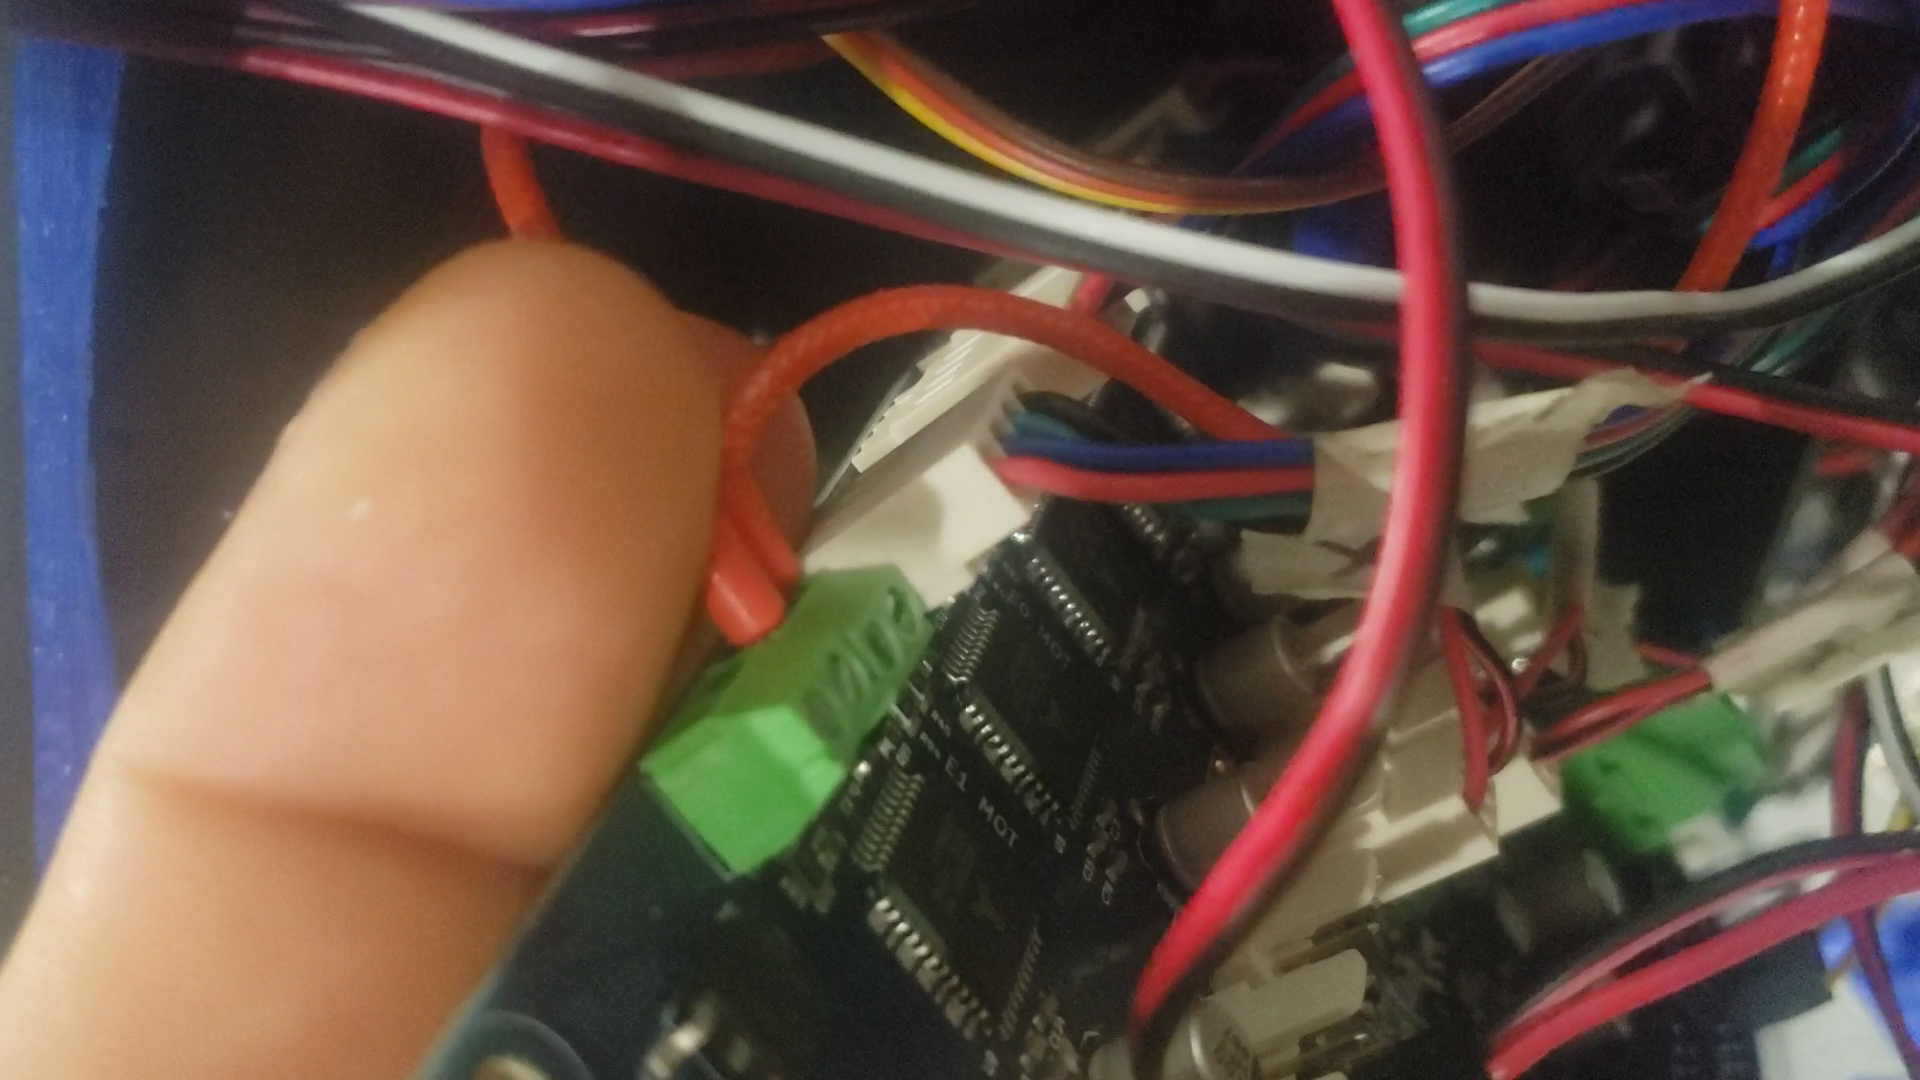
I have a duet3D, and I think I dislodged the heater port on it during assembly. I didn't notice it until I had to pull the board on a different problem and when I went to put my heating cables back in, the port was loose. It's still makes physical contact, but I started running into heating errors and won't tune. I'm thinking there is a mechanical failure in the connection port. Where can I send the board to be repaired??
-
Photos? ..
-
I'm open to suggestions on how to troubleshoot it..
-
Can you show us the back of the board where those green screw down terminals are?
Does it wiggle around?
When and where was the board purchased?
-
Can you use the other heater port instead?
-
I would love to use the other port. I'm just not sure where to change it. Just curious, would it be terrible if I flowed a tiny bit more solder into the joint to help if the joint has failed?
-
@hbrownell said in Repair needed on heater port for Duet3D:
I'm just not sure where to change it.
Post your config.g and response to M115 (to show firmware version).
Ian
-
@hbrownell said in Repair needed on heater port for Duet3D:
Just curious, would it be terrible if I flowed a tiny bit more solder into the joint to help if the joint has failed?
If the solder joint has failed, then that is how it would be repaired.
-
M115
FIRMWARE_NAME: RepRapFirmware for Duet 2 WiFi/Ethernet FIRMWARE_VERSION: 2.05 ELECTRONICS: Duet WiFi 1.02 or later FIRMWARE_DATE: 2019-12-13b1Config.g
; Configuration file for Duet WiFi (firmware version 1.21)
; executed by the firmware on start-up
;
; generated by RepRapFirmware Configuration Tool v2 on Fri May 24 2019 20:44:40 GMT-0500 (Central Daylight Time); General preferences
G90 ; Send absolute coordinates...
M83 ; ...but relative extruder moves; Network
M550 P"3DPrinter" ; Set machine name
M552 S1 ; Enable network
M586 P0 S1 ; Enable HTTP
M586 P1 S0 ; Disable FTP
M586 P2 S0 ; Disable Telnet; Drives
M569 P0 S0 ; Physical drive 0 goes Backwards
M569 P1 S0 ; Physical drive 1 goes Backwards
M569 P2 S1 ; Physical drive 2 goes forwards
M569 P3 S0 ; Physical drive 3 goes forwards;current settings
M584 X0 Y1 Z2:4 E3; two Z motors connected to driver outputs Z and E1
M671 X-81.5:291.5 Y110:110 S2 ; leadscrews at left (connected to Z) and right (connected to E1) of X axisM350 X16 Y16 Z16 E16 I1 ; Configure microstepping with interpolation
M92 X99.9 Y100.1 Z398.3436 E99. ; Set steps per mm
M566 X900.00 Y900.00 Z12.00 E110.00 ; Set maximum instantaneous speed changes (mm/min)
M203 X6000.00 Y6000.00 Z4000.00 E1200.00 ; Set maximum speeds (mm/min)
M201 X500.00 Y500.00 Z20.00 E250.00 ; Set accelerations (mm/s^2)
M906 X1100.00 Y1100.00 Z1100.00 E1100.00 I30 ; Set motor currents (mA) and motor idle factor in per cent
M84 S30 ; Set idle timeout; Axis Limits old
;M208 X20 Y0 Z0 S1 ; Set axis minima
;M208 X230 Y210 Z200 S0 ; Set axis maxima;New Settings
M208 X-20:230 Y-20:230 ; X carriage moves from 0 to 210, Y bed goes from 0 to 210; Endstops
M574 X1 Y1 S1 ; Set active high endstops; Z-Probe
M574 Z1 S2 ; Set endstops controlled by probe
M307 H3 A-1 C-1 D-1 ; Disable heater on PWM channel for BLTouch
; new suggested settings
M558 P9 H5 F120 T6000 A5 T0.0 ; Set Z probe type to bltouch and the dive height + speeds (F100 T2000 original settings)
;M558 P9 H10 F500 T4000 X0 Y0 Z1 ; Set Z probe type to bltouch and the dive height + speeds (F100 T2000 original settings)
G31 P25 X34.82 Y-8 Z-.033 ; Set Z probe trigger value, offset and trigger height
M557 X0:210 Y15:210 S52.5 ; Define mesh grid
M564 H0; Heaters
M305 P0 T100000 B4138 R4700 ; Set thermistor + ADC parameters for heater 0
M143 H0 S120 ; Set temperature limit for heater 0 to 120C
M305 P1 T100000 B4725 C7.060000e-8 R4700 ; Set thermistor + ADC parameters for heater 1
M143 H1 S280 ; Set temperature limit for heater 1 to 280C; Fans
M106 P0 S0 I0 F500 H T45 ; Set fan 0 value, PWM signal inversion and frequency. Thermostatic control is turned on
M106 P1 S1 I0 F500 H1 T45 ; Set fan 1 value, PWM signal inversion and frequency. Thermostatic control is turned on; Tools
M563 P0 D0 H1 ; Define tool 0
G10 P0 X0 Y0 Z0 ; Set tool 0 axis offsets
G10 P0 R0 S0 ; Set initial tool 0 active and standby temperatures to 0C; Automatic saving after power loss is not enabled
; Custom settings are not configured
; Miscellaneous
M501 ; Load saved parameters from non-volatile memory -
I added a little more solder and the connection felt better. I tried to heat up the hot end but got another error. However, I then tried to do an auto-tune and it successfully completed the task. So, I've added this to my config.g
M307 H1 A309.8 C176.8 D3.7 S1.00 V12.0 B0 -
May I suggest that, unless you are well versed in electronic soldering, you sort out a warranty exchange.
Unless all the old solder was removed (solder wick or similar), you will most definitively have additional problems down the line.
Adding a 'bit' of solder will only be a temporary fix.
If this isn't a warranty repair, try to do the job yourself but first remove the old solder.
Are you using ferrules on the cables? If not, please do so. Bare wires can shift with time and cause poor connections to the screw down point. This in turn can cause heat to be developed which can, in turn, cause faulty solder joints.
In any case, when you think about it, give all screw connectors a quick tightening every now and then. This is doubly true for high power joints like the bed heater. -
After the re-calibration I tried a print that had failed. It was successful!
All issues aside does anyone have any tips for improving the quality?Thanks for getting back to me!
-
@hbrownell Looks like printing too hot and over extruding. Calibrate your extruder (see https://duet3d.dozuki.com/Guide/Ender+3+Pro+and+Duet+Maestro+Guide+Part+4:+Calibration/40#s165 for an example). You may have the wrong temperature sensors set. You're certainly using the default for the bed thermistor.
In config.g, you're missing an H parameter value on your first defined fan. Should be H1, I think:
M106 P0 S0 I0 F500 H T45 ; Set fan 0 value, PWM signal inversion and frequency. Thermostatic control is turned on
If you want to use the E1 heater connections, the easiest thing to do is change the following in config.g and rewire the hot end heater to E1 heater, and move the thermistor wires from E0 temp to E1 temp:
; Heaters
...
M305 P2 T100000 B4725 C7.060000e-8 R4700 ; Set thermistor + ADC parameters for heater 1
M143 H2 S280 ; Set temperature limit for heater 1 to 280C

; Fans
M106 P0 S0 I0 F500 H2 T45 ; Set fan 0 value, PWM signal inversion and frequency. Thermostatic control is turned on
M106 P1 S1 I0 F500 H2 T45 ; Set fan 1 value, PWM signal inversion and frequency. Thermostatic control is turned on

; Tools
M563 P0 D0 H2 ; Define tool 0
Ian
-
@hbrownell said in Repair needed on heater port for Duet3D:
I added a little more solder and the connection felt better.
as long as you don't mix different alloys and the solder contains sufficient flux that should be fine, but given the heat capacity of the duets I'd be more concerned about weather or not you reflowed the whole solder joint. if you upload a picture I'm sure someone would be able to tell you how it looks.
however as you can't really be certain what alloy was used then for future reference you'd be better off just adding some lead free flux and reflowing the existing solder (unless there was a a shortage of solder in the first place)
-
bearer;
I reflowed the connection and it looks good. nice and shiny. I'll adjust for the fan on the first M106.droftarts;
I agree about the temp of the PLA, but when I did my retract tests, surprisingly the higher temp (200c) seemed to do better. Though at the time I had my Z lead screws tied at the top. Taking off the restraints DRASTICALLY changed the Z layering quality. I'll try 190 when I do my next print and see how that does.I have calibrated the extruder, but with the new calibration on the hot-end would that change the extruder as well? ( I noticed that retracting too far seemed to cause jams in the hot-end, so I'm keeping it at 3mm and no more per Matterhackers notes on the V6 hotend.)
I'm a little confused by your comment about the wrong sensor set. Could you elaborate please? I don't see what the bed thermistor has to do with the extruder.
")
I've now done a couple more prints and the machine worked very well, so I don't think I'll switch it unless I see that same error pop up again.
-
@hbrownell said in Repair needed on heater port for Duet3D:
it looks good. nice and shiny.
that would suggest you mixed in leaded solder?
-
@hbrownell said in Repair needed on heater port for Duet3D:
I'm a little confused by your comment about the wrong sensor set. Could you elaborate please? I don't see what the bed thermistor has to do with the extruder.
; Heaters
M305 P0 T100000 B4138 R4700 ; Set thermistor + ADC parameters for heater 0T100000 B4138 is the default thermistor setting in the configuration tool, for a Honeywell 135-104QAD-J01 thermistor that shipped with hot ends from RepRapPro, who have been out of business since 2015!
All 100k ohm thermistors have a resistance of 100k ohms at 25C, and will be fairly accurate at room temperature, but they report very differently as they get hotter. So check what thermistor you have in your bed and set the parameters accordingly, for more accurate bed temperature reporting.
As your hot end is an E3D V6, and you're using thermistor settings for the Semitec 104-GT2 which is usually supplied with them, I think that is correct. I was just pointing out that you'd used the default for the bed, so you may have chosen incorrectly for the hot end.
Ian
-
Gotcha. The solder is rosin core 2% flux.
I'll have to look into the bed thermistor. I bought it as an upgrade for the Anet A8 that I was originally going to upgrade to a BLV. But, by the time I got most of the frame bits, I just wound up building an entirely new machine. I'm not sure what thermistor is in it. I just knew that the hot end, bl touch, and duet3d I wanted to be not notch, so I went with all OEM parts.