Smart effector first layer issues
-
Hello,
Last year I already posted something about the problems, but they were never really solved. I did not use the printer much but trying to start again with the same problems...
I have a AC Predator with a duet wifi, heydn magball arms and a smart effector. The problem is that I cannot get a decent first layer, with or without mesh. Only with a 0.8mm nozzle and a 0.3mm fisrt layer a can sometimes get away with it, or small parts and microstep untill that area is ok.
Reason for upgrading was problems with the original AC ignoring some slicer settings and going sideways halfway prints for no reason. I have 2 predators, 1 origional and 1 with duet. both printed a perfect good first layer when original. I only have to do a bed calibration once every couple of months. Had the printer apart and checked everything, so I do not believe the hardware is that bad that is can not be done.
The original even had a difference in arm length of more than a mm and that did not seem to matter at all, so it should be much better now.The smart effector is set as sensetive as possible (M672 S105:18:237), I also tried the other direction, same result. I use baby steps a lot, but on 1 point it is to high, and 1 cm next to it it might be scraping the bed. This issue is there for over a year, I did update in between, so I doubt it has anything to do with firmware version.
Any help is much appreciated.
My config file:
; Configuration file for Duet WiFi (firmware version 3)
; executed by the firmware on start-up
;
; generated by RepRapFirmware Configuration Tool v3.1.4 on Mon Aug 03 2020 16:16:44 GMT+0200 (Midden-Europese zomertijd); General preferences
G90 ; send absolute coordinates...
M83 ; ...but relative extruder moves
M550 P"Predator" ; set printer name
M665 R227.9 L440.48 B185 H418.879 X0.217 Y0.125 Z0 ; Set delta radius, diagonal rod length, printable radius and homed height
M666 X0.3 Y-0.08 Z0 ; put your endstop adjustments here, or let auto calibration find them; Network
M552 S1 ; enable network
M586 P0 S1 ; enable HTTP
M586 P1 S0 ; disable FTP
M586 P2 S0 ; disable Telnet; Drives
M569 P0 S0 ; physical drive 0 goes backwards
M569 P1 S0 ; physical drive 1 goes backwards
M569 P2 S0 ; physical drive 2 goes backwards
M569 P3 S1 ; physical drive 3 goes forwards
M584 X0 Y1 Z2 E3 ; set drive mapping
M350 X16 Y16 Z16 E16 I1 ; configure microstepping with interpolation
M92 X80.00 Y80.00 Z80.00 E400.00 ; set steps per mm
M566 X1200.00 Y1200.00 Z1200.00 E1200.00 ; set maximum instantaneous speed changes (mm/min)
M203 X18000.00 Y18000.00 Z18000.00 E1200.00 ; set maximum speeds (mm/min)
M201 X1000.00 Y1000.00 Z1000.00 E1000.00 ; set accelerations (mm/s^2)
M906 X1000 Y1000 Z1000 E800 I30 ; set motor currents (mA) and motor idle factor in per cent
M84 S30 ; Set idle timeout; Axis Limits
M208 Z0 S1 ; set minimum Z; Endstops
M574 X2 S1 P"xstop" ; configure active-high endstop for high end on X via pin xstop
M574 Y2 S1 P"ystop" ; configure active-high endstop for high end on Y via pin ystop
M574 Z2 S1 P"zstop" ; configure active-high endstop for high end on Z via pin zstop; Z-Probe
M558 P8 C"zprobe.in+zprobe.mod" R0.4 H3 F200 T6000 ; set Z probe type to effector and the dive height + speeds
G31 P100 X0 Y0 Z-0.1 ; set Z probe trigger value, offset and trigger height
M557 R185 S20 ; define mesh grid; Heaters
M308 S0 P"bedtemp" Y"thermistor" T100000 B4138 ; configure sensor 0 as thermistor on pin bedtemp
M950 H0 C"bedheat" T0 ; create bed heater output on bedheat and map it to sensor 0
M143 H0 S120 ; set temperature limit for heater 0 to 120C
M307 H0 B1 S1.00 ; enable bang-bang mode for the bed heater and set PWM limit
M140 H0 ; map heated bed to heater 0
M308 S1 P"e0temp" Y"thermistor" T100000 B4138 ; configure sensor 1 as thermistor on pin e0temp
M950 H1 C"e0heat" T1 ; create nozzle heater output on e0heat and map it to sensor 1
M143 H1 S280 ; set temperature limit for heater 1 to 280C
M307 H1 B0 S1.00 ; disable bang-bang mode for heater and set PWM limit; Fans
M950 F0 C"fan0" Q500 ; create fan 0 on pin fan0 and set its frequency
M106 P0 S0 H-1 ; set fan 0 value. Thermostatic control is turned off
M950 F1 C"fan1" Q500 ; create fan 1 on pin fan1 and set its frequency
M106 P1 S1 H1 T45 ; set fan 1 value. Thermostatic control is turned on; Tools
M563 P0 D0 H1 F0 ; define tool 0
G10 P0 X0 Y0 Z0 ; set tool 0 axis offsets
G10 P0 R0 S0 ; set initial tool 0 active and standby temperatures to 0C; Custom settings are not defined
; Miscellaneous
M911 S10 R11 P"M913 X0 Y0 G91 M83 G1 Z3 E-5 F1000" ; set voltage thresholds and actions to run on power loss
M501 ;should save my data after calibration without homing. -
Here a picture of the first layer, as you can see on the bottom it can be to low and to high over the course of a cm. I am sure the bed is not perfect, but it is not that bad either. This problem stays the same with or without mesh compensation. I do a delta calibration before every print, and do not home after.

-
@Lakeman said in Smart effector first layer issues:
M208 Z0 S1 ; set minimum Z
G31 P100 X0 Y0 Z-0.1
M208 Z0 S1 ; set minimum Z Change to Z-0.3
M666 X0.3 Y-0.08 Z0 set to 0.0 let calibration find it
Post your config-override.g ,bed.g also
Hope this helps -
; bed.g
; called to perform automatic delta calibration via G32
;
; generated by RepRapFirmware Configuration Tool v2.1.3 on Sat Dec 07 2019 21:21:10 GMT+0100 (Midden-Europese standaardtijd)
M561 ; clear any bed transform
; Probe the bed at 6 peripheral and 6 halfway points, and perform 6-factor auto compensation
; Before running this, you should have set up your Z-probe trigger height to suit your build, in the G31 command in config.g.
G30 P0 X0.00 Y185.00 Z-99999 H0
G30 P1 X118.92 Y141.72 Z-99999 H0
G30 P2 X182.19 Y32.12 Z-99999 H0
G30 P3 X160.21 Y-92.50 Z-99999 H0
G30 P4 X63.27 Y-173.84 Z-99999 H0
G30 P5 X-63.27 Y-173.84 Z-99999 H0
G30 P6 X-160.21 Y-92.50 Z-99999 H0
G30 P7 X-182.19 Y32.12 Z-99999 H0
G30 P8 X-118.92 Y141.72 Z-99999 H0
G30 P9 X0.00 Y92.50 Z-99999 H0
G30 P10 X80.11 Y46.25 Z-99999 H0
G30 P11 X80.11 Y-46.25 Z-99999 H0
G30 P12 X0.00 Y-92.50 Z-99999 H0
G30 P13 X-80.11 Y-46.25 Z-99999 H0
G30 P14 X-80.11 Y46.25 Z-99999 H0
G30 P15 X0 Y0 Z-99999 S6
; Use S-1 for measurements only, without calculations. Use S4 for endstop heights and Z-height only. Use S6 for full 6 factors
; If your Z probe has significantly different trigger heights depending on XY position, adjust the H parameters in the G30 commands accordingly. The value of each H parameter should be (trigger height at that XY position) - (trigger height at centre of bed); config-override.g file generated in response to M500 at 2020-01-20 12:41
; This is a system-generated file - do not edit
; Delta parameters
M665 L440.500:440.500:440.500 R227.793 H418.764 B185.0 X0.269 Y0.195 Z0.000
M666 X0.247 Y-0.013 Z-0.235 A0.00 B0.00
; Heater model parameters
M307 H0 A90.0 C700.0 D10.0 S1.00 V0.0 B1
M307 H1 A340.0 C140.0 D5.5 S1.00 V0.0 B0
; Workplace coordinates
G10 L2 P1 X0.00 Y0.00 Z0.00
G10 L2 P2 X0.00 Y0.00 Z0.00
G10 L2 P3 X0.00 Y0.00 Z0.00
G10 L2 P4 X0.00 Y0.00 Z0.00
G10 L2 P5 X0.00 Y0.00 Z0.00
G10 L2 P6 X0.00 Y0.00 Z0.00
G10 L2 P7 X0.00 Y0.00 Z0.00
G10 L2 P8 X0.00 Y0.00 Z0.00
G10 L2 P9 X0.00 Y0.00 Z0.00 -
Are you heating the bed and nozzle to get your trigger height and during probing ?
60C bed
130C nozzleconfig.g
M558 P8 C"zprobe.in+zprobe.mod" R0.4 H3 F1200 T6000 change feedrate
M501 change to
;M501 restart the printer after changing the other bits M208 ,M666 above also
And calibrate your trigger height with 60c 130c that should do it then delta calibration with heat and redo your height map with those settings changed with heat with ;M501 no config-override.g -
This is with the Z-0.3 and M666 all on 0
I always heat the bed to 60 in advance, and nozzle usually 120
-
@Lakeman
Leave it @ Z-0.3 -
Especially on the bottom you can see that it is scraping the bed on the right, and half a cm next to it it comes off. I wanted to finish this layer, because this will continue untill the layers next to each other have that difference, but it started pulling everything off.
-
can you post the picture of the mesh bed?
-
@Lakeman
I have the same printer as you and had similar issues ..unless you have a mechanical issue
its in the setup which carriages are you using for the mag conversion ? -
This is with mag conversion.
-
can you post a complete image with deviation on the right and more side on?
-
have you tried 8 factor calibration instead of 6?
change S6 to S8 in bed.g
-
What length is on the stickers on the arms from Haydn?
-
3d printed the conversion as per thingiverse, and 440.47
How did you solve the issues on your printer?

-
@Lakeman
Same length as mine, by doing what I suggesting you do
Ok but you have 3 diff lengths for the arms then so you must have done a Factor 7 in your bed as it changed the length of the arms so copy your M307 to your config.g delete config-override and have you made the changes to feedrate etc and tried calibration again with ;M501 in config.g ?
Also is it a Volcano your using and a clean nozzle? -
Oke, changed the config file, deleted config override. Put S8 in the bed.g.
Heated to 60/120 (had to reset the bed heating several times because it was going to slow, but looked normal... ?) Anyway, after that did a delta calibration.
G32
Calibrated 8 factors using 16 points, (mean, deviation) before (-0.201, 0.639) after (0.000, 0.062)
Then mesh compensation with sensitivity M672 S105:30:225 (to many false readings before)
G29
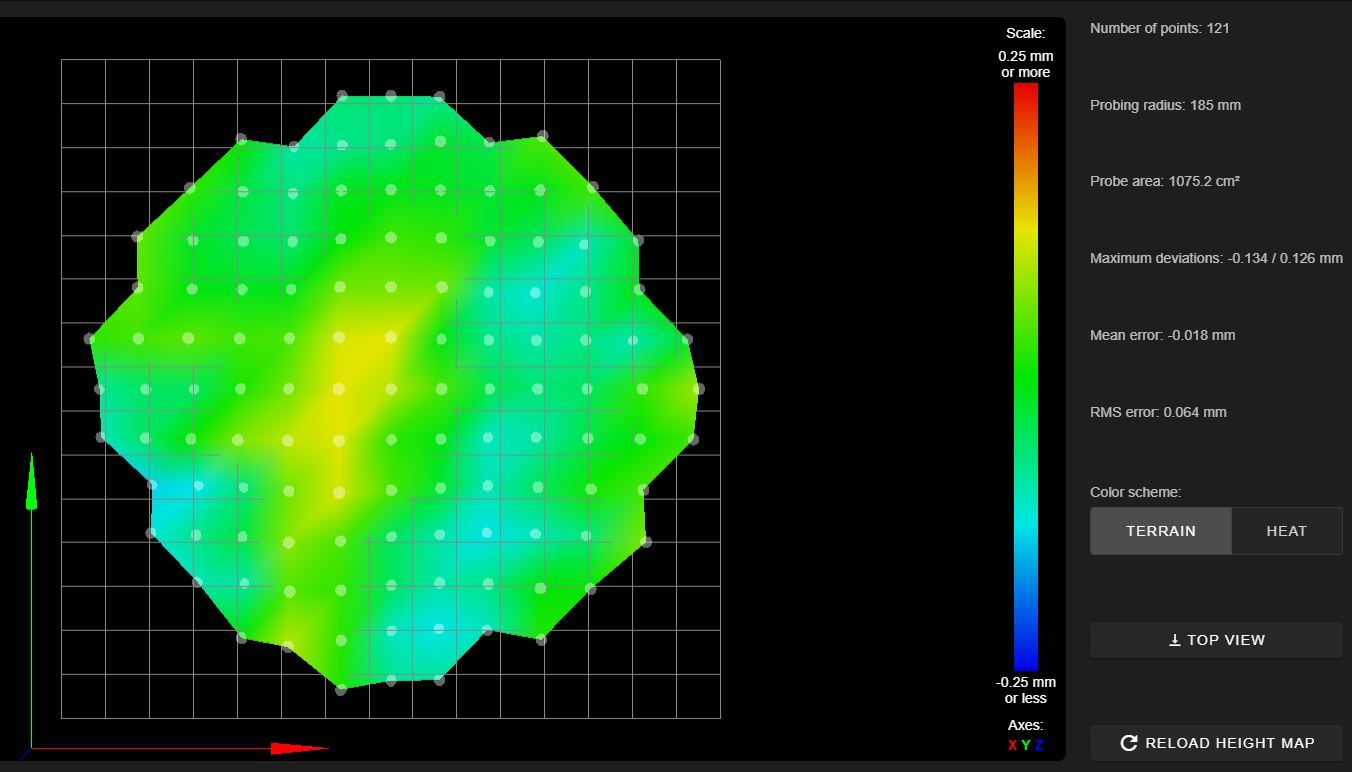
121 points probed, min error -0.146, max error 0.138, mean -0.014, deviation 0.059
Height map saved to file 0:/sys/heightmap.csv (lookes the same as picture before ;))Started printing and have the same results, with the same high and low spots.
I do not really understand what you are saying about the 3 different lengths and a factor 7 in the bed?
Config:
; Configuration file for Duet WiFi (firmware version 3)
; executed by the firmware on start-up
;
; generated by RepRapFirmware Configuration Tool v3.1.4 on Mon Aug 03 2020 16:16:44 GMT+0200 (Midden-Europese zomertijd); General preferences
G90 ; send absolute coordinates...
M83 ; ...but relative extruder moves
M550 P"Predator" ; set printer name
M665 R227.9 L440.48 B185 H418.879 X0.217 Y0.125 Z0 ; Set delta radius, diagonal rod length, printable radius and homed height
M666 X0 Y0 Z0 ; put your endstop adjustments here, or let auto calibration find them; Network
M552 S1 ; enable network
M586 P0 S1 ; enable HTTP
M586 P1 S0 ; disable FTP
M586 P2 S0 ; disable Telnet; Drives
M569 P0 S0 ; physical drive 0 goes backwards
M569 P1 S0 ; physical drive 1 goes backwards
M569 P2 S0 ; physical drive 2 goes backwards
M569 P3 S1 ; physical drive 3 goes forwards
M584 X0 Y1 Z2 E3 ; set drive mapping
M350 X16 Y16 Z16 E16 I1 ; configure microstepping with interpolation
M92 X80.00 Y80.00 Z80.00 E400.00 ; set steps per mm
M566 X1200.00 Y1200.00 Z1200.00 E1200.00 ; set maximum instantaneous speed changes (mm/min)
M203 X18000.00 Y18000.00 Z18000.00 E1200.00 ; set maximum speeds (mm/min)
M201 X1000.00 Y1000.00 Z1000.00 E1000.00 ; set accelerations (mm/s^2)
M906 X1000 Y1000 Z1000 E800 I30 ; set motor currents (mA) and motor idle factor in per cent
M84 S30 ; Set idle timeout; Axis Limits
M208 Z-0.3 S1 ; set minimum Z; Endstops
M574 X2 S1 P"xstop" ; configure active-high endstop for high end on X via pin xstop
M574 Y2 S1 P"ystop" ; configure active-high endstop for high end on Y via pin ystop
M574 Z2 S1 P"zstop" ; configure active-high endstop for high end on Z via pin zstop; Z-Probe
M558 P8 C"zprobe.in+zprobe.mod" R0.4 H3 F1200 T6000 ; set Z probe type to effector and the dive height + speeds
G31 P100 X0 Y0 Z-0.1 ; set Z probe trigger value, offset and trigger height
M557 R185 S30 ; define mesh grid; Heaters
M308 S0 P"bedtemp" Y"thermistor" T100000 B4138 ; configure sensor 0 as thermistor on pin bedtemp
M950 H0 C"bedheat" T0 ; create bed heater output on bedheat and map it to sensor 0
M143 H0 S120 ; set temperature limit for heater 0 to 120C
M307 H0 B1 S1.00 ; enable bang-bang mode for the bed heater and set PWM limit
M140 H0 ; map heated bed to heater 0
M308 S1 P"e0temp" Y"thermistor" T100000 B4138 ; configure sensor 1 as thermistor on pin e0temp
M950 H1 C"e0heat" T1 ; create nozzle heater output on e0heat and map it to sensor 1
M143 H1 S280 ; set temperature limit for heater 1 to 280C
M307 H1 B0 S1.00 ; disable bang-bang mode for heater and set PWM limit; Fans
M950 F0 C"fan0" Q500 ; create fan 0 on pin fan0 and set its frequency
M106 P0 S0 H-1 ; set fan 0 value. Thermostatic control is turned off
M950 F1 C"fan1" Q500 ; create fan 1 on pin fan1 and set its frequency
M106 P1 S1 H1 T45 ; set fan 1 value. Thermostatic control is turned on; Tools
M563 P0 D0 H1 F0 ; define tool 0
G10 P0 X0 Y0 Z0 ; set tool 0 axis offsets
G10 P0 R0 S0 ; set initial tool 0 active and standby temperatures to 0C; Custom settings are not defined
; Miscellaneous
M911 S10 R11 P"M913 X0 Y0 G91 M83 G1 Z3 E-5 F1000" ; set voltage thresholds and actions to run on power loss
;M501 ;should save my data after calibration without homing.; bed.g
; called to perform automatic delta calibration via G32
;
; generated by RepRapFirmware Configuration Tool v2.1.3 on Sat Dec 07 2019 21:21:10 GMT+0100 (Midden-Europese standaardtijd)
M561 ; clear any bed transform
; Probe the bed at 6 peripheral and 6 halfway points, and perform 6-factor auto compensation
; Before running this, you should have set up your Z-probe trigger height to suit your build, in the G31 command in config.g.
G30 P0 X0.00 Y185.00 Z-99999 H0
G30 P1 X118.92 Y141.72 Z-99999 H0
G30 P2 X182.19 Y32.12 Z-99999 H0
G30 P3 X160.21 Y-92.50 Z-99999 H0
G30 P4 X63.27 Y-173.84 Z-99999 H0
G30 P5 X-63.27 Y-173.84 Z-99999 H0
G30 P6 X-160.21 Y-92.50 Z-99999 H0
G30 P7 X-182.19 Y32.12 Z-99999 H0
G30 P8 X-118.92 Y141.72 Z-99999 H0
G30 P9 X0.00 Y92.50 Z-99999 H0
G30 P10 X80.11 Y46.25 Z-99999 H0
G30 P11 X80.11 Y-46.25 Z-99999 H0
G30 P12 X0.00 Y-92.50 Z-99999 H0
G30 P13 X-80.11 Y-46.25 Z-99999 H0
G30 P14 X-80.11 Y46.25 Z-99999 H0
G30 P15 X0 Y0 Z-99999 S8
; Use S-1 for measurements only, without calculations. Use S4 for endstop heights and Z-height only. Use S6 for full 6 factors
; If your Z probe has significantly different trigger heights depending on XY position, adjust the H parameters in the G30 commands accordingly. The value of each H parameter should be (trigger height at that XY position) - (trigger height at centre of bed) -
@Lakeman
So in your config.g M665 L=440.48 in config-overrride.g it was L440.50 but actual is L440.47
Did you redo G29 ? new height map
Almost all delta users do a delta calibration before a print
Change S8 - S6
Are you actually enabling G29 S1 to enable mesh in your start gcode or typing it in before print ? -
Smart effector with standard e3d hotend

-
This was the new height map
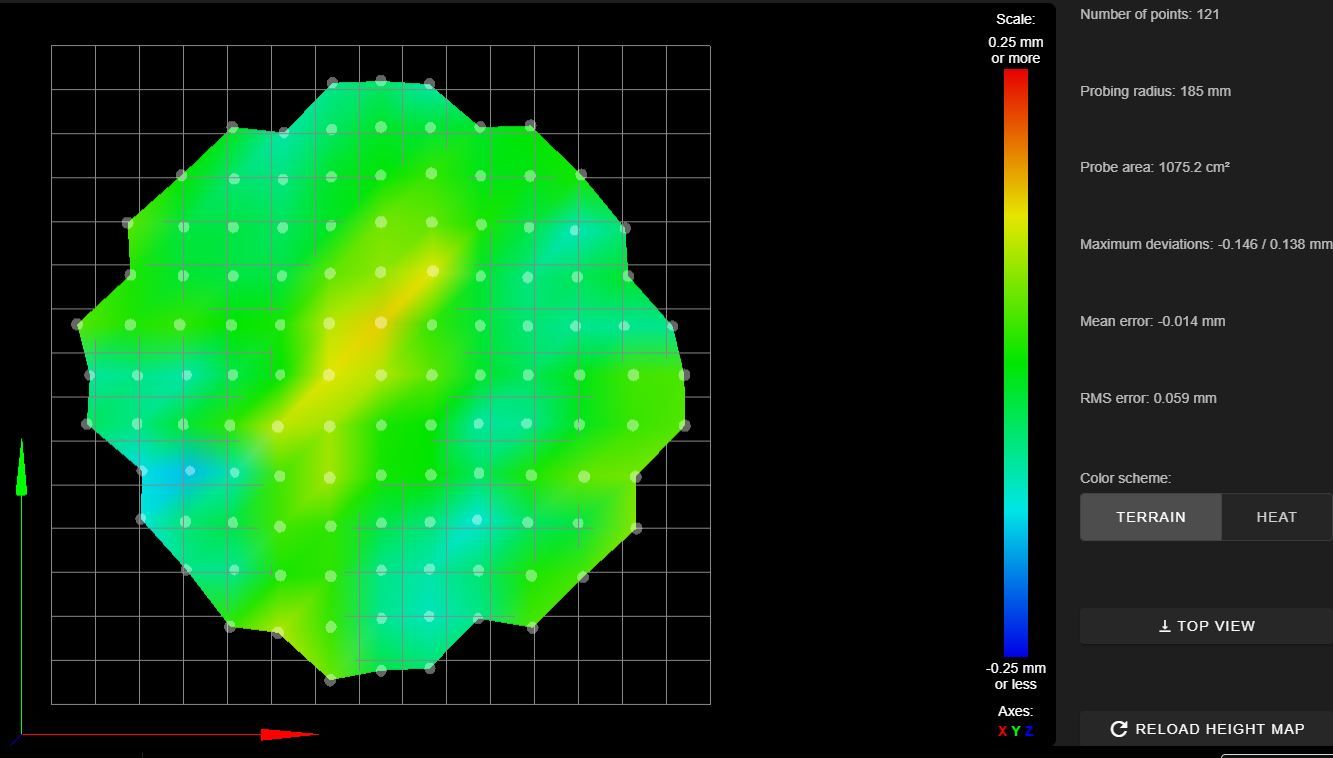
Nozzle is clean, and filament I pulled back 5cm
Changed back to S6 in the bed.g
Some arms are 440.48 and some .47 So I have to chose, but that difference is minimum. Not sure why it was .50 in the override.
Mesh is enabled