Delta printer prints parallelograms and other problems
-
Hi,
I got the problem that my printer prints parallelorgams instead of rectangles, also when I probe the bed it shows as warped. but my bed is a milled aluplate which is flat.
My printer is a converted Anet A4 with following changes:
-Maestro board
-smart effector
-Maxiwatt heatblock
-BMG Extruder
-24V PSU
-8mm glide guides
-exchanged the bed leveling screws with solid studs
-milled Alu plate with PEI (not glamped but secured agains movement)
-removed slack in the balljoints of the rods via ruberbandsI added a sample heightmap
-
M350 X256 Y256 Z256 I0 ; configure microstepping without interpolation
M350 E256 I0 ; configure microstepping with interpolationThis will overload the cpu on a delta. start with X16 and interpolation
post your bed.g and config overwrite
-
sure here
-
post an image of the mesh bed
-
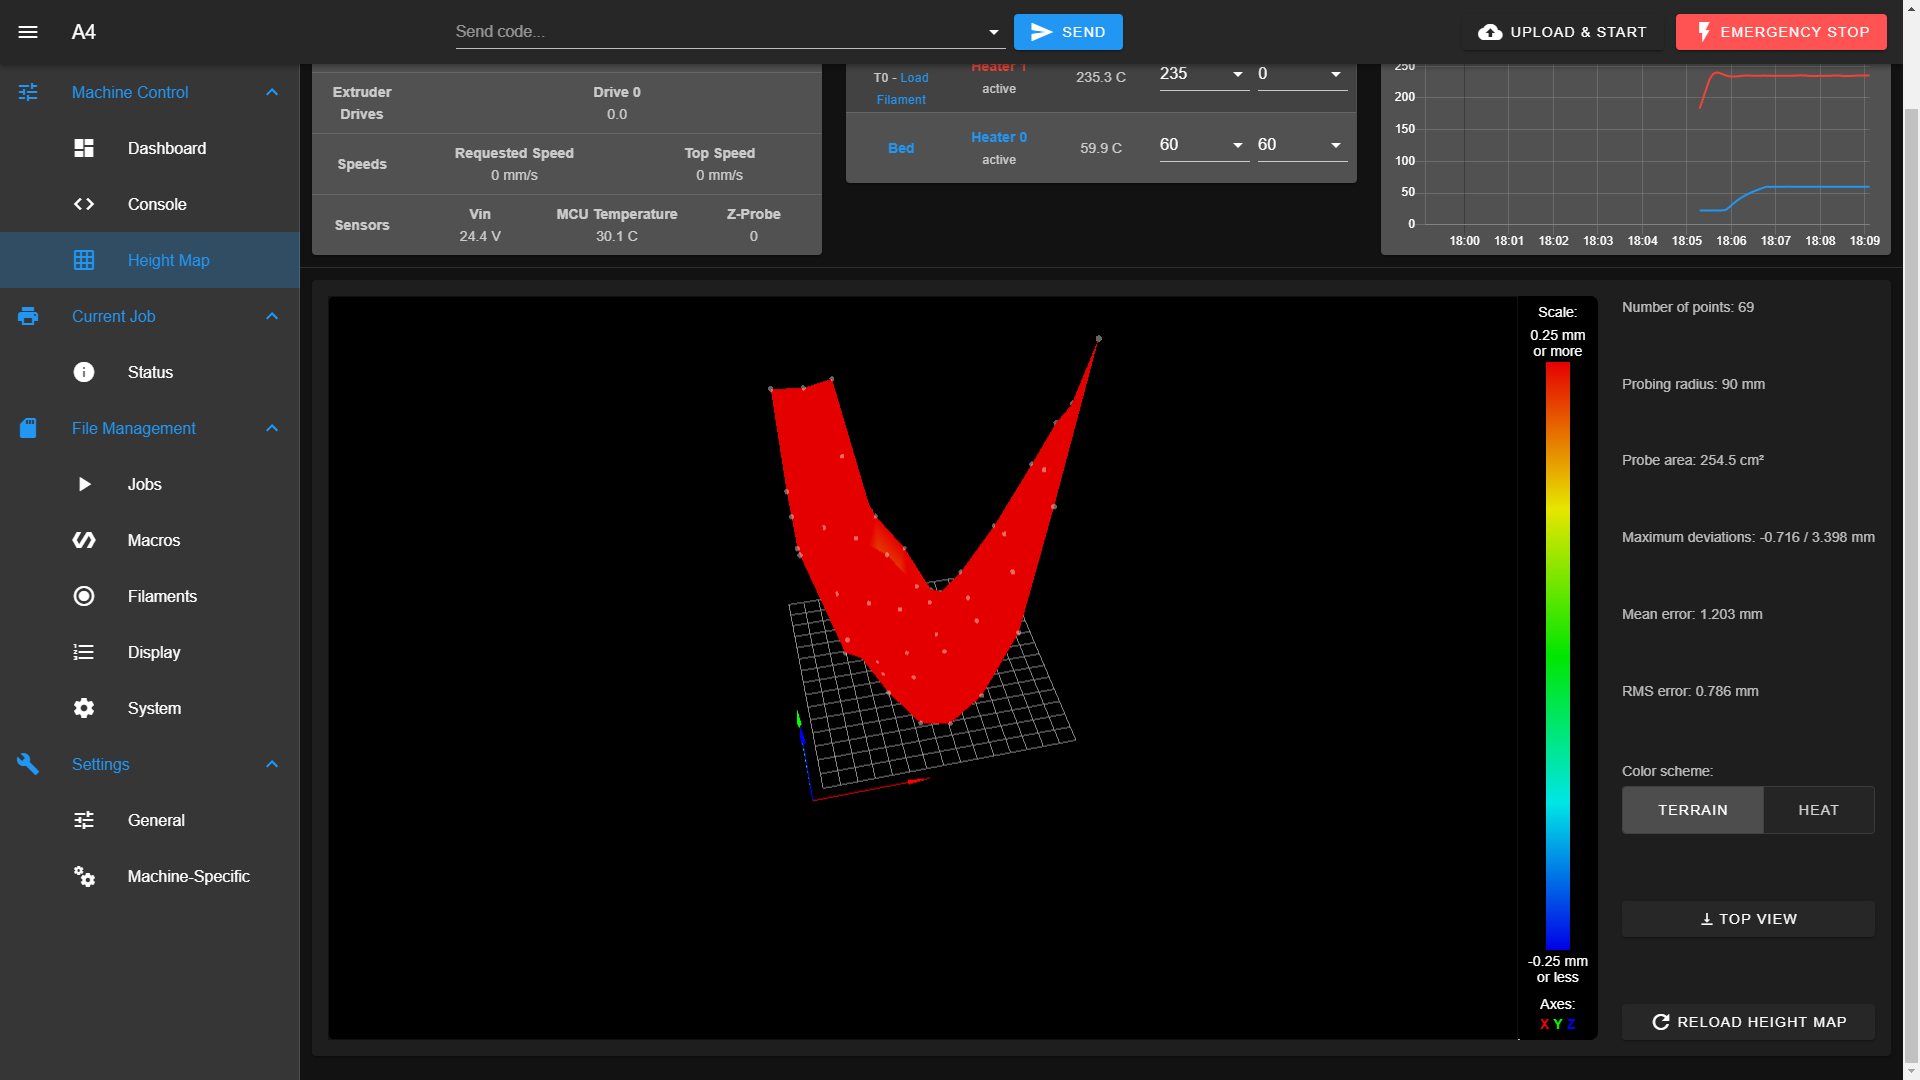
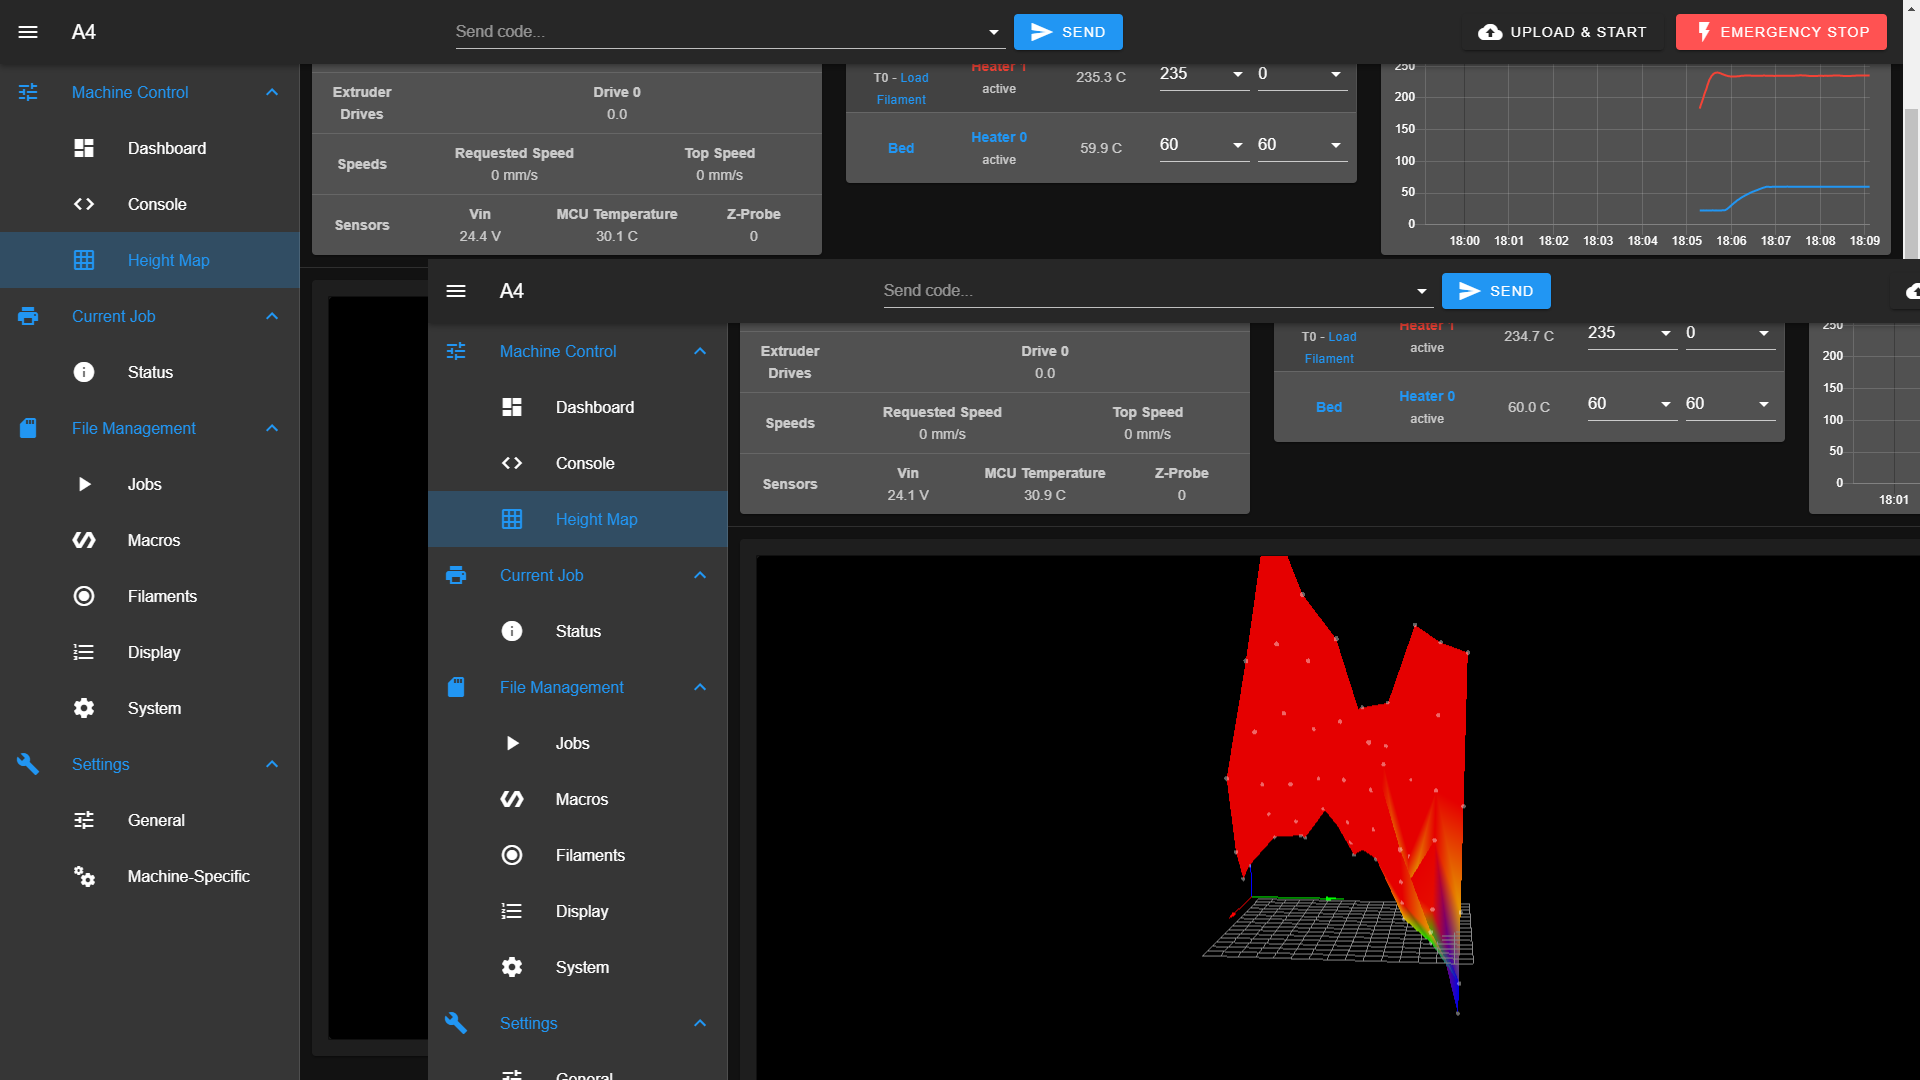
-
if not even a bit of that is green, then there is a problem with the probing.
try adjusting the sensitivity
https://duet3d.dozuki.com/Wiki/Smart_effector_and_carriage_adapters_for_delta_printer
-
@Radio-Active I'd also check everything mechanical. Belt tensions, are all of the idlers running properly, are the pulley grub screws tight on the motor shafts,any loose bolts/nuts etc.
-
also post a picture of your printer
-
the belt tension is good probably a little bit on the strongside. I checked the towers, distance and tilt (there is tilt on one Tower of under 0,1mm at 600mm rodlenght).
also I already checked the bolts and nuts (all are glued with locktide). -

-
@Veti
higher or lower? can you give me anyy suggestions? -
are the arm perfectly parallel?
i dont think i have seen a smart effector not mounted with magnetic arms.
is looks like that is a very tight fit on the arm mounts. could they be colliding?
-
there is 0,1mm space, so there are not coliding.
The reason why I´m not using Magballs is that I got bad memorys with (hudleys)Magballs in my Anycubic predator, particuly with vibrations and wiggling at high speeds of 130mm+ (im using a custom hotend wich reaches far down)
-
what about the parallel arms?
try 7,8 and 9 factor calibration
-
I tryed a 9 factor calibration an that fixed the shift dimensions and improved the height map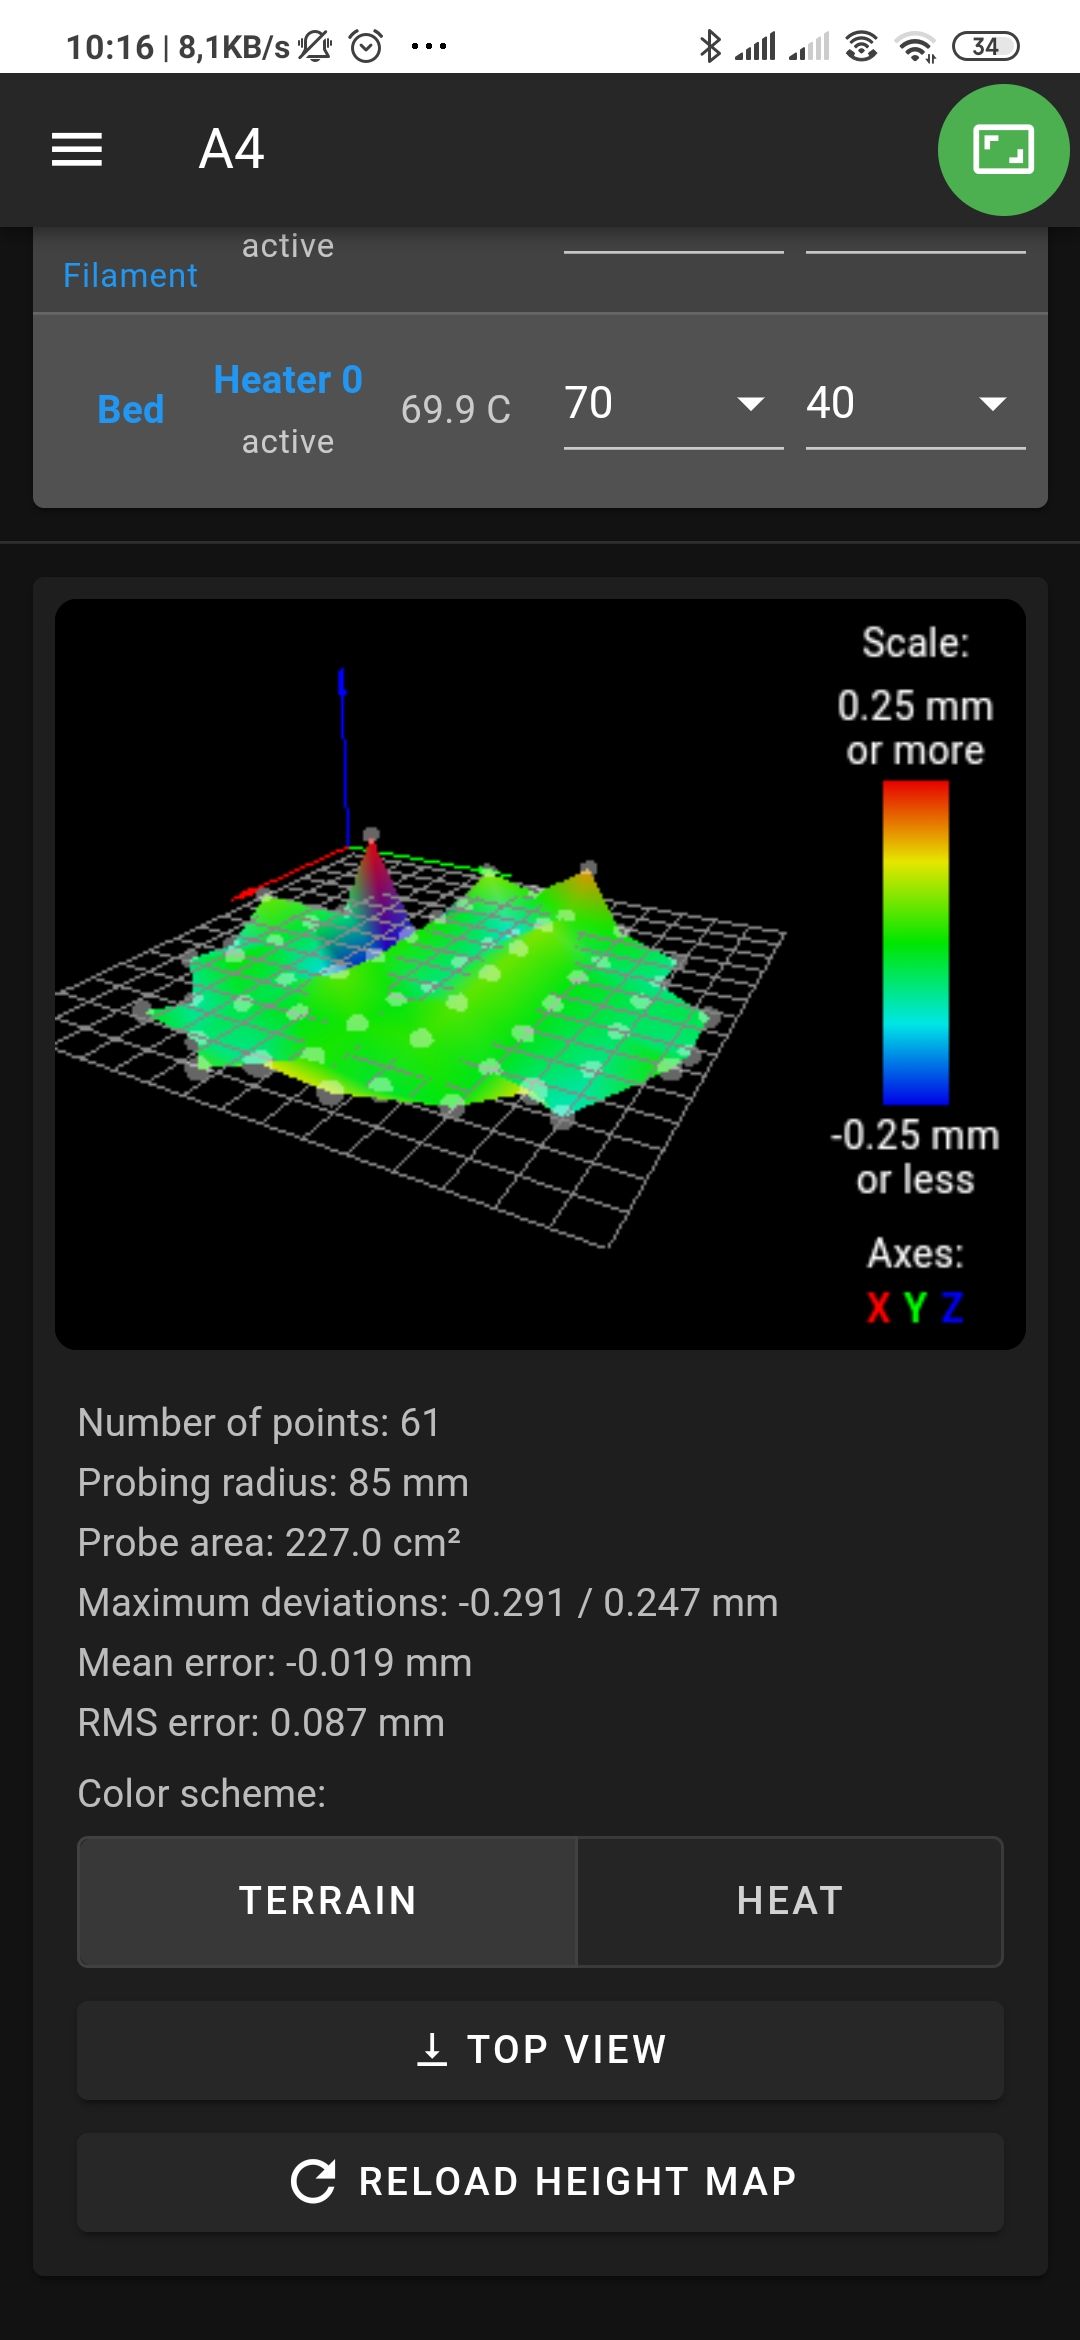
But now I have the problem that my 1st layer has to baby stepped up (the heed starts the printing maybe at 0.1mm (0.3mm first layer).
Here is the start part of my Gcode:
G28 G1 Z15 F1000 M107 G90 M82 M190 S60 M104 T0 S210 G92 E0 M109 T0 S210 M107 G0 X1.908 Y-24.187 Z0.3 F9000 G1 X-1.908 Y-24.187 E0.19038 F1800 -
@Radio-Active
Can you post your homing files so we can see what G28 does? Are you using your Z-probe to home Z after homing your towers? Have you also manually cleaned any old ooze off the nozzle before using the Z-probe? You could try probing with the nozzle warm (130deg) or hot (print temp) depending on what your bed surface can take. That way you account for any thermal expansion on the heater (minor), but also any old filament on the nozzle which you can't get off with a pair of pliers will be softer so won'taffect the results. I'd then run the Z-probe once or twice somewhere else on your bed to clear it before doing the proper probe in the center.In your config, you have set the probe trigger height as 0
G31 P500 X0 Y0 Z0Have you calibrated this?
Looking at your heat maps, it seems that there are still some steep valleys/spikes for a milled plate. To me, this suggests that there is some non-repeatability in your mechanical system or Z-probe. We'll focus on the probe as you've done most easy mechanical things. Most of this is based off the Smart Effector dozuki page https://duet3d.dozuki.com/Wiki/Smart_effector_and_carriage_adapters_for_delta_printer#Section_Commissioning
In your M558, you use probe type P5 (filtered). Recommended is P8 (same but unfiltered for a faster response). With changing this, you will need to tweak the probe threshold (you have 500, recommended is to start from 100 and tweak as required).
I would use the A & S parameters in M558 so that it repeats each Z-probe and will give you a more accurate reading/will average out any bad readings. This will also let you get a better idea of how repeatable your Z probe is. You can then see if you can improve it by some of the other config settings etc. I'd start with M558 A3 S0.05 then play with the numbers from there.
Have you tried programming the sensitivity of the smart effector itself? I don't have one, so don't know much about it though...
Final point, your dive height in M558 is quite high at 10mm. If there is any mechanical issue causing the non-repeatability, extra Z-motion between probing won't help. I'd drop this down to 3mm (unless you have a good reason for keeping it at 10?)
Home-built CoreXY, Duet Wifi, Chimera direct drive, 2x BMG, 300x300x300 build volume
i3 clone with a bunch of mods -
what is the arm length calculated by the delta calibration, vs your values?
i.e new new config overwrite
-
@Veti there is on the Y arm a 0,2mm difference
-
@engikeneer
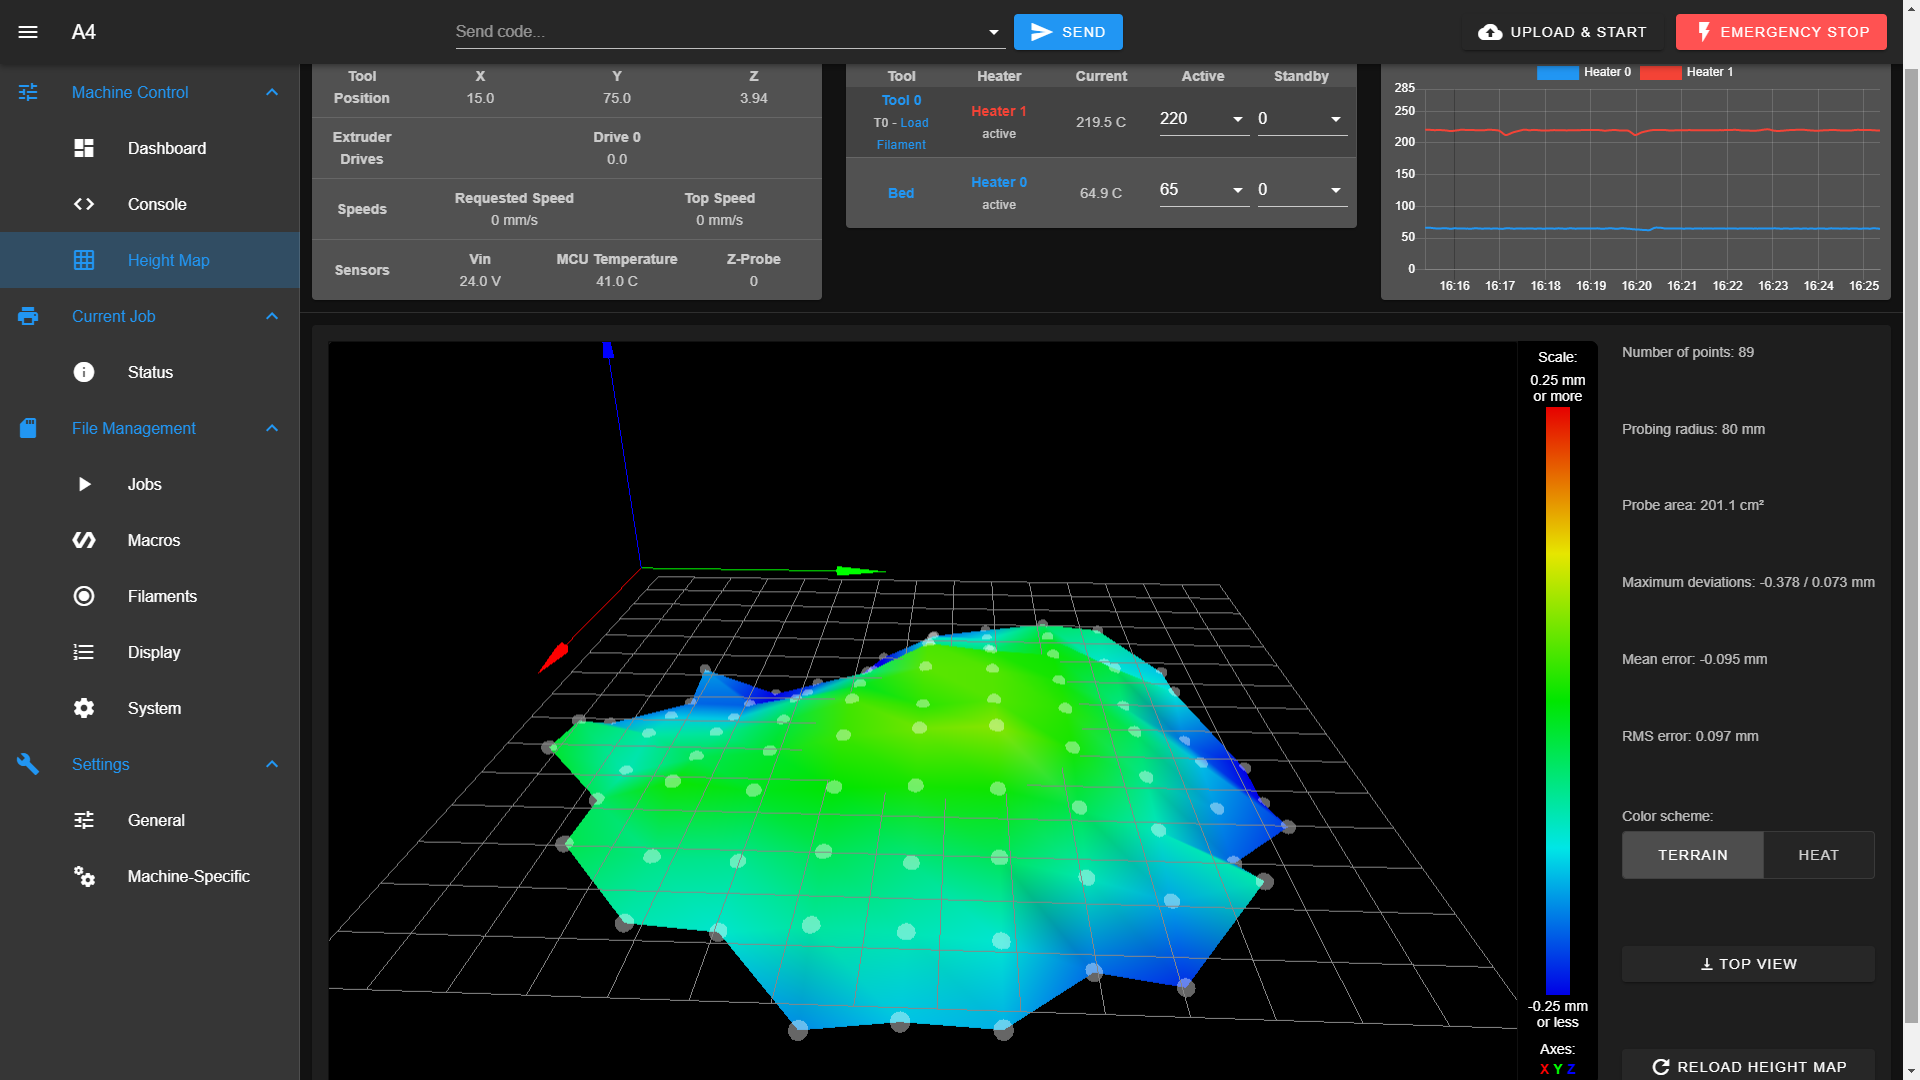
I reduced the dive height to 4mm and set the A to 7 (some spots needed to mesured 6 times) and S to your suggestions.
the result:
and my home file:
homedelta.g -
@Radio-Active Well that at least looks smoother and a bit more realistic
")
I'm not a delta expert, but I'm wondering if that slight differerence in your y-arms could be causing that wave in the mesh bed (e.g. by inaccuracies in the height and tilt)? If you want perfection, you could chase that, but probably not necessary til you've got it all up and running well.
How are the results of the prints and delta calibration now? Has this helped with the parallelograms?
Your homedelta.g looks sensible to me. However, I would recommend the hot/warm probing, and doing a test probe first (e.g. at X10 Y10) so that any filament left on the nozzle is squished out of the way. Something like below:
; homedelta.g
; called to home all towers on a delta printer
;
; generated by RepRapFirmware Configuration Tool v3.1.4 on Thu Aug 20 2020 14:43:44 GMT+0200 (Mitteleuropäische Sommerzeit)

M104 S130 T0 ;start heating the nozzle
G91                        ; relative positioning
G1 H1 X300 Y300 Z300 F1800 ; move all towers to the high end stopping at the endstops (first pass)
G1 H2 X-5 Y-5 Z-5 F1800    ; go down a few mm
G1 H1 X10 Y10 Z10 F360     ; move all towers up once more (second pass)
G1 Z-5 F6000               ; move down a few mm so that the nozzle can be centre
G90                        ; absolute positioning
G1 X10 Y10 z5 F6000 ;go to initial probe point
M116 ; wait until all temps have been reached
G30 S-2
G1 X0 Y0 z5 F6000 ;go to proper probe point
G30 S-2 ;probe z
G1 X0 Y0 z50 F6000
Another thought is how repeatable is your Z-probe? It looks pretty good, but better repeatability/accuracy is always good, and my experience is that printed brackets on force-type Z-probes can make tuning a little harder. I use a macro to measure mine (shamelessly copied from some other forum post whoch I can't remember the link to...). You'll need to change the X-Y coordinates to suit your printer but it should work. You could also try running it at different parts of the bed to see if that affects things, and to give you a better idea of the limitations/impacts of the mechanics (if there are any differences)?
;Probe Repeatability Macro
M291 P"Probe will be tested 10 times and return mean and standard deviation. Ok or Cancel?" R"WARNING" S3 ; User must click OK or cancel.
G28
;M401
G30 P0 X151 Y151 Z-9999
G30 P1 X151 Y151 Z-9999
G30 P2 X151 Y151 Z-9999
G30 P3 X151 Y151 Z-9999
G30 P4 X151 Y151 Z-9999
G30 P5 X151 Y151 Z-9999
G30 P6 X151 Y151 Z-9999
G30 P7 X151 Y151 Z-9999
G30 P8 X151 Y151 Z-9999
G30 P9 X151 Y151 Z-9999 S-1
;M402