problem with irregular bltouch mesh
-
@RODOKAS said in problem with irregular bltouch mesh:
should I remove all double settings for the second z?
Yes. It's not really a second Z. There is only 1 Z axis, even if made up of multiple motors. If you want to control the motors separately, you'd need to create an entirely separate axis like U and then you'd have settings for that axis. In fact, before RRF3 you would have needed to do that to do the dual endstop leveling and home each axis separately and then recombine into a single Z axis.
I should have asked for your bed.g as well.
-
; bed.g ; called to perform automatic bed compensation via G32 ; ; generated by RepRapFirmware Configuration Tool v3.1.1 on Fri Jun 05 2020 16:15:10 GMT-0300 (Horário Padrão de Brasília) M561 ; clear any bed transform Thanks!
-
@Phaedrux
this is the macro I use to read and create the mesh for ABS;macro /macros/__prepare_ABS.g prepare the machine after a cold start for ABS printing T0 ; define tool M190 S95 ; Set the bed temperature at 95°C and wait for it G28 ; home G29 S2 ; Limpa a malha G29 S0 ; executa leitura da cama G29 S3 P"ABS.csv" ; salva a leitura como ABS G29 S1 P"ABS.csv" ; carrega a malha ABS G1 X5 Y5 F7200 M500; -
@RODOKAS said in problem with irregular bltouch mesh:
this is the macro I use to read and create the mesh for ABS
;macro /macros/__prepare_ABS.g prepare the machine after a cold start for ABS printing T0 ; define tool M190 S95 ; Set the bed temperature at 95°C and wait for it G28 ; home G29 S2 ; Limpa a malha G29 S0 ; executa leitura da cama G29 S3 P"ABS.csv" ; salva a leitura como ABS G29 S1 P"ABS.csv" ; carrega a malha ABS G1 X5 Y5 F7200 M500; Hi,
- It doesn't seem as if your homing macro is setting the Z=0 datum using G30
- As I recall you don't need to use G29 S2 right before using G29 S0 - it won't cause problems if you leave it
- You don't need to use G29 S1 to load the just created height map, the map is still active
- What is the point of the M500?
Frederick
-
I was curious about the m561 in my beg.g and took it out to test it, did the mesh in abs again and restarted the machine to make sure, I did the same print test as before and the result was the same.
-
Your homeall doesn't have a z homing component, so please post homez as well.
Where are you doing the Z axis leveling? In homez?
Could you post all of your files in a single post? That would make it much easier to see what's going on without having to scroll around all over the place. The only way we can see what's going on is be looking at the gcode.
-
@Phaedrux you are right, i will put all gcodes here.
;config.g ; Configuration file for Duet WiFi (firmware version 3) ; General preferences G90 ; send absolute coordinates... M83 ; ...but relative extruder moves M550 P"3DPRINT" ; set printer name M669 K1 ; select CoreXY mode ; Network M552 S1 ; enable network ;M552 S2 ;Habilitar ponto de acesso M586 P0 S1 ; enable HTTP M586 P1 S1 ; enable FTP M586 P2 S0 ; desabilitado Telnet ; Drives M569 P0 S0 F3 ; physical drive 0 goes forwards M569 P1 S0 F3 ; physical drive 1 goes forwards M569 P2 S1 F3 ; physical drive 2 goes backwards M569 P3 S1 F3 ; physical drive 3 goes backwards M569 P4 S1 ; physical drive 4 goes backwards M584 X0 Y1 Z2:3 E4 ; set drive mapping M350 X16 Y16 Z16 E16 I1 ; Micropassos cem interpolação M92 X80.00 Y80.00 Z800.00 E416.5 ; set steps per mm M566 X400.00 Y400.00 Z60.00 E2000.00 P1 ; set maximum instantaneous speed changes (mm/min) JERK M203 X12000.00 Y12000.00 Z720.00 E2100.00 ; set maximum speeds (mm/min) M201 X2300.00 Y2300.00 Z240.00 E9000.00 ; set accelerations (mm/s^2) ;M204 P2600 T2000 ; set accelerations travel (mm/s^2) M906 X1150 Y1150 Z1150 E700 I30 ; set motor currents (mA) and motor idle factor in per cent M84 S20 ; Set idle timeout ; Z-Probe M98 P"0:/macros/configuracao_sonda" ; Heaters M308 S0 P"bedtemp" Y"thermistor" T100000 B3950 ; configure sensor 0 as thermistor on pin bedtemp M950 H0 C"bedheat" T0 ; create bed heater output on bedheat and map it to sensor 0 M307 H0 A180.2 C510.1 D2.9 S0.75 V12.8 B0 ; disable bang-bang mode for the bed heater and set PWM limit M140 H0 ; map heated bed to heater 0 M143 H0 S115 ; set temperature limit for heater 0 ;M308 S1 P"e0temp" Y"thermistor" T100000 B4267 ; configuração conforme opção 5 do marlin M308 S1 P"e0temp" Y"thermistor" T100000 B4725 C0.0000000706 ; configuração conforme recomendação do duet3d M950 H1 C"e0heat" T1 ; create nozzle heater output on e0heat and map it to sensor 1 ;M307 H1 B1 ; ativa o modo bang bang M307 H1 A651.7 C191.8 D6.3 S1.00 V12.7 B0 ; disable bang-bang mode for heater and set PWM limit M143 H1 S250 ; seta o limite de temperatura para o extrusor ; Fans M950 F0 C"fan0" Q500 ; create fan 0 on pin fan0 and set its frequency M106 P0 C"fan0" S0 H-1 ; set fan 0 name and value. Thermostatic control is turned on ;M950 F1 C"fan1" Q500 ; create fan 0 on pin fan0 and set its frequency ;M106 P1 C"PLACA" S1 H1 T40 ; set fan 0 name and value. Thermostatic control is turned on M950 F2 C"fan2" Q200 ; create fan 2 on pin fan2 and set its frequency M106 P2 C"FONTE" S0.8 H1 T180 ; set fan 2 name and value. Thermostatic control is turned off M950 F1 C"e1heat" Q500 ; create fan 1 on pin HEATER2 and set its frequency M106 P1 C"HOTEND" S1 H1 T60 ; set fan 1 name and value. Thermostatic control is turned off ; Axis Limits M208 X-3 Y0 Z0 S1 ; set axis minima M208 X300 Y300 Z345 S0 ; set axis maxima ; Endstops M574 X1 S1 P"xstop" ; configure active-high endstop for low end on X via pin xstop M574 Y1 S1 P"ystop" ; configure active-high endstop for low end on Y via pin ystop M574 Z1 S1 P"zstop+e1stop" ; Tools M563 P0 D0 H1 ; define tool 0 G10 P0 X0 Y0 Z0 ; set tool 0 axis offsets G10 P0 R0 S0 ; set initial tool 0 active and standby temperatures to 0C ; Miscellaneous M911 S11 R11.5 P"M913 X0 Y0 G91 M83 G1 Z1 E-2 F1000" ; set voltage thresholds and actions to run on power loss M501 ; homeall.g ; called to home all axes ; ; generated by RepRapFirmware Configuration Tool v3.1.1 on Fri Jun 05 2020 16:15:12 GMT-0300 (Horário Padrão de Brasília) G91 ; relative positioning G1 H2 Z2 F900 ; lift Z relative to current position G1 H1 X-305 Y-315 F6000 ; move quickly to X or Y endstop and stop there (first pass) G1 H1 X-305 ; home X axis G1 H1 Y-315 ; home Y axis G1 X3 Y3 F6000 ; go back a few mm G1 H1 X-305 F600 ; move slowly to X axis endstop once more (second pass) G1 H1 Y-315 ; then move slowly to Y axis endstop G90 ; absolute positioning G1 X5 Y5 F6000 ; go to first bed probe point and home Z ; homez.g ; called to home the Z axis ; ; generated by RepRapFirmware Configuration Tool v3.1.1 on Fri Jun 05 2020 16:15:12 GMT-0300 (Horário Padrão de Brasília) G91 ; relative positioning G1 H1 Z-350 F900 ; move Z down until the endstop is triggered G1 Z3 F900 G1 H1 Z-5 F150 G92 Z0 ; set Z position to axis minimum (you may want to adjust this) G1 H1 Z3 F900 G1 Z2.9 G30 ; bed.g ; called to perform automatic bed compensation via G32 ; ; generated by RepRapFirmware Configuration Tool v3.1.1 on Fri Jun 05 2020 16:15:10 GMT-0300 (Horário Padrão de Brasília) ;M561 ; clear any bed transform ;macro /macros/__prepare_ABS.g prepare the machine after a cold start for ABS printing T0 ; define tool M140 S95 ; Set the bed temperature and don't wait for it M190 S95 ; Set the bed temperature at 95°C and wait for it G28 ; home G29 S2 ; Limpa a malha G29 S0 ; executa leitura da cama G29 S3 P"ABS.csv" ; salva a leitura como ABS G29 S1 P"ABS.csv" ; carrega a malha ABS G1 X5 Y5 F7200 M500; I really don't know if the M500 makes a difference at the end of the ABS macro
-
@RODOKAS said in problem with irregular bltouch mesh:
I really don't know if the M500 makes a difference at the end of the ABS macro
It doesn't do anything in this case because there hasn't been anything calculated or measured to save to config-override.g.
-
; homez.g ; called to home the Z axis ; ; generated by RepRapFirmware Configuration Tool v3.1.1 on Fri Jun 05 2020 16:15:12 GMT-0300 (Horário Padrão de Brasília) G91 ; relative positioning G1 H1 Z-350 F900 ; move Z down until the endstop is triggered G1 Z3 F900 G1 H1 Z-5 F150 G92 Z0 ; set Z position to axis minimum (you may want to adjust this) G1 H1 Z3 F900 G1 Z2.9 G30 Your homez could be improved. The endstop leveling proceeds correctly, but then it gets a bit odd.
Remove this part
G92 Z0 ; set Z position to axis minimum (you may want to adjust this) G1 H1 Z3 F900 G1 Z2.9 G30 And replace it with
G1 Z3 ; raise for clearance G1 X150 Y150 ; move to center G30 ; probe the bed Probing the center of the bed is important for setting Z0 since you are adjusting the tilt of the bed. You want to measure the center of that tilt.
You're also only using the endstops for tilt correction. You aren't using the probe anywhere. This is fine as long as the endstop positions are accurate to remove any tilt.
See here for how you would use the probe to correct for tilt.
https://duet3d.dozuki.com/Wiki/Bed_levelling_using_multiple_independent_Z_motors
This would normally be done in G32/bed.gCan you please post this macro s well: M98 P"0:/macros/configuracao_sonda"
Then in your prepare_abs macro to generate the heightmap you would have G28 to home the bed, G32 to level the tilt with the probe, and then G29 to create a heightmap of the bed surface.
-
@Phaedrux
I'm sorry I forgot that I leave the probe configuration in a macroM950 S0 C"exp.heater3" ; criar servo / gpio 0 no aquecedor de 3 pinos no conector de expansão M558 P9 C"^zprobe.in" R0.2 H2.8 F60 T10800 ; BLTouch conectado ao pino de entrada da sonda Z G31 P500 X-4.5 Y25 Z0.55 ; deslocamento da sonda com o bico M557 X20:280 Y30:290 S50 ; define mesh grid if my z-axis is a little unbalanced, it can hit, so I don’t think it’s safe to probe the center of the bed and then probe the bed close to the engines, maybe if I did all that I mentioned after using the endstop I already have it would make it safer.
I will try this change and then put the result.would my new abs mesh macro look like this?
;macro /macros/__prepare_ABS.g prepare the machine after a cold start for ABS printing T0 ; define tool M190 S95 ; Set the bed temperature at 95°C and wait for it G28 ; home G29 S0 ; executa leitura da cama G29 S3 P"ABS.csv" ; salva a leitura como ABS G1 X5 Y5 F7200; -
@RODOKAS said in problem with irregular bltouch mesh:
would my new abs mesh macro look like this?
Yes that looks cleaner.
@RODOKAS said in problem with irregular bltouch mesh:
if my z-axis is a little unbalanced, it can hit, so I don’t think it’s safe to probe the center of the bed and then probe the bed close to the engines, maybe if I did all that I mentioned after using the endstop I already have it would make it safer.
I think it would be ok because your first homing pass is with the endstops which should remove most of the tilt even if it's not perfect and establishes an approximate Z0 point. Probing the center to get a finer measurement and then a probe based tilt correction to get it dialed in before creating the heightmap should give good results.
-
@Phaedrux I don't know if I expressed myself correctly, I would prefer to continue with the optical endstop that I have for the 2 engines, then probe the center of the table, and then afterwards set the z0 for each engine again using the bltouch next to each spindle. would it be possible?
I can't imagine how it would be, the link to teach to use either the probe or the endstop, but not the two systems. -
The way I have described uses both. The endstops are used for the first pass just as they are now, but then the probe is used afterwards.
The homez you already posted uses both the endstops and then the probe. The only change I've suggested is probing the center of the bed after the endstops are done, and then doing the tilt correction again with the probe as described in that independant leveling link.
-
@Phaedrux I inserted it in my home z, it seems that everything works fine
; homez.g ; called to home the Z axis ; ; generated by RepRapFirmware Configuration Tool v3.1.1 on Fri Jun 05 2020 16:15:12 GMT-0300 (Horário Padrão de Brasília) G91 ; relative positioning G1 H1 Z-350 F900 ; move Z down until the endstop is triggered G90; G1 X150 Y150 Z3 F6000; raise for clearance G30 ; probe the bed M671 X-43:343 Y165:165 S1; parafusos de avanço à esquerda (conectado a Z) e à direita (conectado a E1) do eixo X M208 X0:300 Y0:300; G30 P0 X10 Y150 Z-99999; sonda perto de um parafuso de avanço, a meio caminho ao longo do eixo Y G30 P1 X290 Y150 Z-99999 S2; sonda perto de um parafuso de avanço e calibre 2 motores G1 X5 Y5 F6000; -
@RODOKAS said in problem with irregular bltouch mesh:
M671 X-43:343 Y165:165 S1; parafusos de avanço à esquerda (conectado a Z) e à direita (conectado a E1) do eixo X M208 X0:300 Y0:300;
That part should go in the config.g
You should also add an additional G30 at the center of the bed after the tilt correction since changing the tilt will change the Z0 point as well.
-
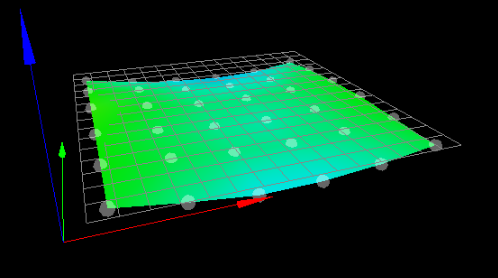
@Phaedrux thank you very much for the help, my g codes are cleaner and more correct, however I carried out new tests and saw no difference, I believe that some problem is not in firmware, to eliminate the possibility of a problem with the screws, I put it on the slicer for the jump za each travel movement in about 4 mm, thus eliminating any possibility of clearance on the z axis, even so I did not have any different results, the right side of the printer, where I have y + is always higher and I cannot make the engines compensate for that. the mesh is good but in practice that side gets higher.
this is the current mesh, everything looks perfect, but when I print I don't get the same in practice as the theory, it seems that the motors do not obey the correct values of the mesh.
-
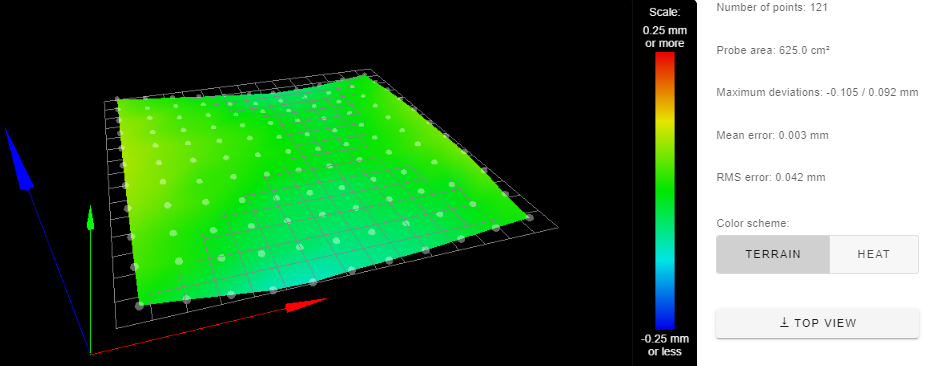
I also tried a mesh with more stitches, 121, but I got the same result, the right side of the machine, the first layer is more crushed, the only way to correct this is by using the table screws after creating the mesh.
-
When you run the leveling probes what results do you get in the console?
G30 P0 X10 Y150 Z-99999; sonda perto de um parafuso de avanço, a meio caminho ao longo do eixo Y
G30 P1 X290 Y150 Z-99999 S2; sonda perto de um parafuso de avanço e calibre 2 motoresYou may need to run the leveling passes more than once.
-
@Phaedrux
G28:
Leadscrew adjustments made: 0.105 0.104, points used 2, (mean, deviation) before (0.104, 0.001) after (0.000, 0.000)G29:
121 points probed, min error -0.105, max error 0.092, mean 0.003, deviation 0.042 -
@Phaedrux said in problem with irregular bltouch mesh:
G30 P0 X10 Y150 Z-99999; sonda perto de um parafuso de avanço, a meio caminho ao longo do eixo Y
G30 P1 X290 Y150 Z-99999 S2; sonda perto de um parafuso de avanço e calibre 2 motoresCopy and paste that section a few times to run it multiple times in a row.
@RODOKAS said in problem with irregular bltouch mesh:
the right side of the printer, where I have y + is always higher and I cannot make the engines compensate for that. the mesh is good but in practice that side gets higher.
Just to confirm that we're dealing with a standard coordinate system, 0,0 is the front left corner and +x goes to the right, -X to the left, +y to the back, and -Y to the front.