Printing too high.
-
Hello, I am new to Duet and so far am really liking it and a much better experience/UI for a newbie.
However I have almost successfully set up my printer but it prints way too high (~5mm) above bed. When I move the printer to Z0 it is at perfect height but when I start printing it doesn't want to comply.I am using an Ender 3 with BLTouch, Duet Maestro with firmware 2.01beta1(RTOS) (2018-06-23b1) and Cura
-
; Configuration file for Duet Maestro (firmware version 2.03)
; executed by the firmware on start-up
;
; generated by RepRapFirmware Configuration Tool v3.1.4 on Mon Nov 02 2020 15:23:04 GMT+1000 (AEST); General preferences
G90 ; send absolute coordinates...
M83 ; ...but relative extruder moves
M550 P"MDAero Ender 3" ; set printer name; Network
M552 P0.0.0.0 S1 ; enable network and acquire dynamic address via DHCP
M586 P0 S1 ; enable HTTP
M586 P1 S0 ; disable FTP
M586 P2 S0 ; disable Telnet; Drives
M569 P0 S1 ; physical drive 0 goes backwards
M569 P1 S1 ; physical drive 1 goes backwards
M569 P2 S0 ; physical drive 2 goes forwards
M569 P3 S1 ; physical drive 3 goes backwards
M584 X0 Y1 Z2 E3 ; set drive mapping
M350 X16 Y16 Z16 E128 I1 ; configure microstepping with interpolation
M92 X80.00 Y80.00 Z400.00 E741.00 ; set steps per mm
M566 X600.00 Y600.00 Z60.00 E300.00 ; set maximum instantaneous speed changes (mm/min)
M203 X9000.00 Y9000.00 Z600.00 E6000.00 ; set maximum speeds (mm/min)
M201 X500.00 Y500.00 Z120.00 E5000.00 ; set accelerations (mm/s^2)
M906 X800 Y800 Z800 E900 I30 ; set motor currents (mA) and motor idle factor (%)
M84 S30 ; Set idle timeout; Axis Limits
M208 X0 Y0 Z0 S1 ; set axis minima
M208 X235 Y235 Z260 S0 ; set axis maxima; Endstops
M574 Z0 S0 ; set active low and disabled endstops
M574 X1 Y1 S1 ; set active high endstops; Z-Probe
;M307 H3 A-1 C-1 D-1
M558 P9 H5 F120 T6000 ; set Z probe type to bltouch & the dive height + speeds
G31 P500 X-44 Y-16 Z3.2 ; set Z probe trigger value, offset and trigger height
M557 X10:190 Y10:190 S20 ; define mesh grid
;M557 X10:190 Y10:190 S45 ; define mesh grid; Heaters
M305 P0 T98801 B4185 R2200 ; set thermistor + ADC parameters for heater 0
M143 H0 S80 ; set temperature limit for heater 0 to 80C
M305 P1 T98801 B4185 R2200 ; set thermistor + ADC parameters for heater 1
M143 H1 S250 ; set temperature limit for heater 1 to 250C; Fans
M106 P0 C"PCF" S0 I0 F500 H-1 ; set fan 0 name, value, PWM signal inversion and frequency. Thermostatic control is turned off
M106 P1 C"HEF" S1 I0 F500 H1 T45 ; set fan 1 name, value, PWM signal inversion and frequency. Thermostatic control is turned on
M106 P2 C"ECF" S1 I0 F500 H1:0 T45 ; set fan 2 name, value, PWM signal inversion and frequency. Thermostatic control is turned on; Tools
M563 P0 S"Hotend" D0 H1 ; Define tool 0
G10 P0 X0 Y0 Z0 ; Set tool 0 axis offsets
G10 P0 R0 S0 ; Set initial tool 0 active and standby temperatures to 0C; Custom settings are not defined
; Miscellaneous
M501 ; load saved parameters from non-volatile memory
M911 S21 R23 P"M913 X0 Y0 G91 M83 G1 Z3 E-5 F1000" ; set voltage thresholds and actions to run on power loss -
; Ender 3 Custom Start G-code
M140 S{material_bed_temperature_layer_0} ; start preheating the bed
M104 S{material_print_temperature_layer_0} T0 ; start preheating hotend
G28 ; Home all axes, BLTouch
G29 S1; BLTouch do full bed level
M190 S{material_bed_temperature_layer_0} ; heat to Cura Bed setting
M109 S{material_print_temperature_layer_0} T0 ; heat to Cura Hotend
G92 E0 ; Reset Extruder
G1 Z2.0 F3000 ; Move Z Axis up little to prevent scratching of Heat Bed
G1 X0.1 Y20 Z0.3 F5000.0 ; Move to start position
G1 X0.1 Y200.0 Z0.3 F1500.0 E15 ; Draw the first line
G1 X0.4 Y200.0 Z0.3 F5000.0 ; Move to side a little
G1 X0.4 Y20 Z0.3 F1500.0 E30 ; Draw the second line
G92 E0 ; Reset Extruder
G1 Z2.0 F3000 ; Move Z Axis up little to prevent scratching of Heat Bed
G1 X5 Y20 Z0.3 F5000.0 ; Move over to prevent blob squish
.GCODE Flavour: RepRap
-
Your firmware is quite old. It would be a good idea to update it.
https://github.com/Duet3D/RepRapFirmware/releases/download/2.05.1/Duet2Firmware-2.05.1.zip
Download that zip file and then upload it to the system tab in the web interface. Don't extract it. Just upload the whole zip file. It should update the firmware and web interface for you.
As for why it's printing 5mm too high, post your homeall.g file so we can see what you're homing routine looks like.
If you tell the Z axis to move up a certain amount, does it actually move the correct amount if you measure it?
It looks like you're loading a saved heightmap for mesh compensation. It might not hurt to redo the mesh in case the Z axis wasn't set correctly when it was originally created.
-
Thank you @Phaedrux! i just updated that firmware, so easy
Yes i have tried to redo the mesh and comes out the same; homeall.g
; called to home all axes
;
; generated by RepRapFirmware Configuration Tool v3.1.4 on Mon Nov 02 2020 15:23:05 GMT+1000 (AEST)
G91 ; relative positioning
G1 H2 Z5 F6000 ; lift Z relative to current position
G1 H1 X-240 Y-240 F3000 S1 ; move quickly to X and Y axis endstops and stop there (first pass)
G1 H2 X5 Y5 F6000 ; go back a few mm
G1 H1 X-240 Y-240 F240 S1 ; move slowly to X and Y axis endstops once more (second pass);G1 H1 Z-265 F240 ; move Z down stopping at the endstop
G90 ; absolute positioning
G1 X161.5 Y133.5 F3000
M558 F400
G30
M558 F100
G30
G92 Z0 ; set Z position to axis minimum (you may want to adjust this)G29 S1 ; Load heightmap and enable mesh grid compensation
G28 XY
G1 X10 Y10 Z10 F6000 ; return head to park position; Uncomment the following lines to lift Z after probing
;G91 ; relative positioning
;G1 Z5 F100 ; lift Z relative to current position
;G90 ; absolute positioning -
also; after updating the motors are making a terrible noise when moving
-
@evilfknpotato said in Printing too high.:
G30
G92 Z0 ; set Z position to axis minimum (you may want to adjust this)Remove the G92 Z0 since you're using the probe with G30 to set the Z height, you don't want to over ride it with that G92 command.
The trigger height of the probe needs to be calibrated and put in G31.
G31 P500 X-44 Y-16 Z3.2 ; set Z probe trigger value, offset and trigger height
https://duet3d.dozuki.com/Wiki/Test_and_calibrate_the_Z_probe
When that is set correctly, G30 should set the Z height correctly and you won't need any G92 Z to force a height. (that's more common when using an endstop switch instead of a probe).
This could explain why it's not printing at the right height.
@evilfknpotato said in Printing too high.:
also; after updating the motors are making a terrible noise when moving
Please send M115 to confirm your firmware version.
Send M98 P"config.g" and report the results.
Did anything else change?
-
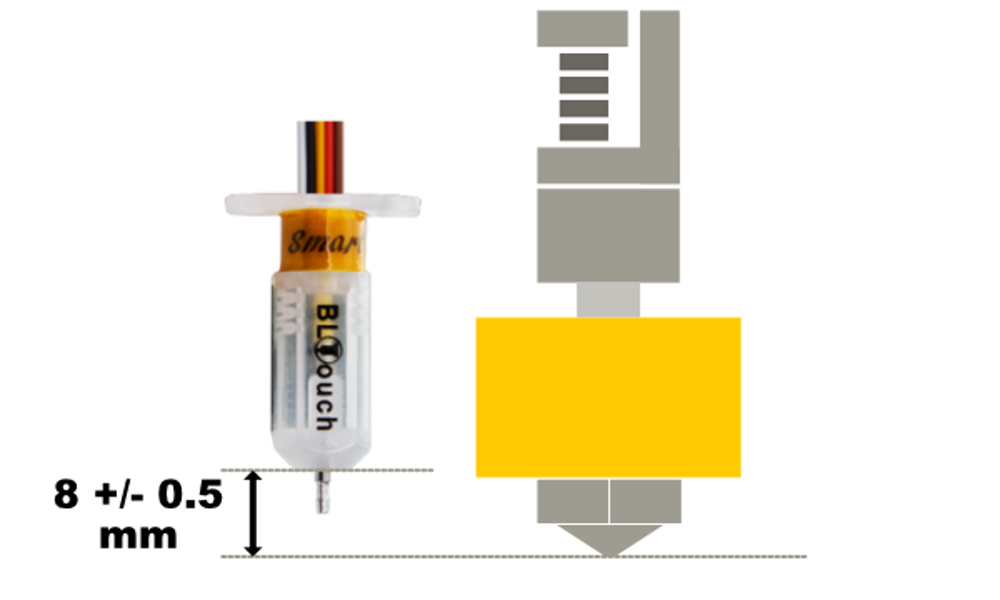
g31 trigger height is 8mm where does this go?
FIRMWARE_NAME: RepRapFirmware for Duet 2 Maestro FIRMWARE_VERSION: 2.05.1 ELECTRONICS: Duet Maestro 1.0 FIRMWARE_DATE: 2020-02-09b1
M98 P"config.g"
HTTP is enabled on port 80
FTP is disabled
TELNET is disabled
Warning: Macro file config-override.g not found -
nothing else changed so far except the beautiful new UI, but the motor noise doesn't sound healthy
-
@evilfknpotato said in Printing too high.:
g31 trigger height is 8mm where does this go?
8mm? Are you sure about that? When mounted correctly as suggested by Antclabs the BLTouch body should be 8mm above the nozzle which leads to a trigger height of about 2mm.
-
@evilfknpotato said in Printing too high.:
but the motor noise doesn't sound healthy
Which motor? All of them? What moves are you doing?
Can you record a video to show it?
-
@Phaedrux yes that seems correct its a stock creality metal mount and re measured and the trigger height is correct at 3.2mm
-
@Phaedrux all of them on homing and g1 moves
How do I upload a video? -
@evilfknpotato said in Printing too high.:
@Phaedrux yes that seems correct its a stock creality metal mount and re measured and the trigger height is correct at 3.2mm
Alright, so with that G92 Z0 removed from the homeall.g file does the nozzle touch the bed when you tell it to move to the Z0?
@evilfknpotato said in Printing too high.:
How do I upload a video?
On a desktop you can drag and drop a file onto the post text box to upload it, or you can put it on dropbox or google drive if it's too big and share a link.
-
yes it always did move to Z0 before printing and now it prints at correct height thank you so much!
Now its just the strange motor problems, if it were my wiring it would have done this before updating firmware. uploading video -
-
Maybe if have to compare to how it sounded before but that doesn't sound too bad to me.
You can try reducing the motor current a bit. Try 600 or 700 instead of 800.
-
@Phaedrux it was silent before this sounds like back emf or something
-
@evilfknpotato reduced current to 600 and still the same
-
is it worth upgrading to v3.0?