Duet3D Logo Duet3D
    • Tags
    • Documentation
    • Order
    • Register
    • Login

    [HELP] Ender 3 Pro + Duet WiFi 2

    Scheduled Pinned Locked Moved
    Tuning and tweaking
    7
    88
    4.8k
    Loading More Posts
    • Oldest to Newest
    • Newest to Oldest
    • Most Votes
    Reply
    • Reply as topic
    Log in to reply
    This topic has been deleted. Only users with topic management privileges can see it.
    • Phaedruxundefined
      Phaedrux Moderator
      last edited by

      https://duet3d.dozuki.com/Wiki/Duet3dFilamentMonitor_RotatingMagnetVersion

      https://duet3d.dozuki.com/Wiki/Duet3dFilamentMonitor_LaserVersion

      Z-Bot CoreXY Build | Thingiverse Profile

      didi767undefined 1 Reply Last reply Reply Quote 0
      • didi767undefined
        didi767 @Phaedrux
        last edited by

        @Phaedrux Thanks!

        1 Reply Last reply Reply Quote 0
        • didi767undefined
          didi767
          last edited by

          Hi guys,

          long time 🙂
          I have a quick question if I may.
          I became pretty familiar with 3d printing by now, all thanks to you!
          I was wondering if there is a more efficient way for me to perform bed leveling instead of doing it manually?
          is there a script that can move the motor to few places and then I just swipe the paper?
          or is there a better way to do so?
          and is it still necessary even though I'm using BLtouch? isn't it compensating the height differences already?

          Thanks!
          didi

          1 Reply Last reply Reply Quote 0
          • Phaedruxundefined
            Phaedrux Moderator
            last edited by

            The BLtouch and mesh compensation will adjust for any errors, but it's always best to start with as level a bed as possible,

            This might be what you're looking for.

            https://duet3d.dozuki.com/Wiki/Using_the_manual_bed_levelling_assistant

            It will measure the points closest to the leveling screws and tell you how much to adjust them to bring them closer to your defined Z0 point (ideally set by probing the center of the bed).

            But really for the ender 3 it's not too hard to level manually with some paper too.

            https://duet3d.dozuki.com/Guide/Ender+3+Pro+and+Duet+Maestro+Guide+Part+4:+Calibration/40

            Z-Bot CoreXY Build | Thingiverse Profile

            didi767undefined 1 Reply Last reply Reply Quote 0
            • didi767undefined
              didi767 @Phaedrux
              last edited by

              @Phaedrux Thanks!!

              1 Reply Last reply Reply Quote 0
              • didi767undefined
                didi767
                last edited by

                Hey guys,

                Another quick question please 🙂
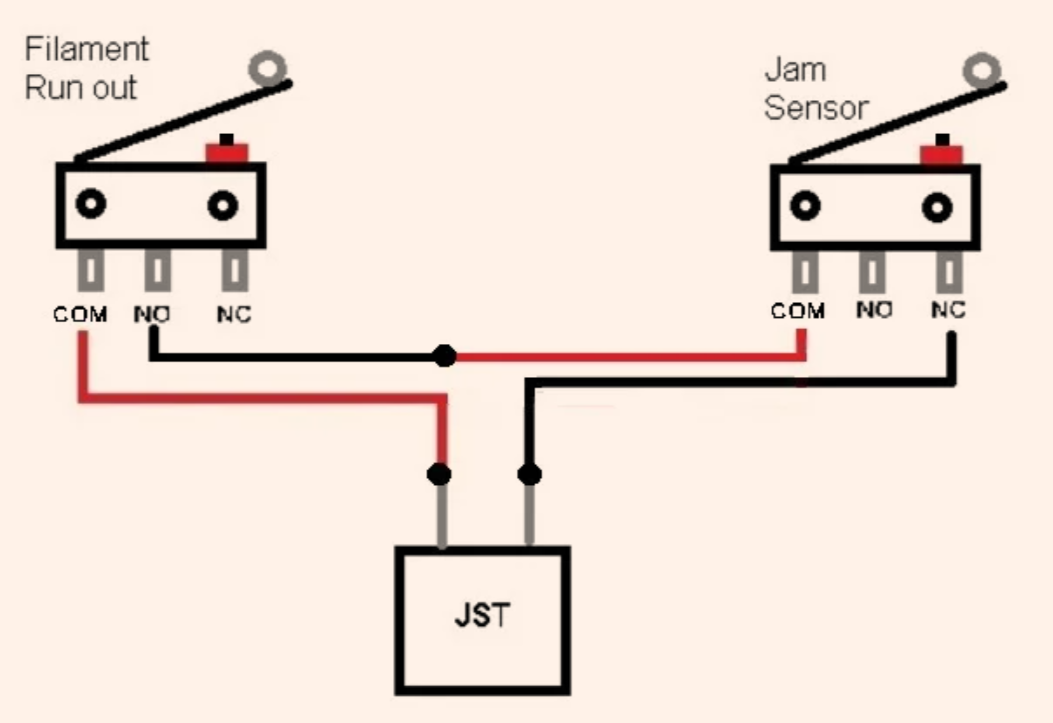
                I have a filament sensor with two simple roller switches (one for the filament and the other for jam). I was looking for the documentation on how to connect it to the board but I'm a bit confused.
                I only have two wires from the sensors, and in the documntation they mention an optical sensor which uses 3 (with the 3.3v which it my case I don't have).
                so should I just connect it to the ground and signal? any additional configuration needed?
                this is the wiring for the sensor (it's from a thingiverse project):
                simple sensor.PNG

                and this is the documentation I was refering to: https://duet3d.dozuki.com/Wiki/Duet3dFilamentMonitor_LaserVersion

                Regards,
                Didi

                1 Reply Last reply Reply Quote 0
                • alankilianundefined
                  alankilian
                  last edited by

                  Can you point to the project?

                  You can certainly connect two switches in series and sense two filament conditions like that given:

                  • Each switch is CLOSED when the filament is in a "Good" state.
                  • Either switch opening when the condition is "bad" will trigger the filament"out" sensing.

                  I can't tell fro your diagram what the state will be for each of your two switches when everything is good-to-go.

                  SeemeCNC Rostock Max V3 converted to V3.2 with a Duet2 Ethernet Firmware 3.2 and SE300

                  didi767undefined 1 Reply Last reply Reply Quote 0
                  • didi767undefined
                    didi767 @alankilian
                    last edited by

                    @alankilian Of course, it's this one:
                    https://www.thingiverse.com/thing:4672537
                    I think that's the best option I've printed, tried many other with optical sensor, the concept was nice but the actual thing wasn't 😕

                    1 Reply Last reply Reply Quote 0
                    • alankilianundefined
                      alankilian
                      last edited by alankilian

                      OK, yes, just wire the two switches as shown in the diagram.

                      Then, connect the two wires to the outer two pins in the endstop connector as described by @dc42 here.

                      SeemeCNC Rostock Max V3 converted to V3.2 with a Duet2 Ethernet Firmware 3.2 and SE300

                      didi767undefined 1 Reply Last reply Reply Quote 0
                      • didi767undefined
                        didi767 @alankilian
                        last edited by

                        @alankilian "Use P2 in your M591 commands" didn't quite understand that part. so I'm assuming I need to edit the main config file, right?
                        to set the endstop as a sensor? (Would it display an error message while a jam or runout detected?)

                        1 Reply Last reply Reply Quote 0
                        • alankilianundefined
                          alankilian
                          last edited by alankilian

                          THIS thread will help you understand what you need to add to your config.g file to enable this sensor and some commands you can use to see if it's triggered or not.

                          When it's triggered, the extruder lifts up and waits for you to add more filament, and then you click the "Continue" button on the Duet Web Control to restart.

                          There are two macro files that get run so you can make it do different things depending on what you need it to do.

                          Basically, you will add:

                          • M591 D0 P2 S1 C<something>

                          to your config.g depending on where you plug the sensor in.

                          C3 if you plug in to E0_stop plug

                          SeemeCNC Rostock Max V3 converted to V3.2 with a Duet2 Ethernet Firmware 3.2 and SE300

                          didi767undefined 1 Reply Last reply Reply Quote 1
                          • didi767undefined
                            didi767 @alankilian
                            last edited by

                            @alankilian Thank you very much! I'll try it this weekend and update!

                            1 Reply Last reply Reply Quote 0
                            • Tanel_76undefined
                              Tanel_76
                              last edited by

                              I'm reading this thread and I have flashbacks - I started the same way, as you didi767, with an Ender3 and a Duet.
                              The first tihing I did after getting Duet up and running, I added second Z motor and lead screw, to get rid of Ender's sagging X-gantry issues.
                              After all my modifications, my Ender looked more or less like a some sort of Franken-Prusa, basically the frame was from Creality, gantry was
                              a Prusa X gantry and I had Ender3 bed. In the end I decided to build a closed COREXY and I have a Duet3, the
                              Creality frame is not meant for heavy-duty printing I think. The wheels need adjusting and the frame is too narrow.

                              1 Reply Last reply Reply Quote 0
                              • First post
                                Last post
                              Unless otherwise noted, all forum content is licensed under CC-BY-SA