Watercooling a CoreXY with a 120°C Heated Chamber
-
Hello together,
I am currently finishing my first printer.
It's a CoreXY with a build volume of 415mmx415mmx500mm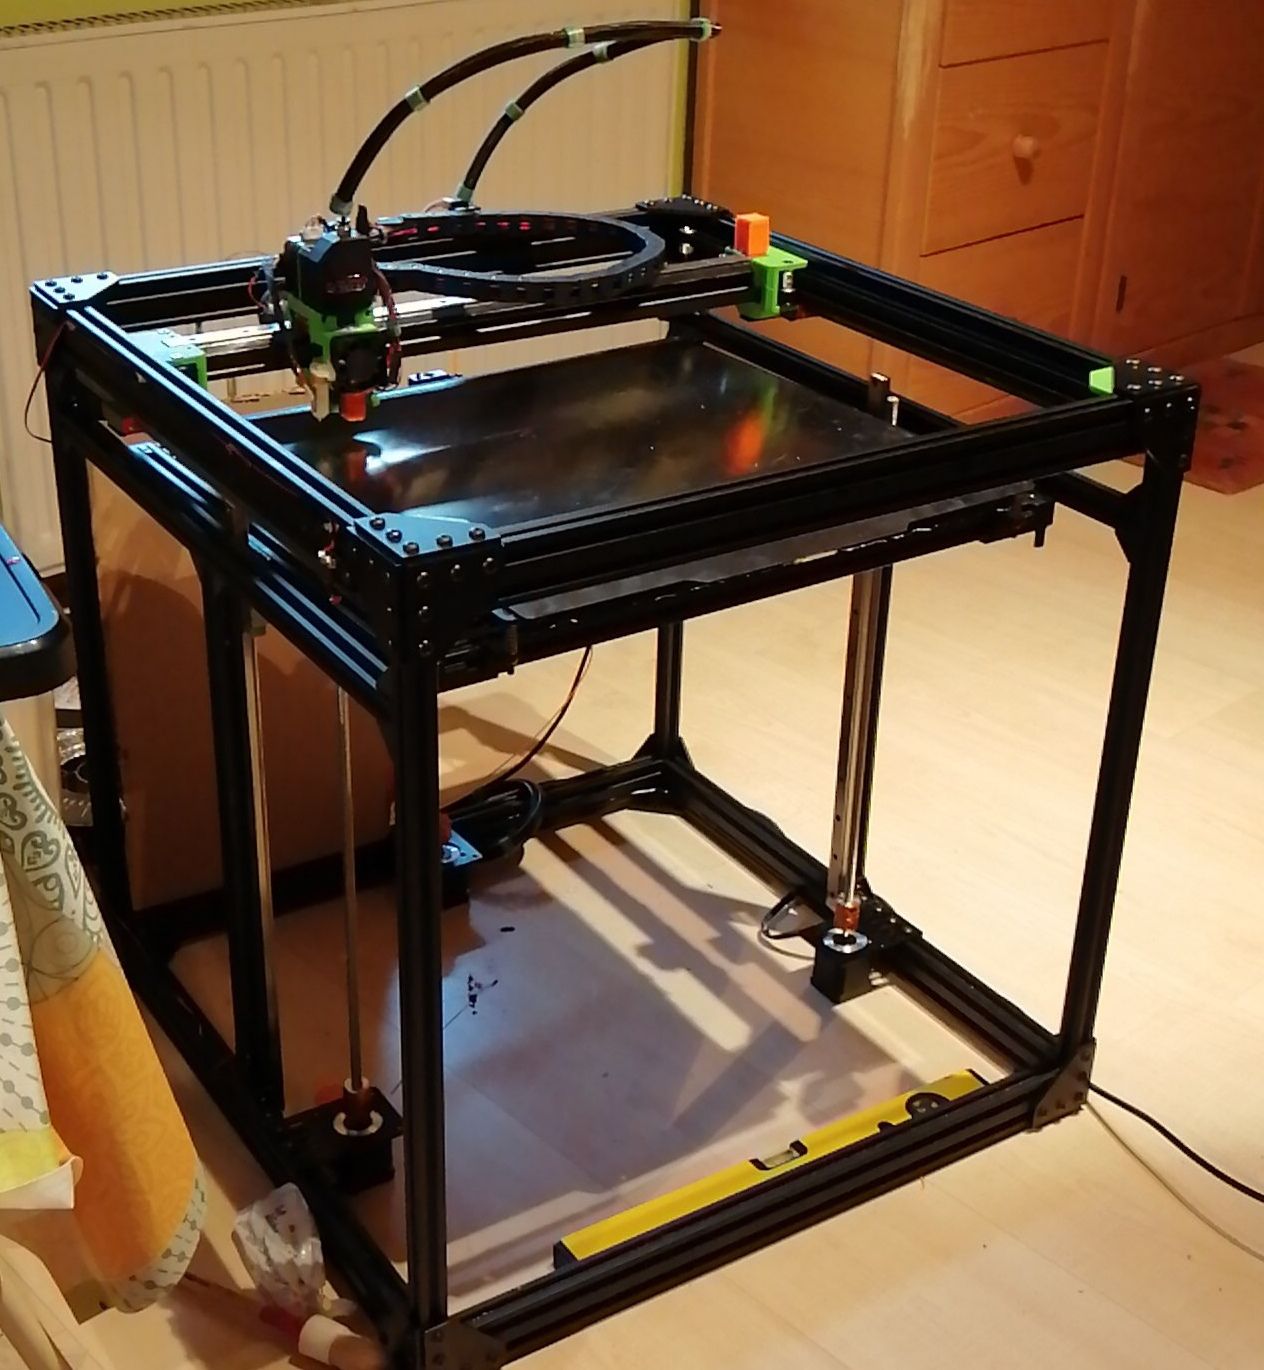
Electronics:
DUET3 6HC, 2x Toolboard LC1, Tool Distribution Board, Raspberry 3b+
RRF 3.2beta4.1
Tool1: E3D Volcano
Tool2: Mosquito MagnumThe next step is to build a heated chamber that will reach ~120°C.
So, I added an additional frame with 25cm on top so I can easily enclose the whole machine with 4mm Polycarbonate Plates. Only the bottom Plates will be 2mm Aluminium, so that I cam proberly hide/mount the electronics + 3 Z Spindle Motors in this double floor.
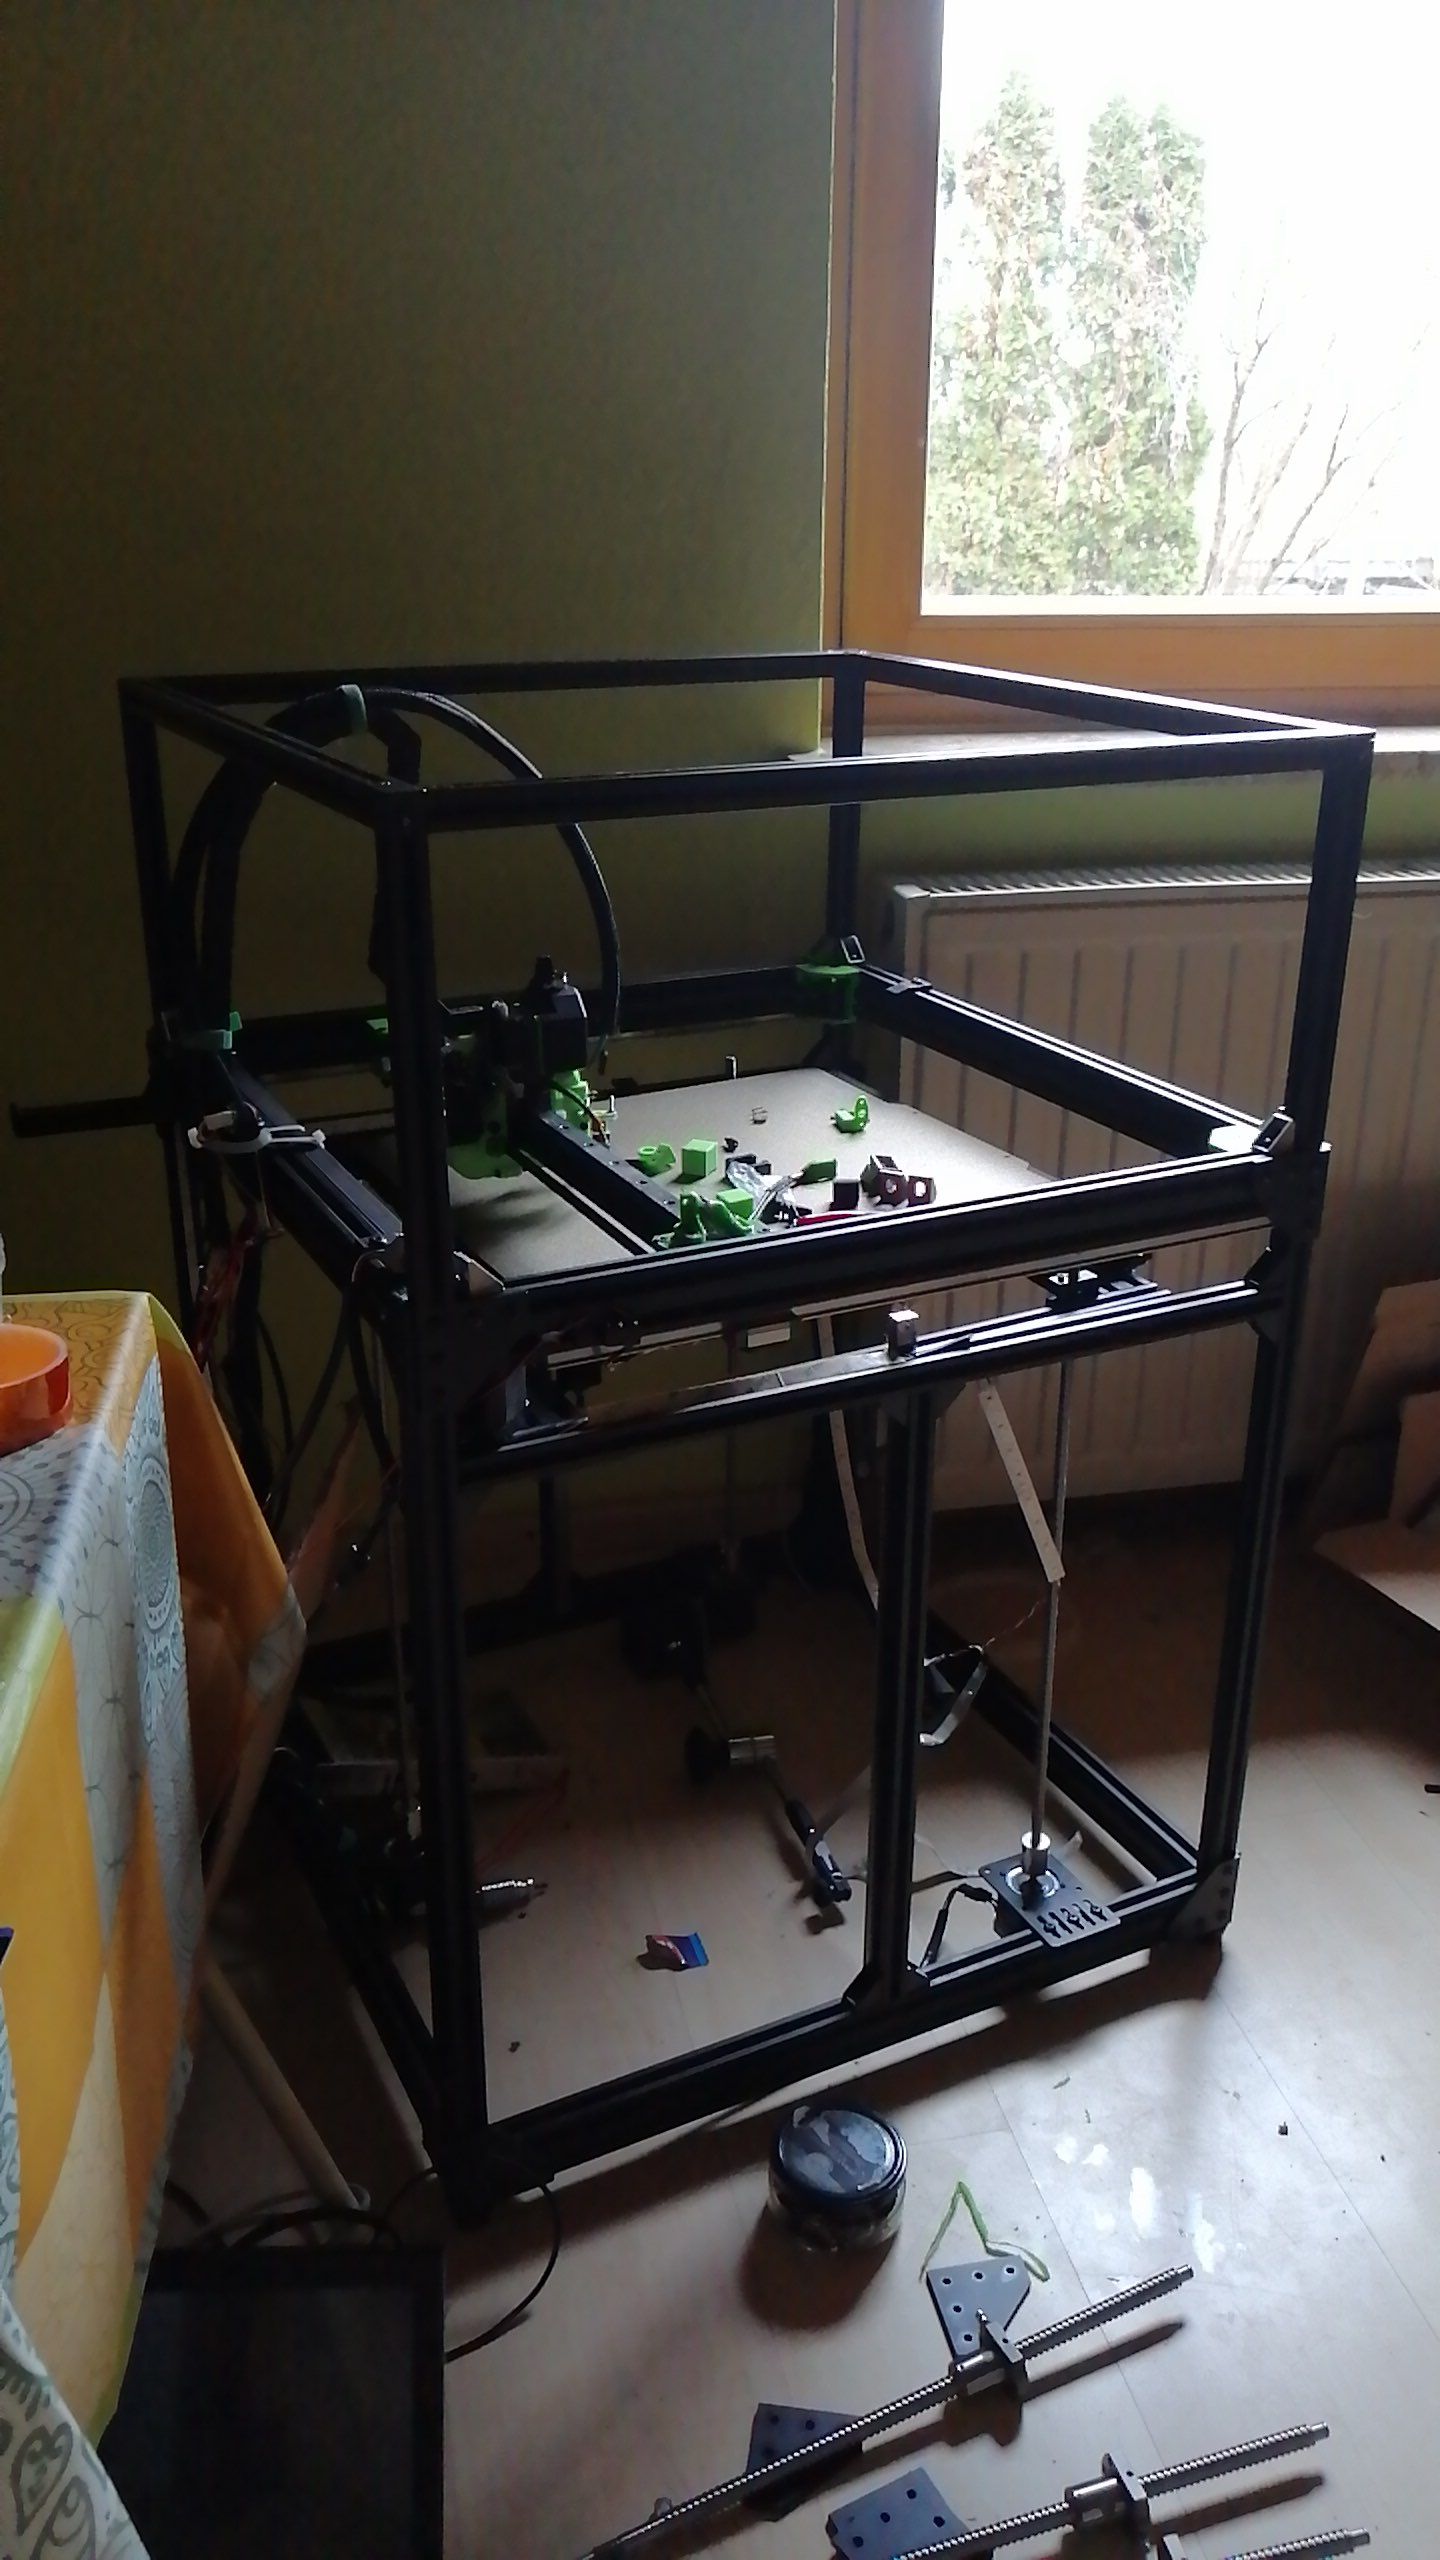
But now I'm starting to think about what's the best and most effektiv solution to cool the motors and other parts that don't like these temperatures.
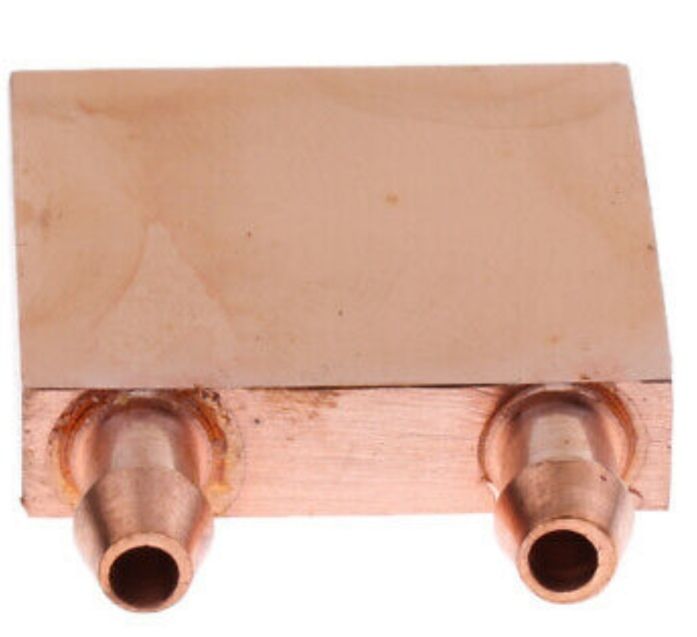
For the Nema17 I found these 40x40x15 Copper Waterblocks
Should I go with a 'classic' Setup like the PC Guys with Radiator, Fans, Reservoir +Pump
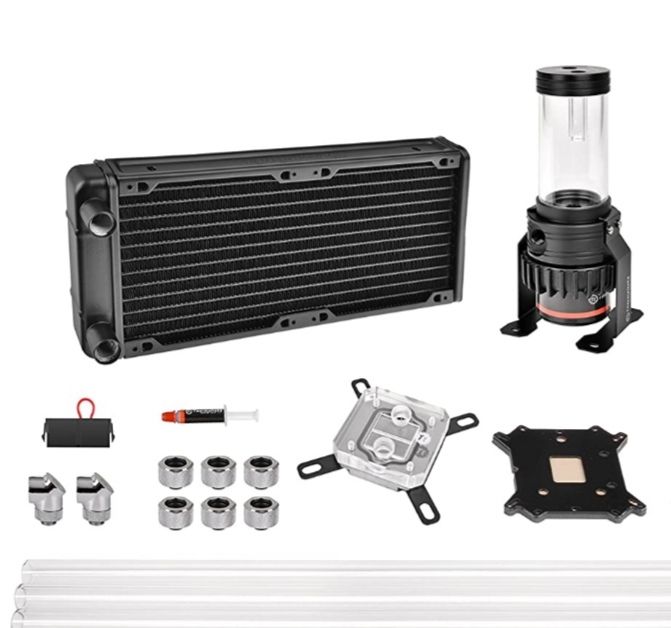
Picture only for demonstration purposes

Or better choose an active cooking solution like these aquarium, cnc spindle or laser coolers:
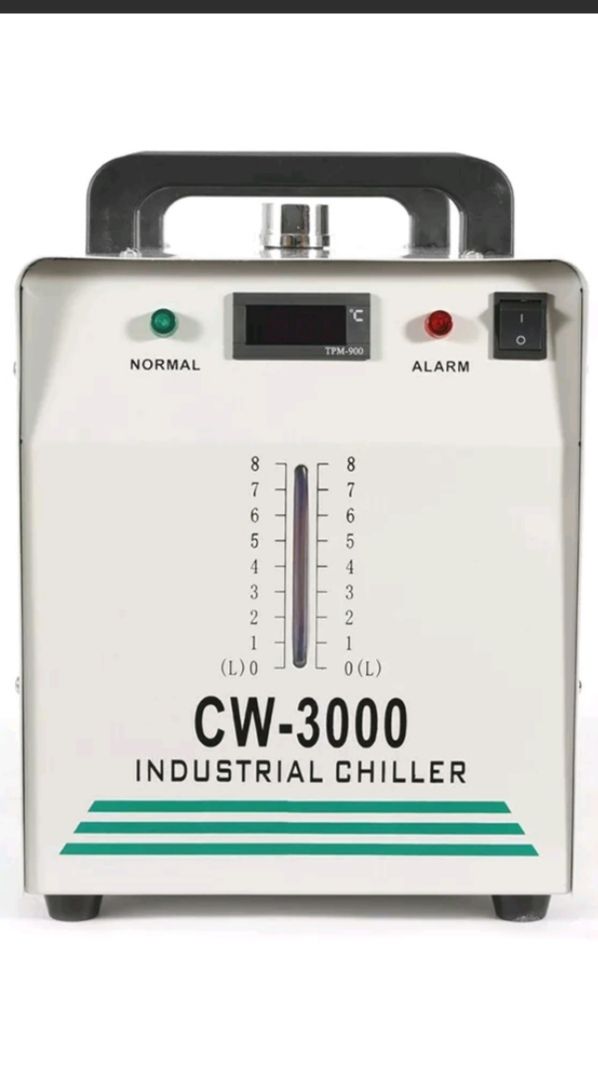
Or build something own from a ptc peltier element so that I can pump liquid as cool as possible through the machine..???
Currently I am running only the Mosquito Hotend that I will convert to liquid cooling as soon as available.
I will mostly print functional parts with high temp plastics like asa, Nylon and PC, later perhaps some test with ultem.
I will Update this Post as the Build continues
Regards Frederik
-
I am contemplating a printer with high-temperature build chamber also. Still in conceptual phase, nothing really designed yet.
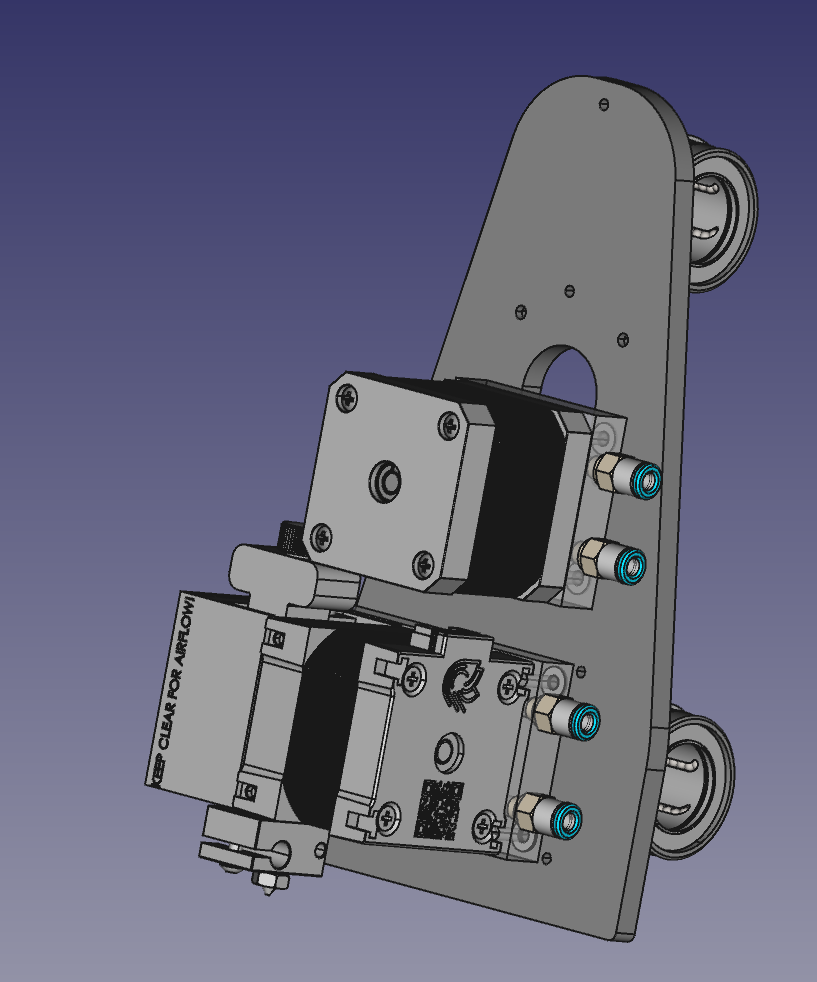
My intention is to cool the motors at their flanges, which is the location motor manufacturers designated to shed heat.
Something like this:
Regarding the cooling: you want to keep the motor winding temperature below 130C, which as a rule of thumb translates to ~80C on the outside. Ideally you want a bit cooler than that. But that is still very well within the capabilities of a regular PC-style cooling loop, nothing special needed.
Furthermore: I don't want to spoil your ideas, but did you know that most linear components cannot take much more than 80 degrees C?
Lineair rails have endcaps with plastic and elastomers in them, Chinese-type ballscrews use a plastic bit for ball recirculation, standard belts handle up to 80C only, grease in the idler bearings is probably not suitable for 120C, etcetera.
On top of that, distortion with steel rails and aluminium frame components is going to be terrible due to different thermal expansion coefficients. -
@DaBit That's a really nice idea to cool the steppers

After the first prints with ASA and a Bed Temperature of around 110C, I noticed that my pancake motor on the BMG was so hot, I couldn´t touch it longer than a few sec on the backside. So, I thought a copper Waterblock with Boron Paste will transfer enough thermal energy when the water temp is perhaps at 0-5°C and not at room temperature. (Only high enough that I don´t get problems with freezing or condensation).
I am aware of that Temp. Limit of ~ 80°C.
but with the 220V -1.2 KW Keenovo Bed Heater I`m using, everything above that monster is at risk anyway

My approach to that would be some kind of a Pressured Air System that is delivering ambient Air to the Belts and other critical spots. Perhaps I can build a small box where I can place the x+y steppers and make a small cooling channel in the walls or something in that direction.
For Testing, I have at the moment a pump that can deliver 6x 10L/min.
I had to switch to some sort of pressured Air cooling anyway because I think my 5015 cant handle higher temps from the bed without melting

If all my attempts fail, I saw a CoreXY Design with only Ballscrews for X, Y, and Z... Perhaps that's the way to go

-
@Frederik said in Watercooling a CoreXY with a 120°C Heated Chamber:
@DaBit That's a really nice idea to cool the steppers

Ander very easy to implement if you have access to a milling machine or just a drill press.
So, I thought a copper Waterblock with Boron Paste will transfer enough thermal energy when the water temp is perhaps at 0-5°C and not at room temperature. (Only high enough that I don´t get problems with freezing or condensation).
I don't see the benefit of boron nitride paste over simple white aluminium-oxide based thermal interface compound. Other than that: all this is easy to try. Make the cooling solution (you have to, anyway), hook it up to water flow, mount a thermistor, and throw it in the oven. Even although the shown design of the X-carriage is probably not even close to final I am tempted to mill and assemble one to do just that.
but with the 220V -1.2 KW Keenovo Bed Heater I`m using, everything above that monster is at risk anyway

It is just as much risk as with a 300W heater; you just set the temperature of the bed. The 300W heater only takes longer to get up to temp and might struggle at the higher end of temperatures.
My approach to that would be some kind of a Pressured Air System that is delivering ambient Air to the Belts and other critical spots. Perhaps I can build a small box where I can place the x+y steppers and make a small cooling channel in the walls or something in that direction.
Cooling the belts with ambient air seems pretty nontrivial to me, unless you mount the CoreXY in a separate chamber above the build chamber and use fiberglass curtains to keep the chamber heat away from the CoreXY.
Not 100% sure, but I think that is how Stratasys does it.If all my attempts fail, I saw a CoreXY Design with only Ballscrews for X, Y, and Z... Perhaps that's the way to go

Sort of hangprinter kinematics laid on the XY plane?
But then you still have to solve the temperature problem for the ballnuts, and use types with a metal tube for ball recirculation. Those are the good ones, not the cheap ones..
Or take the plastic recirculation thingies out of the nuts and recreate them in PTFE or PEEK. Should not be a big deal; those are not complicated.If you bought China-class leadscrews and ballnuts I strongly recommend to take the entire nut apart, clean the grinding dust thorougly from both the screws, nut internals and balls, replace substandard balls or even all balls with fresh ones (a bag of balls cost little money at the local bearing shop), grease, and reassemble. Definitely worth the effort; you will be amazed how much debris will come out of those nuts.
-
Instead of trying to remove heat from the motors, just remove the motion control motors from the heat.
No extra parts (or cost) required.
As for the extruder, most of them current direct drive extruders will be fine to join to +300c club
-
Hi Frederik,
there are several options to keep things cool in a heated chamber.
If you can't keep the motors outside of the heated volume, there are some hightemp motors out there:https://hightemp3d.com/collections/high-temperature-3d-printer-parts
I am in the process of building a toolchanger in a heated chamber (200x200x200 build volumne) and I found that a small radiator with 120 mm fan and D5 pump is more than enough to cool the heatbreaks (I am using a custom 3d alu printed part), the waterblock is connected with 4mm ID silicone tubes.
-
@DaBit said
Not 100% sure, but I think that is how Stratasys does it.
That is exactly how stratasys does it.
Goggle will turn up their patents on heated enclosures, which will give some more ideas on how it can be done.
If I was going to build a high temp machine... I'd be looking very hard at the Igus high temp plastic bushings and stainless steel shafts.
Not the most efficient (conventional linear rails can be had in 150C versions from the good suppliers like Misumi and THK), but those polymers are good to ~200C.
And you want to minimise the things inside the envelope that you need to cool... its already a hassle to insulate the build envelope enough to not need some insane amount of power to keep it hot, but each item with active cooling is going to increase the heat loss from the envelope.
(Of course, a smart engineer would point out that using TEC coolers will actually cool your motors at the same time as heating your enclosure... but that might be cheating). -
-
@Nuramori I see you are running an orbiter/sherpa extruder.
Are you satisfied with it's performance? -
@whosrdaddy it’s my own ground up extruder design (using a helical gear driving the sun gear for a total of 12:1). It’s in the last stages of testing but this is the third version and final iteration of the design. It’s been great so far. I made a GitHub project for it if you’re interested. I’ve been refining it for awhile. I started mine about the same time lorincz started his (orbital) though I initially began with a worm drive approach.
-
@theruttmeister said in Watercooling a CoreXY with a 120°C Heated Chamber:
to not need some insane amount of power to keep it hot, but each item with active cooling is going to increase the heat loss from the envelope.
It's not that bad.
Assume a 500x500x500mm build chamber, that equates to 1.5 m2 of area. If one uses 50mm thick rockwool for the insulation, assumes 150C inner temperature and 20C outside temperature, then at 0,075W/mK for the wool (source) the heat loss is a tad below 300W. Add a double-glass door on one side of the cube instead of rockwool, punch some wires and hoses through the insulation, and we get to 400W or so.
Not really green to have that amount of loss, but it is nice that there is a cooldown in a sane amount of time when the heater is turned off without the drafts and temperature differentials you get when you blow cold air in. Electricity-cost-wise it is not a big deal either; if you are working at such a high chamber temperature you are printing very expensive materials to create high-value parts which makes electricity cost just noise.
Now, replace the top wall of the cube with a curtain and probably a few fans to keep the space above the curtains cool enough. Heat loss skyrockets; thermal insulation of the curtain is not that good; it's relatively thin and it has a high surface area. 1kW is not too far off I think.
Now instead, consider local cooling of the drive motors and adding only 3mm of insulation to them, say something like Armaflex HT. Insulation is not that good with such a thin layer, but with the small surface area of the motors (say 0,02 m2) the heat loss is in the 25W per motor range. Dual extruder, dual Z drive, that's 7 motors, plus some for the hoses, let's say 200W in total.
(another interesting calculation: how much expensive high-temp TEC do you need to keep the cold side at 60C, hot side at 180C or so, and a Q of 25W...)
-
@DaBit I`m searching at the moment for the right ballscrews. I don't want to spend a fortune but also don't want to use the bottom end of the spectrum.
I saw these at a German Reseller
SFU1204 DM
84 Euro for the blank spindle
And these are the nuts that are available
https://www.dold-mechatronik.de/Spindelmutter-SFU1204-3-grau
https://www.dold-mechatronik.de/Spindelmutter-SFU1204-3-rot
26 Euro per piece
For 3 Spindles, Nuts and Bearing blocks that would cost me around ~380 Euro + shipping for the 525mm long versions.
-
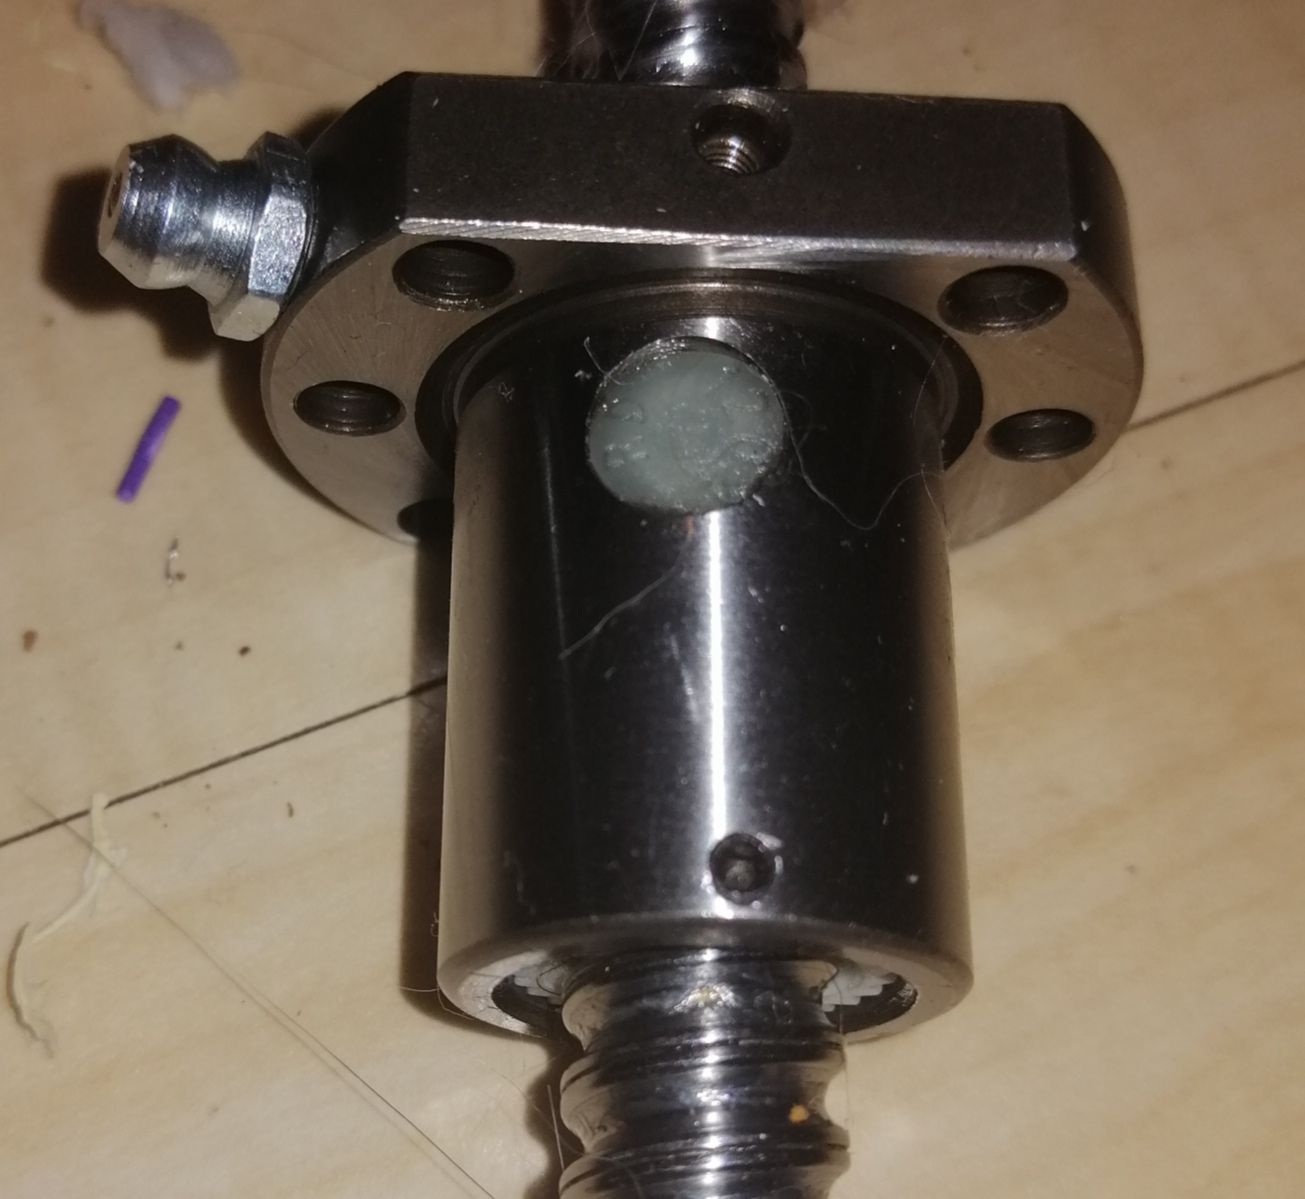
Do you see that orange circle on the nut? That is the plastic part that performs the recirculation of the balls.
Looks like this on the inside:

It makes the balls return to the groove they came from; those cheaper nuts only use one or more single rows of balls. More expensive nuts let the balls circulate for 5 threads or so and do the recirculation with a metal tube.
Once you have one on your hand you will see that those plastic pieces are not very hard to copy in a more heat-resistant material. Most of the geometry is not critical and can be replicated with a file and some elbow grease.
And this is why you should disassemble, clean and re-grease them as soon as you get them:

(These are Chinese 1610 ballnuts BTW. Construction of a China-made-imported-by-Dold 1204 nut is probably very similar)
Disassemble, clean, regrease, accurately re-assemble is a mandatory step for every Chinese linear component if you want a long and trouble-free life out of them. Feel free to ignore that advice and see the backlash and running noise increase after a few hours of service.
Are the Dold nuts better than Ebay? I doubt it; they look exactly the same. Take China-price, add import tax, add profit, add service cost, add VAT, and you are at Dold prices.
Are they bad? If you consider them a DIY package they pre-assembled so you know how things fit together they are very usable. I got the 1610 screws and nuts for my CNC mill from Chai/linearmotionbearings E-bay shop. With some work on those components (straighten screws, clean and deburr stuff, wizardry in the control) I still get <5um positioning accuracy after 6 years of service.
-
@theruttmeister I was thinking about using Peltier elements too, but then I looked at some data sheets and was not sure about the efficiency and cooling capabilities.
I was already playing with the idea to build a chamber in the chamber to reduce the parts that are exposed to the heat, but for that I probably have to build another Printer

Another Idea is to active cool the Frame to compensate for thermal expansion.
I found some small brass tubes that would fit perfektly in the V Slot groove. Perhaps this would help to reduce the thermal expansion and distortion of the frame..

... Or to insulate only the stepper motors and somehow the belt....???
There are a lot of things to build and test

... calculating the costs of this project I'm wondering how long a good glasfiber belt would last at 100 C befor it snaps or get unusable. Perhaps it would be cheaper to replace the belt every few hours instead of spending it on isolation etc. ???

Im curious if I will get a problem with my 3 Z Motors because of the double floor where the electronics sit. The outer bottom plate is 2mm thick Alu and the inner plate 4mm because I will use it as a giant passiv heat spreader.
On this plate I have mounted 4x 220v PTC Heater with 200w with a max Temperatur of 100°C. These are wired to a hardware switch without active regulation. If it is working as expected, I will control it over DWC.
My journey into 3d printing started with this project ~ 5 weeks ago and i jumped right in the deep end of the pool with this CoreXY Build.
Perhaps some ideas aren't the best, but I try to solve the problems as I encounter them one after the other

And when something absolutely doesn't work I go back to the drawing board and test as long till it works.
-
@CaLviNx are the Nema17 or 23 available with longer motorshafts? Like the one with integrated spindles?
I dont have access to a cnc or even a drillpress. All I have are hand tools, 1 electric cordless drill and a small grinder.
My possibilities are very limited when it comes to fabricating metal.
The next thing I have to learn is how to use a CAD Programm like fusion 360, So that I can modify stl. or step files and design my own parts from ground up... But that's a complete other story

-
@DaBit thanks for the tip. 5 weeks ago I didn't even know what ballscrews or linear rails are..
What would you choose for the Z Axis?
SFU1204 or 1605I'm assuming the first two numbers are the diameter and the other? Is it the pitch?
How can I find the right spindle for my application?
Like max. load, repeatability, backlash and so on....
What differences can I expect between cheap and medium priced ones?
And where can ifind better spindles and nuts?
I got 3 complete sets from ebay including the nuts for 30 Euro each with nut!!!

-
Ballscrews from a higher segment means possibly longer lasting, usually better accuracy, stiffer nuts, screws straight instead of bent from internal stresses and shipping from China.
Except maybe for the 'longer lasting' part (on which you can improve a lot by doing your homework) it is quite insignificant for a 3D printer.1204: 12mm diameter, 4mm pitch. For a 3D printer that is already overkill unless you use a very long screw.
You already have them, why not use them? Replace when measurements provide proof that you need better ones.
If you are set on quality screws you might want to check out the dy-global store on Ebay. They sell pre-owned quality parts for reasonable prices.Maybe get your printer up and running first and gain some experience with it, then decide to do the 120C build chamber.
-
@Frederik said in Watercooling a CoreXY with a 120°C Heated Chamber:
@CaLviNx are the Nema17 or 23 available with longer motorshafts? Like the one with integrated spindles?
I think if you actually talk to the motor manufacturers they will fit a custom length shaft.
I use Stepper online and LDO
Any shaft extensions I have required, I did it myself, the LDO motors I installed longer shafts on were quite easy to change, the original shafts were centre punched around one end and epoxied to the stator.
so I just pressed the original shafts out and used ground shaft of the same diameter cut to the new length I wanted then replicated the centre punch points and pressed them in with new epoxy.
They are running fine on a core-xy.
-
@DaBit The Printer is running at the moment with the mosquito as Bowden Setup. The only thing at the moment that isn´t working as supposed is my Toolboard. everything else works fine in the meanwhile.
When the Polycarbonate Plates arrive this week, I will build the enclosure first.
Then I will print a few test parts with ASA and without an additional Chamber Heater... Only the Bedheater fat 110C. Then I will see how high the temps in the chamber will be.... and if everything is working, I will add the PTC chamber heaters and start slowly increasing the temperature.
I installed 2 additional Thermistors on 2 m cables so I can place them quickly where I want to check the temps.
What Sensor is the most accurate for this type of measurement?
PT100, PT1000 K-Type, Thermistors without the enclosure?
-
Pt100 with the Duet add-on board would be the most accurate I think.
I use a regular thermistor; the Pt100's are more useful in the hotends. Not too interested in the last 0,5 degree C accuracy anywayASA with enclosed but otherwise not heated chamber works fine until the parts grow bigger. I tried whatever I could to print a ~350 gram model taking up most of the build volume (~220mm cubed in my printer). Rafts, draft shields, giving the printer plenty of time to get to temperature, etcetera. No luck; kept suffering from layer splitting. Had to switch to PETG for that one and subsequent prints of similar volume.
