• Tags
  • Documentation
  • Order
  • Register
  • Login
Duet3D Logo Duet3D
  • Tags
  • Documentation
  • Order
  • Register
  • Login

UI remains at layer #2?

Scheduled Pinned Locked Moved
Duet Web Control
4
12
350
Loading More Posts
  • Oldest to Newest
  • Newest to Oldest
  • Most Votes
Reply
  • Reply as topic
Log in to reply
This topic has been deleted. Only users with topic management privileges can see it.
  • undefined
    deonholt
    last edited by 2 Jan 2021, 19:01

    Hi all and thanks for your help.

    I noticed this before.
    I am busy with a print of 1089 layers high. It currently sits at 14.84mm and still says layer #2.

    The problem is that the tool fan is set to start at layer #3. So it doesn't run. When I drag the slider to 100% is just goes back to 0% after a couple of seconds.

    Please advise what to do. I need to fix this urgently.
    Thanks.

    Duet-UI-fault.png

    undefined 1 Reply Last reply 2 Jan 2021, 20:44 Reply Quote 0
    • undefined
      Phaedrux Moderator
      last edited by 2 Jan 2021, 19:02

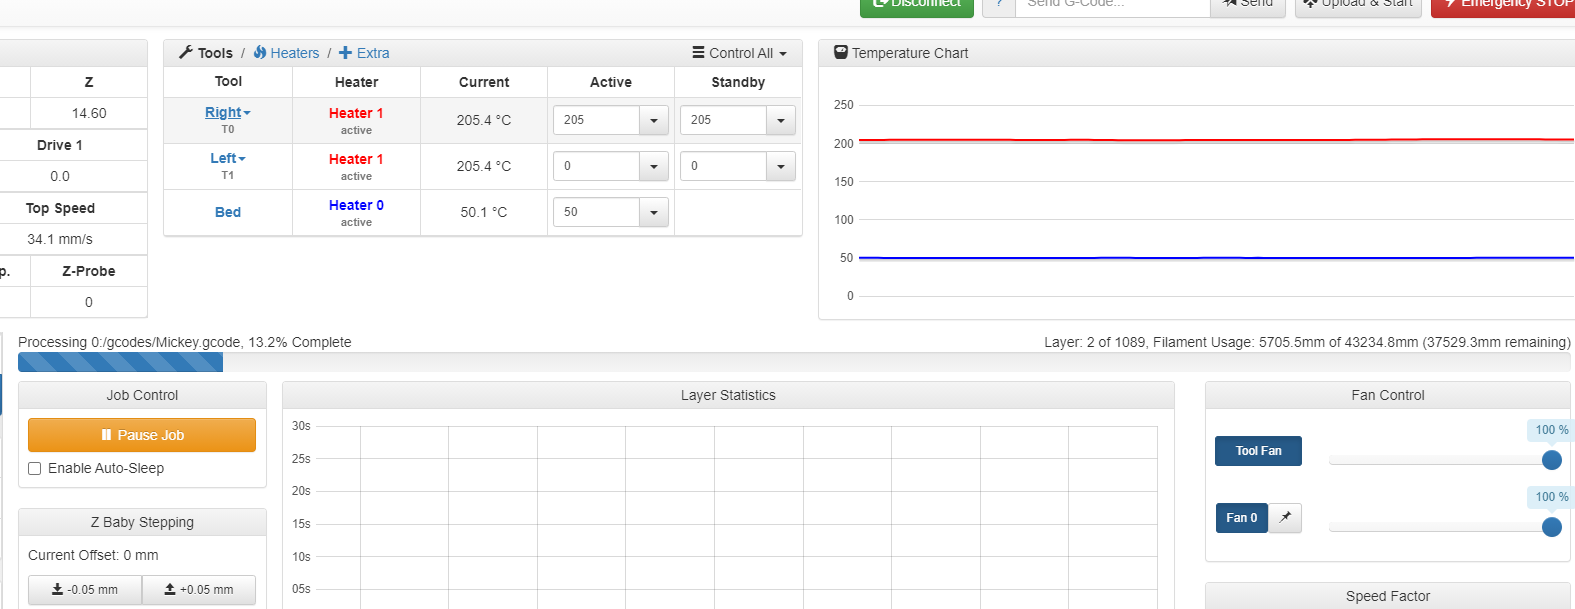
      What firmware version and DWC version?

      Usually this is caused by having some Z moves in the start and end gcode which confused the DWC parser. So post a sample gcode file that has the problem.

      Z-Bot CoreXY Build | Thingiverse Profile

      1 Reply Last reply Reply Quote 0
      • undefined
        deonholt
        last edited by 2 Jan 2021, 19:06

        Thank you for the prompt reply. I'm currently having the issue with the current print.
        This is my specs:
        Firmware Name: RepRapFirmware for Duet 2 WiFi/Ethernet
        Firmware Electronics: Duet WiFi 1.02 or later
        Firmware Version: 2.05.1 (2020-02-09b1)
        WiFi Server Version: 1.23
        Web Interface Version: 1.22.6

        This is my default End gcode
        G91 ; change to relative positioning
        G1 E-90 F1000 ; Retract filament 90mm
        G1 Z20 F500 ; lower bed 20mm from current position
        G90 ; change to absolute positioning
        G1 X200 Y200 ; move tool to back right
        M140 S0 ; turn off heatbed
        M104 S0 ; turn off temperature
        M107 ; turn off fan
        M84 X Y E ; disable motors

        undefined 1 Reply Last reply 2 Jan 2021, 23:58 Reply Quote 0
        • undefined
          deonholt
          last edited by 2 Jan 2021, 19:31

          I forgot to say FW: RepRap

          undefined 1 Reply Last reply 2 Jan 2021, 19:39 Reply Quote 0
          • undefined
            jay_s_uk @deonholt
            last edited by 2 Jan 2021, 19:39

            @deonholt can you post your config lines for the fan?

            Owns various duet boards and is the main wiki maintainer for the Teamgloomy LPC/STM32 port of RRF. Assume I'm running whatever the latest beta/stable build is

            undefined 1 Reply Last reply 2 Jan 2021, 19:41 Reply Quote 0
            • undefined
              deonholt @jay_s_uk
              last edited by 2 Jan 2021, 19:41

              @jay_s_uk
              Thanks.
              ; Fans
              M106 P0 S0 I0 F500 H-1 ; set fan 0 value, PWM signal inversion and frequency. Thermostatic control is turned off
              M106 P1 S1 I0 F500 H1 T45 ; set fan 1 value, PWM signal inversion and frequency. Thermostatic control is turned on

              1 Reply Last reply Reply Quote 0
              • undefined
                jay_s_uk
                last edited by 2 Jan 2021, 20:02

                Can you also post the tool config section?

                Owns various duet boards and is the main wiki maintainer for the Teamgloomy LPC/STM32 port of RRF. Assume I'm running whatever the latest beta/stable build is

                undefined 1 Reply Last reply 2 Jan 2021, 20:07 Reply Quote 0
                • undefined
                  deonholt @jay_s_uk
                  last edited by 2 Jan 2021, 20:07

                  @jay_s_uk thanks.

                  ; Tools
                  M563 P0 S"Right" D0 H1 ; define tool 0
                  G10 P0 S0 R0 X0 Y0 ; set tool 0 temperatures and offsets
                  M563 P1 S"Left" D1 H1 ; define tool 1
                  G10 P1 S0 R0 X0 Y0 ; set tool 0 temperatures and offsets

                  1 Reply Last reply Reply Quote 0
                  • undefined
                    dc42 administrators @deonholt
                    last edited by dc42 1 Feb 2021, 20:44 2 Jan 2021, 20:44

                    @deonholt said in UI remains at layer #2?:

                    I am busy with a print of 1089 layers high. It currently sits at 14.84mm and still says layer #2.
                    The problem is that the tool fan is set to start at layer #3. So it doesn't run. When I drag the slider to 100% is just goes back to 0% after a couple of seconds.

                    These are two separate faults:

                    • The tool fan is controlled by the slicer, so the fact that it doesn't turn on is nothing to do with the display showing layer 2. As you find that it won't stay on, I suspect the slicer is resetting the fan speed to zero at intervals. But please post your entire config.g file in case it is a problem with the configuration.
                    • The display being stuck at layer 2 is a problem I have seen before, and I think it may have been fixed in one of the 3.x releases. If you post the GCode file you are trying to print, I can simulate it and see if it has been fixed.

                    Duet WiFi hardware designer and firmware engineer
                    Please do not ask me for Duet support via PM or email, use the forum
                    http://www.escher3d.com, https://miscsolutions.wordpress.com

                    1 Reply Last reply Reply Quote 0
                    • undefined
                      Phaedrux Moderator @deonholt
                      last edited by 2 Jan 2021, 23:58

                      @deonholt said in UI remains at layer #2?:

                      Web Interface Version: 1.22.6

                      You should probably also update your DWC to 2.0.7 if you're going to stick with 2.05.1 for a while.

                      Post a sample gcode file.

                      Z-Bot CoreXY Build | Thingiverse Profile

                      undefined 1 Reply Last reply 3 Jan 2021, 03:28 Reply Quote 1
                      • undefined
                        deonholt @Phaedrux
                        last edited by 3 Jan 2021, 03:28

                        @Phaedrux Thank you. This is sliced with PrusaSlicer.
                        Here is a link to the file.
                        Thank you once again. I really appreciate your help. 👍

                        1 Reply Last reply Reply Quote 0
                        • undefined
                          Phaedrux Moderator
                          last edited by 3 Jan 2021, 06:29

                          There are some Z moves in your start and end code, try adding ; E to them so that the DWC picks up the E and assumes it's an extrusion move and ignores them as Z moves.

                          In the start code: G1 Z5 F5000 ; lift nozzle 5mm and G1 Z0.28 F240

                          In the end code: G1 Z20 F500 ; lower bed 20mm from current position

                          If that doesn't work, you can try splitting out the Z moves into separate macros at calling them with M98 P

                          Z-Bot CoreXY Build | Thingiverse Profile

                          1 Reply Last reply Reply Quote 1
                          4 out of 12
                          • First post
                            4/12
                            Last post
                          Unless otherwise noted, all forum content is licensed under CC-BY-SA