Volcano to Standard Nozzle: Heater Autotune Failure
-
PRINTER: Delta printer with Duet2 Wifi board and RepRap Firmware 3.2, Duet Wifi server version 1.25.
SITUATION: I was printing with a volcano nozzle and felt I could not tune in the Volcano to print consistently enough and decided to switch back to the standard nozzle. This was a dual configuration head so this seemed like a simple mechanical change. At the time I was running RepRap Firmware 2.05.
PROBLEM: When I autotuned the standard tip, the Autotune failed as the temperature would not come up to 205. I sent M307 H1 S205 to the controller.
THERMISTOR: Tulead NTC3950, 100K. Same as what ran with the volcano head and worked fine.
I read more and more and decided maybe the best thing was to update to the latest Firmware. I see a new heater algorithm was made in RepRap Firmware 3.2 (https://forum.duet3d.com/topic/19761/new-heater-tuning-algorithm?_=1610909943273)
Well, I get the same response from the autotune command. When I run the printer without autotuning the hotend then I get a failure which reads like "temperature is taking too long" error. Maybe I am missing something very simple??? Any ideas?
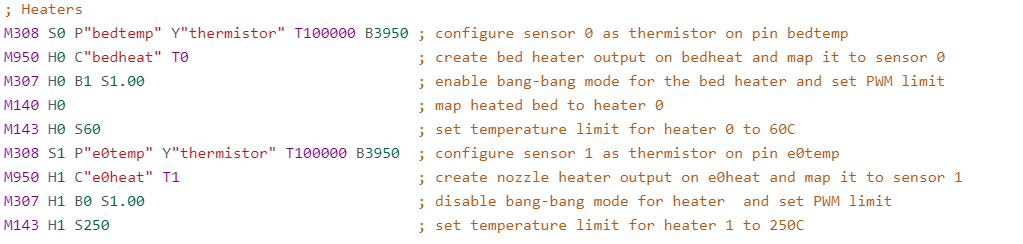
Here is my config.g heater configuration:
-
Photo of the hotend? It sounds like maybe the heat block is making contact somewhere it shouldn't and too much heat is being pulled away or the thermistor or heater isn't making good contact with the block. Same error across firmware versions so I'm thinking it's the machine.
-
The photo below shows the nozzle end, I routed the thermistor wires as far from the hot end as possible. I like where you are going, I often wondered if this is a mechanical problem but I can't see anything that hasn't worked before. I did notice the heater was a bit loose and I could move it with my finger so I tightened tightened it. I tried to heat it up and again, failure.
-
Your heat block is touching the heatsink. There should be a gap and the nozzle should be more in contact with the block. It's sticking out very far.
-
What Phaedrux said...for installing a V6 style heat block you are supposed to first install the nozzle, screw it all the way in and then back it out about 1/2 turn. Next you put the heat-break in the heater block and hand tighten it until it's against the nozzle. Lightly snug the nozzle against the heat break cold, screw the assembly into the heatsink and then once all done, heat the hotend up to the max print temperature you will use with it and tighten the nozzle.
After that is done, then do the PID tune after everything has cooled down completely.
-
-
Check out this v6 assembly guide
https://e3d-online.zendesk.com/hc/en-us/articles/360016355638-Lite6-Assembly
may not match your setup exactly, but it does show the proper way to fit the nozzle/block/heatbreak/heatsink
-
-
@jshelton Glad we could help.
