Multiple Objects Printed One at a Time Fail After the First
-
In config.g I have M376 H10 set to taper off bed mesh compensation by 10mm height
When setting up multiple objects to print in Cura using the "One at a time" special mode, the first item prints fine. But then for the second and subsequent items, the initial layer height is different than it was for the first object, so it doesn't stick to the bed properly and the object fails. It looks like the first layer of each subsequent object is just treated as the next layer in sequence. For example, if the first object had a total of 100 layers, then the next object will start at layer 101, and the bed mesh compensation doesn't apply anymore even though layer 101 is back at the build surface. At least that's my guess, because I can't explain it otherwise.
Is there a way to fix this issue? Or do I need to just stop using M376?
-
Bed compensation taper works on the height above the bed, so it should not be affected by printing parts one at a time.
-
@GoremanX said in Multiple Objects Printed One at a Time Fail After the First:
Is there a way to fix this issue? Or do I need to just stop using M376?
Can you verify that it prints correctly by printing the same gcode again but with M376 H0 to disable the taper?
-
you probably set your printer to relative moves and forgot about it .maybe its one of your homing macros .
add G90 to your start gcode in cura .(dont worry , extrusion stays relative) .
-
@hackinistrator Good suggestion! However the last line in homedelta.g is G90, and the slicer is set to absolute moves for this printer. I checked the gcode file, there's no G91 executed at any time during a print except when doing the initial homing before delta calibration, and then it switches right back to G90.
I'm about to run a test print to see if disabling M376 makes a difference
-
@GoremanX said in Multiple Objects Printed One at a Time Fail After the First:
I'm about to run a test print to see if disabling M376 makes a difference
If it doesn't work, it would be interesting to see the gcode snippet between the two parts.
-
This post is deleted! -
None of the objects in the print failed, but that may just be luck this time because I'm working with an initial layer height of 0.3mm on an 0.6mm nozzle rather than my typical 0.2mm on a 0.4mm nozzle.. Examining the parts, there's a very distinct difference in initial layer height between the first object and every other object. I tried to space them widely across the build surface so that they somewhat spanned the bed mesh probing area:

The very first object that was printed was the top-right one. In the following photo, it's on the left:

The difference is pretty obvious. And it's only between the first object and every other object. It doesn't get progressively worse with each object. It just changes and stays the same amount of "wrong" after the first object.
I checked the gcode file generated by Cura 4.8, and each object always starts at Z 0.3mm. There's never any variance. I measured each item, and the first one is in fact about 0.1mm shorter than the others.
I have my Z-probe height set to -0.075mm. It's a Duet Smart Effector. There is no baby-stepping applied. Bed mesh probing happens before every print job and is in effect during the entire print job. There's nothing in the gcode file that would disable it at any point. The difference in initial layer height is exactly the same for all the other objects, regardless of where they are on the build plate (my build plate has a slight tilt of +0.055mm to -0.055mm from top left to bottom right). The difference between the first and subsequent objects is always positive, never negative.
Contrary to my initial suspicions, the presence or absence of M376 makes no difference in these results.See follow-up post below -
In my previous posts, I stated that the presence or absence of M376 made no difference. I typed that while I had another print job going that DID have M376 enabled. Now that the job has finished, I can confirm that M376 does make a difference, it makes the effect I described above much worse.
Here's the layout of my objects as they were printed:

Note that I'm ignoring the smaller objects for this comparison, because they all had the same (crappy) initial first layer. The actual numbers above should be 1,2,3 and 7 since the 4th large object was printed second-last in the sequence. Also, they're not stuck to the build plate, I already peeled them off to examine them and then put them back in their place.And here's a shot of the underside of each of those objects:

That's REALLY bad and it's a wonder the last 3 stuck to the build plate at all. I barely touched them after the print and they popped right off, while the first one was very well stuck and required a lot of effort to remove.
The skirt around each object has the same issues; perfect for the first one, awful for all the rest. And this is exactly the same gcode file as my other test above, the only change was adding M376 S10 before this second batch.
So, to summarize: when printing multiple objects using "one at a time", the first object prints fine, and every subsequent object has its initial layer slightly taller than the first object. The issue is made worse when M376 is set
So... what am I doing wrong?
-
- Does it approach the XZ-0.3 initial height from below for the first object, and from above for the others?
- Perhaps the bed isn't fully heated when you start the first piece? In particular, if you use a glass bed then the top surface takes a few minutes to come up to temperature after the bed heater has reached temperature.
- Do you use a higher temperature for the first layer? If so, does the GCode allow time between objects for the hot end to reach that higher temperature again?
-
my config.g:
; Configuration file for Duet 3 (firmware version 3)
; executed by the firmware on start-up

; Power On
M80                                           ; Turn on secondary power supply (24v)

; General preferences

G90                                           ; send absolute coordinates...
M83                                           ; ...but relative extruder moves
M665 L600:600:600 R306 H570 B280              ; Set basic delta radius, diagonal rod length, printable radius and homed height, refined through config-override.g and auto-calibration before each print

; Network

M550 P"KosselXT"                         ; set hostname
M552 P0.0.0.0 S1                              ; enable network and acquire dynamic address via DHCP
M586 P0 S1                                    ; enable HTTP
M586 P1 S0                                    ; disable FTP
M586 P2 S1                                    ; enable Telnet

; Drives

M569 P0.0 S1 V100                             ; physical drive 0.0 goes forwards
M569 P0.1 S0 V46                              ; physical drive 0.1 goes backwards
M569 P0.2 S0 V46                              ; physical drive 0.2 goes backwards
M569 P0.3 S0 V46                              ; physical drive 0.3 goes backwards
M584 E0.0 X0.1 Y0.2 Z0.3                      ; set drive mapping
M350 X16 Y16 Z16 I1                           ; configure microstepping with interpolation for tower steppers
M350 E16 I1                                   ; configure microstepping with interpolation for extruder stepper
M92 X160.00 Y160.00 Z160.00 E685              ; set steps per mm
M566 X2400.00 Y2400.00 Z2400.00 E1800         ; set maximum instantaneous speed changes (mm/min)
M203 X18000.00 Y18000.00 Z18000.00 E3600      ; set maximum speeds (mm/min)
M201 X2000.00 Y2000.00 Z2000.00 E2000         ; set accelerations (mm/s^2)
M906 X1800 Y1800 Z1800 E500 I30               ; set motor currents (mA) and motor idle factor in per cent
M84 S30                                       ; Set idle timeout

; Axis Limits

M208 Z-1 S1                                   ; set minimum Z

; Endstops

M574 X2 S1 P"io1.in"                          ; configure active-high endstop for high end on X via pin P
M574 Y2 S1 P"io2.in"                          ; configure active-high endstop for high end on Y via pin P
M574 Z2 S1 P"io3.in"                          ; configure active-high endstop for high end on Z via pin P

; Z-Probe

M558 P8 R0.2 C"io0.in+io0.out" H5 F900 T9000  ; set Z probe type to effector and the dive height + speeds
G31 P100 X0 Y0 Z-0.075                        ; set Z probe trigger value, offset and trigger height
M557 R220 S80                                 ; define mesh grid

; Heaters

M308 S2 P"temp2" Y"thermistor" T100000 B4138 A"Bed Heater" ; configure sensor S as thermistor on pin P
M950 H0 C"out2" T2                                         ; create bed heater output on C and map it to sensor T
M307 H0 B1                                                 ; define heater H
M140 H0                                                    ; map heated bed to heater H
M143 H0 S150 A0                                            ; set temperature limit S for bed

M308 S1 P"temp1" Y"thermistor" T500000 B4723 C1.196220e-7 A"Nozzle Heater" ; configure sensor S as thermistor on pin P
M950 H1 C"out1" T1                                         ; create nozzle heater output on C and map it to sensor T
M307 H1 B0                                                 ; define heater H
M143 H1 S500 A0                                            ; set temperature limit to S for nozzle

M308 S0 P"temp0" Y"thermistor" T100000 B4138 A"Chamber Monitor" ; configure sensor S as thermistor on pin P

M308 S3 P"spi.cs0" Y"thermocouple-max31856" A"Chamber Heaters" T"k" F60 ; configure sensor S as type Y on pin P (2 connected in parallel)
M950 H2 C"out3" T3                                         ; create chamber heater output on C and map it to sensor T
M307 H2 B1                                                 ; define heater H
M141 H2                                                    ; map chamber to heater H
M143 H2 S500 A0                                            ; set temperature limit for chamber to S

M308 S4 Y"drivers" A"Drivers"                              ; configure sensor S as temperature warning and overheat flags on the TMC2660 on Duet
M308 S5 Y"mcu-temp" A"MCU"                                 ; configure sensor S as MCU temperature monitor

; Fans

M950 F0 C"out5" Q500                              ; create fan F on pin C and set its frequency Q
M106 P0 S0 H-1 C"Effector Output"                 ; set fan P value. Thermostatic control is disabled

M950 F1 C"out7" Q500                              ; create fan F on pin C and set its frequency Q
M106 P1 H1 T45 C"Hotend"                          ; set fan P value. Thermostatic control enabled at temp T

M950 F2 C"!out4" Q2500                            ; create fan F on pin C (!inverted) and set its frequency Q
M106 P2 H4:5 L0.50 X1 B0.3 T35:50 C"Electronics"  ; set fan P value. Thermostatic control enabled at temp T, lowest setting is L

M950 F3 C"out6"                                   ; create fan F on pin C
M106 P3 H1 T45 L255 C"Fume Filter"                ; set fan P value. Thermostatic control enabled at temp T, lowest setting is L

M950 F4 C"out8" Q500                              ; create fan F on pin C and set its frequency Q
M106 P4 S0 H-1 L0.35 C"Air Pump"                  ; set fan P value. Thermostatic control is disabled, lowest setting is L

; Tools

M563 P0 D0 H1 F4 S"Hotend"                        ; define tool P, associated with drive D, heater H and fan F, name it S
G10 P0 X0 Y0 Z0 R0 S0                             ; set tool P axis offsets and set active and standby temperatures to S
M591 D0 P3 C"io4.in" S1 R10:190 L25.25 E3.0 A1    ; configure magnetic filament monitor for tool D on pin C

; Custom printing settings

M207 S1.2 F3600                                   ; firmware retraction
M376 H10                                          ; taper off bed compensation by Hmm height
M572 D0 S0.015                                     ; pressure advance

; Miscellaneous
M501                                              ; load saved parameters from non-volatile memory
M911 S9 R11 P"M913 X0 Y0 G91 M83 G1 Z3 E-5 F1000" ; set voltage thresholds and actions to run on power loss
T0                                                ; select first tool
My homedelta.g
; homedelta.g
; called to home all towers on a delta printer
;
G91                           ; relative positioning
G1 H1 X1305 Y1305 Z1305 F9000 ; move all towers to the high end stopping at the endstops (first pass)
G1 H2 X-5 Y-5 Z-5 F1800       ; go down a few mm
G1 H1 X10 Y10 Z10 F360        ; move all towers up once more (second pass)
G1 Z-5 F6000                  ; move down a few mm so that the nozzle can be centred
G90                           ; absolute positioning
;G1 X0 Y0 F6000                ; move X+Y to the centre
My bed.g:
M561 ; clear any bed transform
G28  ; home all towers
; Probe the bed at 6 peripheral and 3 halfway points, and perform 6-factor auto compensation
; Before running this, you should have set up your Z-probe trigger height to suit your build, in the G31 command in config.g.
G30 P0 X0 Y249.9 H0 Z-99999
G30 P1 X216.42 Y124.95 H0 Z-99999
G30 P2 X216.42 Y-124.95 H0 Z-99999
G30 P3 X0 Y-249.9 H0 Z-99999
G30 P4 X-216.42 Y-124.95 H0 Z-99999
G30 P5 X-216.42 Y124.95 H0 Z-99999
G30 P6 X0 Y124.9 H0 Z-99999
G30 P7 X108.17 Y-62.45 H0 Z-99999
G30 P8 X-108.17 Y-62.45 H0 Z-99999
G30 P9 X0 Y0 H0 Z-99999 S6
And the gcode file I've been printing (too big to upload to the forum):
https://drive.google.com/file/d/1I3JV5Sjfe4_em5ZofXt34pdeCTazWiYy/view?usp=sharingAnd before anyone comments on the g3 gcodes in the file, I use Arc Welder to convert arc segments to true arcs. This is not the cause of my issues, I've had this effect happen even when not using Arc Welder.
-
@dc42 said in Multiple Objects Printed One at a Time Fail After the First:
- Does it approach the XZ-0.3 initial height from below for the first object, and from above for the others?
It sets the height to Z 0.5 outside the object's area, moves the nozzle to the print position, then lowers to 0.3 and begins to print. It does this for every object, based on what I've seen in the gcode file and from what I've witnessed while observing.
- Perhaps the bed isn't fully heated when you start the first piece? In particular, if you use a glass bed then the top surface takes a few minutes to come up to temperature after the bed heater has reached temperature.
If that were the case, wouldn't every subsequent object have more squish on the first layer, not less? In any case, for this most recent test, I had the printer sitting at printing temperature for over 10 minutes before actually starting the print.
- Do you use a higher temperature for the first layer? If so, does the GCode allow time between objects for the hot end to reach that higher temperature again?
Exact same temperature throughout the entire print. I do have the calibration and probing temperature set to 170 to prevent damage to the build surface, but all actual printing occurs at 250c for this particular job and never deviates. And again, if the nozzle was colder for the first object, wouldn't every other object have more squish, not less? Also, I see no difference throughout the course of the first layer on the first object to suggest that the nozzle is changing temperature. That first layer happens very slowly, like 25mm/s, and it's very consistent, even when I print very large objects with very large first layers.
-
It's hard to predict what thermal expansion will do between one print and the next. Perhaps you can do a single G30 probe before each print, somewhere away from all the printed objects? Although that won't help if the shape of the bed is changing.
Also worth trying:
- Probe 3/4 of the bed using G29
- Print the first part (outside the 3/4 that you probed)
- Then probe the same 3/4 of the bed
- Compare the height maps
-
@dc42
omg I just spent the entire day on this and I'm sick of it. Used up a crapton of filament, too. But I think I finally figured out what's happening.I tried printing countless batches of rectangular strips in both "One at a time" and "All at once" modes, of various heights and sizes. For the life of me, I could not get it to fail. Sometimes up to 42 strips per job, just to try to get it to fail. Every initial layer on every object was perfect, every time (how many people complain about that?
 )
)Finally, while looking at the DWC status screen for the millionth time, it dawned on me... the firmware was tracking layers differently with my tests vs the actual print job where this issue kept happening (and which I can still get to fail every time).
So here's what I figured out:
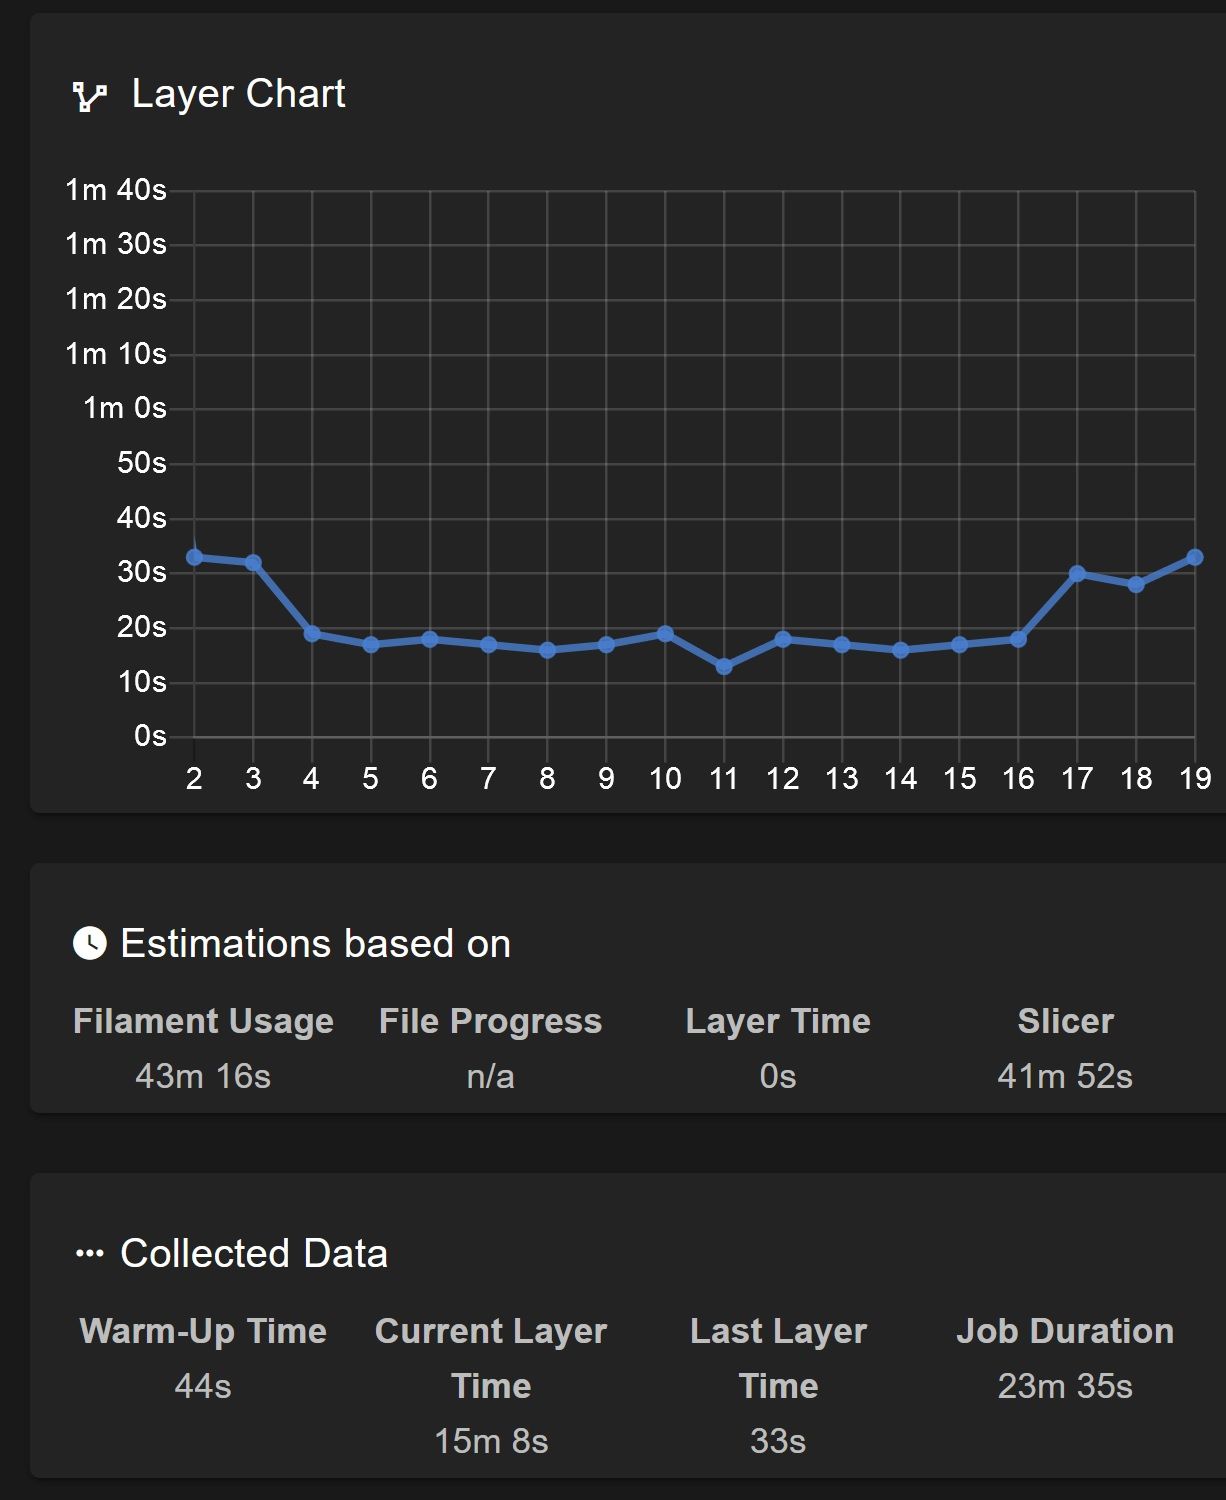
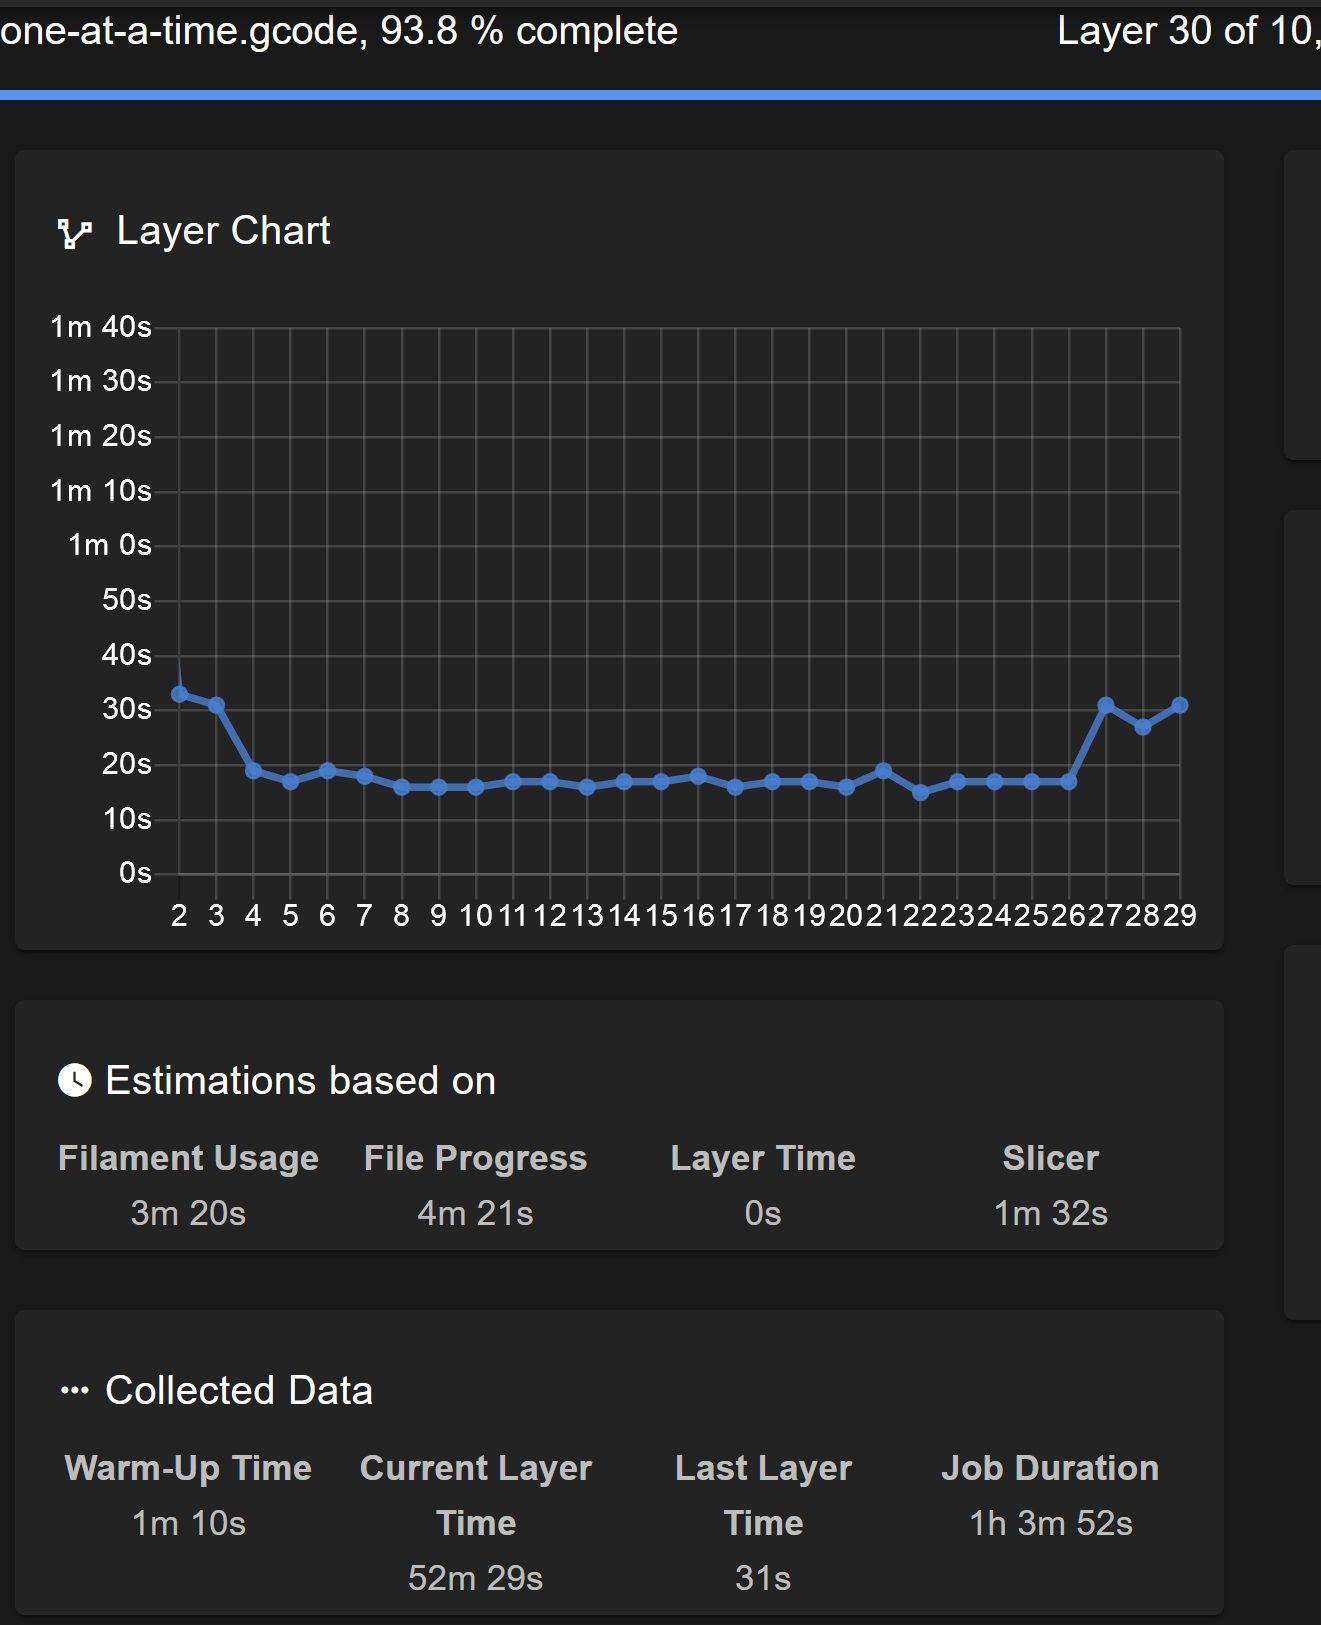
In "One at a time" mode, when all the objects have the same number of layers, then the firmware only reports up to that number of layers and then every other object is reported as being part of the last layer of the first object. For example, if each object has 20 layers of 0.3mm each, then the firmware reports layers (1 of 20, 2 of 20, etc) up to 20 of 20, and every other object after the first is reported as part of that layer 20 of 20. DWC continues to display that last layer constantly so it ends up looking like the never-ending layer.

However, if the objects in the file have a varying number of layers (like for example, the gcode file I referenced above), then the firmware tracks layers up to the top of the shortest object (ie. 10 of 10), and then continues tracking layers beyond that (11 of 10, 12 of 10, 13 of 10, etc) until it reaches the number of layers of the tallest object in the file. It doesn't matter if the first object printed is the shortest one or not, it still reports as high as the tallest object. In my tests, it seemed to stop reporting at layer 30 of 10, which in this case was the top layer of the first and tallest object. At that point, every subsequent layer just gets reported as part of layer 30. But that's still not what screws up the initial layer height on every subsequent object.

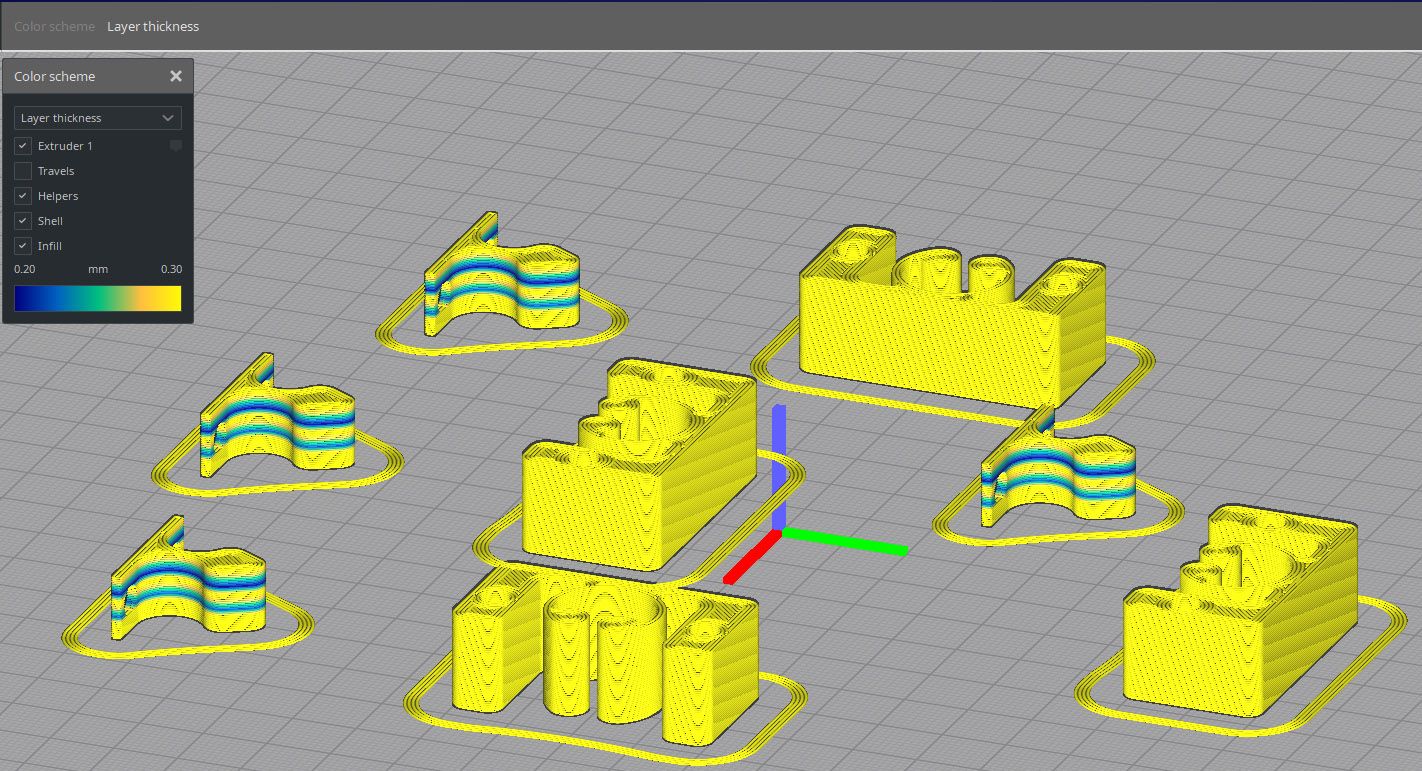
The gcode I posted above has an extra quirk. Not every object in the file has the same layer thickness. When I'm printing something functional that doesn't need to look pretty, I use Cura's "Use Adaptive Layers" feature, which varies layer thickness depending on the features within each layer. Since the smaller pieces in my gcode file have vertical holes, the layers where those holes are were rendered at less than 0.3mm thickness (to a minimum of 0.2mm), but the rest of those objects were rendered with 0.3mm thickness. The larger objects did not have vertical holes, so they were rendered entirely with 0.3mm layers. And I think THAT'S what screws up the initial layer height on subsequent objects.

In this case, a large object is being printed first, which only has 0.3mm layers. My conjecture is that at some point, when printing a layer that's at the same height as a shorter layer on another object, the nozzle moves the correct Z+0.3 (it's pretty obvious to tell by looking at the print), but the firmware counts it as less than that, or an average of the two, or some other form of rounding error is happening. Either way, somehow it ends up losing track of where it's really at, causing it to come down 0.XXmm too high when laying down the initial layer for the next object. It doesn't look like this error stacks between objects, it's probably something in the initial calculation that results in a one-time error after the first object that carries through the rest of the print job. I count about 8 layers in each small object that are less than 0.3mm, which would add up to like 0.5mm or so. But the offset on the subsequent objects doesn't seem to be that big.
In any case, I think I'm done testing this right now.
tl;dr - don't use Adaptive Layers when setting up multiple objects to print One At A Time. Would be nice if the layer reporting in RRF for multiple objects printed One At A Time was fixed to reflect reality.
Also, there's some weirdness in layer reporting when printing a single object with Adaptive Layers. It seems to report non-existent layers as 0 seconds, as if to force an assumption of equal layer heights for the entire object even if that's not the case.
-
@GoremanX thanks for your investigation. I think @dc42 and @chrishamm will need to look at this to work out how to get the layers reporting correctly.
Ian
-
@GoremanX, that's an interesting analysis, but it doesn't explain what's causing the issue. The layer count that RRF maintains is only used for reporting processes and estimation of remaining print time. It is not used by the motion control system.
-
@GoremanX said in Multiple Objects Printed One at a Time Fail After the First:
omg I just spent the entire day on this and I'm sick of it.
I feel with you!
You said you've tried to print with M376 ON and OFF, but did you try to set the taper level above the highest part?
That way M376 would still be valid while moving on to the next part. -
@o_lampe said in Multiple Objects Printed One at a Time Fail After the First:
@GoremanX said in Multiple Objects Printed One at a Time Fail After the First:
omg I just spent the entire day on this and I'm sick of it.
I feel with you!
You said you've tried to print with M376 ON and OFF, but did you try to set the taper level above the highest part?
That way M376 would still be valid while moving on to the next part.M376 doesn't get turned on and turned off during a print, it remains "valid" throughout. if the current Z height is below the taper height, then the appropriate fraction of bed compensation will be used. If it's above the taper height, it won't be used.
-
@GoremanX thanks for the report of the layer heights in sequential printing not being reported correctly.
As @dc42 says - that reporting issue is not the root cause of the issue you are seeing, however I would like to capture it, please can you upload an example gcode file (preferably 2, one with and one without the additional variable layer height issue)
-
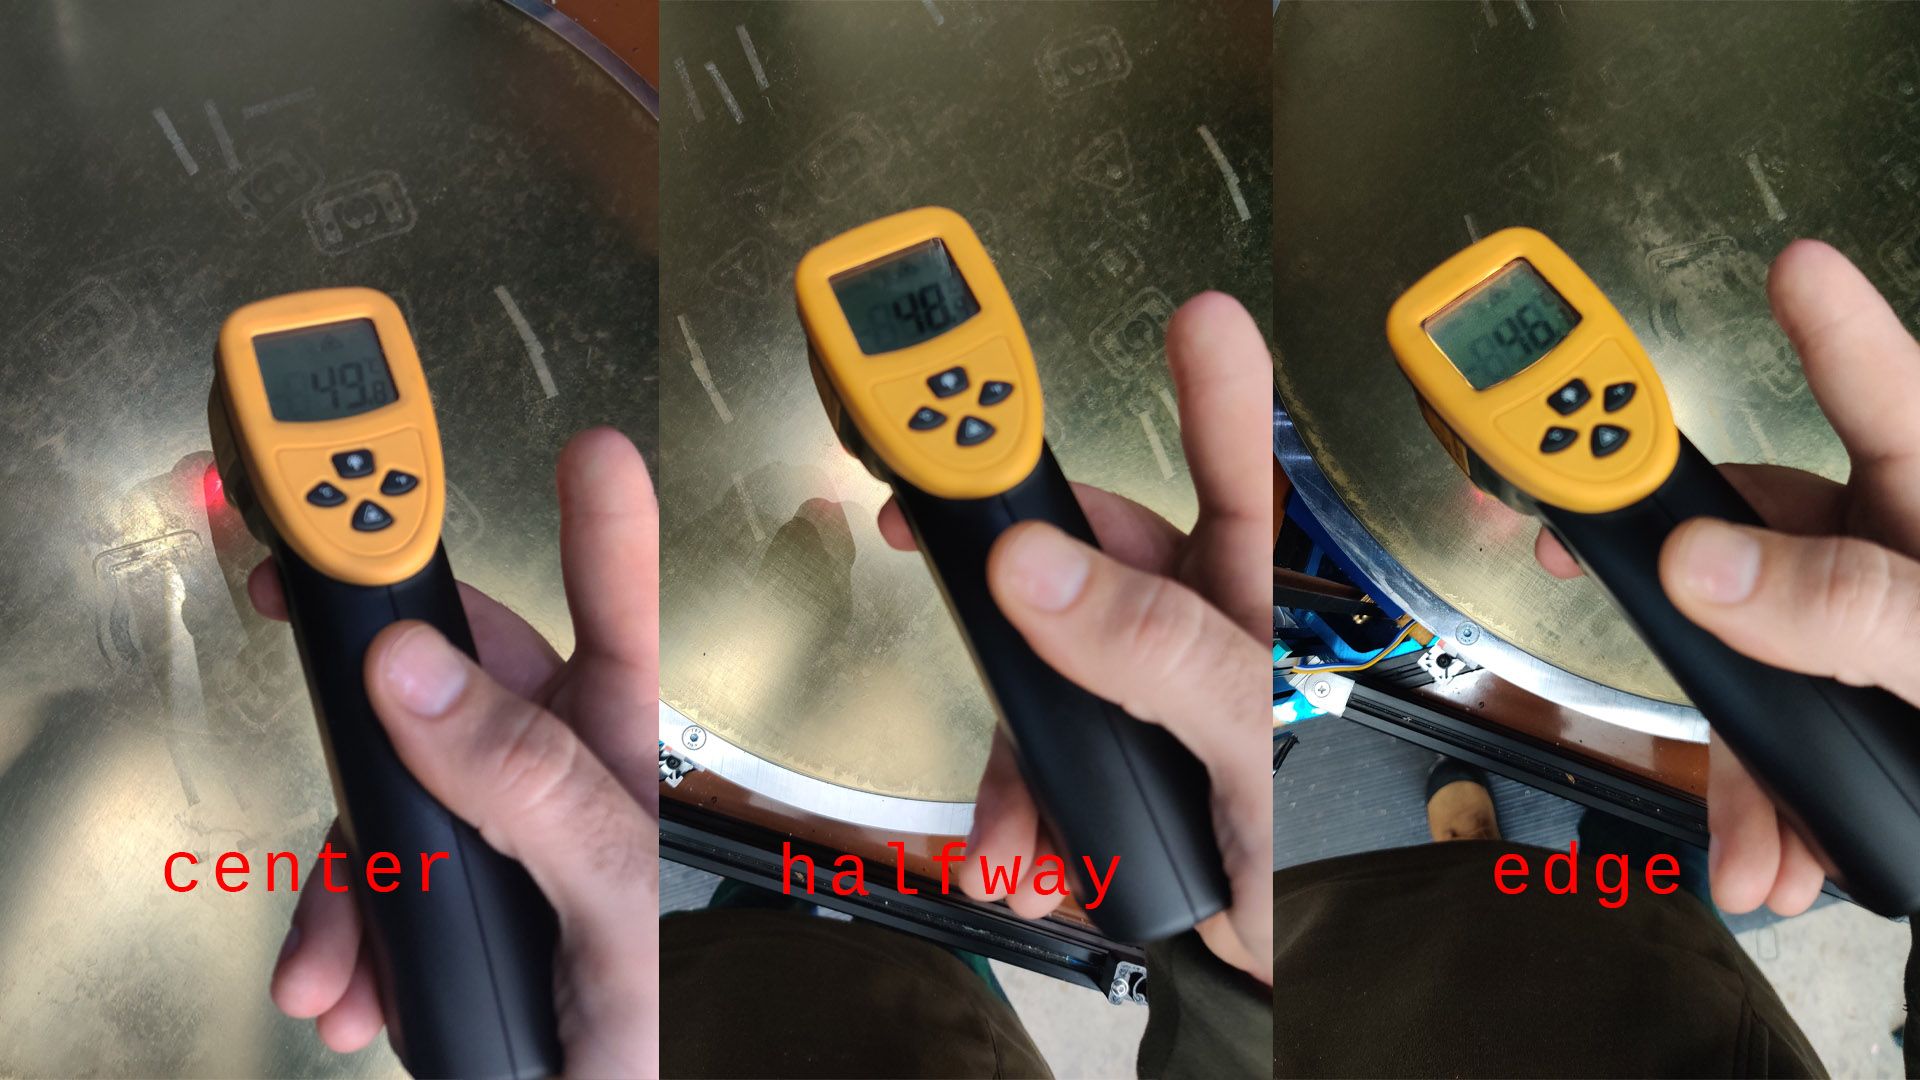
@dc42 Well then I'm afraid I can't help you, I'm done testing this. The gcode file I shared earlier causes every subsequent item in the print to start higher than the first. That's all there is to it. I printed over a dozen tests, some with way more items that were larger and took longer to print, all with Adaptive Layers turned off, and they all turned out fine. But that one I posted above shows the issue every time. I don't think the suggestions about thermal expansion apply here:

As far as I'm concerned, I've solved this enough for my needs: variable layer heights on multiple objects printed one at a time breaks the expected behavior. I won't use it. 8 hours of my life and half a reel of filament on this already. No thank you.