Anycubic Predator Delta effector tilt
-
It's been a long time since i've posted here, I took some time off from tweaking my delta which still is not running correctly.
It has a lot of effector tilt.
I followed this link and measured all of the components. Everything is in order as far as I can measure.
I'm still left with this:
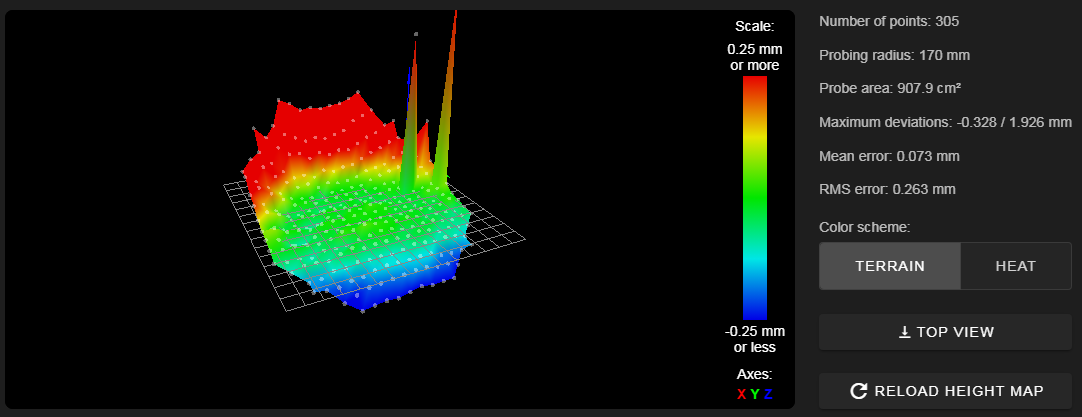
and I'm still not quite sure whats left to do about it. Delta has a smart effector, duet2 wifi, mosquito hot end, bond tech extruder, couple other things. I've made fixtures to align the magballs to be the same distance from eachother and from carriage to carriage and the same on the effector. I also made a fixture for the same rod length, neither seemed to affect the mesh map. Just got done completely disassembling the carriage roller assemblies to find the factory put washers where there shouldnt be and were missing washers where there should be. Once solved, the map still looked exactly the same. Any ideas?


-
what factor calibration are you using?
try 8 or 9 and see if that improves it.
-
Sorry for the delay. Been working on the printer. You were correct, 9 factor helped a lot. I found a few other things and corrected them. Most of all, I found my bed.g file did not include a M500 command so it wasnt actually uploading and using the results. As soon as I did that then ran g29, the mesh bed was very nice.
I have a few other problems I'm hoping some people can help me with perhaps. My filament runout sensor is not registering anything through duet webcontrol or my paneldue. I wired it according to the diagram for duet2wifis (gnd, pwr, signal) and config'ed (M591 D0 P2 C4 S1 at the end) and when I stick filament into the sensor an LED on the board turns on and off as filament enters or leaves but nothing happens in webcontrol.
I'm running RR3 and tried M591 P2 C"e0stop" S1 D0 as well which also did nothing. The board is obvs receiving signal. Perhaps how I'm writting the config?
Also, I think i need to calibrate MCU temps or something because during a benchy print, they hit 45 C. The board didnt turn off though so I'm not sure if theres a fail safe.
I upgraded my fan to a really huge blower and pointed it at the underside of the duet board (blows air over stepper drivers and MCU, lots of air at 0.15amps) and the temps are still around 32-33 C all the time. Duet webcontrol says max is 33.2.... not sure whats up but concerned. -
45C isn't anything to be worried about. 85c maybe.
But you can calibrate the sensor to see how accurate it actually is.
https://duet3d.dozuki.com/Wiki/Calibrating_the_CPU_temperatureWhat firmware versions specifically are you using? Which filament sensor is it specifically? Which port do you have it connected to?
-
RR3.1.1
3 wire low signal when filament present microswitch
E0 stop connector -
M591 D0 P2 C"e0stop" S1should do it.What are you expecting it to do? It's only monitored during a print. Have you tried starting a print and removing the filament?
Can you send M98 P"config.g" and post the results along with your current config.g?
-
@Phaedrux said in Anycubic Predator Delta effector tilt:
rrent confi
ok that worked. I tried M591 D0 P2 C"e0stop" S1 first, but I put it in the endstop category. that didnt work.
I put it at the end in custom settings and that paused the print and gave a message filament out which is what i wanted.
here's my config for posterity or if you see anything that stands out as being incorrect.
M98 P"config.g"
HTTP is enabled on port 80
FTP is disabled
TELNET is disabled
Warning: Heater 0 appears to be over-powered. If left on at full power, its temperature is predicted to reach 365C
Warning: Heater 1 appears to be over-powered. If left on at full power, its temperature is predicted to reach 489C


; General preferences
G90                                                ; send absolute coordinates...
M83                                                ; ...but relative extruder moves
M550 P"Anycubic Predator"                          ; set printer name
M665 L441.014:441.014:441.014 R229.410 H410.221 B185.0 X-0.097 Y0.071 Z0.000 ; Set delta radius, diagonal rod length, printable radius and homed height
M666 X-0.175 Y0.253 Z-0.078 A-0.22 B0.22           ; put your endstop adjustments here, or let auto calibration find them

; Network
M552 S2 P"anycubicp"                               ; enable accesspoint anycubicp
M586 P0 S1                                         ; enable HTTP
M586 P1 S0                                         ; disable FTP
M586 P2 S0                                         ; disable Telnet
M575 P1 S1 B57600				   ; sets serial comms parameters

; Drives
M569 P0 S1                                         ; physical drive 0 goes forwards
M569 P1 S1                                         ; physical drive 1 goes forwards
M569 P2 S1                                         ; physical drive 2 goes forwards
M569 P3 S1                                         ; physical drive 3 goes forwards
M584 X0 Y1 Z2 E3                                   ; set drive mapping
M350 X16 Y16 Z16 E16 I1                            ; configure microstepping with interpolation
M92 X80.00 Y80.00 Z80.00 E406.90                   ; set steps per mm
M566 X1200.00 Y1200.00 Z1200.00 E1200.00           ; set maximum instantaneous speed changes (mm/min)
M203 X18000.00 Y18000.00 Z18000.00 E1200.00        ; set maximum speeds (mm/min)
M201 X1000.00 Y1000.00 Z1000.00 E1000.00           ; set accelerations (mm/s^2)
M906 X1000 Y1000 Z1000 E800 I30                    ; set motor currents (mA) and motor idle factor in per cent
M84 S30                                            ; Set idle timeout

; Axis Limits
M208 Z0 S1                                         ; set minimum Z

; Endstops
M574 X2 S1 P"xstop"                                ; configure active-high endstop for high end on X via pin xstop
M574 Y2 S1 P"ystop"                                ; configure active-high endstop for high end on Y via pin ystop
M574 Z2 S1 P"zstop"                                ; configure active-high endstop for high end on Z via pin zstop

; Z-Probe
M558 P8 C "zprobe.in+zprobe.mod" R0.4 F2500 T15000 H5 ; set Z probe type to switch and the dive height + speeds
G31 P100 X0 Y0 Z-0.2                            ; set Z probe trigger value, offset and trigger height
M557 R170 S70                                      ; define mesh grid

; Heaters
M308 S0 P"bedtemp" Y"thermistor" T100000 B4138     ; configure sensor 0 as thermistor on pin bedtemp
M950 H0 C"bedheat" T0                              ; create bed heater output on bedheat and map it to sensor 0
M143 H0 S120                                       ; set temperature limit for heater 0 to 120C
M307 H0 B0 S1.00                                   ; disable bang-bang mode for the bed heater and set PWM limit
M140 H0                                            ; map heated bed to heater 0
M308 S1 P"e0temp" Y"thermistor" T100000 B3950      ; configure sensor 1 as thermistor on pin e0temp
M950 H1 C"e0heat" T1                               ; create nozzle heater output on e0heat and map it to sensor 1
M143 H1 S280                                       ; set temperature limit for heater 1 to 280C
M307 H1 B0 S1.00                                   ; disable bang-bang mode for heater  and set PWM limit

; Fans
M950 F0 C"fan0" Q500                               ; create fan 0 on pin fan0 and set its frequency
M106 P0 S0 H-1                                     ; set fan 0 value. Thermostatic control is turned off
M950 F1 C"fan1" Q500                               ; create fan 1 on pin fan1 and set its frequency
M106 P1 S1 H1 T45                                  ; set fan 1 value. Thermostatic control is turned on

; Tools
M563 P0 D0 H1 F0                                   ; define tool 0
G10 P0 X0 Y0 Z0                                    ; set tool 0 axis offsets
G10 P0 R0 S0                                       ; set initial tool 0 active and standby temperatures to 0C

; Custom settings are not defined
M591 D0 P2 C"e0stop" S1                            ; activate filament runout sensor

; Miscellaneous
M911 S10 R11 P"M913 X0 Y0 G91 M83 G1 Z3 E-5 F1000" ; set voltage thresholds and actions to run on power loss
M501						   ; Allows stored parameters to be read
not sure whats up with the heaters appearing overpowered. I havent had them overshoot yet.
I also have a blobbing and light stringing at layer changes and retraction points issue that Ive been trying to get rid of with retraction, temps or pressure advance. Doing tests for a bit but so far not much luck.
-
@gperman said in Anycubic Predator Delta effector tilt:
not sure whats up with the heaters appearing overpowered. I havent had them overshoot yet.
It's just telling you how hot it thinks the heaters could get in a runaway situation.
@gperman said in Anycubic Predator Delta effector tilt:
I also have a blobbing and light stringing at layer changes and retraction points issue that Ive been trying to get rid of with retraction, temps or pressure advance. Doing tests for a bit but so far not much luck.
Would need more details on your extruder to be of much help.
-
All genuine. Mosquito w/0.4 tool steel nozzle. Bondtech BMG (flying extruder). Capricorn 1.75mm bowden tube (190mm from extruder to mosquito top entry)
Standard chinese stepper that came with the Anycubic Predator.
currently on hatchbox pro PLA that sits in a desiccant filled bucket. Putting a food dehydrator together to dry rolls if needed.
-
What retraction and pressure advance settings?
-
M572 D0 S0.09 right now.
retraction:
6mm length
80mm/s -
Photos of example prints?
Tool steel nozzles can be extra tricky.
-


that and they're relatively lumpy which is my next trick I have to tackle.
hatchbox PLA seems to like the higher temps so i'm going to stick to the 220 area. was printing at 190...
-
Looks like some lifting on the corners. Needs more cooling?
And yeah higher temps with a steel nozzle to keep the plastic temp at the tip up.
-
I’ll give that a try. I need to print a slightly better fan shroud as well.