delta smart effector hightmap mess
-
Im building a delta printer right now using a duet wifi 2 and smart effector running rrf3.
set my z0 tested g29 on a spare glass bed before using my flexible alu one because it didn't arrive at that point and this is the result
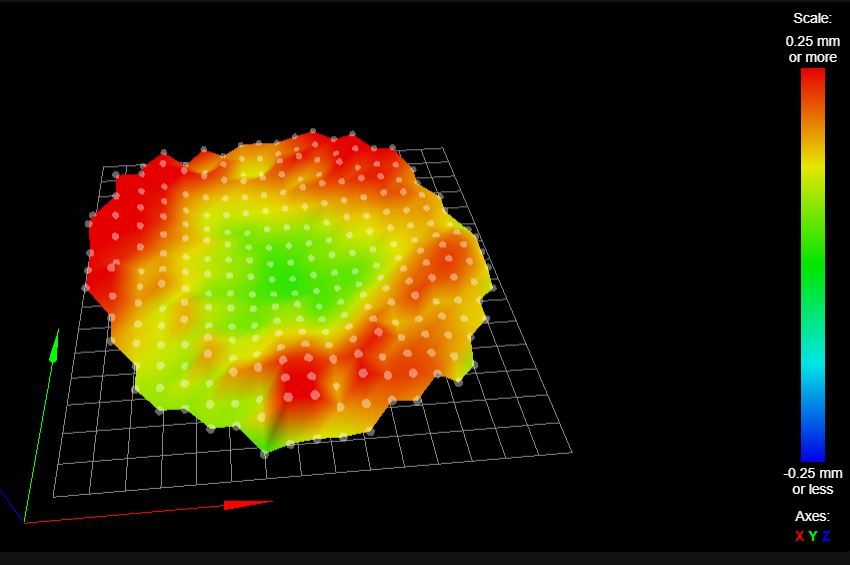
looks pretty good to meso i installed my other printbed when it arrived deleted HeightMap.csv restarted the printer and used g29 again to see this
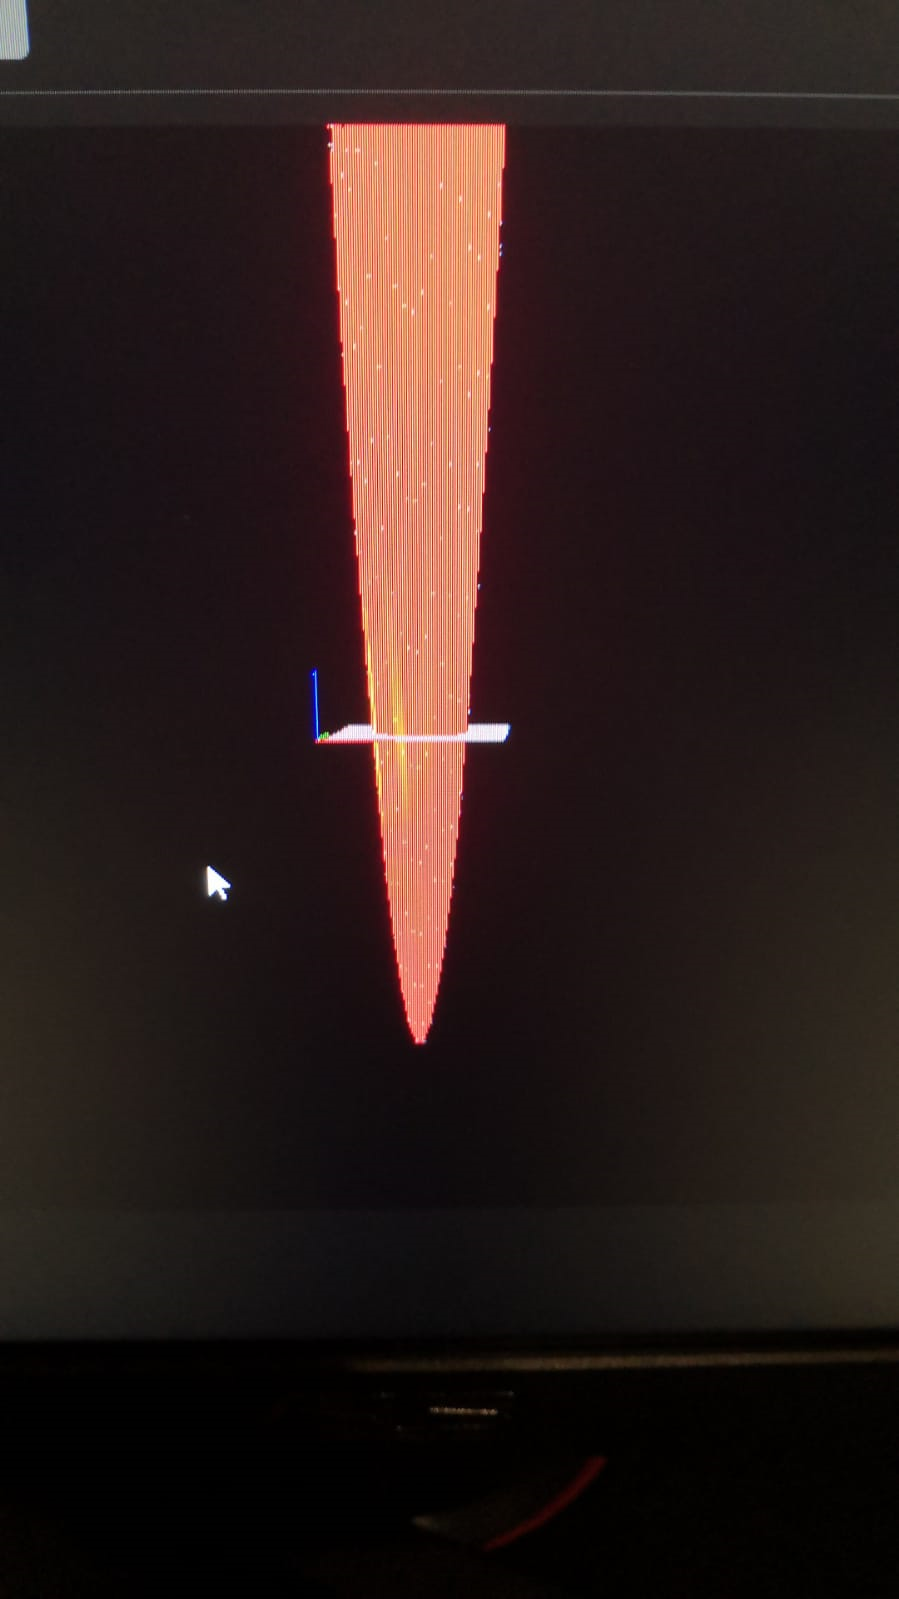
i thought to my self well maybe it has really a lot of warping or something and i forgot to set the new z0 so i went back to the glass bed i probed before deleted HeightMap.csv restarted and it looks also like a mess now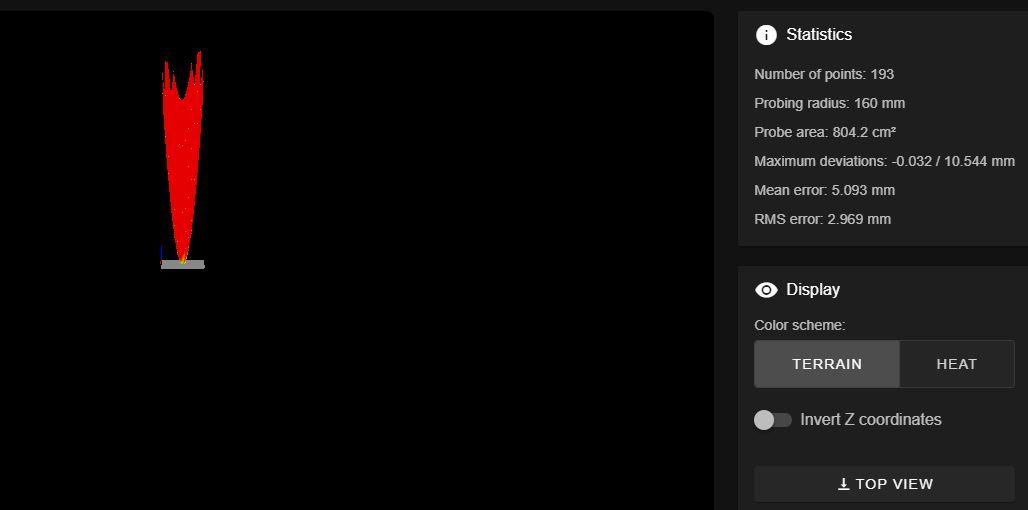
i tryed a lot of different setting for the probe on the smart effector but cant seem to find a solution maybe its just busted somehow.
the other thing i noticed is that i cant set a custom sensitivity using
M672 S105:aaa:bbbbut resetting it
M672 S131:131works fine and flashes 5 times
; Configuration file for Duet WiFi (firmware version 3) ; executed by the firmware on start-up ; ; generated by RepRapFirmware Configuration Tool v3.2.2 ; General preferences G90 ; send absolute coordinates... M83 ; ...but relative extruder moves M550 P"Delta" ; set printer name M665 R190 L440.35 B190 H415 ; Set delta radius, diagonal rod length, printable radius and homed height M666 X0 Y0 Z0 ; put your endstop adjustments here, or let auto calibration find them ; Network M552 S1 ; enable network M586 P0 S1 ; enable HTTP M586 P1 S0 ; disable FTP M586 P2 S0 ; disable Telnet ; Drives M569 P0 S1 ; physical drive 0 goes forwards M569 P1 S1 ; physical drive 1 goes forwards M569 P2 S1 ; physical drive 2 goes forwards M569 P3 S0 ; physical drive 3 goes forwards M584 X0 Y1 Z2 E3 ; set drive mapping M350 X32 Y32 Z32 E32 I0 ; configure microstepping without interpolation M92 X320 Y320 Z320 E812.5 ; set steps per mm M566 X1200.00 Y1200.00 Z1200.00 E1200.00 ; set maximum instantaneous speed changes (mm/min) M203 X18000.00 Y18000.00 Z18000.00 E1200.00 ; set maximum speeds (mm/min) M201 X1000.00 Y1000.00 Z1000.00 E1000.00 ; set accelerations (mm/s^2) M906 X2000 Y2000 Z2000 E1200 I30 ; set motor currents (mA) and motor idle factor in per cent M84 S30 ; Set idle timeout ; Axis Limits M208 Z0 S1 ; set minimum Z ; Endstops M574 X2 S1 P"xstop" ; configure active-high endstop for high end on X via pin xstop M574 Y2 S1 P"ystop" ; configure active-high endstop for high end on Y via pin ystop M574 Z2 S1 P"zstop" ; configure active-high endstop for high end on Z via pin zstop ; Z-Probe M558 P8 C"zprobe.in+zprobe.mod" X0 Y0 Z0 H35 R0.4 F1200 T4500 ; Set Z probe type to unmodulated, the axes for which it is used and the probe + travel speeds G31 P100 X0 Y0 Z-0.1; Set Z probe trigger value, offset and trigger height M557 R160 S20 ; Define mesh grid ;M672 S105:25:255 ;M672 S105:50:255 ;M558 P8 C"zprobe.in+zprobe.mod" R0.4 H5 F1200 T6000 ; set Z probe type to effector and the dive height + speeds ;G31 P100 X0 Y0 Z-0.05 ; set Z probe trigger value, offset and trigger height ;M557 R190 S20 ; define mesh grid ;Heatbed M308 S0 P"bedtemp" Y"thermistor" T100000 B4300 C0 R4700 ; configure sensor 0 as thermistor on pin bedtemp M950 H0 C"bedheat" T0 ; create bed heater output on bedheat and map it to sensor 0 M307 H0 A137.8 C533.3 D1.5 V24.3 B0 ; disable bang-bang mode for the bed heater and set PWM limit M140 H0 ; map heated bed to heater 0 M143 H0 S110 ; set temperature limit for heater 0 to 110C ;Hotend M308 S1 P"e1temp" Y"thermistor" T100000 B4725 C7.06e-8 ; configure sensor 1 as thermistor on pin e1temp M950 H1 C"e0heat" T1 ; create nozzle heater output on e0heat and map it to sensor 1 M307 H1 B0 S1.00 ; disable bang-bang mode for heater and set PWM limit M143 H1 S285 ; set temperature limit for heater 1 to 285C ; Fans M950 F0 C"fan0" Q500 M106 P0 C"Hotend" S0 H1 T45 ; set fan 0 name and value. Thermostatic control is turned on M950 F1 C"fan1" Q500 ; create fan 1 on pin fan1 and set its frequency M106 P1 C"Part Cooling" S0 H-1 ; set fan 1 value. Thermostatic control is turned off M950 F2 C"fan2" Q500 ; create fan 2 on pin fan2 and set its frequency ; Tools M563 P0 D0 H1 F0 ; define tool 0 G10 P0 X0 Y0 Z0 ; set tool 0 axis offsets G10 P0 R0 S0 ; set initial tool 0 active and standby temperatures to 0C ; Miscellaneous M575 P1 S1 B57600 ; enable support for PanelDue M106 P2 C"LED" S1 H-1 ; LED Light -
Can you provide the results of M122 and M98 P"config.g" please?
G31 P100 X0 Y0 Z-0.1;You've got two spaces after the G31. Not sure if that will be a problem or not.M558 P8 C"zprobe.in+zprobe.mod" X0 Y0 Z0X0 Y0 Z0 is no longer used so remove those. -
i got rid of x0 y0 z0 and the extra space didn't make a difference, here are my M98 and M122 P"config.g"
M98 P"config.g"
HTTP is enabled on port 80
FTP is disabled
TELNET is disabled
M122 P"config.g" === Diagnostics === RepRapFirmware for Duet 2 WiFi/Ethernet version 3.2 running on Duet WiFi 1.02 or later Board ID: 08DLM-996RU-N85T0-6J9FL-3SD6M-1SSMN Used output buffers: 3 of 24 (14 max) === RTOS === Static ram: 23460 Dynamic ram: 72536 of which 60 recycled Never used RAM 16024, free system stack 101 words Tasks: NETWORK(ready,193) HEAT(blocked,307) MAIN(running,472) IDLE(ready,19) Owned mutexes: WiFi(NETWORK) HTTP(MAIN) === Platform === Last reset 00:11:55 ago, cause: software Last software reset at 2021-03-19 23:14, reason: User, GCodes spinning, available RAM 16060, slot 0 Software reset code 0x0003 HFSR 0x00000000 CFSR 0x00000000 ICSR 0x0041f000 BFAR 0xe000ed38 SP 0x00000000 Task MAIN Freestk 0 n/a Error status: 0x00 Aux0 errors 0,0,0 MCU temperature: min 33.8, current 35.3, max 35.8 Supply voltage: min 24.0, current 24.1, max 24.3, under voltage events: 0, over voltage events: 0, power good: yes Driver 0: position 106237, standstill, SG min/max 0/368 Driver 1: position 125544, standstill, SG min/max 0/386 Driver 2: position 149846, standstill, SG min/max 0/362 Driver 3: position 0, standstill, SG min/max not available Driver 4: position 0, standstill, SG min/max not available Driver 5: position 0 Driver 6: position 0 Driver 7: position 0 Driver 8: position 0 Driver 9: position 0 Driver 10: position 0 Driver 11: position 0 Date/time: 2021-03-19 23:26:07 Cache data hit count 747146687 Slowest loop: 42.73ms; fastest: 0.16ms I2C nak errors 0, send timeouts 0, receive timeouts 0, finishTimeouts 0, resets 0 === Storage === Free file entries: 10 SD card 0 detected, interface speed: 20.0MBytes/sec SD card longest read time 3.9ms, write time 9.2ms, max retries 0 === Move === DMs created 83, maxWait 84543ms, bed compensation in use: mesh, comp offset 0.000 === MainDDARing === Scheduled moves 587, completed moves 587, hiccups 614, stepErrors 0, LaErrors 0, Underruns [0, 0, 0], CDDA state -1 === AuxDDARing === Scheduled moves 0, completed moves 0, hiccups 0, stepErrors 0, LaErrors 0, Underruns [0, 0, 0], CDDA state -1 === Heat === Bed heaters = 0 -1 -1 -1, chamberHeaters = -1 -1 -1 -1 === GCodes === Segments left: 0 Movement lock held by null HTTP is ready with "M122 P"config.g"" in state(s) 0 Telnet is idle in state(s) 0 File is idle in state(s) 0 USB is idle in state(s) 0 Aux is idle in state(s) 0 Trigger is idle in state(s) 0 Queue is idle in state(s) 0 LCD is idle in state(s) 0 Daemon is idle in state(s) 0 Autopause is idle in state(s) 0 Code queue is empty. === Network === Slowest loop: 149.92ms; fastest: 0.00ms Responder states: HTTP(0) HTTP(0) HTTP(0) HTTP(0) FTP(0) Telnet(0), 0 sessions HTTP sessions: 1 of 8 - WiFi - Network state is active WiFi module is connected to access point Failed messages: pending 0, notready 0, noresp 0 WiFi firmware version 1.23 WiFi MAC address 84:0d:8e:b3:bc:a6 WiFi Vcc 3.38, reset reason Turned on by main processor WiFi flash size 4194304, free heap 20248 WiFi IP address 192.168.178.66 WiFi signal strength -74dBm, mode none, reconnections 0, sleep mode modem Clock register ffffffff Socket states: 0 0 0 0 0 0 0 0 -
Try updating to 3.2.2 by uploading this zip file as is to the system tab.
https://github.com/Duet3D/RepRapFirmware/releases/download/3.2.2/Duet2and3Firmware-3.2.2.zip
Such an exaggerated cone shape of the heightmap seems to indicate a rod length problem based on this: http://boim.com/DeltaUtil/CalDoc/Calibration.html
I've never seen anything so extreme though.
Can you post your bed.g as well?
-
im going to make the firmware update now.
The rods i got are made by Haydn Huntley's and labeled each 440.35 one of them is 440.34i tried a couple different bed.g files. My understanding was that the bed.g isn't used for g29 which is run before delta calibration G32 but for all i know this might be totally wrong.
On the side i ordered another smart effector.M561 ; clear any bed transform ; If the printer hasn't been homed, home it if !move.axes[0].homed || !move.axes[1].homed || !move.axes[2].homed G28 ; Probe the bed and do auto calibration G1 X0 Y0 Z10 F10000 ; go to just above the first probe point while true if iterations = 5 abort "too many auto calibration attempts" G30 P0 X0.00 Y150.00 Z-99999 H0 if result != 0 continue G30 P1 X96.42 Y114.91 Z-99999 H0 if result != 0 continue G30 P2 X147.72 Y26.05 Z-99999 H0 if result != 0 continue G30 P3 X129.90 Y-75.00 Z-99999 H0 if result != 0 continue G30 P4 X51.30 Y-140.95 Z-99999 H0 if result != 0 continue G30 P5 X-51.30 Y-140.95 Z-99999 H0 if result != 0 continue G30 P6 X-129.90 Y-75.00 Z-99999 H0 if result != 0 continue G30 P7 X-147.72 Y26.05 Z-99999 H0 if result != 0 continue G30 P8 X-96.42 Y114.91 Z-99999 H0 if result != 0 continue G30 P9 X0.00 Y75.00 Z-99999 H0 if result != 0 continue G30 P10 X64.95 Y37.50 Z-99999 H0 if result != 0 continue G30 P11 X64.95 Y-37.50 Z-99999 H0 if result != 0 continue G30 P12 X0.00 Y-75.00 Z-99999 H0 if result != 0 continue G30 P13 X-64.95 Y-37.50 Z-99999 H0 if result != 0 continue G30 P14 X-64.95 Y37.50 Z-99999 H0 if result != 0 continue G30 P15 X0 Y0 Z-99999 S8 if result != 0 continue if move.calibration.final.deviation <= 0.07 break echo "Repeating calibration because deviation is too high (" ^ move.calibration.final.deviation ^ "mm)" ; end loop echo "Auto calibration successful, deviation", move.calibration.final.deviation ^ "mm" G30 S-3 G1 Z50; Probe the bed at 6 peripheral and 3 halfway points, and perform 6-factor auto compensation ; Before running this, you should have set up your Z-probe trigger height to suit your build, in the G31 command in config.g. ; bed.g file for RepRapFirmware, generated by Escher3D calculator ; 16 points, 6 factors, probing radius: 170, probe offset (0, 0) ; Auto calibration routine for large delta printer ;M561 ; clear any bed transform ; If the printer hasn't been homed, home it G28 ; Probe the bed and do auto calibration G1 X0 Y0 Z10 F10000 ; go to just above the first probe point G30 P0 X0.00 Y190.00 Z-99999 H0 G30 P1 X122.13 Y145.55 Z-99999 H0 G30 P2 X187.11 Y32.99 Z-99999 H0 G30 P3 X164.54 Y-95.00 Z-99999 H0 G30 P4 X64.98 Y-178.54 Z-99999 H0 G30 P5 X-64.98 Y-178.54 Z-99999 H0 G30 P6 X-164.54 Y-95.00 Z-99999 H0 G30 P7 X-187.11 Y32.99 Z-99999 H0 G30 P8 X-122.13 Y145.55 Z-99999 H0 G30 P9 X0.00 Y95.00 Z-99999 H0 G30 P10 X82.27 Y47.50 Z-99999 H0 G30 P11 X82.27 Y-47.50 Z-99999 H0 G30 P12 X0.00 Y-95.00 Z-99999 H0 G30 P13 X-82.27 Y-47.50 Z-99999 H0 G30 P14 X-82.27 Y47.50 Z-99999 H0 G30 P15 X0 Y0 Z-99999 S7 G1 Z50M561 ; clear any bed transform G28 ; home all towers ; Probe the bed at 10 peripheral and 6 halfway points, and perform 6-factor auto compensation ; Before running this, you should have set up your Z-probe trigger height to suit your build, in the G31 command in config.g. G30 P0 X0 Y184.9 H0 Z-99999 G30 P1 X108.68 Y149.59 H0 Z-99999 G30 P2 X175.85 Y57.14 H0 Z-99999 G30 P3 X175.85 Y-57.14 H0 Z-99999 G30 P4 X108.68 Y-149.59 H0 Z-99999 G30 P5 X0 Y-184.9 H0 Z-99999 G30 P6 X-108.68 Y-149.59 H0 Z-99999 G30 P7 X-175.85 Y-57.14 H0 Z-99999 G30 P8 X-175.85 Y57.14 H0 Z-99999 G30 P9 X-108.68 Y149.59 H0 Z-99999 G30 P10 X0 Y92.4 H0 Z-99999 G30 P11 X80.02 Y46.2 H0 Z-99999 G30 P12 X80.02 Y-46.2 H0 Z-99999 G30 P13 X0 Y-92.4 H0 Z-99999 G30 P14 X-80.02 Y-46.2 H0 Z-99999 G30 P15 X-80.02 Y46.2 H0 Z-99999 G30 P16 X0 Y0 H0 Z-99999 S6 -
it fails to upload the firmware files
Edit: i managed to install it -
@Lihyon said in delta smart effector hightmap mess:
it fails to upload the firmware files
Edit: i managed to install itthe results aren't much different
Number of points: 277 Probing radius: 185 mm Probe area: 1075.2 cm² Maximum deviations: -0.870 / 15.173 mm Mean error: 7.258 mm RMS error: 4.668 mm -
bed.g is G32.
What order are you running things? There should be G28 to home the towers, G32 to do an auto calibration, and then G29 to map the bed surface.
-
@Lihyon Looking at the errors in your results, one point is measured 15mm above the z=0 datum!
In your bed.g, you need to uncomment the M561 to make sure you don't have mesh compensation enabled when ddoing the calibration. if you don't it will be calibrating a mesh-compensated bed and you'll only bake in the errors you're seeing in your heightmap.
E3D TC with D3Mini and Toolboards.
Home-built CoreXY, Duet Wifi, Chimera direct drive, 2x BMG, 300x300x300 build volume
i3 clone with a bunch of mods -
@Phaedrux i found my biggest mistake so far, its silly
M665 R190 L440.35 B190 H415 ; Set delta radius, diagonal rod length, printable radius and homed heightR is supposed to be R230.6.
and i was running M561 - g29 s2 - g29 - g32 but i guess im suppose to do g32 - g29 so i added g29 on the end of my bed.g for nownow im facing this issue that the probe doesn't trigger at some point and runs into the bed but not right away like halve way through probing
21.3.2021, 22:02:40 Error: Z probe was not triggered during probing move while g29 21.3.2021, 21:58:29 Z probe trigger height set to 0.018 mm G30 S-3 included in bed.g 21.3.2021, 21:58:28 G32 Calibrated 8 factors using 16 points, (mean, deviation) before (-0.643, 0.353) after (-0.000, 0.037) Auto calibration successful, deviation 0.037mm -
@engikeneer but M561 disables any existing bed compensation or not?
EDIT: well i tried and didn't make a difference -
This post is deleted! -
Maybe a sensitivity issue?
-
setting the sensitivity just doesn't work its suppose to blink 3 times when changed but does not
example
M672 S105:25:255
i found the firmware for it but im struggling to find out how to use Atmel Studio 7 to compile it or upload it
-
How old is the smart effector? Does it have a revision number on the PCB?
What does it respond with if you send M672 by itself?
-
its says pcb Revision 2.0 CERL OHL 1.2 on it
and M672 spits outError: M672: No program bytes provided -
@Lihyon said in delta smart effector hightmap mess:
setting the sensitivity just doesn't work its suppose to blink 3 times when changed but does not
example
M672 S105:25:255
i found the firmware for it but im struggling to find out how to use Atmel Studio 7 to compile it or upload it
You don't need to build it, you can download the .elf or .hex file from the release at https://github.com/Duet3D/SmartEffectorFirmware/releases/tag/2.01.
-
@Lihyon said in delta smart effector hightmap mess:
setting the sensitivity just doesn't work its suppose to blink 3 times when changed but does not
I've noticed oddities with changing the sensitivity of the smart effector. At times, the smart effector seems to lose the sensitivity setting (often after a reset or power off/on) and it has to be set again.
When this happens, about 50% of the time sending either the "set" (M672 S105:aaa:bbb) or "revert" (M672 S131:131) commands does nothing whatsoever in regards to the smart effector LED and I have to power it off/on again.
My suggestion would be to power off the machine, wait 10 seconds, and power it back on again. Then set the sensitivity and see if the smart effector responds properly. (It should blink 4 times in response.)
example
M672 S105:25:255
That's not a valid combination. If the first number is 25, the second number should be
230 (255-25 = 230) -
Thank you for everyone's help i really appreciate it !
After installing a new smart effector it seems to work !@dc42 after uploading .hex to the printer it saves my sensitivity
@garyd9 that was the last puzzle piece i completely misunderstood the instructions givenTo program the sensor, send command M672 S105:aaa:bbb replacing aaa by the desired sensitivity and bbb by 255 - aaa.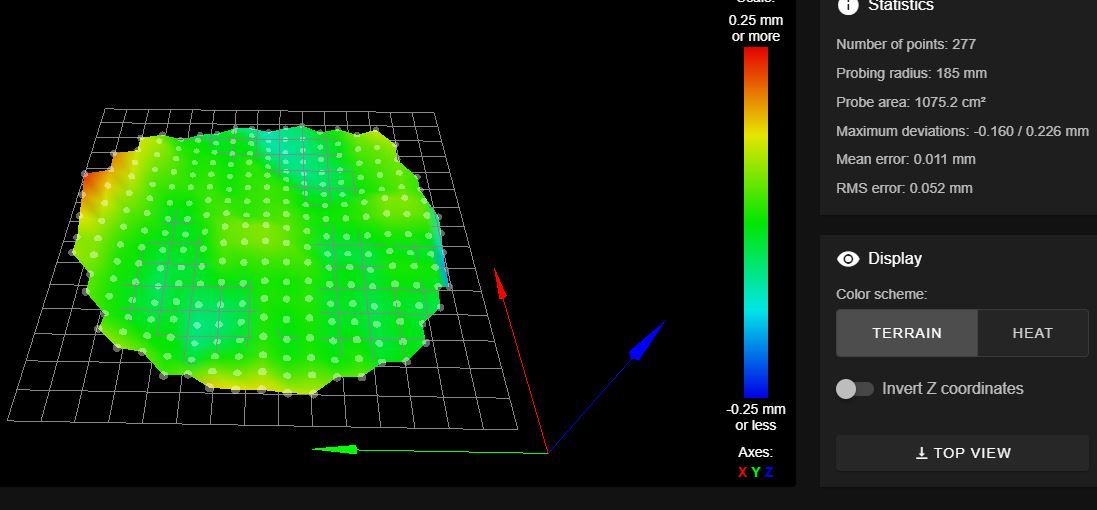
-
@Lihyon said in delta smart effector hightmap mess:
@dc42 after uploading .hex to the printer it saves my sensitivity
Umm.. I thought the only way to update the smart effector's firmware was using special hardware.
Is that ability built into the duet firmware now? (I'd love to get that fix on my smart effector, but didn't think it would be feasible for me.)