Printing time VS Cura
-
SO has him nearly at the stage of finally be done with my printer , ive noticed for a long time that print using cura as slicer would take 2-2.5X more time than what cura say . From my observation it seem that the problem is with the infill , it seem to stutter when trying to print it . Printer has no problem getting to speed on perimeter but infill rarely reach the asking print speed . IVe tried different infill type and it doesnt change anything .Him on firmware 3.2.2 i believe. waiting a bit to upgrade to 3.3.
I have done a test a few day ago with a 25mm cube cura was showing 12min i believe fastest i could ever done it was 20min , i tested acceleration and jerk up to 3000 jerk and 7000 acc , started at 1000 jerk and 2500 acc and there was no difference . 10 more min on a small print is not a lot , but when i slice piece and it say 4-5 hour and they take 8-10 hour it a real difference and a problem .
My printer is a custom build core XY with 12mm belt all around , each axis is powered by 2 stepper motor . with a bond tech bmg-x2 as direct extruder
https://forum.duet3d.com/topic/17999/the-mean-machine?_=1622328626147
SO any idea how i can achieve actual time or be closer ?
here my config :
; Configuration file for Duet 3 (firmware version 3)
; executed by the firmware on start-up
;
; generated by RepRapFirmware Configuration Tool v2.1.8 on Sun May 03 2020 01:01:37 GMT-0600 (Mountain Daylight Time)

; General preferences
M669 K1
G90                                             ; send absolute coordinates...
M83                                             ; ...but relative extruder moves
G4 S4
M550 P"The mean printer"                        ; set printer name
M669 K1                                         ; select CoreXY mode


; Network
M551 P"---------"                                 ; set password
M552 P0.0.0.0 S1                                ; enable network and acquire dynamic address via DHCP
M586 P0 S1                                      ; enable HTTP
M586 P1 S1                                      ; enable FTP
M586 P2 S1                                      ; disable Telnet

; Drives
M569 P0.0 S1                                   ; physical drive 0.0 goes forwards X
M569 P0.1 S1                                   ; physical drive 0.1 goes forwards double Z
M569 P0.2 S0                                    ; physical drive 0.2 goes forwards Z
M569 P0.3 S1                                    ; physical drive 0.3 goes forwards double X
M569 P0.5 S1                                    ; physical drive 0.5 goes forwards EXT 1
M569 P0.4 S0                                    ; physical drive 0.4 goes forwards EXT 2
M569 P1.2 S0                                   ; physical drive 1.2 goes forwards Y, 3HC
M569 P1.1 S0                                    ; physical drive 1.1 goes forwards Y, 3HC
M584 X1.1:1.2 Y0.0:0.3 Z0.2:0.1 E0.5:0.4                    ; set drive mapping
M350 X32 Y32 Z16:16 E16:16 I1                      ; configure microstepping with interpolation
M92 X320.00 Y320.00 Z1440.00 E403:403      ; set steps per mm
M566 X1000.00 Y1000.00 Z1000.00 E2000.00:2000.00      ; set maximum instantaneous speed changes (mm/min)
M203 X7500.00 Y7500.00 Z1000.00 E5500.00:5500.00 ; set maximum speeds (mm/min)
M201 X4000.00 Y4000.00 Z1000.00 E2000.00:2000.00      ; set accelerations (mm/s^2)
M906 X1200:1200 Y1200:1200 Z1600:1600 E0550:0550 I60           ; set motor currents (mA) and motor idle factor in per cent
M84 S1800                                         ; Set idle timeout

; Axis Limits
M208 X0 Y0 Z0 S1                                ; set axis minima
M208 X300 Y300 Z600. S0                          ; set axis maxima

; Filaments
M591 D0 P1 C"io3.in" S1                          ; filament monitor connected to E0_stop
M591 D1 P1 C"io4.in" S1                          ; filament monitor connected to E1_stop


; Endstops
M574 X1 S1 P"!io0.in"                            ; configure active-high endstop for low end on X via pin io0.in
M574 Y1 S1 P"1.io1.in"                          ; configure active-high endstop for low end on Y via pin 1.io1.in


; Z-Probe
M950 S0 C"io7.out"                              ; create servo pin 0 for BLTouch
M558 P9 C"^io7.in" H5 F120 T3000               ; set Z probe type to bltouch and the dive height + speeds
G31 P500 X25 Y40 Z2.95           ; set Z probe trigger value, offset and trigger height
M557 X50:280 Y50:250 S50                        ; define mesh grid


; Heaters
M308 S0 P"temp3" Y"thermistor" T100000 B4050   ; configure sensor 0 as thermistor on pin temp3
M950 H0 C"out0" T0                              ; create bed heater output on out0 and map it to sensor 0
M143 H0 S120                                    ; set temperature limit for heater 0 to 120C
M307 H0 B1 S1.00                                ; disable bang-bang mode for the bed heater and set PWM limit
M140 H0                                         ; map heated bed to heater 0
M308 S1 P"temp2" Y"thermistor" T100000 B4050   ; configure sensor 1 as thermistor on pin temp2
M950 H1 C"out1" T1                              ; create nozzle heater output on out1 and map it to sensor 1
M307 H1 B0 S1.00                                ; disable bang-bang mode for heater  and set PWM limit
M143 H1 S295
M308 S2 P"temp1" Y"thermistor" T100000 B4050    ; configure sensor 2 as thermistor on pin temp1
M950 H2 C"out2" T2                              ; create nozzle heater output on out2 and map it to sensor 2
M307 H2 B0 S1.00                                ; disable bang-bang mode for heater  and set PWM limit
M143 H2 S295                                    ; set temperature limit for heater 0 to 295C

; Fans
M950 F0 C"out9" Q150                         ; create fan 0 on pin out9 and set its frequency
M106 P0 C"blower" S0 H-1                        ; set fan 0 name and value. Thermostatic control is turned off
M950 F1 C"out4" Q250                            ; create fan 1 on pin out4 and set its frequency
M106 P1 C"blower E0" S0 H-1                     ; set fan 1 name and value. Thermostatic control is turned off
M950 F2 C"out5" Q250                            ; create fan 2 on pin out5 and set its frequency
M106 P2 C"blower E1" S0 H-1                     ; set fan 2 name and value. Thermostatic control is turned off
M950 F3 C"out6" Q750                            ; create fan 3 on pin out6 and set its frequency
M106 P3 C"electrical" S1 H1:2 T20               ; set fan 3 name and value. Thermostatic control is turned on
M950 F4 C"out7" Q200                        ; create fan 4 on pin out7 and set its frequency
M106 P4 C"E0" S1 H1 T45                         ; set fan 4 name and value. Thermostatic control is turned on
M950 F5 C"out8" Q200                            ; create fan 5 on pin out8 and set its frequency
M106 P5 C"E1" S1 H2 T30                         ; set fan 5 name and value. Thermostatic control is turned on

; Tools
M563 P0 D0 H1 F0:1:2                                ; define tool 1
G10 P0 X0 Y0 Z0                                 ; set tool 1 axis offsets
G10 P0 R0 S0                                    ; set initial tool 1 active and standby temperatures to 0C
M563 P1 D1 H2 F0:2:1                                ; define tool 2
G10 P1 X0 Y-34.10 Z0                         ; set tool 2 axis offsets
G10 P1 R0 S0                                    ; set initial tool 2 active and standby temperatures to 0C

; Custom settings are not defined
M593 F5.                                          ; cancel ringing at 30Hz

; Miscellaneous
M501                                            ; load saved parameters from non-volatile memory
T0                                              ; select first tool
here an example of a beginning of a program
;FLAVOR:RepRap ;TIME:19026 ;Filament used: 59.8681m, 0m ;Layer height: 0.25 ;MINX:113.3 ;MINY:100.3 ;MINZ:0.15 ;MAXX:236.7 ;MAXY:199.7 ;MAXZ:119.9 ;Generated with Cura_SteamEngine 4.9.1 T0 M190 S85 M104 S220 M109 S220 M82 ;absolute extrusion mode G28 X0 Y0 ;Home G00 X150 Y125 G30 G1 Z15.0 F6000 ;Move the platform down 15mm ;Prime the extruder G92 E0 G1 F200 E3 G92 E0 M83 ;relative extrusion mode G1 F3000 E-0.5 ;LAYER_COUNT:480 ;LAYER:0 M107 G0 F3600 X115.091 Y101.267 Z0.15 ;TYPE:SKIRT G1 F3000 E0.5 G1 F2400 X115.622 Y100.792 E0.02666 G1 X116.023 Y100.558 E0.01737 G1 X116.459 Y100.397 E0.01739 G1 X117.176 Y100.3 E0.02707 G1 X168.824 Y100.3 E1.93255 G1 X169.287 Y100.34 E0.01739 G1 X169.736 Y100.459 E0.01738 G1 X170.158 Y100.652 E0.01736 G1 X170.733 Y101.091 E0.02707 G1 X171.208 Y101.622 E0.02666 G1 X171.442 Y102.023 E0.01737 G1 X171.603 Y102.459 E0.01739 G1 X171.7 Y103.176 E0.02707 G1 X171.7 Y105.479 E0.08617 G1 X176.828 Y118.3 E0.51668 and the end ;TIME_ELAPSED:19026.970009 G1 F3000 E-0.5 M140 S0 M82 ;absolute extrusion mode M107 M104 S0 M140 S0 ;Retract the filament G92 E1 G1 E-1 F300 G28 X0 Y0 G90 G0 X20 Y20 M84 M83 ;relative extrusion mode M104 S0 ;End of Gcode ;SETTING_3 {"global_quality": "[general]\\nversion = 4\\nname = Fine #2\\ndefini ;SETTING_3 tion = custom\\n\\n[metadata]\\ntype = quality_changes\\nquality_type ;SETTING_3 = normal\\nsetting_version = 16\\n\\n[values]\\nlayer_height = 0.25\ ;SETTING_3 \nlayer_height_0 = 0.15\\nmaterial_bed_temperature = 80\\nmaterial_be ;SETTING_3 d_temperature_layer_0 = 85\\nsupport_enable = True\\nsupport_type = b ;SETTING_3 uildplate\\ntop_bottom_extruder_nr = 0\\nwall_extruder_nr = 0\\n\\n", ;SETTING_3 "extruder_quality": ["[general]\\nversion = 4\\nname = Fine #2\\ndef ;SETTING_3 inition = custom\\n\\n[metadata]\\ntype = quality_changes\\nquality_t ;SETTING_3 ype = normal\\nsetting_version = 16\\nposition = 0\\n\\n[values]\\nbr ;SETTING_3 im_width = 3\\ncool_fan_speed = 75\\nfill_perimeter_gaps = nowhere\\n ;SETTING_3 infill_overlap = 2.5\\ninfill_pattern = grid\\ninfill_sparse_density ;SETTING_3 = 80\\nmaterial_final_print_temperature = 220\\nmaterial_initial_prin ;SETTING_3 t_temperature = 220\\nmaterial_print_temperature = 220\\noptimize_wal ;SETTING_3 l_printing_order = True\\nretraction_amount = 0.5\\nretraction_speed ;SETTING_3 = 50\\nspeed_print = 80\\nspeed_wall = 50\\nspeed_wall_0 = 40\\nsuppo ;SETTING_3 rt_angle = 55\\nsupport_infill_rate = 7\\ntop_bottom_thickness = 1\\n ;SETTING_3 top_layers = 5\\nwall_line_count = 2\\n\\n", "[general]\\nversion = 4 ;SETTING_3 \\nname = Fine #2\\ndefinition = fdmprinter\\n\\n[metadata]\\ntype = ;SETTING_3 quality_changes\\nquality_type = normal\\nsetting_version = 16\\nposi ;SETTING_3 tion = 1\\n\\n[values]\\n\\n"]} -
Do you have acceleration and jerk control enabled in Cura? I use that with Cura and I find the time estimates are basically exact.
Alternately you can install the Printer Settings plugin in cura and it gives you a place to enter the actual max speed, jerk, and accel values that you use in your config.g. That may help as well.
I can't spot your travel speed in the settings there. Do you have it set higher than the max speed in config.g would allow?
Are you taking heatup time into account? (that isn't likely the reason for the large disparity in long prints)
-
@phaedrux no i havent try to put the acceleration on cura , i might try it and see when i got some time .
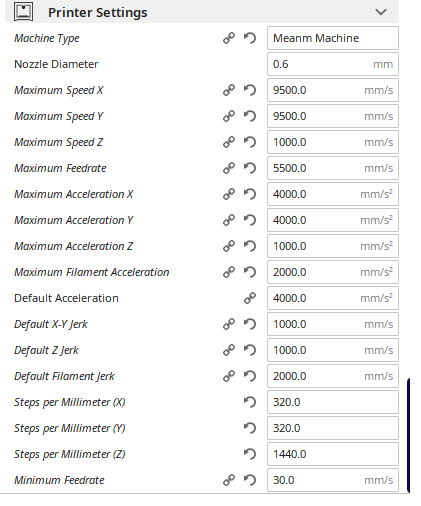
heat up time is not taken in the time count , even at that it less than 10min . when i watch the duet control page every fast travel reach it speed , only on the infill it seem to only achieve like 4-5mm/sec in small area , everything else get to the speed it need to . i went as high as 9500mm/sec for max axis speed on X and Y. ill aad a few more setting on cura and see what it give .
-
I'm pretty sure this plugin will help.
https://marketplace.ultimaker.com/app/cura/plugins/fieldofview/PrinterSettingsPlugin
Then you can set the actual limits for your printer. The defaults that cura is using are likely intended for an ultimaker printer. So if it's assuming very different jerk and accel profiles the time estimates will be way off.
As I said, my estimates are basically to the minute.
-
@phaedrux so i gived this a try , nothing the time hasnt change when i simulate on the printer it still double to 2.5x time
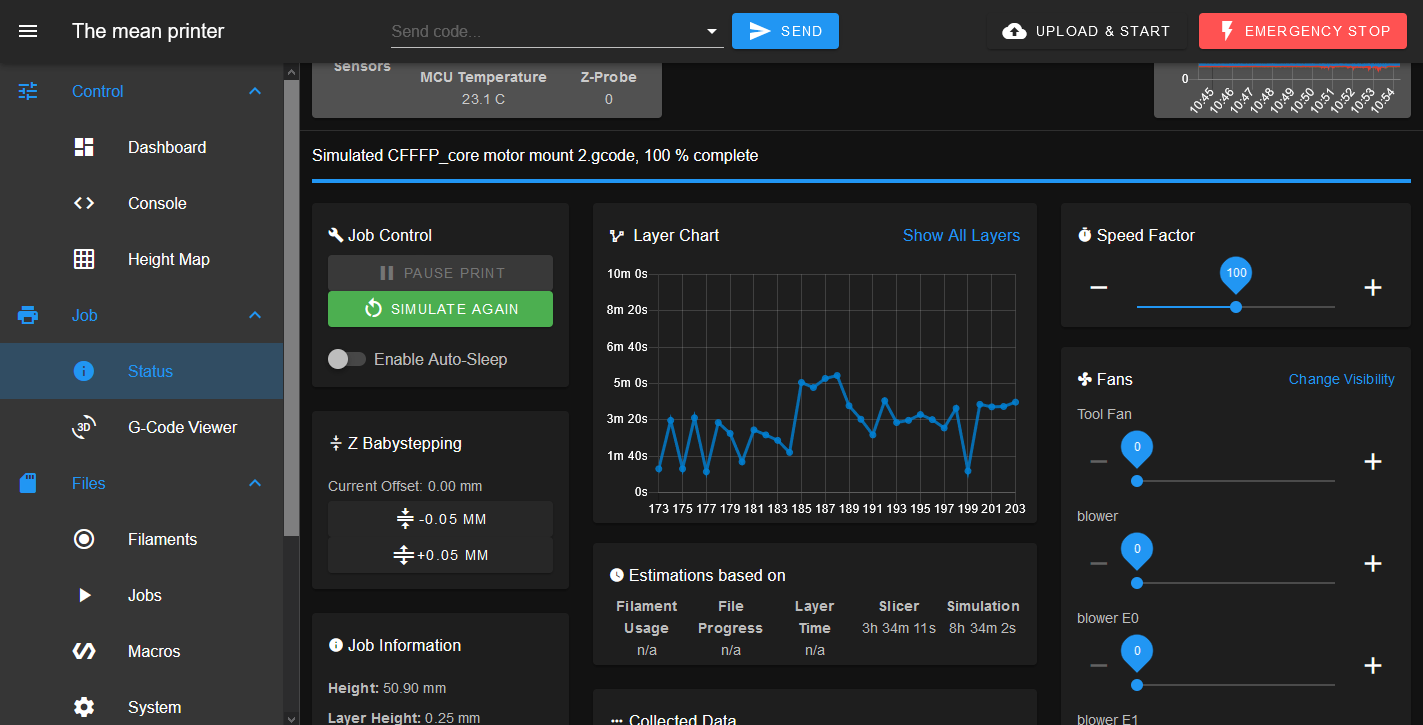
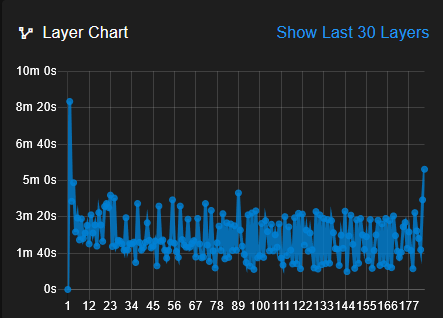
Here why it take so much more time the infill layer should all be about the same time but they are not one layer can take 1min and the next one will take 4min when it the exact same things with no change of geometries . any idea what would casue infill layer to have so much different time when they are all the same ?
-
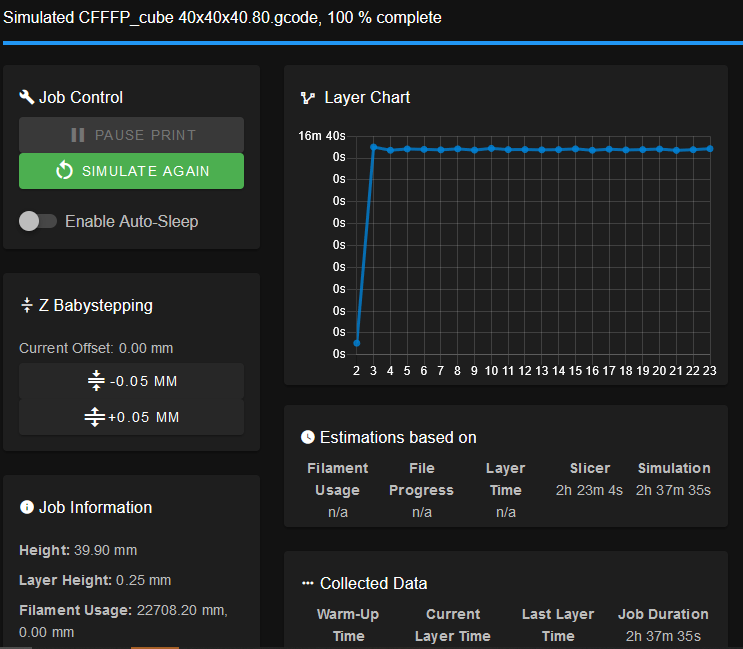
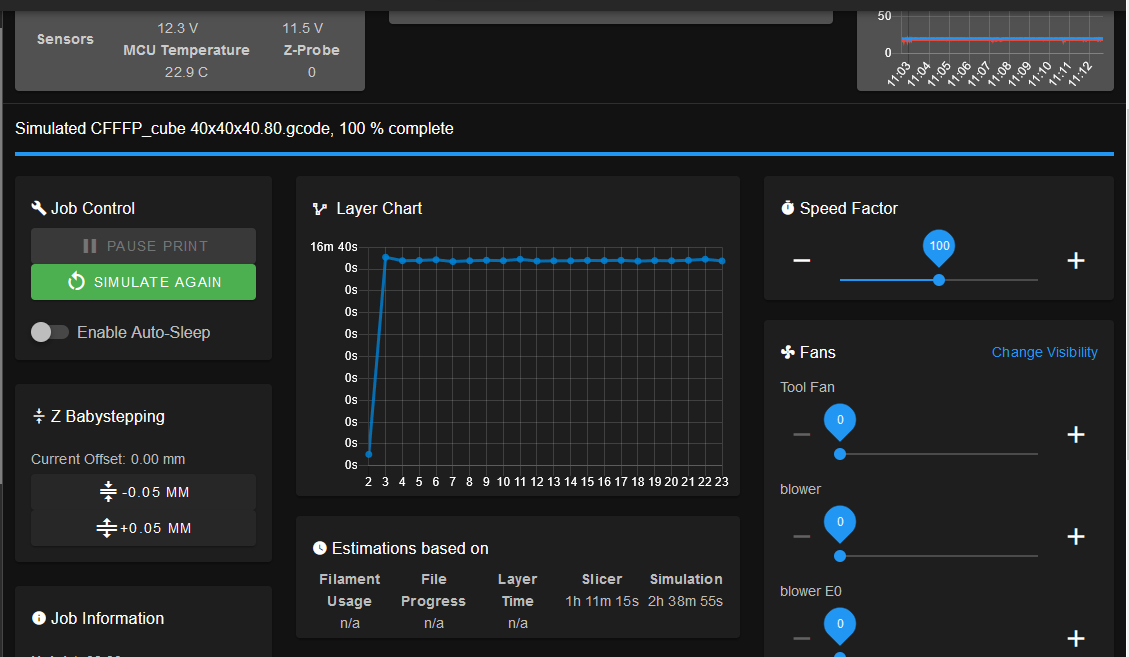
here another test wit ha 40x40x40 80%infill cube , 1.5hour difference with printer simulation , something somewhere is not working like it should
-
@dad003 note the speeds in Cura are in Mm/s and RRF uses mm/min for a lot of things so you'll need to divide the values you put in by 60
-
i think you might ust have found why i keep getting big difference
-
after converting the number it seem to be more accurate now
