A bit confused about Tools positioning
-
Good afternoon, as I told in a previous post I'm finisghing my Chimera + setup.. But I'm a bit confused about the Tools "positioning" in relation to bed.
I have the main tool (T0) wich is the left extruder and the second tool (T1) wich is the right one. (I made a little mistake in connecting the cables so I've attacched T0 to D1 Drive and T1 to D0 to D0 Drive but I don't want to re-open the board box again so I've swapped them in the M563 GCODE)
I have a BLtouch wich Offsets from T0 (left extruder) are X40 Y1 Z4.4 /the BLTouch is on the left of the extruder by 40mm and in fron of it by 1mm)
I thought that all my setting should be "refered" to T0, but maybe I'm missing somethig (after 9 hours of "hardware" working on the printer)
This is what I have when I Home the Z axis (the bed origin is in the left lower corner of the bed):

This is what I got after typing T0 and G1 X0:

And this is G1 X320:

As you can see the positiong is made "on" the right nozzle and not the left....what Am I doing worng?
This is my config.g:
; Endstops
M574 X1 S1 P"xstop" ; configure active-high endstop for low end on X via pin xstop
M574 Y1 S1 P"ystop" ; configure active-high endstop for low end on Y via pin ystop
M574 Z1 S2 ; configure Z-probe endstop for low end on Z; Z-Probe
M950 S0 C"exp.heater3" ; create servo pin 0 for BLTouch
M558 P9 C"^zprobe.in" H5 F120 T6000 ; set Z probe type to bltouch and the dive height + speeds
G31 P500 X40 Y1 Z 4.4 ; set Z probe trigger value, offset and trigger height
M557 X5:290 Y5:290 S20 ; define mesh grid; Heaters
M308 S0 P"bedtemp" Y"thermistor" T100000 B4092 ; configure sensor 0 as thermistor on pin bedtemp
M950 H0 C"bedheat" T0 ; create bed heater output on bedheat and map it to sensor 0
M307 H0 B0 S1.00 ; disable bang-bang mode for the bed heater and set PWM limit
M140 H0 ; map heated bed to heater 0
M143 H0 S120 ; set temperature limit for heater 0 to 120C
M308 S1 P"e0temp" Y"thermistor" T100000 B4725 C7.06e-8 ; configure sensor 1 as thermistor on pin e0temp
M950 H1 C"e0heat" T1 ; create nozzle heater output on e0heat and map it to sensor 1
M307 H1 B0 S1.00 ; disable bang-bang mode for heater and set PWM limit
M143 H1 S285 ; set temperature limit for heater 1 to 280C
M308 S2 P"e1temp" Y"thermistor" T100000 B4725 C7.06e-8 ; configure sensor 2 as thermistor on pin e1temp
M950 H2 C"e1heat" T2 ; create nozzle heater output on e1heat and map it to sensor 2
M307 H2 B0 S1.00 ; disable bang-bang mode for heater and set PWM limit
M143 H2 S285 ; set temperature limit for heater 2 to 280C; Fans
M950 F0 C"fan0" Q500 ; create fan 0 on pin fan0 and set its frequency
M106 P0 S0 H-1 ; set fan 0 value. Thermostatic control is turned off
;M950 F1 C"fan1" Q500 ; create fan 1 on pin fan1 and set its frequency
;M106 P1 S1 H1:2 T70 ; set fan 1 value. Thermostatic control is turned on
M308 S4 Y"mcu-temp" A"MCU" ; configure sensor 3 as thermistor on pin e1temp for left stepper
M308 S3 Y"drivers" A"Drivers" ; configure sensor 4 as temperature warning and overheat flags on the TMC2660 on Duet
M950 F2 C"fan2" Q2000 ; create fan 2 on pin fan2 and set its frequency
M106 P2 H3:4 L0.5 X1 B1 T40:50 ; set fan 2 value
; =============================================
; = HEATERS FAN =
; =============================================
M950 F10 C"exp.heater5"
M106 P10 S1 H1:2 T70
; =============================================
; = LED FAN =
; =============================================
M950 F11 C"exp.heater4"
M106 P11 S0; Tools
M563 P0 S"Master" D1 H2 F0 ; define tool 0
G10 P0 X0 Y0 Z0 ; set tool 0 axis offsets
G10 P0 R0 S0 ; set initial tool 0 active and standby temperatures to 0C
M563 P1 S"Slave" D0 H1 F0 ; define tool 1
G10 P1 X20 Y0 Z0 ; set tool 1 axis offsets
G10 P1 R0 S0 ; set initial tool 0 active and standby temperatures to 0CThanks!
-
@the_dragonlord what do you have for your axis limits (M208). That's what determines where 0,0 is relative to your bed (it's what the coordinate is set to when the endstop is triggered during a homing move).
Looks like your config is correct for having the left tool at 0,0 but you need to know where that is in reality!
Some people put 0,0 in the front left of the bed (I do), others put it in the centre -
@engikeneer said in A bit confused about Tools positioning:
@the_dragonlord what do you have for your axis limits (M208). That's what determines where 0,0 is relative to your bed (it's what the coordinate is set to when the endstop is triggered during a homing move).
Looks like your config is correct for having the left tool at 0,0 but you need to know where that is in reality!
Some people put 0,0 in the front left of the bed (I do), others put it in the centreI have 0,0 in the front left corner of the bed too
Theese are my settings:
; Axis Limits
M208 X0 Y0 Z0 S1
M208 X320 Y300 Z350 S0should I say M208 X20 Y0 Z0 S1 to place the left extruder where I want it to be?
-
@the_dragonlord said in A bit confused about Tools positioning:
; Axis Limits
M208 X0 Y0 Z0 S1
M208 X320 Y300 Z350 S0should I say M208 X20 Y0 Z0 S1 to place the left extruder where I want it to be?
Well the M208 S1 line tells the firmware where the minimum end stops are relative to 0,0. What you want is
M208 X-20 Y0 Z0 S1You may want to change the y parameter to too.
It might also be worth setting the Z parameter to -0.1 to allow some babystepping to below z=0 if you need it. Though of course, this does come with some risks -
@engikeneer said in A bit confused about Tools positioning:
@the_dragonlord said in A bit confused about Tools positioning:
; Axis Limits
M208 X0 Y0 Z0 S1
M208 X320 Y300 Z350 S0should I say M208 X20 Y0 Z0 S1 to place the left extruder where I want it to be?
Well the M208 S1 line tells the firmware where the minimum end stops are relative to 0,0. What you want is
M208 X-20 Y0 Z0 S1You may want to change the y parameter to too.
It might also be worth setting the Z parameter to -0.1 to allow some babystepping to below z=0 if you need it. Though of course, this does come with some risksOk, thanks...when I set the Tool 1 offset is it reffered to the Tool 0 or is it always reffered to the "physical" 0?
I Explain...in the G10 Gcode you set the "nozzles" offset,
if I set
M563 P0 S"Master" D1 H2 F0 ; define tool 0
G10 P0 X0 Y0 Z0 ; set tool 0 axis offsets
M563 P1 S"Slave" D0 H1 F0 ; define tool 1
G10 P1 X20 Y0 Z0 ; set tool 1 axis offsetsis it correct or in the G10 P1 I should consider "in some way" the offset already setted with M208?
Thanks!
-
@the_dragonlord as you have it will be fine.
In reality it's all a bit arbitrary so as long as you pick a way of setting it up and stick with it, that's fine. There's nothing saying you can put the left nozzle at -10 and the right one at +10, though I think setting one as 0 like you have is probably easier!
One side note which I have found with my chimera setup... I don't actually use the offsets in the firmware, so the machine things both nozzles are on top of each other. Instead I set it in my slicer which just adds it on to the move commands. I did this because I originally found the slicer (PrusaSlicer) kept leaving one of the nozzles over the print when doing the tool change and heating up the new nozzle (as it didn't know what the offset was). It does mean that the mesh compensation is a bit off, but generally works for me. Only real way to tell is to try it for yourself and see!
")
-
@engikeneer said in A bit confused about Tools positioning:
@the_dragonlord as you have it will be fine.
In reality it's all a bit arbitrary so as long as you pick a way of setting it up and stick with it, that's fine. There's nothing saying you can put the left nozzle at -10 and the right one at +10, though I think setting one as 0 like you have is probably easier!
One side note which I have found with my chimera setup... I don't actually use the offsets in the firmware, so the machine things both nozzles are on top of each other. Instead I set it in my slicer which just adds it on to the move commands. I did this because I originally found the slicer (PrusaSlicer) kept leaving one of the nozzles over the print when doing the tool change and heating up the new nozzle (as it didn't know what the offset was). It does mean that the mesh compensation is a bit off, but generally works for me. Only real way to tell is to try it for yourself and see!
Don't you use a purge tower/wipe shield in your slicer (i use Ideamaker)? Do you use a BLtouch? In case how have you configured its offsets?
-
@the_dragonlord I had to use the ooze shieldto get decent results. I will say that some filaments were a lot better than others with that though!
I've gone through a Precision Piezo Orion, DC42 IR, and now using a BLTouch... For all of them I've just set the offsets from the LH nozzle. Most of my printing only requires the single nozzle, so I'll quite often remove the RH on completely to avoid it catching on things.
-
@engikeneer said in A bit confused about Tools positioning:
@the_dragonlord I had to use the ooze shieldto get decent results. I will say that some filaments were a lot better than others with that though!
I've gone through a Precision Piezo Orion, DC42 IR, and now using a BLTouch... For all of them I've just set the offsets from the LH nozzle. Most of my printing only requires the single nozzle, so I'll quite often remove the RH on completely to avoid it catching on things.
What kind of heatblocks are you using? I've mounted the original E3D but I'm considering to mount two E3D Volcanos, the only thing that stops me is that with my previous setup I've noticed that the Volcano "oozes" so much more than a traditional extruder with the majority of the filaments...I hope to be able to set up the whole system for let both the extruders always mounted...
-
@the_dragonlord I had standard V6's. I've got a volcano on my delta and it oozes a bit so never bothered putting it on the chimera. Somewhat ironic as the delta is the smaller build volume and can't print fast because the frame is c**p

I know some people have run volcanoes on chimeras but no idea how successful they've been.If everything else had been working properly on my corexy (I got the nozzle levels spot on, extrusion dialed in perfectly, better cooling arrangement to avoid overhang curling etc) then I could have kept with both nozzles all the time. But I was lazy and it is my better printer so I wanted to be able to 'just print' simple stuff on it with minimal faffing.
I've also had a play with the cyclops which is good fun! -
@engikeneer said in A bit confused about Tools positioning:
@the_dragonlord I had standard V6's. I've got a volcano on my delta and it oozes a bit so never bothered putting it on the chimera. Somewhat ironic as the delta is the smaller build volume and can't print fast because the frame is c**p
I know some people have run volcanoes on chimeras but no idea how successful they've been.If everything else had been working properly on my corexy (I got the nozzle levels spot on, extrusion dialed in perfectly, better cooling arrangement to avoid overhang curling etc) then I could have kept with both nozzles all the time. But I was lazy and it is my better printer so I wanted to be able to 'just print' simple stuff on it with minimal faffing.
I've also had a play with the cyclops which is good fun!I've considered Cyclops insted of Chimera but I gave up because for me is a total nonsense to always leave the second filament on even when you print in a single color....are you using Chimera in Bowden mode or direct mode using the Bondtech XM2? In your slicer have you inserted a tool change GCODE?
Sorry for the large number of questions but you are the first person I met with almost the same printer configuration than mine...Thanks
-
@the_dragonlord keep em coming - I'm sure you'll have a few things to teach me too!
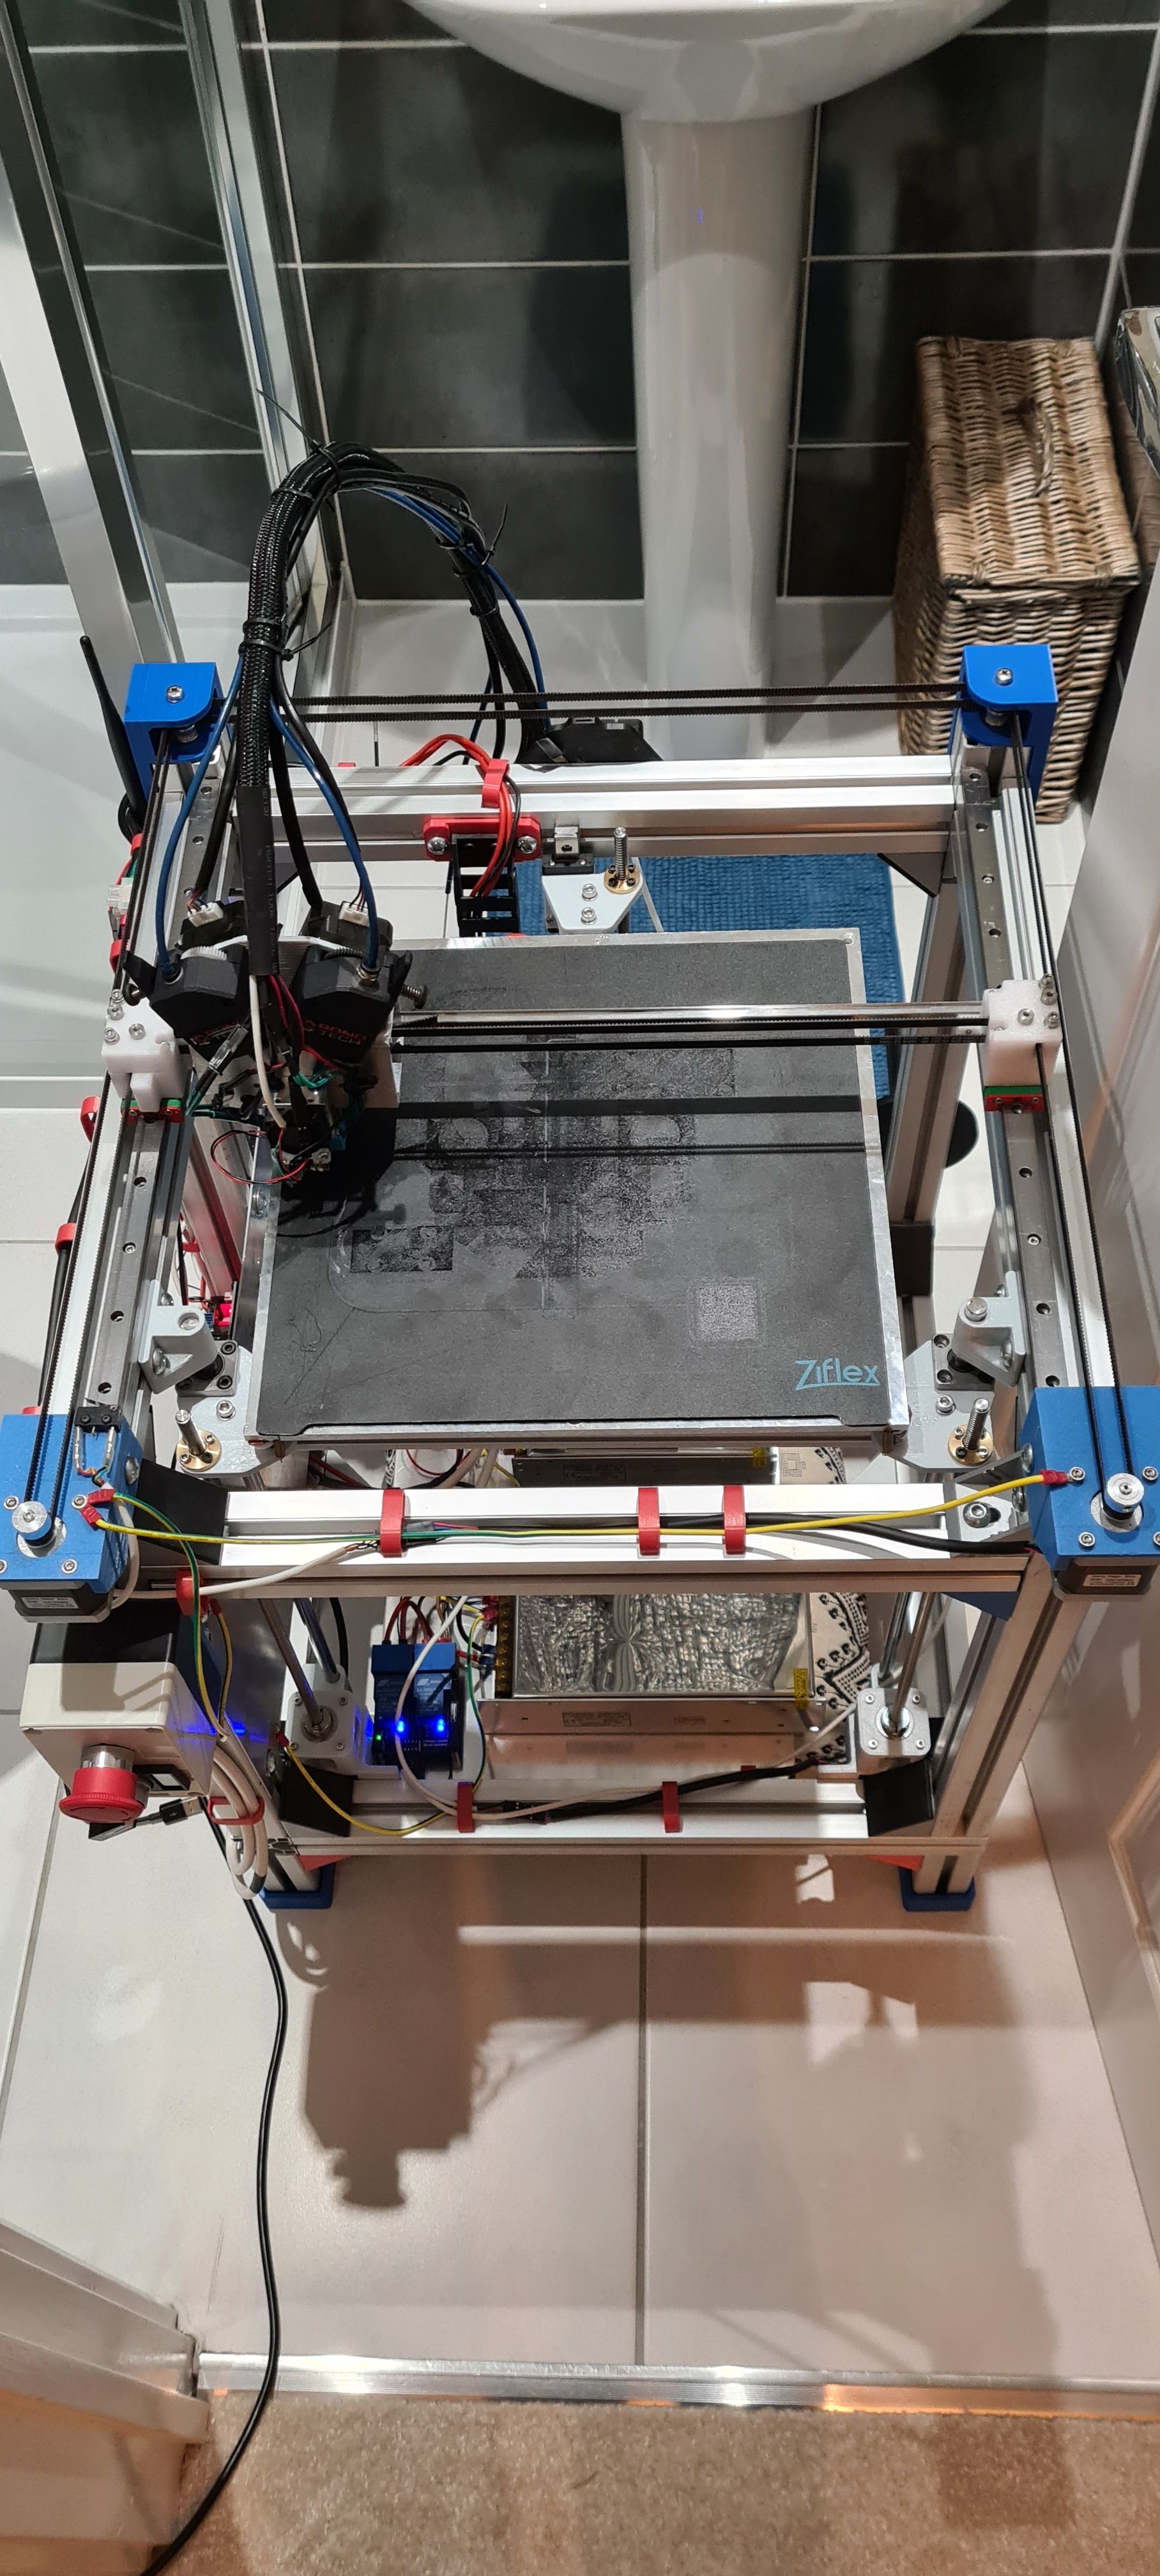
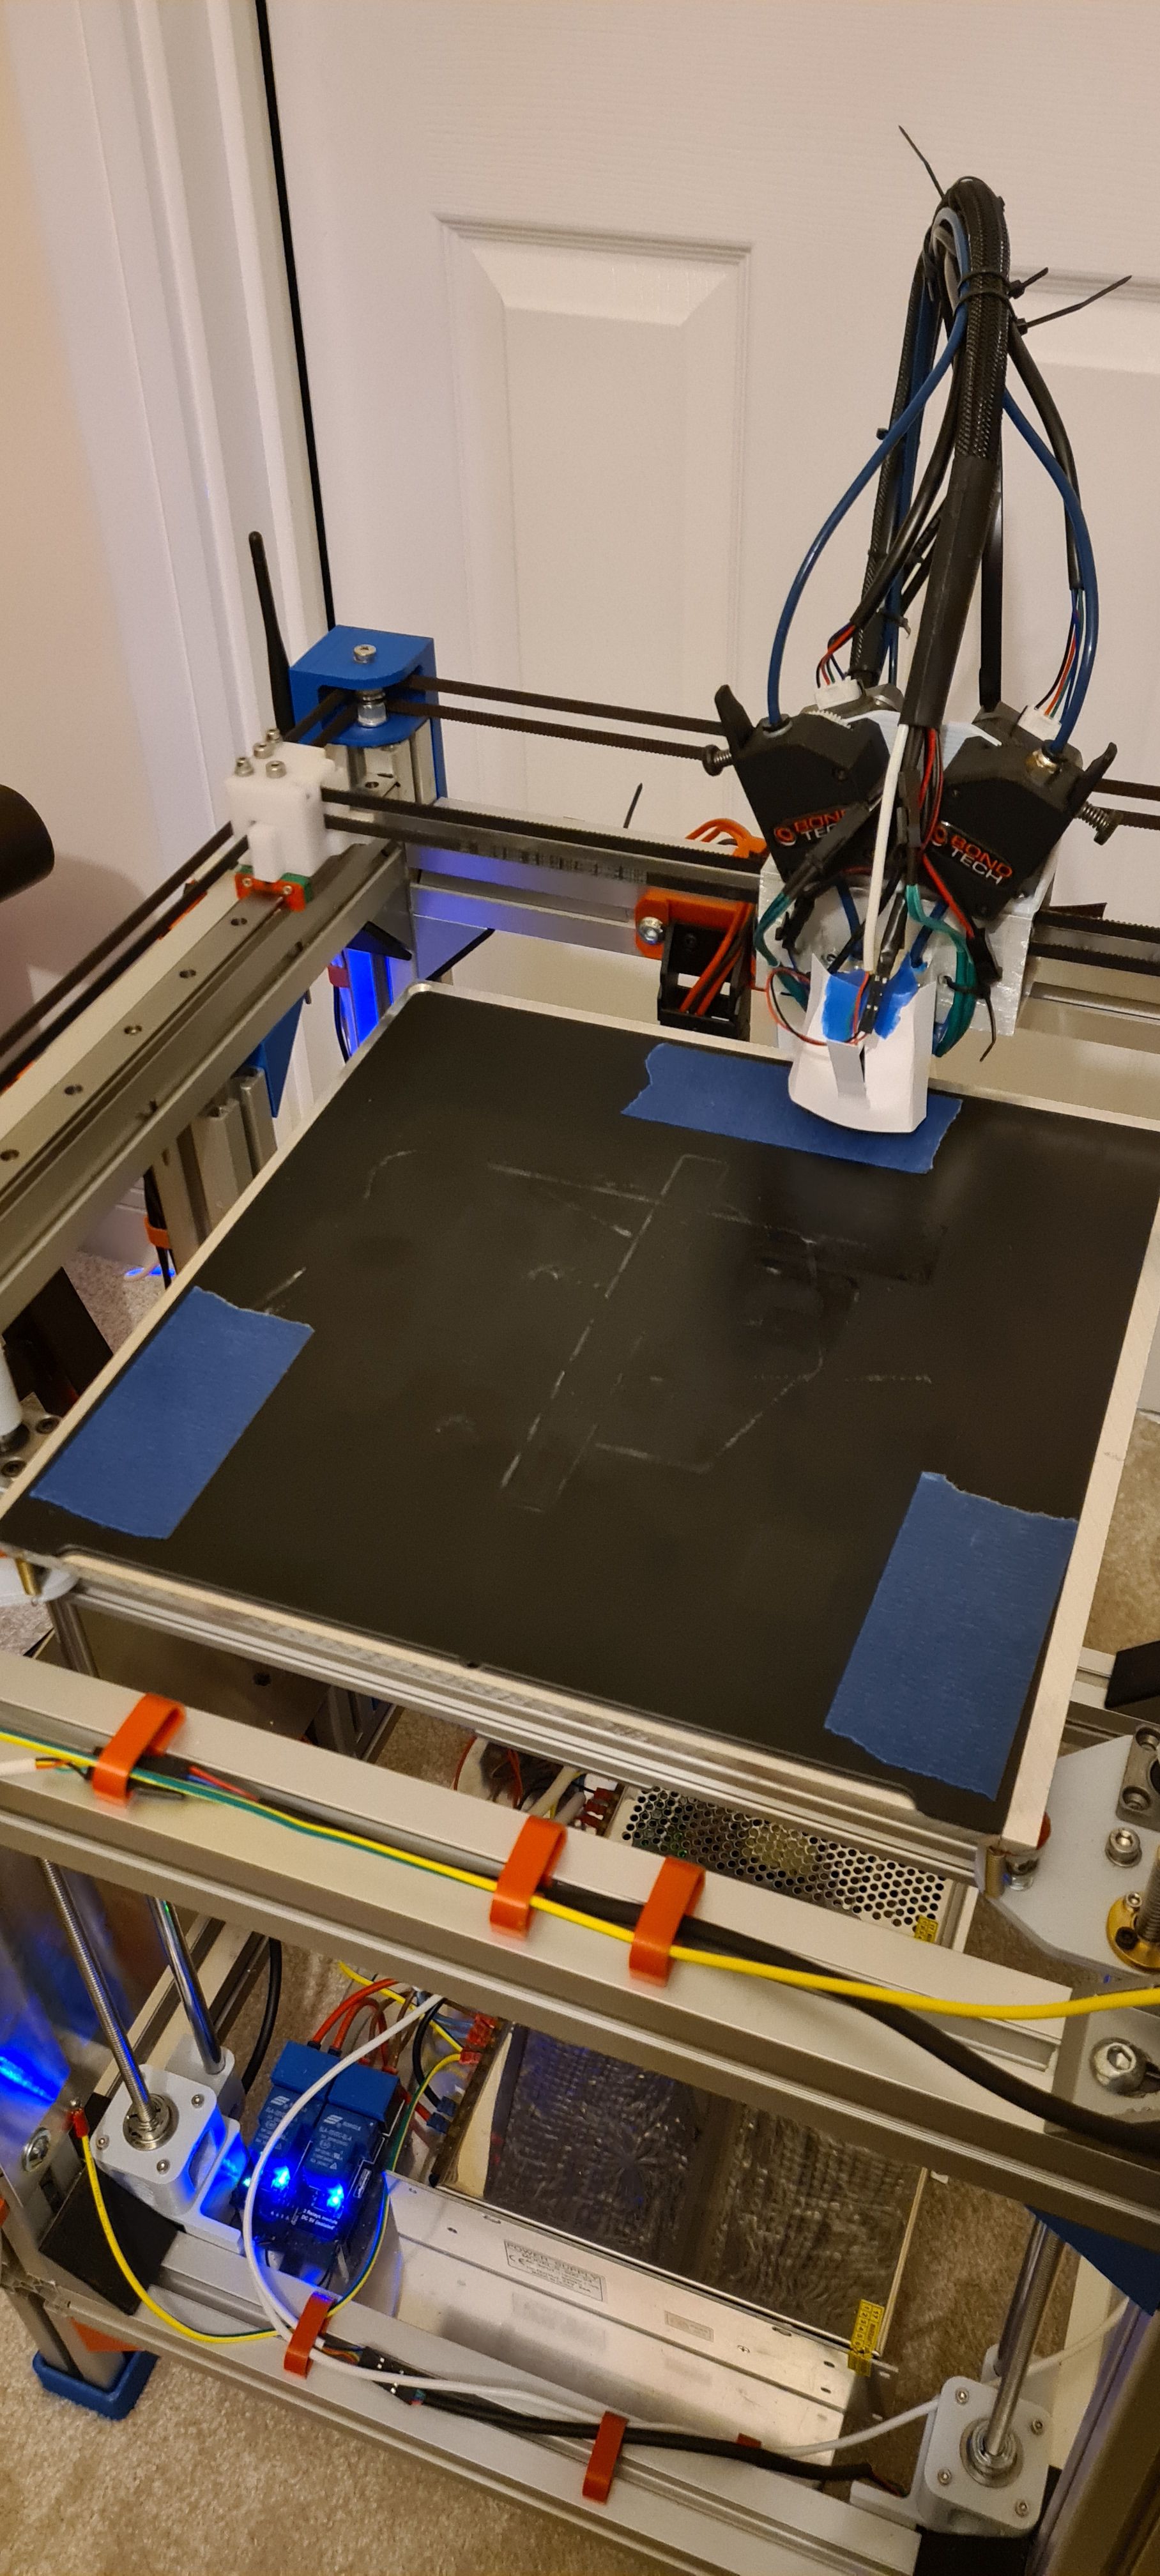
Ive attached a few old pictures of my setup below. Theses are from when I was playing with a DC42 IR sensor (now got a BLTouch).
Using a direct drive arrangement with a pair of BMGs (so similar to the X2). Originally I had a normal v6 hotend with a single BMG so didn't want to splash out for the full X2 when I got the chimera.I just call T0 or T1 from the slicer then have the toolchange macros on the Duet. They're pretty simple, just retract a bit and wait for temps. I'll post the actual files when I get home tonight to show you
-
@engikeneer said in A bit confused about Tools positioning:
@the_dragonlord keep em coming - I'm sure you'll have a few things to teach me too!
Ive attached a few old pictures of my setup below. Theses are from when I was playing with a DC42 IR sensor (now got a BLTouch).
Using a direct drive arrangement with a pair of BMGs (so similar to the X2). Originally I had a normal v6 hotend with a single BMG so didn't want to splash out for the full X2 when I got the chimera.I just call T0 or T1 from the slicer then have the toolchange macros on the Duet. They're pretty simple, just retract a bit and wait for temps. I'll post the actual files when I get home tonight to show you
thanks! So you don't leave the unactive tool at its working temperature? Why? To avoid oozing?
-
@the_dragonlord exactly. Depends on the material, but usually I use a 15-20deg difference, but only wait for the new tool to heat, not the old one to cool
-
@engikeneer said in A bit confused about Tools positioning:
@the_dragonlord exactly. Depends on the material, but usually I use a 15-20deg difference, but only wait for the new tool to heat, not the old one to cool
excellent I'll give it a try
-
@the_dragonlord Sorry didn't get a chance to get my tool change macro's yesterday, but here they are for T0 (T1 is the same, just reversed)
Tfree0.g - empty
Tpost0.g:
; tpost0.g
; called after tool 0 has been selected
;
; generated by RepRapFirmware Configuration Tool v2 on Sat May 04 2019 23:30:24 GMT+0100 (British Summer Time)
; Wait for set temperatures to be reached
M116 P0; wait fot T0 to get up to active temperature
Tpre0.g:
; tpre0.g
; called before tool 0 is selected
;
; generated by RepRapFirmware Configuration Tool v2 on Sat May 04 2019 23:30:24 GMT+0100 (British Summer Time)

M116 P1 S10 ;wait till tool 1 has got within 10deg of it's standby temp
So I wait for T1 to cool down to within 10deg of it's standby temp (typically 15-20deg lower than active). That's because I find it take a lot longer for the old tool to cool down enough than it does for the new one to heat up.
Then it switches over and waits for T0 to get up to active temperature before continuing.
I though I had extra retraactions in there, but it seems I took them out.One thing to think about is what happens at the start of the print (you want both tools to be up to temp before you start), but also what happens when you restart a print.
Also, there are probably much better & more clever things you can do than I have!
-
@engikeneer said in A bit confused about Tools positioning:
@the_dragonlord Sorry didn't get a chance to get my tool change macro's yesterday, but here they are for T0 (T1 is the same, just reversed)
Tfree0.g - empty
Tpost0.g:
; tpost0.g
; called after tool 0 has been selected
;
; generated by RepRapFirmware Configuration Tool v2 on Sat May 04 2019 23:30:24 GMT+0100 (British Summer Time)
; Wait for set temperatures to be reached
M116 P0; wait fot T0 to get up to active temperature
Tpre0.g:
; tpre0.g
; called before tool 0 is selected
;
; generated by RepRapFirmware Configuration Tool v2 on Sat May 04 2019 23:30:24 GMT+0100 (British Summer Time)

M116 P1 S10 ;wait till tool 1 has got within 10deg of it's standby temp
So I wait for T1 to cool down to within 10deg of it's standby temp (typically 15-20deg lower than active). That's because I find it take a lot longer for the old tool to cool down enough than it does for the new one to heat up.
Then it switches over and waits for T0 to get up to active temperature before continuing.
I though I had extra retraactions in there, but it seems I took them out.One thing to think about is what happens at the start of the print (you want both tools to be up to temp before you start), but also what happens when you restart a print.
Also, there are probably much better & more clever things you can do than I have!
excellent, thanks but where do you set the Tool's stand by temperature?
May I ask you how can you add "formatted" parts of g file here? (line nunbers, colors etc.) -
@the_dragonlord I put a line in my start code that uses
G10 P__ S__to set them. I then have a python script that comments out all the other temp setting commands that PrusaSlicer puts out.For the code snippets, there's an option on the forum called code snippet. The button looks like this </> and is next to the Bold, Italics bullet points etc. You can then either put it inline like I have in this post, or as a block like I did in the others
E3D TC with D3Mini and Toolboards.
Home-built CoreXY, Duet Wifi, Chimera direct drive, 2x BMG, 300x300x300 build volume
i3 clone with a bunch of mods -
@engikeneer said in A bit confused about Tools positioning:
@the_dragonlord I put a line in my start code that uses
G10 P__ S__to set them. I then have a python script that comments out all the other temp setting commands that PrusaSlicer puts out.For the code snippets, there's an option on the forum called code snippet. The button looks like this </> and is next to the Bold, Italics bullet points etc. You can then either put it inline like I have in this post, or as a block like I did in the others
great! thanks again for everything!
-
@engikeneer said in A bit confused about Tools positioning:
@the_dragonlord I put a line in my start code that uses
G10 P__ S__to set them. I then have a python script that comments out all the other temp setting commands that PrusaSlicer puts out.For the code snippets, there's an option on the forum called code snippet. The button looks like this </> and is next to the Bold, Italics bullet points etc. You can then either put it inline like I have in this post, or as a block like I did in the others
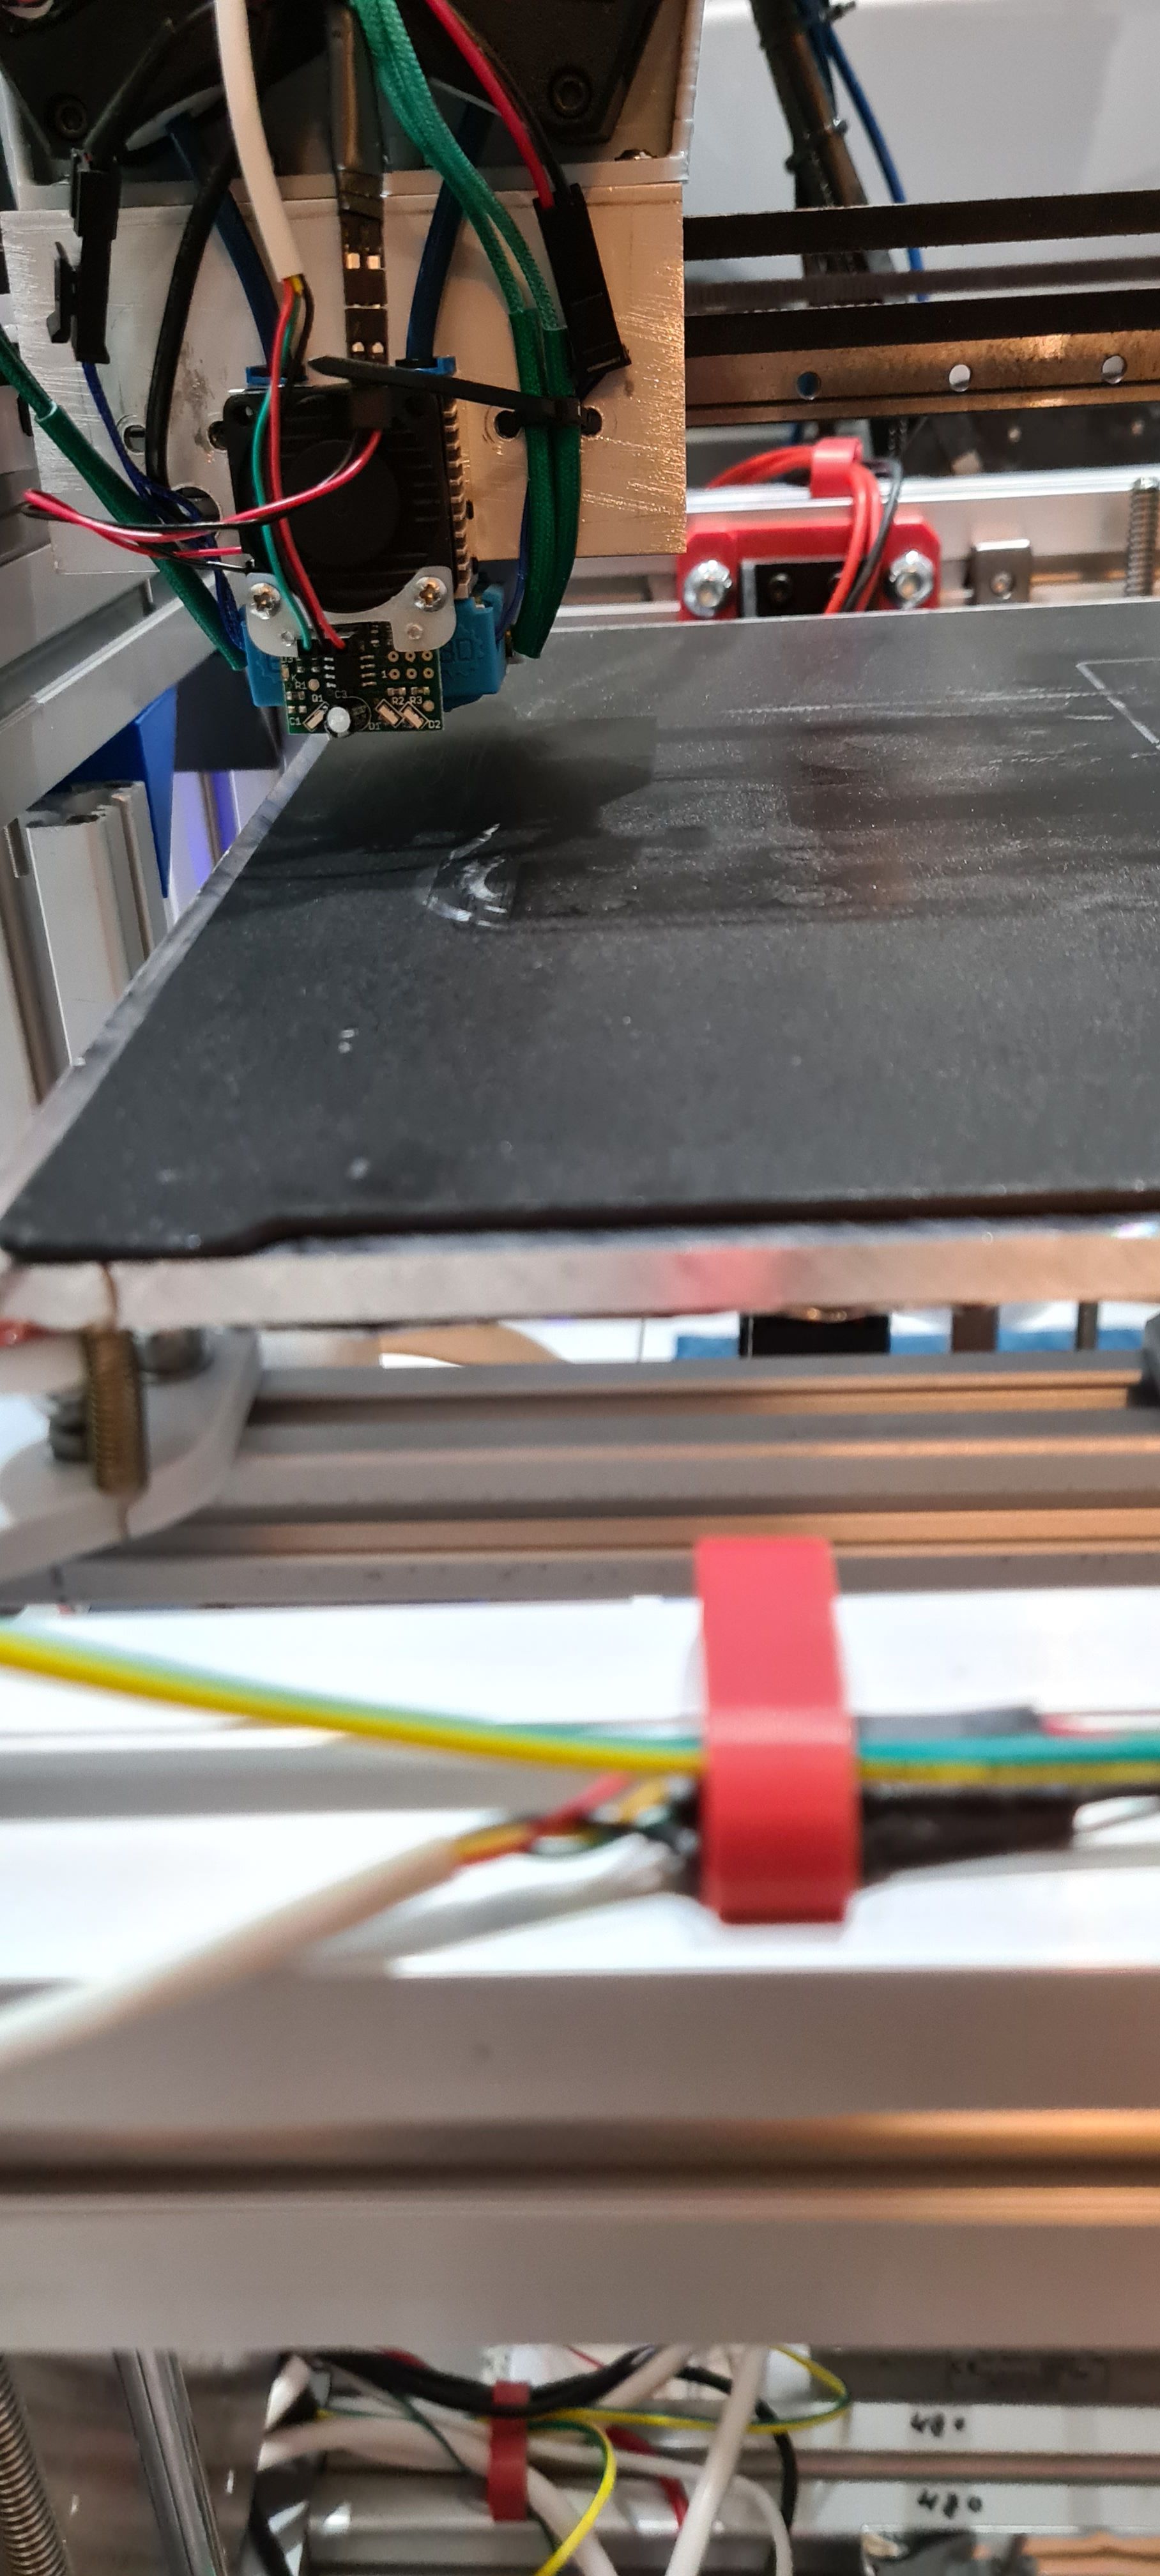
Hi, if I could I would like to ask you some advices...I'm starting to print with PLA, at now I want to male the thin wall test to calibrate the extrusion width....I'm experiencing a lot of problems....I'm starting with only one extruder and as you can see the print shows a lot of artifacts wich are very awful....as I told I'm printong PLA...I've started the first time at a temperature of 200°C, now I'm trying at 220°C but the result dosn't look beeter at now (I'm finishing the print). Have you evere noticed something like this? Have you suggestions for me?
Edit: even at 220°C the result is awful....I've printed using the other extruder and the print is perfect....I'm starting to print to have a failed throat in the left extruder...what do you think?