Laser Controller, Connection, Programming
-
I Read a few Threads but nothing that explains everything:
i want to connect a Laser PSU (Co2) to the Duet 3.
(it's a JG80W Powersupply)
=> I connected 5V, Ground and the IN Signal of the Powersupply to the respective
out9,laser,vfd Port.
(in Some Comments it's said that you don't should connect the 5V from the Power Supply=
but it's a 5V EXT Port so it will be ok in my opinion?!herefore i wanted to configure it as "fan" to have a sliderbar from 0-100%
=> i Connected the TL Signal to io3.out (to switch the laser on and off.
My config is as follows:
; Laser Mode
M452 C"out9" R255 F200        							 ; Enable Laser mode, on out9, with max intensity being 255, and a PWM frequency of 200
;Laser M950 P7 C"!out9,laser,vfd" Q20000 ; Assign PWM Output out9 to Laser Controller on Port 7The Question now, how to switch it on or off in one Macro?
i Saw that in another Post:
if state.gpOut[1].pwm == 1
	M42 P7 S0
else
	M42 P7 S1
i also have connected a Waterpump on the out1 port (with a Flyback diode). (VIN/24V on/off)
Questions now:
- is the Wiring OK that way?
- How to determine the state from the out9,laser,vfd port to use that in the macro?
- is it possible to Control the Waterpump speed? for example if the Temperature of Sensor XY is
higher than 30 degree, set out1 to 30%, is it higher than 50 degree set it to 50% and so on.
-
I don't know about this subject, but maybe THIS page will help. Skip the beginning part with the circuit for Duet2 since you have a Duet3
-
@alankilian
That’s one way i used to get informations for it.
Btw. The M571 P"out9" F200 S255 command
Is also in my config but currently commented out.In the step „Controlling the Laser“ it‘s all about the „Automatic Sequence“….
I also want to control it over a macro (on/off) with the itensity of a sliderbar, i suppose i have to configure it as a fan with min max value from 0.05-1 (1=100%) -
i Played a little bit around with options...
the Config File is as Follows:
; Configuration file for Duet 3 (firmware version 3)
; executed by the firmware on start-up

; General preferences
G90                                                      ; send absolute coordinates...
M83                                                      ; ...but relative extruder moves
M550 P"Duet3"                                            ; set printer name


; Laser Mode
M452 C"out9" R200 F20000        						 ; Enable Laser mode, on out9, with max intensity being 200, and a PWM frequency of 20000

;Use this Control Command for Laser:
;Duet 3, RRF 3.x Beta:
;M571 P"out9" F20000 S20								 ; set Output on while extruder is commanded, frequency and value

; Drives
M669 K1													 ; set kinematic to core xy
M569 P0.0 S0                                             ; physical drive 0.0 goes forwards X
M569 P0.1 S0                                             ; physical drive 0.1 goes forwards Y
M569 P0.2 S1                                             ; physical drive 0.2 goes forwards ZL
M569 P0.3 S1 											 ; physical drive 0.3 goes forwards ZR
M569 P0.4 S1                                             ; physical drive 0.4 goes forwards W1
M584 X0.0 Y0.1 Z0.2 U0.3 W0.4                            ; set drive mapping
M350 X16 Y16 Z16 U16 W16 I1                           	 ; configure microstepping with interpolation
M92 X100.00 Y100.00 Z100.00 U100.00 W500.00              ; set steps per mm
M566 X1700.00 Y1700.00 Z200.00 U200.00 W200.00     		 ; set maximum instantaneous speed changes (mm/min)
M203 X26000.00 Y26000.00 Z4000.00 U4000.00 W5000.00 	 ; set maximum speeds (mm/min)
M201 X1100.00 Y1100.00 Z100.00 U100.00 W100.00        	 ; set accelerations (mm/s^2)
M906 X1200 Y1200 Z900 U900 W800 I10                		 ; set motor currents (mA) and motor idle factor in per cent
M84 S30    												 ; Set idle timeout

; Axis Limits
M208 X0 Y0 Z-150 U-150 W0 S1                             ; set axis minima
M208 X580 Y260 Z0 U0 W800 S0                        	 ; set axis maxima

; Endstops
M574 X2 S1 P"io2.in"                                     ; configure active-high endstop for low end on X via pin io1.in
M574 Y2 S1 P"io3.in"                                     ; configure active-high endstop for low end on Y via pin io2.in

; Fans
M950 F1 C"!out4+out4.tach" Q5000                 		 ; create fan 1 on pin out4 and set its frequency
M106 P1 C"Boardfan" S200 H-1                             ; set fan 1 name and value.
M950 F2 C"!out5+out5.tach" Q5000                 		 ; create fan 2 on pin out5 and set its frequency
M106 P2 C"RadiatorfanUpper" S100 H-1                     ; set fan 2 name and value.
M950 F3 C"!out6+out6.tach" Q5000                 		 ; create fan 3 on pin out6 and set its frequency
M106 P3 C"RadiatorfanLower" S100 H-1                     ; set fan 3 name and value.

; Waterpump
M950 F4 C"out1" 										 ; create fan 4 on pin out1
M106 P4 C"Waterpump" S0 H-1								 ; set fan 4 name and value. (Waterpump 24V / 16W)

; Tools
M563 P0 S"Laserhead"    		                         ; define tool 0
G10 P0 X0 Y0 Z0                                          ; set tool 0 axis offsets

;Laser
M950 F5 C"!out9,laser,vfd" Q20000						 ; Assign PWM Output out9 to Laser Power Supply on Port 4
M106 P5 C"Laserpower" S0 X150 H-1						 ; set Laser Power Supply name and maximum PWM value
M950 P6 C"io4.out"										 ; Assign Port 6 to io4.out (Laser ON/OFF)

; Miscellaneous
M501
M912 P0 S-13
M575 P1 S1 B57600                                        ; enable support for PanelDue
;M564 H0											     ; allow axis movement before homing, needed for Z axis
T0

; Variables
global LastZAxisPosition = 0
global LastUAxisPosition = 0
global PositionWriteCounter = 0
M98 P"0:/macros/VariableBuffer.g" 						 ; Update Axis Values from Z and U
Now i've encountered Following Problems:
- i don't have a toolfan but DWC has configured one?! (in the Fan Selection a Fan 0 exists)
in the Object Model Browser:
-
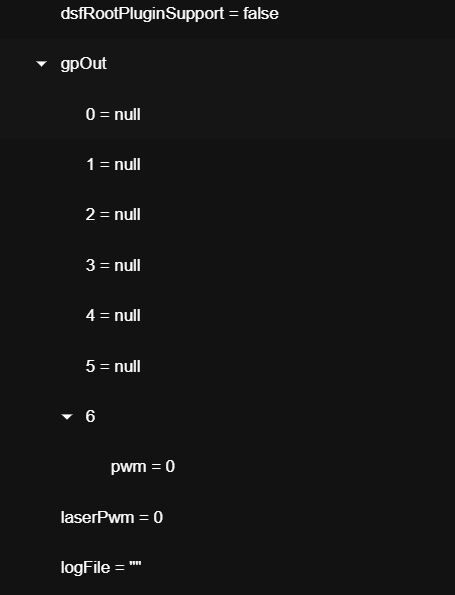
state, gpOut 0-5 are "null" and gpOut 6 are pwm????
-
P6 isn't configured as PWM but P5 (the Laserpower output should be a PMW output)
-
the Laser PMW Output or "FAN 5" is missing. i have only 4 Fans (3 Fans and 1 Waterpump) in DWC, but it's configured like the other "Fans"
-
is it possible to configure 2 Fans to 1 Port to Control 2 Fan Outputs with one Slider
or 2 Outputs (M950 F2 C"!out5+out5.tach+!out6+out6.tach" Q5000) to one Fan? -
how to determine if a IO output is 1 or 0 ? state.IO4.out ? what's the Declaration?
-
@neueklasse said in Laser Controller, Connection, Programming:
i don't have a toolfan but DWC has configured one?! (in the Fan Selection a Fan 0 exists)
What version of DWC/RRF?
What is the exact name shown and where is it shown? It may just be a vestige of the tool fan slider. Does it actually control anything? Screen shot? -
@phaedrux
RRF + DWC Version 3.4.0-b3 (beta 3), Duet MB6HC V1.01Thats the Fan Control: TOOL FAN is not existent in the config....

That's the gpOut file, gpOut 6 seems Wrong, gpOut 5 needs to be the PWM....
-
@neueklasse said in Laser Controller, Connection, Programming:
TOOL FAN is not existent in the config....
TOOL FAN is as I said, just a vestige of the DWC fan control. If you had a fan, that slider would control it when the tool it was assigned to was selected. As you have no fans, it's just an empty text label.
-
is it possible to "Clean that up"?
-
There are two places where those fans are listed. In one of them, there is a link to "change visibility" where you can deselect TOOL FAN and not display it. I'm not sure if that applies to both fan display locations or not. Forgive me, I can't remember if it's in status, or dashboard, but you'll find it poking around I'm sure. If that doesn't hide it, It would be a matter of duplicating that change visibility link for that fan display block as well which may already be in the works.
-
@phaedrux on the right side of the Status screen the visibility can be changed,
in the Dashboard Bar (like the Screenshot i made) it's still visible.
Good to know that's something in progress.