Guide for Duet 3 Mini 5+ using CO2 Laser
-
Setting up a laser is challenging enough from a safety standpoint and without proper documentation for wiring and software testing it becomes more challenging and potentially unsafe. Since there are many possibilities we can select from a hardware perspective, the purpose of this guide is to not steer someone into choosing my set up. Rather it is an example of how I was able to connect my system. My hope is that others will begin to add more information to this guide on how they were able to get their system going with their set up.
My laser is installed on a RatRig V-Core 3.1 500x500 3D printer. I have been 3D printing for seven years now. I wanted to upgrade to a larger printer and also have the ability to expand into laser cutting. Both the printer and the Duet3D hardware were chosen because they met both goals.
In order to keep this short this will not be a complete guide from start to finish showing every single component used like tubing, water connections, etc., or a step by step guide. The most important thing is how I got this working by showing my wiring and testing methods.
I am including the 3D printed parts I used for the laser mounts, mirror/focus head mounts, drag chains and water flow switch.
Components:
- CO2 Laser Tube 35W-45W 50mmx720mm
- Laser Power Supply 40W-50W
- Water Chiller 9L capacity 2.6gpm for 40W-50W CO2 Laser
- Adjustable Water Flow Meter Panel 0.5-5GPM 2-18LPM
- Water Flow Switch
- CO2 Laser Alignment Tool Red Laser Pointer
- CO2 Laser Head Whole Set
- CO2 Laser Second Mirror Mount
- Laser Cutter Honeycomb Working Panel
- CO2 Laser Eyes Protection Glasses/Goggles
Wiring:
BE EXTREMELY CAREFUL WORKING AROUND LASER POWER. My first laser tube was bad (different brand) and was arching to the frame of my printer from the base of the tube on the hot end side. You can and will be killed if you do not take your time and take every precaution when working around high voltages
After setting everything up except the connection to the Duet, I used the built in test fire button on the PSU to set up my mirror alignments (see the many YouTube videos on how to do this). If the laser does not fire with the bare minimum power connections then there is a problem with either your laser power supply or laser. Again be extremely careful when working around 16-20K volts. Also note to not hold down the test button for long periods because it will run the laser at 100% which will quickly kill the lifetime of your laser.
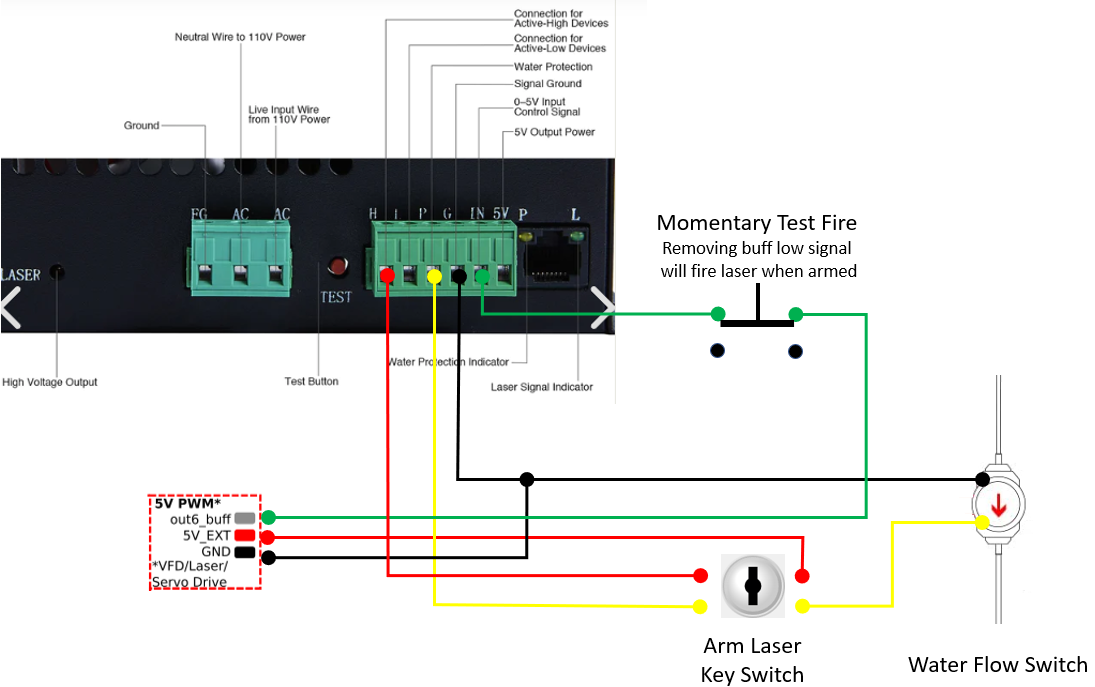
After verifying the laser fires and setting up my mirrors I connected the Duet3D according to the wiring below. Note that you can easily disconnect the Duet3D from the PSU by unplugging the wire block connector.
Macros:
I created a macro to switch my 3D printer to laser mode. For me this is essential since I need to home my Z axis and then raise it up first using the bare bed before placing the removable honeycomb laser panel onto the print bed.;Switch to Laser Mode ;Tools M563 P1 S"Laser" F0 ; define tool 1 Laser G10 P1 X0 Y0 Z0 ; set tool 1 axis offsets G10 P1 R0 S0 ; set initial tool 1 active and standby power to 0 M452 C"out6" R255 Q500 ; enable Laser mode, on out6 T1 ; select laser as default tool G21 ; metric values G32 ; True Bed Leveling G90 ; Absolute positioning G1 H0 X0 Y0 Z50 F10000 ; Go to 0,0 50mm with bed below M98 P"0:/macros/leds/leds_red" ; change LEDs to red to indicate laser mode M117 Laser mode selected ; display mode message on LCD screenGCode test commands:
The below commands are what I use to test that my laser is working using the Duet after switching to laser mode using the above macroG0 X0 Y0 S0 ;Move to 0x0, zero laser power G1 X100 Y100 S40 F500 ;Turn on laser and move to 100,100 using 40/255 power at speed of 500Software
Lightburn - While this software is not free or will give you the ability to directly control your Duet3 board directly, it is quickly becoming my favorite software as a new laser hobbyists.Here are the settings I am using in Lightburn
-
Device Setup
When you first start the program it will prompt you for a device. Select GRBL and then set the size of your laser bed.
Finish the setup then you will be at the main screen. -
Set up the Device Settings
Click on Edit>Device Settings
Basic Settings tab - set the S-value max to 255
GCocde tab - Turn on Use G0 moves for overscan
GCocde tab - Turn on Emit S value with every G1 command. This is a new command that is planned to be released in the new 1.3.xx release. Thank you Lightburn support for working with me to get this implemented for the Duet community!
Gcode tab - Start GCode
M106 S255 ; Turn on air assist fanGcode tab - End GCode
M107	        ; turn off fan
G90       	; relative moves
G0 X0 Y500	; move laser head out of the way
G91     	; absolute moves
G0 Z100     	; move bed down 100mm
Pictures:
3D Parts:
This is a working document and I will be adding more information soon
-
@kchristopher
Interesting start, I'll follow with great interest.
Just a small remark from me: the water chiller CW3000 doesn't cool below environment temperature. At room temps above 25°C it is useless and will reduce laser lifetime. Only the CW5000 is able to chill water, hence the higher price. CW5200 is overkill, the only difference to CW5000 is, that it can also heat water.
I currently use a waterpump submersed in a 20liter container. If the room temp is around 20C, I can cut stuff for around an hour which is perfectly sufficient.
Other K40-users use icepacks to cool down the water for longer engraving sessions.
I've also added anti-freeze to the demineralized water. It will hopefully stop algae to grow in my laser tube.... -
@kchristopher that´s cool....just hoping you continue updating the post
thanks -
@o_lampe
Thanks for the reply. Yes I knew that before I ordered and even hesitated to post it here as someone with higher laser use than me might think it sufficient. I almost went with an aquarium pump in a bucket of water, but for me it was more important to have a closed water system (there is a cap on the tank) that would not get contaminated and cause issues from high water conductivity. But again this is going to be a guide on how to get this working. I am now working on software issues for example with Lightburn and it not setting Sxxx for every G1 move.In reference to using antifreeze or what type of water to use, I used this article to make my decision. I ended up deciding to use distilled water and change it every three months by flushing for one hour with distilled water mixed with 4oz bleach for every gallon and then refill with fresh distilled water. Maybe I will add the article also as a reference.
-
@kchristopher there a few users using a k40 with an SKR2 running the STM32 port. I use a fly-e3-pro.
@paulg4h wrote a nice little guide here https://github.com/TeamGloomy/LPC-STM32-RRFUserConfigs/tree/master/K40 CO2 Laser - SKR 2 - ESP - paulg4h -
@kchristopher btw, the link for the honeycomb working panel doesn't work
-
This post is deleted! -
This post is deleted! -
@jay_s_uk said in Guide for Duet 3 Mini 5+ using CO2 Laser:
there a few users using a k40 with an SKR2 running the STM32 port. I use a fly-e3-pro.
Yeah I saw that article a while back. I spent about six months researching first 3D hardware and then laser hardware before deciding on my current configuration (yeah I am an engineer and sometimes plan too much). Because of this I think I reached the end of the internet for K40 searches lol.
btw, the link for the honeycomb working panel doesn't work
fixed, thank you!
-
This post is deleted!