Active chamber heater
-
Hi everyone. I have been experimenting with an Arduino controlled active chamber heater for a Prusa i3. This has been successful and so my next step is to build a chamber heater for my Duet 3 Mini 5+ delta machine. This got me thinking as to how I might control the chamber heater. Presently the Arduino
does everything, so brings the chamber up to temperature and then I start the printer printing. Then later when I see the print is done I can slowly cool the part down. All very manual.For the Duet I'm thinking there is possibly a better way to do this. So I took a look in the Duet instructions and I see info on how to connect a simple chamber heater with thermistor and heating element. The thing is my chamber heater is more elaborate (Eg. multiple independently controlled fans) and so it would be better if the Duet could somehow tell the Arduino the desired temperature and the Arduino could report back the current temperature. Or something like that. I'm wondering if there is a meaningful way to do this and how. My brief searches suggest that canbus is used by a number of external boards, but if I went down this path would this require changes to the Duet firmware?
On one hand I have experience building and writing code for canbus devices for my day job. On the other hand, I don't want to embark on a massive mission.
-
@martinv There's a few ways you can control the Arduino from the Duet:
- Via serial port: you could send commands to the Arduino via the PanelDue port. The Arduino needs some programming to understand what is being sent, but could also provide feedback. This is probably the preferred method. A couple of projects that do this: https://docs.duet3d.com/en/User_manual/Connecting_hardware/IO_CNC_Pendant and https://github.com/mule1972/NeoPixelBLVmgn
- Via a pin that supports I2C: somewhat similar to the above
- Via a digital or PWM pin: you could use a digital (for on/off) or PWM pin on the Duet, and set that at a specific output, for the Arduino to read and set the chamber heater.
All of the above have been done at various times, search the forum for examples. Note that Arduinos usually run on 5V, while Duet run on 3.3V, so you may need to level shift between them, depending on which Arduino you have.
Ian
Bed-slinger - Mini5+ WiFi/1LC | RRP Fisher v1 - D2 WiFi | Polargraph - D2 WiFi | TronXY X5S - 6HC/Roto | CNC router - 6HC | Tractus3D T1250 - D2 Eth
-
@droftarts the serial port sounds like a good idea to me. As you say there is the opportunity for feedback. Thanks for the idea!
-
@droftarts Hmm, having had a look at those two projects as well as generally reading up on PanelDue it looks to me like the Duet sends status information (bed, hotend temperatures etc.) to the PanelDue and the PanelDue sends control information like axis movements to the Duet. So if you're wanting to get in the middle of that, it's all good. I'm not presently seeing how I might use this for a chamber heater interface however. The communication looks to be in the wrong direction, as in the Duet might tell the PanelDue the chamber temperature, not the other way round. Am I missing something?
What I kind of need is a way to see the G-code "as it goes by" to the printer so that I can control the chamber heater. Then somehow to report the chamber temperature back to the Duet. Hmm...
-
@droftarts Ahh! I think I might have found something useful - M118.
Eg. M118 P2 S"SET_TEMP 60"
This looks to send the string "SET_TEMP 60" to serial port 2 of the Duet, which I could pick up using the Arduino. Not sure yet how I could send info in the other direction though; like chamber presently at 53C. Or how I could get the Duet to wait until the temperature hits 60.
-
@martinv using M118 to send custom commands is one possibility. Another would be to replace the Arduino with a SAMMYC21 development board and adapt the code that we provide for that board to include the functions that the Arduino does currently. That way you would use regular M141 and/or M191 commands to control the chamber heater. See https://docs.duet3d.com/en/Duet3D_hardware/Duet_3_family/Using_the_Sammy-C21_development_board_with_Duet_3.
Duet WiFi hardware designer and firmware engineer
Please do not ask me for Duet support via PM or email, use the forum
http://www.escher3d.com, https://miscsolutions.wordpress.com -
@dc42 Thanks for the reply. I took a look at the link, but decided that's quite a departure from the Arduino and would be quite a lot of work to re-implement everything for a new development environment that's otherwise low on my radar. I'll hopefully set up a quick test in the coming days to have a look at the M118 command in more depth.
-
I thought I'd post an update on the enclosure heater design. While I still don't have an enclosure for the Duet3D delta printers I've built, I have an enclosure on a Prusa i3 that I do heat, using the same heater controller design.
Splash screen:
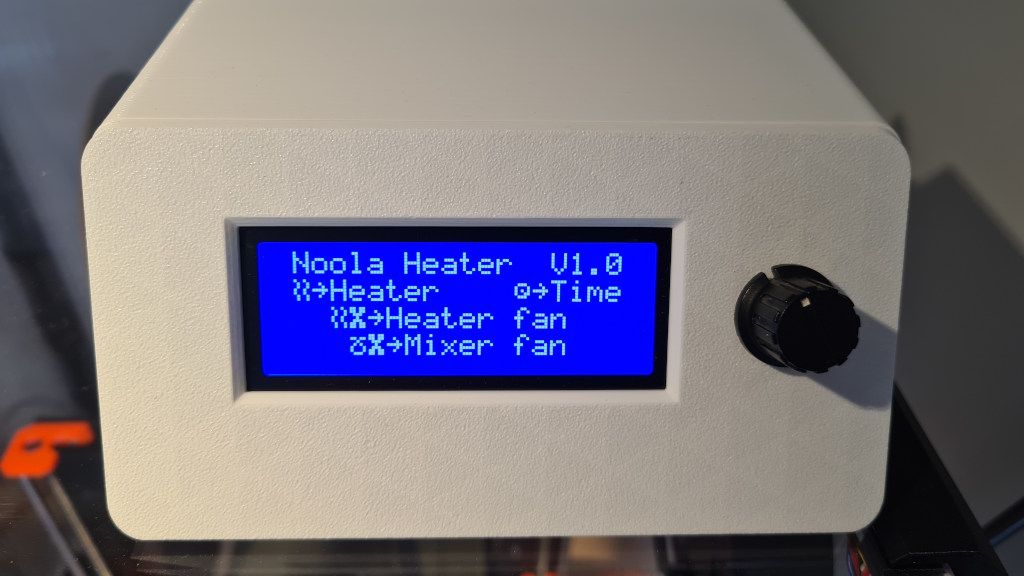
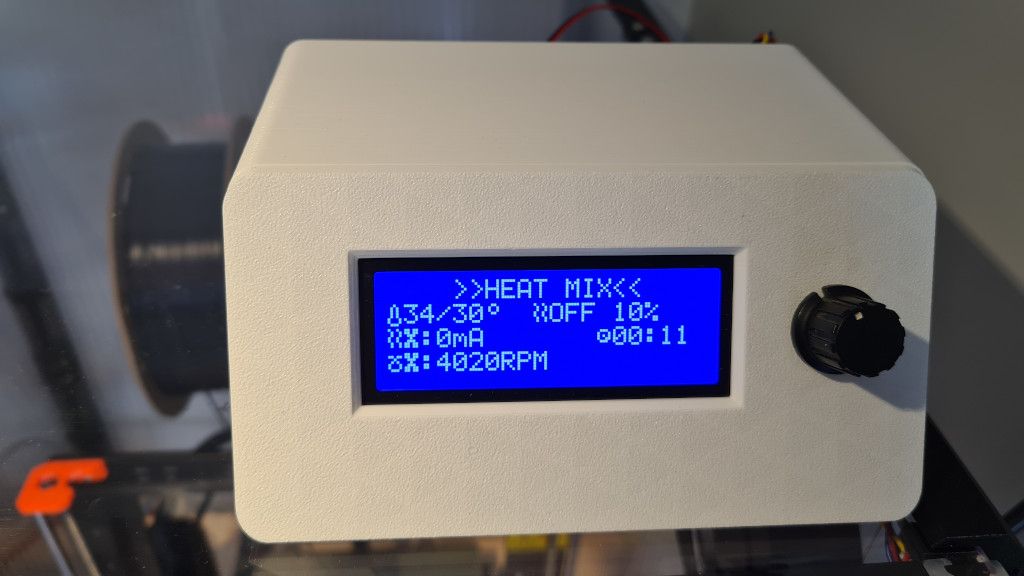
The unit measures temperature, current flow through the heater element fan and RPM of the 'mixer' fan. I have only briefly hooked up the serial port and it wasn't working, so something to investigate there. So it's all manual for now.
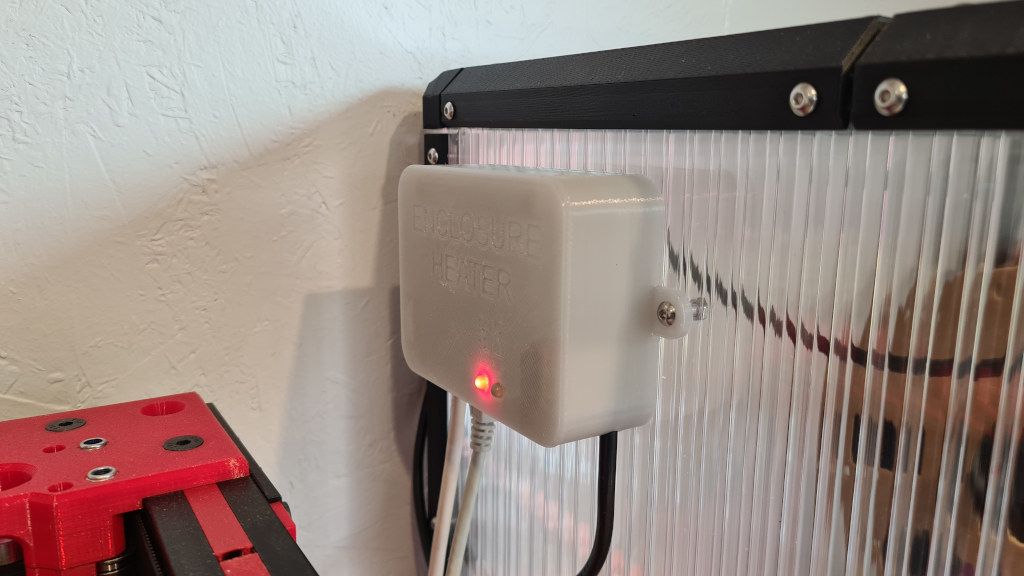
Driving the mains powered heater element is handled by a separate box using a relay.
-
@martinv what is the chamber heater controller actually controlling? How many heaters, fans, temperature sensors etc?
-
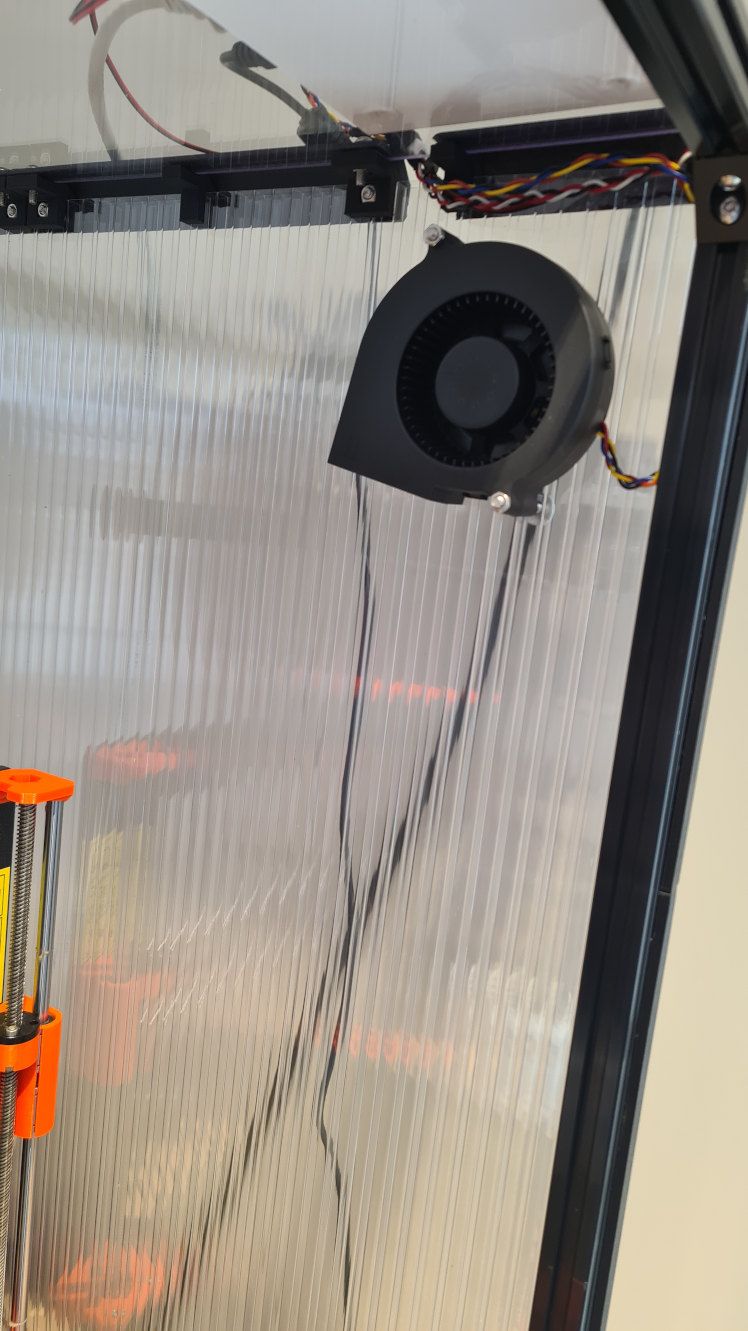
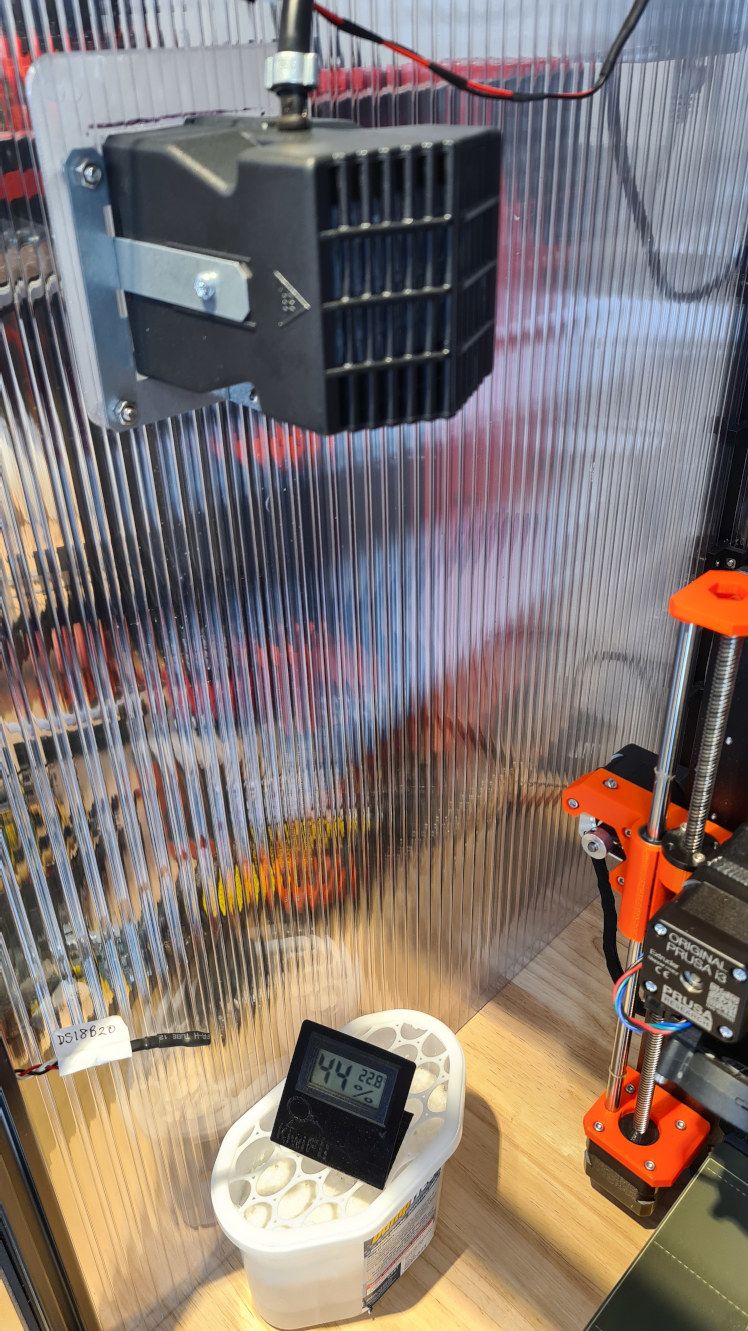
@T3P3Tony The heater is a combined 24V fan and 400W mains voltage heating element mounted towards the top on the left hand side of the enclosure. It brings in air from outside the enclosure, and, while it's not easily visible, the rear of the enclosure hangs over the back of the work bench, so the cooler air lower in the enclosure air exits at that point. I debated for a long time whether to just recycle (reheat) the air in the enclosure, but I hadn't worked with this kind of heater before and didn't know how hot the 'input' air could safely be, so I went for the safe option, and heat room temperature air. It looks like the heater is designed to be mounted on the outside of an enclosure, but I couldn't find any more guidance on the data sheet. This work space is not occupied, so I have no problems with potentially harmful ASA and other particles from engineering filament being blown into the room.
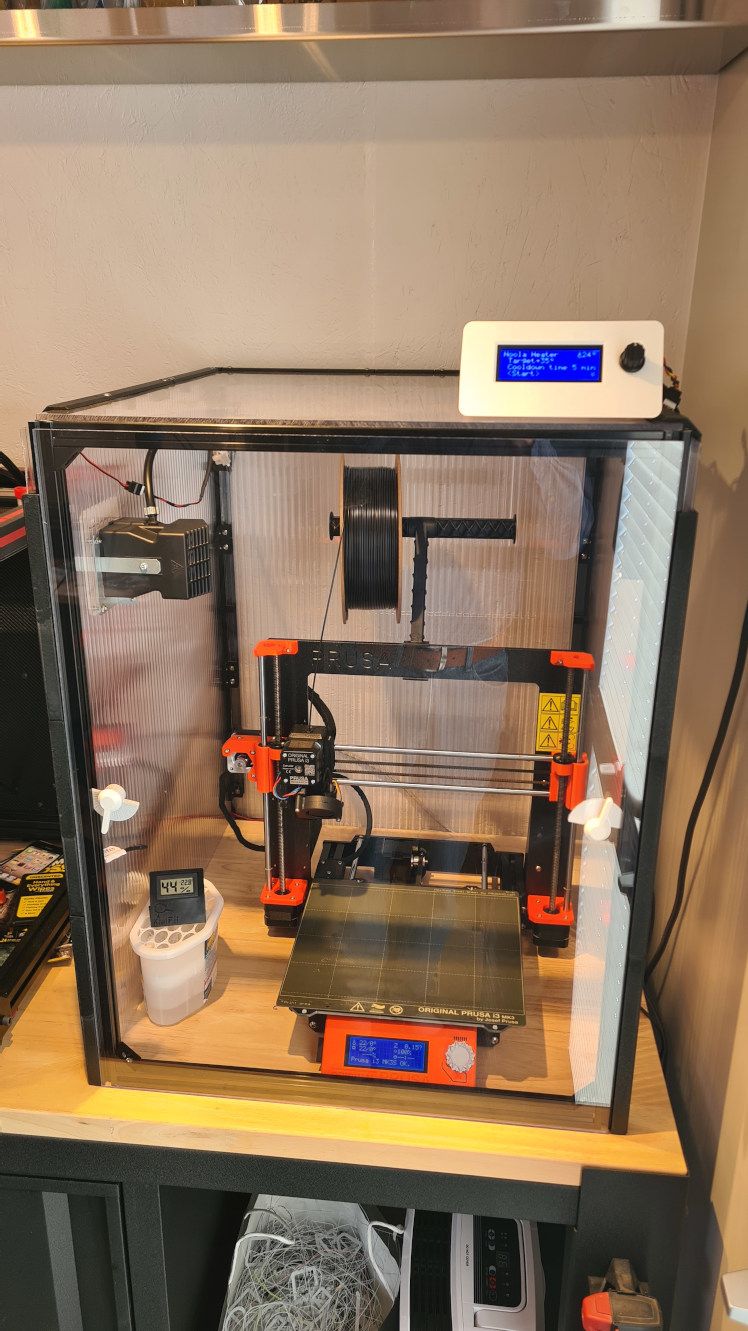
There is a blower fan that is used for the initial stage of heating in order to mix the air thoroughly throughout the enclosure.
I have a single DS18B20 temperature sensor.
I'm using a simple heating thermostat algorithm (bang bang) to turn the heating element on and off. I found the location of the temperature sensor is critical and sensitive. At one extreme, if the sensor is in the hot air stream the heater will of course turn off far too early. At the other extreme, say if the sensor is tucked away in the enclosure frame tubing, the air in the enclosure gets far too hot before the heater will turn off. What I have found is that it's best where it is in the photo. I think it's best to have a sensor that reacts a little on the fast side, and just let the whole setup stabilise for a while, than risk wild temperature swings of a too slow sensor response. Yes, I could implement a PID system, but that would be more work.
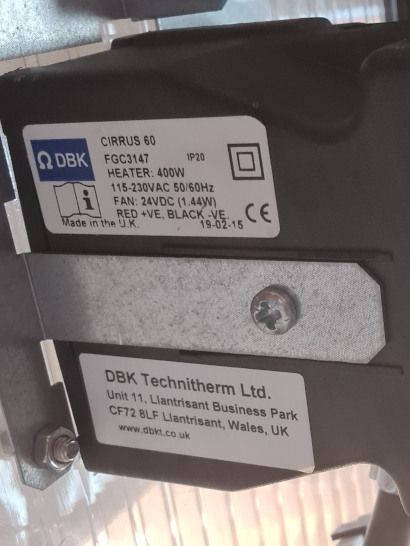
The heater unit spec is as follows.
As I say, this is not hooked up to a Duet, but the controller does have a serial interface that I designed to work with my Duet equipped machines. I'm hoping that one day I'll have an enclosure ready for those, and can do something similar.
Incidentally the enclosure is made from 8mm twin wall polycarbonate (roofing material), which is cheap, and for the parts where I want to see in it's made from 4mm Lexan (polycarbonate). This was about the best bang for the buck I could manage here in New Zealand, but it still cost a few hundred NZ dollars (maybe USD$200). The panels are joined together using brackets printed from eSun ABS-MAX which is UL94V0 rated filament. There is also a smoke detector nearby and a second one that is wired to an occupied area.
Regards,
-Martin