@jay_s_uk thanks for the quick response!
That makes good sense! I'll write that in and let you know how it goes when everything is up and running!
@jay_s_uk thanks for the quick response!
That makes good sense! I'll write that in and let you know how it goes when everything is up and running!
@droftarts Thanks Ian, I'll give that a go! Appreciate the support!
Here is my code for the parts that are relevant:
config.g
; Configuration file for Duet
; executed by the firmware on start-up

; Configuration files
M98 P"config-drives.g"
M98 P"config-axes.g"
M98 P"config-axes-endstops.g"
M98 P"config-axes-limits.g"
M98 P"config-extruder.g"
M98 P"config-fans.g"
M98 P"config-heater.g"
M98 P"config-network.g"
M98 P"config-probe.g"
M98 P"bed.g"

; Other Settings
M451 	   			; Put the machine into FFF Modes
G21
G90 	  			; Set absolute coordinates
G54 	   			; Change workplace coordinates to set 1

; User Configuration files
M98 P"config-user-settings.g"

M501 ; Load Stored Parameters

M950 J1 C"e1stop"				; Emergency stop
M581 P1 T0 S0 R0				;
M582 T0 S1					; Check if estop active
T1
config-drives.g
; Drive configuration executed by config.g

M569 P0 S0                 ; physical drive 0 goes forwards
M569 P1 S1                 ; physical drive 1 goes forwards
M569 P4 S0                 ; physical drive 4 goes forwards
M569 P3 S0                 ; physical drive 3 goes forwards
M569 P6 S1		   ; physical drive 6 goes forwards
M584 X0 Y1:3 Z4 E6 P3      ; set drive mapping DUAL Y
M569 P2 R-1		   ; set drive 2 to not monitored - burned driver
			   ; Define axis X on drive 0, axis Y on drives 1 and 3, axis Z on drive 2
config-axes.g
; Axes configuration executed by config.g

M350 X16 Y16 Z16 E16 I0                  ; configure microstepping with interpolation
M92 X400 Y400 Z400 E424.90               ; set steps per mm
M566 X900 Y900 Z60 E120.00               ; set maximum instantaneous speed changes (mm/min)
M203 X6000 Y6000 Z400 E3000             ; set maximum speeds (mm/min)
M201 X500 Y500 Z40 E200                  ; set accelerations (mm/s^2)
M906 X1900 Y1900 Z1900 E1000 I30         ; set motor currents (mA) and motor idle factor in per cent
M84 S30                                  ; Set idle timeout
config-extruder.g
M563 P1 D0 H1 F0:1 S"Extruder"                ; define tool 1
G10 P1 X0 Y0 Z0                               ; set tool 0 axis offsets
G10 P1 R0 S0                                  ; set initial tool 1 active and standby temperatures to 0C
T1
Please let me know if there is more info that could be useful!
I've desoldered the pads on the UART pads, the reverse of step 4 in the in this link.
After doing this there is no more vibration and nothing now seems to happen.
Any other suggestion would be appreciated!
Thanks!
@droftarts Hi Ian,
Thanks for your response and suggestions.
That link is correct for the driver.
When the motor vibrates it doesn't seem to feel harder to turn? That may however be because the extruder is geared? The extruder is a creality sprite pro ([Sprite pro] (https://www.3djake.uk/creality-3d-printers-spare-parts/sprite-extruder-pro?sai=11996&gclid=CjwKCAiA9ourBhAVEiwA3L5RFsn4hYGqdPLLDWS2xImA0Bskaq2V_2cee9obOMTV9tudYBkrpWim6hoCQ2oQAvD_BwE))
As for the configuration of the driver, I'm not sure. I looked for info regarding it's state, hoping to use it in standalone mode but as you've said, there isn't much info on it. I've tried to pulling the PDN pin to ground but that doesn't do much either from what I can tell. My drivers are currently in the factory condition as the image below with the resistor (in red) on the left hand image: 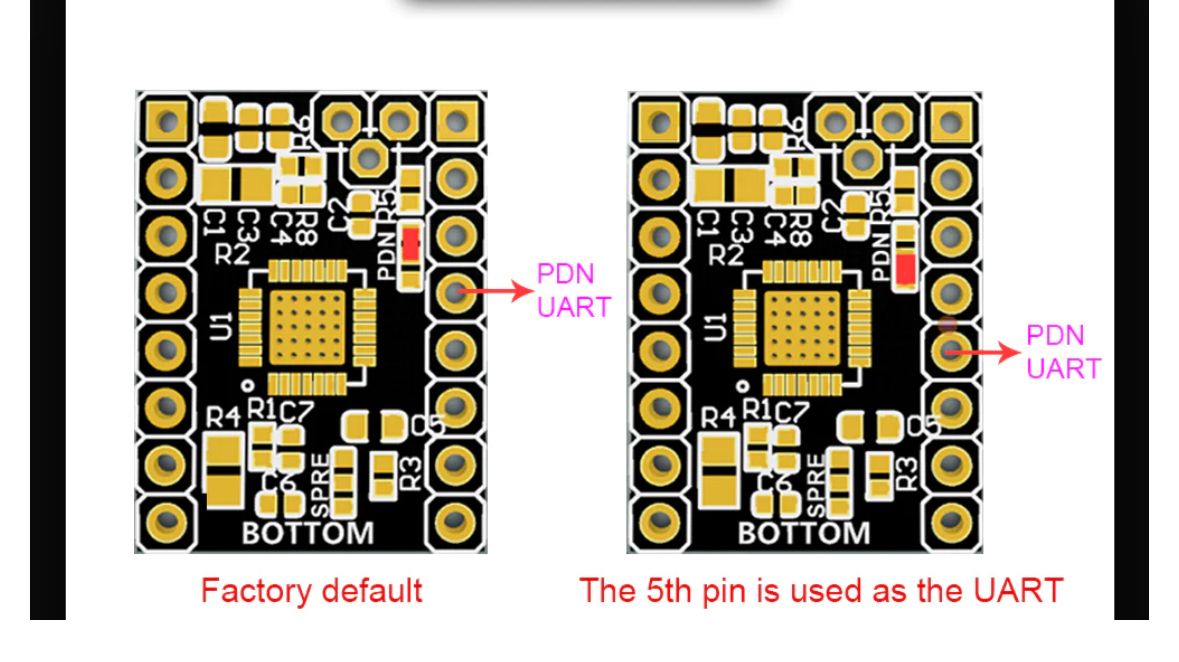
I have set the current using the pot and I've also pulled the ms1 and ms2 pins up to 3.3V using the VCC_IO pin to set the microstep as suggested by the manual on the Biqu driver page you've linked but none of it seems to make much difference.
Do I need to remove the resistor from the PDN pads all together maybe? Or am I missing a blinding obvious piece of course?
Something else I discovered after posting was that I was initialising the drivers (M584) after the axis commands (M350 and so on), which I discovered was wrong. I then moved the M584 command to earlier in the code and now the motor doesn't vibrate at all anymore...so am I missing something with the code? I'll drop my full code in a zipped file when I get back to my pc.
Thanks for your help so far!
Hi there,
I've been trying to figure out what I'm missing but have not had much luck. Hopefully someone where is able to help.
I need an extra extruder for my setup on my Duet2 wifi and had some TMC2209 bigtreetech drivers to use. Here is a pin description: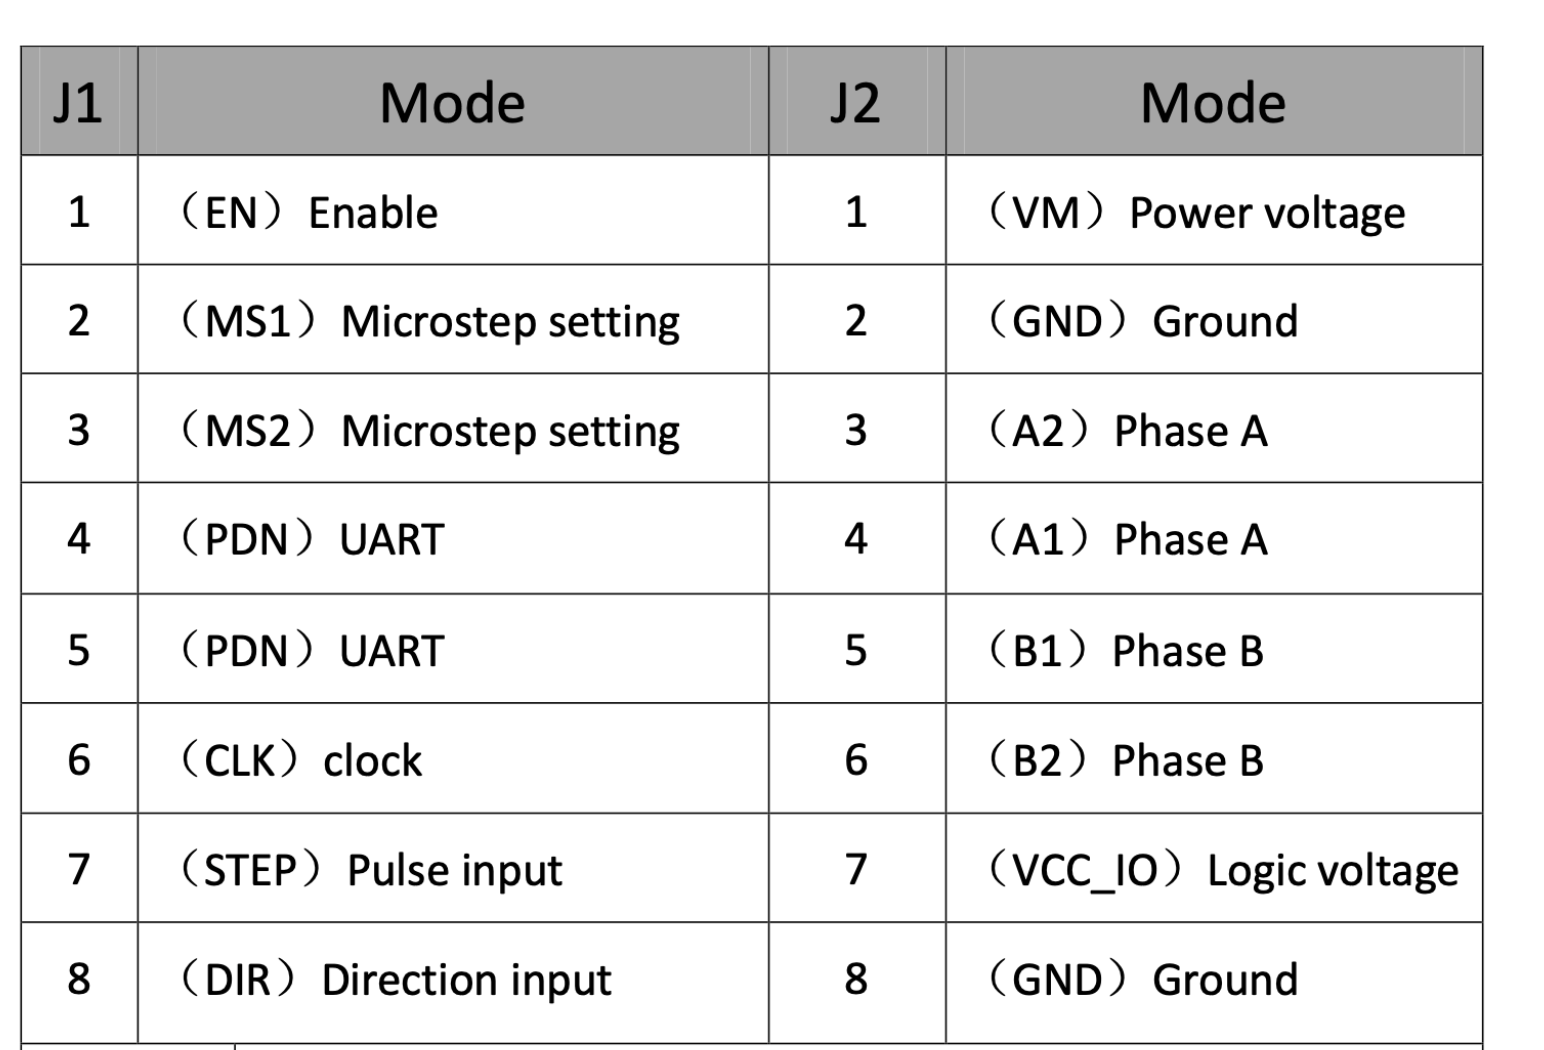
Currently I have connected wires as follows:
TMC2209-----Duet Expansion
Enable---------E2_EN
STEP------------E2_STEP
DIR--------------E2_DIR
VCC_IO-------- +3.3V
GND (8)--------GND (30)
Motor pairs are correctly wired (Triple checked)
I've wired 24V directly to the VM and GND pins on the driver as necessary
Snipits from my code:
;Firmware 3.3

;Drives
M569 P5 S0
M584 X0 Y1:3 Z4 E5 P3

;Extruder
M563 P1 D0 H1 F0:1 S"Extruder"

;Axis setting
M350 X16 Y16 Z16 E16 I0
M92 X400 Y400 Z400 E424.90
Basically, I can't seem to get my extruder drive to move, it just vibrates. I've checked its working by connecting it to an internal driver (E1) and the stepper functions as it should with the all the firmware settings below, with the exception of the drive mapping (E5). I've swapped out stepper drivers as well and its still the same.
Any help would be greatly appreciated!
Thanks
@jay_s_uk great thanks!
Appreciate all your efforts!
@jay_s_uk okay thanks.
So I'll remove U from drive mapping, step setting and all of that kind of stuff.
I hope I'm understanding this correctly, but could you just confirm the logic please.
During the homey, without splitting the axis but defining the endstops as you've suggested in the first instance, the y axis should self square, right?
Y1 and Y2 move towards the endstops and Y1 only stops when it triggers ystop (the endstop assigned to it) and Y2 only stops when it triggers zstop. When both have stopped (whether they've travelled the same distance or not, just both triggering their respective endstops) they will then both move a defined amount back off the triggers and then set that as Y0. Now provided the endstops are in the "square position" the axis should now be squared?
Hope that makes sense!
@jay_s_uk is that because the axis don't need to be split like in 2.x?
Sure thing:
; Configuration file for Duet WiFi (firmware version 3.3)
; executed by the firmware on start-up
;
; generated by RepRapFirmware Configuration Tool v3.3.10 on Fri Jun 10 2022 23:32:09 GMT+0100 (BST)

; General preferences
M453						; CNC Mode
G21						; Work in millimetres
G90                                             ; send absolute coordinates...
M83                                             ; ...but relative extruder moves
M550 P"Armand CNC"                              ; set printer name

; Network
M551                                            ; set password
M552 S1                                         ; enable network
M586 P0 S1                                      ; enable HTTP
M586 P1 S0                                      ; disable FTP
M586 P2 S0                                      ; disable Telnet

; Define axis X on drive 0, axis Y on drives 1 and 3, axis Z on drive 2 and dummy axis U on drive 3
; Show only axis X, Y and Z

; Drives
M569 P0 S1                                      ; physical drive 0 goes forwards
M569 P1 S1                                      ; physical drive 1 goes forwards
M569 P2 S1                                      ; physical drive 2 goes forwards
M569 P3 S1                                      ; physical drive 3 goes forwards
M584 X0 Y1:3 Z2 U3 P3                           ; set drive mapping DUAL Y
						; Define axis X on drive 0, axis Y on drives 1 and 3, axis Z on drive 2 and dummy axis U on drive 9
						; Show only axis X, Y and Z
M350 X16 Y16 Z16 U16 I1                         ; configure microstepping with interpolation
M92 X400.00 Y400.00 Z400.00 U400.00             ; set steps per mm
M566 X300.00 Y300.00 Z12.00 U300.00             ; set maximum instantaneous speed changes (mm/min)
M203 X15000.00 Y15000.00 Z2700.00 E15000.00 ; set maximum speeds (mm/min)
M201 X800.00 Y800.00 Z20.00 E800.00             ; set accelerations (mm/s^2)
M906 X1900 Y1900 Z1900 E1900 I30                ; set motor currents (mA) and motor idle factor in per cent
M84 S30                                         ; Set idle timeout

; Axis Limits
M208 X0 Y0 Z0 U0 S1                             ; set axis minima
M208 X610 Y528 Z120 U528 S0                     ; set axis maxima

; Endstops
M574 X1 S1 P"!xstop"                             ; configure switch-type (e.g. microswitch) endstop for low end on X via pin xstop
M574 Y1 S1 P"!ystop"                             ; configure switch-type (e.g. microswitch) endstop for low end on Y via pin ystop
M574 Z2 S1 P"!zstop"                             ; configure switch-type (e.g. microswitch) endstop for high end on Z via pin zstop
M581 X Y Z S1 T0 C0  				 ; Enable endstop triggers while machining

; Z-Probe
M558 P0 H5 F120 T6000                           ; disable Z probe but set dive height, probe speed and travel speed
M557 X15:600 Y15:500 S20                        ; define mesh grid

; Heaters
M140 H-1                                        ; Disable heated bed


; Fans
M950 F0 C"fan0" Q500                            ; create fan 0 on pin fan0 and set its frequency
M106 P0 S1 H-1                                  ; set fan 0 value. Thermostatic control is turned off
M950 F1 C"fan1" Q500                            ; create fan 1 on pin fan1 and set its frequency
M106 P1 S1 H-1                                  ; set fan 1 value. Thermostatic control is turned off

; Tools

M950 R0 C"fan2" Q100                            ; set PWM on fan2
M563 P0 S"Spindle" R0                           ; define tool 0
M453 P0 R24000 Q100				; define max spindle speed
G10 P0 X0 Y0 Z0                                 ; set tool 0 axis offsets
G10 P0 R0 S0                                    ; set initial tool 0 active and standby temperatures to 0C

; Miscellaneous
M501                                            ; load saved parameters from non-volatile memory

; Change to workplace coordinates set 1
G54

M950 J1 C"e1stop"				; Emergency stop
M581 P1 T0 S0 R0				;
M582 T0 S1					; Check if estop active

M564 S1 H1					; Force homing
Thanks!
@jay_s_uk does the following make sense for the homey file:
G91	                     ; relative positioning
M574 Z2 S1 P"nil"            ; un-assign zstop from z axis
M574 Y1 S1 P"!ystop+!zstop"  ; assign ystop and z stop to Y and U
G1 H1 Y-533 U-533 F1800      ; move quickly to Y axis endstop and stop there (first pass)
G1 H2 Y5 U5 F6000            ; go back a few mm
G90                          ; absolute positioning
G92 Y0                       ; reset the Y coordinate
Thanks again!
@jay_s_uk thanks for the quick response!
That makes good sense! I'll write that in and let you know how it goes when everything is up and running!
Hello,
New to Duet and Reprap firmware, so hoping for some guidance please!
Currently running my CNC on a GRBL board that does dual axis homing, but the dual axis homing uses one Y endstop and a second endstop connected in series to the Z endstop which is a bit different to what I've seen people using so far.
The idea is that on a CNC your Z axis will move out the way first and then the X and Y axis will move meaning the Z endstop is available for use when homing X and Y axis.
My question is this: Can I use this current setup in the reprap firmware to achieve the same thing? Like this I think:
M584 X0 Y1:3 Z2 U3 P3 ; Map drives
M574 X1 S1 P"!xstop" ; Configure endstops using Makerbot endstops with NC config
M574 Y1 S1 P"!ystop+!zstop"
M574 Z2 S1 P"!zstop"
In the prep phase of moving over from GRBL to Reprap with a Duet2, so not able to test this physically yet.
Thanks for any help and suggestions!