Here is the sketch, need to be fine tuned but working very good already.
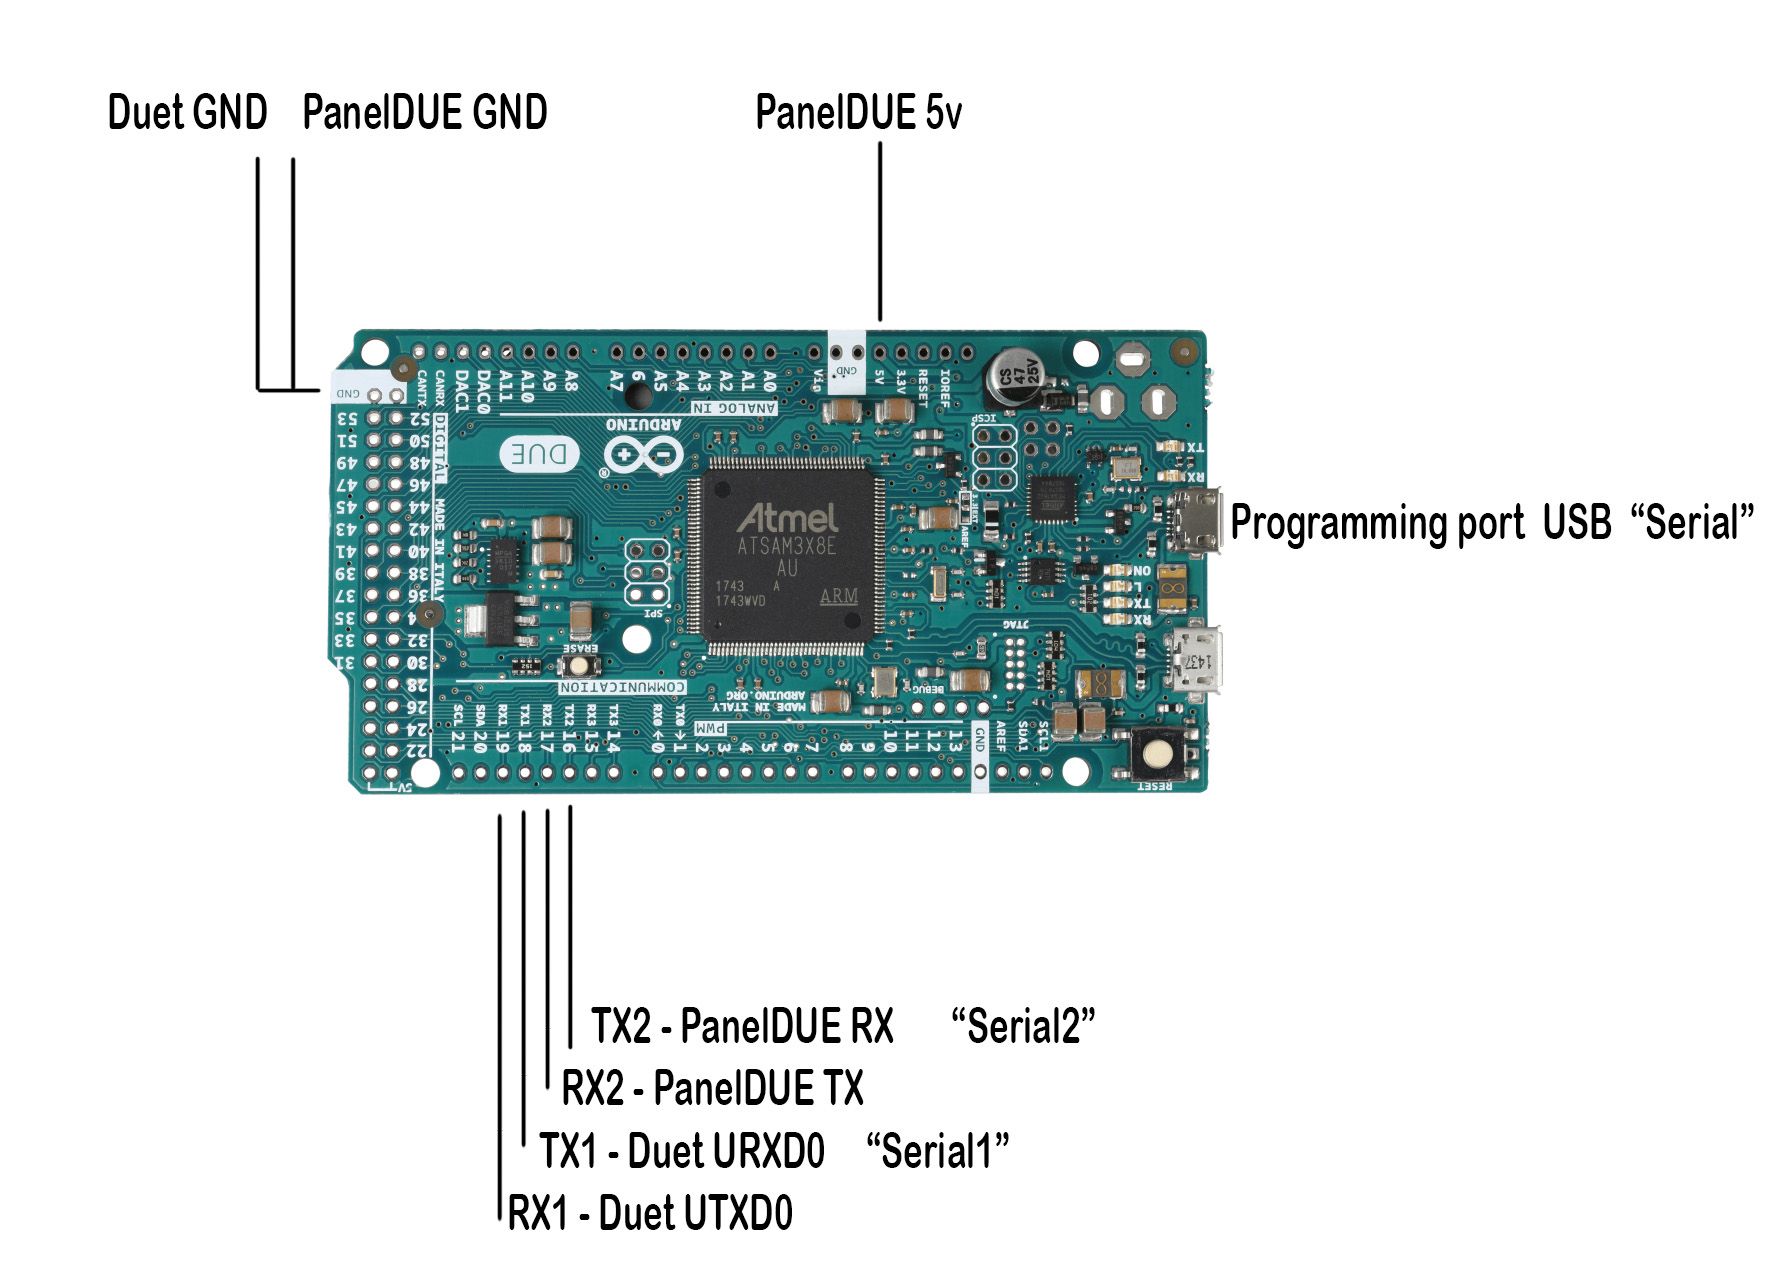
The wiring for serial is on this topic just above, wiring of joystick are on the Analog pins of arduino and buttons on Digital pins.
@dhusolo Let me know if you have remarks or improvement on the code, and show us your project.
#include <LiquidCrystal_I2C.h>
#include <Wire.h>
#define COLUMS 20
#define ROWS 4
#define LCD_SPACE_SYMBOL 0x20 //space symbol from the LCD ROM, see p.9 of GDM2004D datasheet
LiquidCrystal_I2C lcd(PCF8574_ADDR_A21_A11_A01, 4, 5, 6, 16, 11, 12, 13, 14, POSITIVE);
/*
Workbee CNC pendant
Duet3d and PanelDue7i
Olivier Dessy
*/
int PotX = 0; // Joystick X reading
int PotY = 0; // Joystick Y reading
int PotZ = 0; // Joystick Z reading
int PotZB = 0; // Joystick Z babystep reading
int PotF = 0; // Potentiometer Feed reading
bool ButtonX = 0; // Button X joystick
bool ButtonZ = 0; // Button Z joystick
bool Button1 = 0; // Button 1
bool Button2 = 0; // Button 2
bool Button3 = 0; // Button 3
bool Button4 = 0; // Button 4
bool Button5 = 0; // Button 5
float X = 0.2; // X move
float Y = 0.2; // Y move
float Z = 0.200; // Z move
float ZB = 0.002; // Z babystep move
int F = 0;
int PotFlcd = 0;
String Buffer ="";
String Move =""; // Instruction GCODE
String Message ="";
String Status ="";
// I=idle, P=printing from SD card, S=stopped (i.e. needs a reset), C=running config file (i.e starting up), A=paused, D=pausing, R=resuming from a pause,
// B=busy (e.g. running a macro), F=performing firmware update, O=Vin power low
unsigned long startMillis;
unsigned long currentMillis;
unsigned long period=500;
void setup() {
pinMode(22, INPUT);
pinMode(23, INPUT);
pinMode(24, INPUT);
pinMode(25, INPUT);
pinMode(26, INPUT);
pinMode(27, INPUT);
Serial1.begin(57600); // Serial port to Duet3d
Serial2.begin(57600); // Serial port to PanelDue
// Serial1.print("M111 S1 P3\n"); // Start debug mode on USB
Serial1.print(F("M575 P1 B57600 S0\n")); // Serial port without checksum for GCode commands
Serial.begin(57600); // Programming port of Arduino Due for debug
lcd.begin(16,4);
lcd.setCursor(0,0);
lcd.print("Feed : ");
startMillis=millis(); // Start time
}
void loop() {
if (Buffer.substring(2,8) == "status") { // If status received, extract status
Status = Buffer.substring(11,12);
}
Serial.print(Buffer); // Print received message from Duet3d for debug
Buffer="";
Readsensor(); // read the value from the sensor:
period=(abs((max(abs(X),max(abs(Y),abs(Z+ZB)))/(F)*60.00*1000.00)*0.8)); // Wait for move to be terminated in ms
if (abs(PotF-PotFlcd)>25) { // LCD Anti flickering, display only once when changed
PotFlcd = PotF;
Serial.print(String(PotFlcd));
lcd.setCursor(7,0);
lcd.print(String(PotFlcd)+" mm/' ");
}
currentMillis=millis();
if ((abs(PotX) > 8 || abs(PotY) > 8 || abs(PotZ) > 15 || abs(PotZB) > 15) && (Status !="P") ) { // If one joystick is moved and machine not processing/printing
F = PotF*(max(abs(PotX),max(abs(PotY),abs(PotZ)))/512.00); // Feed from 4% to 100% of F proportionnal to PotX
if (F < 150) { F=150; } // Avoid divide by 0 // Feed min 150mm/min max 3500mm/min, from 4% to 100% of F proportionnal to PotX
X = int((PotX)/100.00*10.00)/10.00; // Max potentiometer 512/100 -> X Y move of 5.12 mm max
Y = int((PotY)/100.00*10.00)/10.00;
Z = int((PotZ)/5000.000*1000.000)/1000.000; // Max potentiometer 512/5000 -> Z move of 0.10 mm max
ZB = int((PotZB)/100000.000*10000.000)/10000.000; // Max potentiometer 512/100000 -> ZB move of 0.005 mm max
period=(abs((max(abs(X),max(abs(Y),abs(Z+ZB)))/(F)*60.00*1000.00)*1)); // Wait for move to be terminated in ms
if (currentMillis-startMillis>=period) { // Start new move only when move is finished
String Move = "G91 G1 X"+String(X)+"Y"+String(Y)+"Z"+String(Z+ZB)+" F"+String(F)+"\n" ;
Serial1.print(F("G91\n"));
Serial1.print(Move); // GCODE send
Serial.println(Status+" start="+String(startMillis)+" current="+String(currentMillis)+" delay="+String(period)+" PotF="+String(PotF)+" Move="+String(Move)); // Debug print
startMillis=currentMillis; // Reset delay count for next move
}
}
else { // If no joystick is moved do serial passthrough between Duet3d and PanelDue
// read from port 1, send to port 2, transmit from Duet to PanelDUE
while (Serial1.available() > 0) {
Buffer = Serial1.readString();
Serial2.print(Buffer);
}
// read from port 2, send to port 1, transmit from PanelDUE tu Duet
while (Serial2.available() > 0) {
// Serial.print(char(Serial2.peek()));
Serial1.write(Serial2.read());
}
}
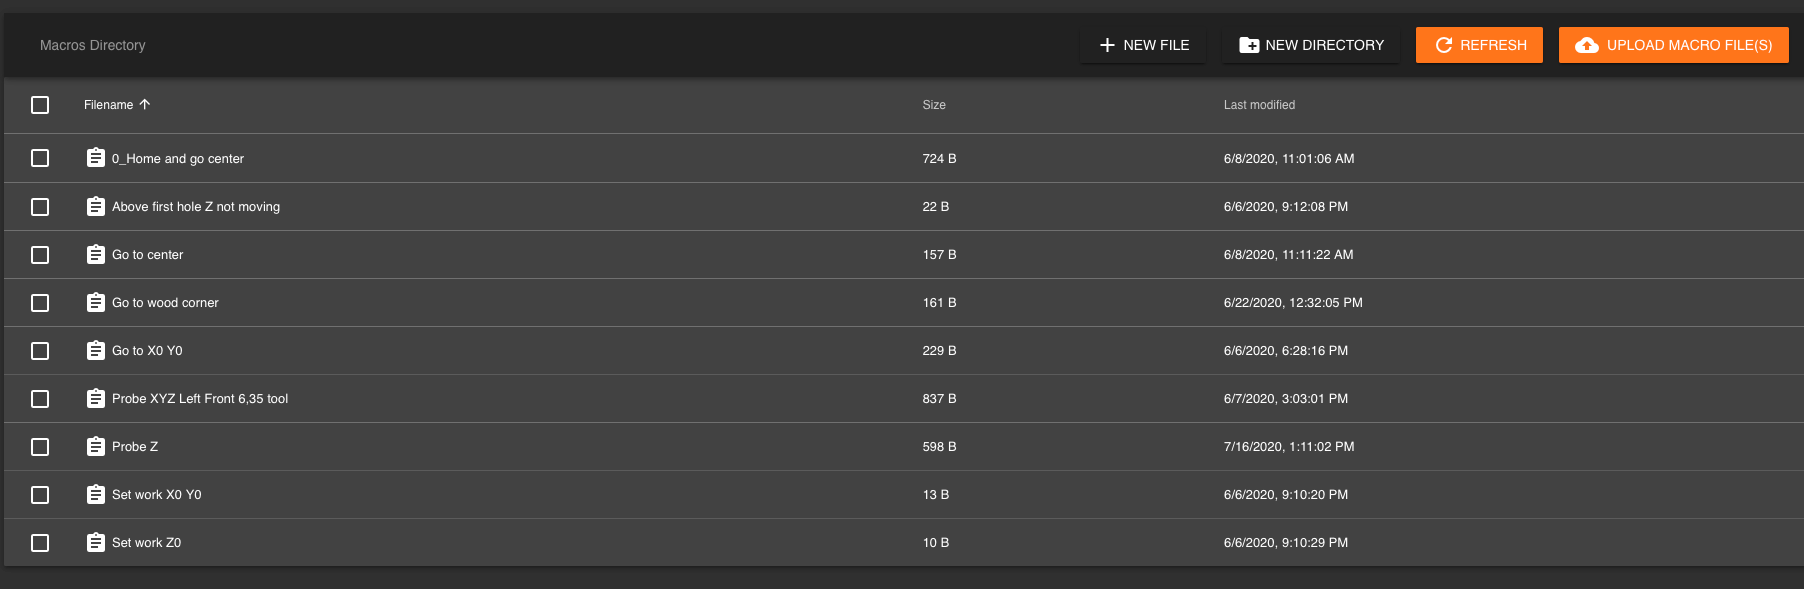
// Read buttons and execute macros
if (ButtonX == LOW ) {
Serial1.println("M98 P""0:/macros/Set work X0 Y0""");
lcd.setCursor(0,1);
lcd.print("Set work X0 Y0 ");
delay(1000);
lcd.setCursor(0,1);
lcd.print(" ");
}
if (ButtonZ == LOW ) {
Serial1.println("M98 P""0:/macros/Set work Z0""");
lcd.setCursor(0,1);
lcd.print("Set work Z0 ");
delay(1000);
lcd.setCursor(0,1);
lcd.print(" ");
}
if (Button1 == HIGH ) {
Serial1.println("M98 P""0:/macros/Probe XYZ Left Front 6,35 tool""");
lcd.setCursor(0,1);
lcd.print("Probe XYZ 6,35 ");
delay(2000);
lcd.setCursor(0,1);
lcd.print(" ");
}
if (Button2 == HIGH ) {
Serial1.println("M98 P""0:/macros/Probe Z""");
lcd.setCursor(0,1);
lcd.print("Probe Z ");
delay(2000);
lcd.setCursor(0,1);
lcd.print(" ");
}
if (Button3 == HIGH ) {
Serial1.println("M98 P""pause.g""");
lcd.setCursor(0,1);
lcd.print("Pause ");
delay(2000);
lcd.setCursor(0,1);
lcd.print(" ");
}
if (Button4 == HIGH ) {
Serial1.println("M98 P""stop.g""");
lcd.setCursor(0,1);
lcd.print("Stop ");
delay(2000);
lcd.setCursor(0,1);
lcd.print(" ");
}
}
void Readsensor() {
PotX = map(analogRead(A0),0,1023,-512,512)-8; // Offset of -8 joystick not at 0 at center
PotY = map(analogRead(A1),0,1023,-512,512)-5;
PotZ = map(analogRead(A2),0,1023,-512,512)+7;
PotZB = map(analogRead(A4),0,1023,-512,512);
PotF = map(analogRead(A3),0,1023,3500,150); // Feed min 150mm/min max 3500mm/min
ButtonX = digitalRead(22);
ButtonZ = digitalRead(23);
Button1 = digitalRead(24);
Button2 = digitalRead(25);
Button3 = digitalRead(26);
Button4 = digitalRead(27);
}

")