Duet3D Logo Duet3D
    • Tags
    • Documentation
    • Order
    • Register
    • Login
    1. Home
    2. rug
    • Profile
    • Following 0
    • Followers 0
    • Topics 2
    • Posts 4
    • Best 1
    • Controversial 0
    • Groups 0

    rug

    @rug

    1
    Reputation
    1
    Profile views
    4
    Posts
    0
    Followers
    0
    Following
    Joined Last Online

    rug Unfollow Follow

    Best posts made by rug

    • RE: bed leveling 2 z motors

      I might have the answer to this myself.

      I took an old printer out of storage and got bed leveling to work on the first try. I think I have a mechanical problem. I have changed to a e3d hemera extruder and made some other changes that I think are to heavy for my X-axis rails to handle. I can make the carriage flex with just moving the wires going to it. I will get some new beefier hardware and try again.

      posted in Tuning and tweaking
      rugundefined
      rug

    Latest posts made by rug

    • RE: bed leveling 2 z motors

      I might have the answer to this myself.

      I took an old printer out of storage and got bed leveling to work on the first try. I think I have a mechanical problem. I have changed to a e3d hemera extruder and made some other changes that I think are to heavy for my X-axis rails to handle. I can make the carriage flex with just moving the wires going to it. I will get some new beefier hardware and try again.

      posted in Tuning and tweaking
      rugundefined
      rug
    • bed leveling 2 z motors

      I wanted to do some upgrades to my printer (hypercube evolution) and set of on making auto bed leveling with 2 motors work before getting into DAA.

      I am having some issues with getting auto bed leveling to work. I run probing and compensation 4 times and according to the bed leveling process I am getting pretty good results (I think).

      2022-07-11 11:52:03	Leadscrew adjustments made: -0.013 0.009, points used 2, (mean, deviation) before (-0.003, 0.007) after (-0.000, 0.000)
      2022-07-11 11:51:57	Leadscrew adjustments made: -0.022 0.025, points used 2, (mean, deviation) before (-0.001, 0.014) after (-0.000, 0.000)
      2022-07-11 11:51:53	Leadscrew adjustments made: -0.065 0.083, points used 2, (mean, deviation) before (0.002, 0.044) after (-0.000, 0.000)
      2022-07-11 11:51:48	G32
      Leadscrew adjustments made: 0.046 0.559, points used 2, (mean, deviation) before (0.278, 0.153) after (-0.000, 0.000)
      

      I am using a BLtouch as a probe.

      This does now show in where the nozzle of the extruder ends up though. If I set the nozzle at 0.5mm on the left side of the bed where I probe for the left motor and then move over to the right side my nozzle is about 1mm higher.

      I can not figure out what I am doing wrong here...

      config:

      ; General preferences
      G90                                          ; send absolute coordinates...
      M83                                          ; ...but relative extruder moves
      M550 P"Hypercube"                            ; set printer name
      M669 K1                                      ; select CoreXY mode
      
      ; Network
      M552 S1                                      ; enable network
      M586 P0 S1                                   ; enable HTTP
      M586 P1 S0                                   ; disable FTP
      M586 P2 S0                                   ; disable Telnet
      
      ; Drives
      M569 P0 S1                                   ; physical drive 0 goes forwards
      M569 P1 S1                                   ; physical drive 1 goes forwards
      M569 P2 S1                                   ; physical drive 2 goes forwards
      M569 P3 S1                                   ; physical drive 3 goes forwards
      M584 X0 Y1 Z2:4 E3                             ; set drive mapping
      M671 X-37.5:336 Y150:150 S3 P2				 ; Set lead screw position
      M350 X16 Y16 Z16 E16 I1                      ; configure microstepping with interpolation
      M92 X160.00 Y160.00 Z1600.00 E398.00         ; set steps per mm
      M566 X900.00 Y900.00 Z10.00 E300.00          ; set maximum instantaneous speed changes (mm/min)
      M203 X12000.00 Y12000.00 Z500.00 E3000.00      ; set maximum speeds (mm/min)
      M201 X2000.00 Y2000.00 Z200.00 E5000.00          ; set accelerations (mm/s^2)
      M906 X1100 Y1100 Z1300 E800 I30              ; set motor currents (mA) and motor idle factor in per cent
      M84 S30                                      ; Set idle timeout
      M572 D0 S0.060								 ; Set pressure advance
      
      ; Axis Limits
      M208 X0 Y-10 Z0 S1                             ; set axis minima
      M208 X263 Y290 Z270 S0                       ; set axis maxima
      
      ; Endstops
      M574 X1 S1 P"xstop"                          ; configure active-high endstop for low end on X via pin xstop
      M574 Y1 S1 P"ystop"                          ; configure active-high endstop for low end on Y via pin ystop
      
      ; Z-Probe
      M950 S0 C"exp.heater3"                       ; create servo pin 0 for BLTouch
      M558 P9 C"^zprobe.in" H2 F140 T9000          ; set Z probe type to bltouch and the dive height + speeds
      G31 P500 X6.8 Y-44.7 Z1.25                   ; set Z probe trigger value, offset and trigger height
      M557 X20:243 Y20:243 P5:5                    ; define mesh grid
      
      ; Heaters
      M308 S0 P"bedtemp" Y"thermistor" T100000 B4092 ; configure sensor 0 as thermistor on pin bedtemp
      M950 H0 C"bedheat" T0                        ; create bed heater output on bedheat and map it to sensor 0
      M307 H0 B0 S1.00                             ; disable bang-bang mode for the bed heater and set PWM limit
      M140 H0                                      ; map heated bed to heater 0
      M143 H0 S120                                 ; set temperature limit for heater 0 to 120C
      M308 S1 P"e0temp" Y"thermistor" T100000 B4725  ; configure sensor 1 as thermistor on pin e0temp
      M950 H1 C"e0heat" T1                         ; create nozzle heater output on e0heat and map it to sensor 1
      M307 H1 B0 S1.00                             ; disable bang-bang mode for heater  and set PWM limit
      
      ; Fans
      M950 F0 C"fan0" Q500                         ; create fan 0 on pin fan0 and set its frequency
      M106 P0 S0 H-1                               ; set fan 0 value. Thermostatic control is turned off
      M950 F1 C"fan1" Q500                         ; create fan 1 on pin fan1 and set its frequency
      M106 P1 S1 H1 T45                            ; set fan 1 value. Thermostatic control is turned on
      
      ; Tools
      M563 P0 D0 H1 F0                             ; define tool 0
      G10 P0 X0 Y0 Z0                              ; set tool 0 axis offsets
      G10 P0 R0 S0                                 ; set initial tool 0 active and standby temperatures to 0C
      
      M501
      
      ; Custom settings are not defined
      

      bed.g:

      G30 P0 X20 Y150 Z-99999 ; probe near a leadscrew, half way along Y axis
      G30 P1 X243 Y150 Z-99999 S2 ; probe near a leadscrew and calibrate 2 motors
      G30 P0 X20 Y150 Z-99999 ; probe near a leadscrew, half way along Y axis
      G30 P1 X243 Y150 Z-99999 S2 ; probe near a leadscrew and calibrate 2 motors
      G30 P0 X20 Y150 Z-99999 ; probe near a leadscrew, half way along Y axis
      G30 P1 X243 Y150 Z-99999 S2 ; probe near a leadscrew and calibrate 2 motors
      G30 P0 X20 Y150 Z-99999 ; probe near a leadscrew, half way along Y axis
      G30 P1 X243 Y150 Z-99999 S2 ; probe near a leadscrew and calibrate 2 motors
      G1 X15 Y-10 F6000     ; go home again
      
      posted in Tuning and tweaking
      rugundefined
      rug
    • RE: Did I just burn a driver?

      Thanks for the quick reply.

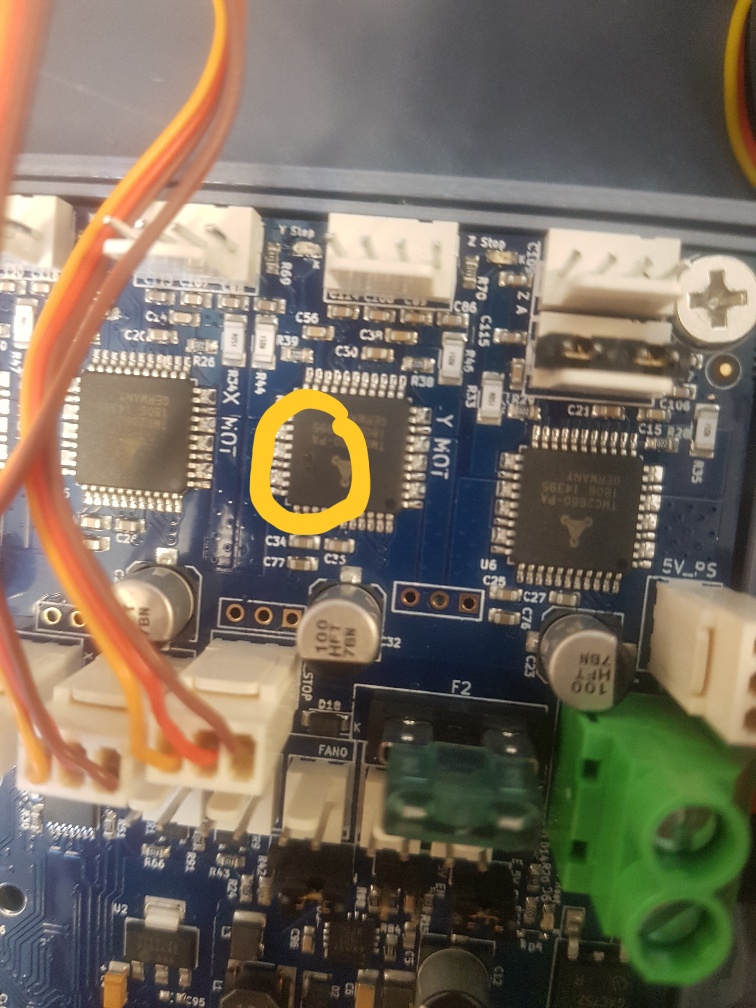
      Yes, I have a small burn marked on the attached image. I find no short between the stepper connections and ground. I have around 2 ohms on each coil and that is close enough to what the specs on my motors say.

      0_1531931812533_20180718_183534_resized.jpg

      posted in Duet Hardware and wiring
      rugundefined
      rug
    • Did I just burn a driver?

      I just bought a duet wifi the other day to upgrade from my ramps 1.4 setup. Wired it up to my ATX power supply with external 5v and ps_on. Works perfectly. Wired the endstops. Still works nicely, easy install wiring is so much nicer than the ramps board. Now comes the not-so-fun part... I connected my y-motor to driver 1. I try to move my y-axis in the console but all I get is a small "poof", burnt electronics smell, and a message "short to ground on driver 1". So I am guessing I burnt this driver.... 😞
      How did this happen? This is an MPCNC machine that worked fine on the ramps board for over a year. Motor wiring has not changed. Power wiring is fine, endstops work but the driver just went poof when I tried to move the y-axis! I have not changed anything in the config file as of yet so I should only be driving the motors with 800ma. I have 2 self-built printers and one cnc machine so I think I have plenty of experience and I do not think I made a misstake, even though this is my first duet board.

      Can this be covered by warranty or is this a "crap, I burnt €150 and I need to get a new one" situation?

      /Carl

      posted in Duet Hardware and wiring
      rugundefined
      rug