Duet3D Logo Duet3D
    • Tags
    • Documentation
    • Order
    • Register
    • Login
    1. Home
    2. sharctic
    • Profile
    • Following 0
    • Followers 0
    • Topics 2
    • Posts 10
    • Best 1
    • Controversial 0
    • Groups 0

    sharctic

    @sharctic

    1
    Reputation
    1
    Profile views
    10
    Posts
    0
    Followers
    0
    Following
    Joined Last Online

    sharctic Unfollow Follow

    Best posts made by sharctic

    • RE: CoreXYU second extruder offset and stuttering

      @deckingman said in CoreXYU second extruder offset and stuttering:

      @sharctic Just out of curiosity, does Cura add U and V values to the M201 commands? It just seems odd that you can control accelerations for all axes via Cura but not the instantaneous speed threshold (jerk).

      No, it does not use M201 at all, but M204 which works independently from axis names. AFAIK, since T1 (U&V) is mapped to X and Y, the M204 command applies to T1 movement in that moment

      Apparently , the M566 command works differently. Cura spits out M566 commands but only for Y and X axis. For Cura jerk control to work on my machine it would have to generate something like M566 X720 Y720 U600 V600 for example. However Cura does not even know what axis I'm using, there is no setting to enter the axis setup. I guess Cura just expects a single carriage with 2 nozzles, like the Ultimaker

      posted in General Discussion
      sharcticundefined
      sharctic

    Latest posts made by sharctic

    • RE: CoreXYU second extruder offset and stuttering

      @deckingman said in CoreXYU second extruder offset and stuttering:

      @sharctic Just out of curiosity, does Cura add U and V values to the M201 commands? It just seems odd that you can control accelerations for all axes via Cura but not the instantaneous speed threshold (jerk).

      No, it does not use M201 at all, but M204 which works independently from axis names. AFAIK, since T1 (U&V) is mapped to X and Y, the M204 command applies to T1 movement in that moment

      Apparently , the M566 command works differently. Cura spits out M566 commands but only for Y and X axis. For Cura jerk control to work on my machine it would have to generate something like M566 X720 Y720 U600 V600 for example. However Cura does not even know what axis I'm using, there is no setting to enter the axis setup. I guess Cura just expects a single carriage with 2 nozzles, like the Ultimaker

      posted in General Discussion
      sharcticundefined
      sharctic
    • RE: CoreXYU second extruder offset and stuttering

      @dc42 said in CoreXYU second extruder offset and stuttering:

      @sharctic said in CoreXYU second extruder offset and stuttering:

      But I can't get the benefit of slicer jerk control (eg for different materials, detail grades, travel vs drive moves, etc)

      Do you really think there is any benefit in that?

      I have to admit I was writing this as I was having a hard time getting PVA to stick on PLA, especially line ends and corners, thinking that smoother movement might be the key. So being able to go fast with PLA while going buttersmooth with PVA is definitely an application for this kind of thing, or so I think
      Now after some testing and tweaking rather than jerk I found low accelleration to be the better solution, which is something I can control via Cura.

      On the tool offset:
      For prints that start with Tool1 I found out that at least the Z height works when I add the Z offset to the homing file. You would think that T0 then bumps into the bed, as it should now sit double the offset lower, but actually both tools are level, the offset flipped?!.....I dont even know what happens to XY offset on those prints. When I get a print that starts with T0 I have to modify the homing file back again. This cant be the right way?
      Do you know anything about this offset matter? Or do you at least know that it SHOULD work firmware-wise and that the error is somewhere else?

      posted in General Discussion
      sharcticundefined
      sharctic
    • RE: CoreXYU second extruder offset and stuttering

      @dc42 Yes I set the max jerk in cofig. But I can't get the benefit of slicer jerk control (eg for different materials, detail grades, travel vs drive moves, etc)

      I find it curious that XY speed and XY accelleration applies to a UV tool, but XY jerk does not

      posted in General Discussion
      sharcticundefined
      sharctic
    • RE: CoreXYU second extruder offset and stuttering

      Yes, I had it set to reprap flavor, however Cura does not know about any U or V axes of the machine. I add the correct jerk settings for U and V manually when a print starts, but maybe there is a better solution? (but I assume this has to be dealt with on the Cura side...)

      Tool offset:
      After further testing I noticed that the tool offset does not work, when the print starts with the second extruder (T1). I can see it immediately from the Z offset.
      Prints that start with the first extruder (T0) work fine, first layer sticks to bed perfectly and when the second extruder (T1) comes into play next, it also has the correct position.
      However when a print starts with the second extruder (T1) the first layer is too high and does not stick to the bed. (Maybe I can work around by babystepping down the Z offset, but thats not a real solution)

      These are my current tool settings in config:
      M563 P0 D0 H1 ; Define tool 0
      G10 P0 X0.10 Y0 Z0 ; Set tool 0 axis offsets
      M563 P1 D1 H2 X3 ; Define tool 1 and bind it to U-axis (X3)
      G10 P1 X0 Y-0.40 Z0.4 ; Set tool 1 axis offsets
      In the homing files for first layer height:
      G1 S1 Z-310 F100 ; move slowly to Z axis endstop once more (second pass)
      G92 Z0.7 ; set Z to axis minimum

      posted in General Discussion
      sharcticundefined
      sharctic
    • RE: CoreXYU second extruder offset and stuttering

      I finally found the cause for the stuttering:
      When controlling jerk by Cura (eg 12mm/s) it adds a "M566 X720 Y720" command.
      However for it to work on a the second carriage of a CoreXYU it has to be "M566 X720 Y720 U720 V720".

      At the same time I noticed that in Cura you set jerk in mm/s while the M566 needs a mm/min value, or so I think. So my jerk setting in config.g was totally wrong all the time...

      posted in General Discussion
      sharcticundefined
      sharctic
    • RE: CoreXYU second extruder offset and stuttering

      config.g

      ; General preferences
      G21 ; Work in millimetres
      G90 ; Send absolute coordinates...
      M83 ; ...but relative extruder moves

      M669 K5 ; Select CoreXYU mode

      ; Network
      M550 P"My Printer" ; Set machine name
      M552 S1 ; Enable network
      ;*** Access point is configured manually via M587
      M586 P0 S1 ; Enable HTTP
      M586 P1 S0 ; Disable FTP
      M586 P2 S0 ; Disable Telnet

      ; Axis, endstop and motor configuration
      M584 X0 Y1 Z2 U3 V4 E5:6 ; Set up steppers for x, y, u, v, z and e
      M574 X2 Y1 Z1 U1 S1 ; set endstop configuration. X endstop at max, Y and U and Z at min, all NO active low (S0)

      ; Core xyu + axis limits
      M669 K5 ; Select CoreXYU mode
      M208 X0 Y0 U-89 V0 Z-0.5 S1 ; Set axis minima
      M208 X389 Y300 U300 V389 Z300 S0 ; Set axis maxima

      ; Drives
      M569 P0 S0 ; Physical drive 0 goes forwards X
      M569 P1 S1 ; Physical drive 1 goes forwards Y
      M569 P2 S0 ; Physical drive 2 goes forwards Z
      M569 P3 S1 ; Physical drive 3 goes forwards E1 aka U
      M569 P4 S0 ; Physical drive 4 goes forwards E2 aka V
      M569 P5 S1 ; Physical drive 5 goes forwards E3 aka Ex1
      M569 P6 S1 ; Physical drive 6 goes forwards E4 aka Ex2

      M350 X16 Y16 U16 V16 Z16 E16:16 I1 ; Configure microstepping with interpolation
      M92 X66.67 Y66.67 U66.67 V66.67 Z1600 E678:678 ; Set steps per mm
      M566 X20 Y20 U20 V20 Z15 E120:120 ; Set maximum instantaneous speed changes (mm/min)
      M203 X12000 Y12000 U12000 V12000 Z350 E2100:2100 ; Set maximum speeds (mm/min)
      M201 X3000 Y3000 U3000 V3000 Z75 E250:250 ; Set accelerations (mm/s^2)
      M906 X2200 Y2200 U2200 V2200 Z2200 E650:650 I30 ; Set motor currents (mA) and motor idle factor in per cent
      M84 S30 ; Set idle timeout

      ; Z-Probe
      M558 P0 H5 F120 T6000 ; Disable Z probe but set dive height, probe speed and travel speed
      M557 X15:290 Y15:290 S25 ; Define mesh grid

      ; Heaters
      ; Chamber
      M141 H3 ; Assign chamber heater to heater 3
      M305 P3 T100000 B4138 R4700 ; Set thermistor + ADC parameters for heater 3
      M143 H3 S180 ; Set temperature limit for heater 3 to 180C
      ; Bed
      M307 H0 B0 S1.00 ; Disable bang-bang mode for the bed heater and set PWM limit
      M305 P0 T100000 B4138 R4700 ; Set bed thermistor + ADC parameters for heater 0
      M143 H0 S200 ; Set bed temperature limit for heater 0 to 200C
      ; E0
      M307 H1 B0 S1.00 ; Disable bang-bang mode for the E0 heater and set PWM limit
      M305 P1 X200 ; Configure PT100 for heater 1
      M143 H1 S500 ; Set temperature limit for heater 1 to 500C
      ; E1
      M307 H2 B0 S1.00 ; Disable bang-bang mode for the E1 heater and set PWM limit
      M305 P2 X201 ; Configure PT100 for heater 2
      M143 H2 S500 ; Set temperature limit for heater 2 to 500C

      ; Fans
      M106 P0 S0.0 I0 F1000 H-1 ; Set fan 0 value, PWM signal inversion and frequency. Thermostatic control is turned off
      M106 P1 S0 I0 F500 H-1 ; Set fan 1 value, PWM signal inversion and frequency. Thermostatic control is turned off

      ; Tools
      M563 P0 D0 H1 ; Define tool 0
      G10 P0 X0 Y0 Z0 ; Set tool 0 axis offsets
      G10 P0 R0 S0 ; Set initial tool 0 active and standby temperatures to 0C
      M563 P1 D1 H2 X3 ; Define tool 1 and bind it to U-axis (X3)
      G10 P1 X0 Y0 Z0 ; Set tool 1 axis offsets
      G10 P1 R0 S0 ; Set initial tool 1 active and standby temperatures to 0C

      ; Automatic power saving
      M911 S16 R25 P"M913 X0 Y0 G91 M83 G1 Z3 E-5 F1000" ; Set voltage thresholds and actions to run on power loss

      ; Custom settings are not configured

      ; Miscellaneous
      M501 ; Load saved parameters from non-volatile memory
      T0 ; Select first tool
      posted in General Discussion
      sharcticundefined
      sharctic
    • CoreXYU second extruder offset and stuttering

      I am currently testing my new CoreXYU build.
      I got the first carriage (X) working and got pretty nice prints so far.
      Now that I wanted to add the second carriage (U) I got weird problems.
      To first test the second extruder alone I just edited some existing gcode files from T0 to T1 (Cura slicer).

      First Problem:
      I tried all day but I cant figure out how to set up a Z offset. My 2nd extruder nozzle sits 0.4mm higher. I tried to add "G10 P1 Y0 U0 Z0.4" to all sorts of places (config, tfree, tpost, tpre) but it never worked.
      I noticed that the Z value changes only when I type "T1" twice, same when I go back to T0.

      Second Problem:
      The second print head stutters heavily in curved perimeters. Speed, accel and jerk settings are the same for all 4 steppers. The cgode file must be fine also, since I printed the same file with the first extruder without problems...

      I would really appreciate your help, thanks!

      posted in General Discussion
      sharcticundefined
      sharctic
    • RE: User friendly heating chamber control

      Yes, I mainly wanted to know, from a firmware perspective, if it is possible to use the same fan for two different roles. One being a chamber heater, the other being a part cooler run by fan control G-codes from the slicer.
      (On a sidenote: I only now got into printing PEEK and don't know too much about it, but would you consider blowing 180°C air on a PEEK print cooling?)

      posted in Firmware installation
      sharcticundefined
      sharctic
    • RE: User friendly heating chamber control

      I'm not sure if I got your thought on PLA cooling right...
      Since my print nozzle stays on the same height and the (300x300) bed moves down, I always blow air on the nozzle tips. The air nozzle and thus also the airstream is 300mm wide (and maybe 5mm high, depending on how far away from the air nozzle) and moves parallel across the whole bed.

      posted in Firmware installation
      sharcticundefined
      sharctic
    • User friendly heating chamber control

      I have an isolated chamber (550x470x400) inside my corexy printer that I want to heat up to 180°C.

      I have these components:

      • Finned heater, 230V, 1kW, controlled via SSR? via PWM? via bang-bang?
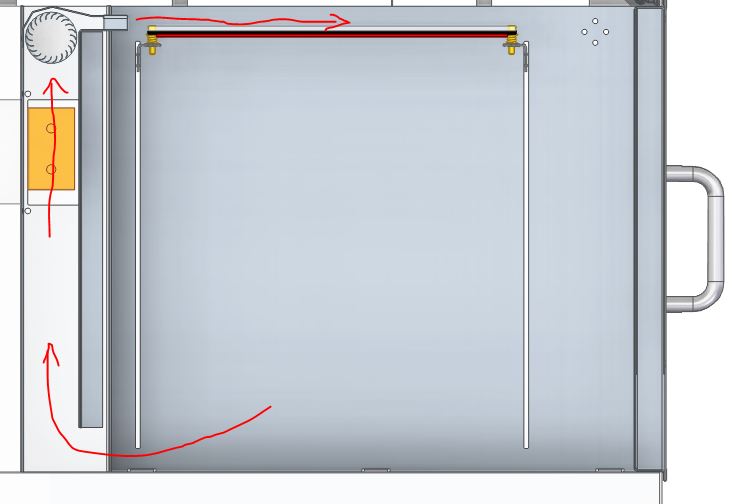
      • A cross flow fan will suck air through the finned heater and out through a flat but wide air nozzle so that the air flows directly across the currently printing layer. Driven by a 24V brushed motor.

      The air circulation is a closed system, the same air will be reheated.
      Where should the temperature probe be? Directly in front of the air nozzle? Somewhere else in the chamber? Both?

      If possible, I want to control the chamber just via the Cura slicer (maybe setting up cura profiles for different materials and their according chamber temperature, like PEEK 180°C or ABS 60°C).
      Upon starting a print, the chamber should first heat up to the specific temperature and then proceed with the actual printing.

      Additionially I want to use the cross flow fan as a cooling fan when printing PLA.

      What would be the smartest way to implement all this? Is something like this possible?
      I would really appreciate your ideas!
      Thanks

      0_1561631410748_Air circulation.JPG

      posted in Firmware installation
      sharcticundefined
      sharctic