Anycubic I3 Mega Mod questions
-
Rather than run both z motors off the z connector, run them independently. So map the other one to E1 (for example). Then connect the second end stop to E1.
See M584 in the wikiOwns various duet boards and is the main wiki maintainer for the Teamgloomy LPC/STM32 port of RRF. Assume I'm running whatever the latest beta/stable build is
-
Thanks, I just run both Z motors togehter with just one endstop and homing seems to work so far. Is there a specific advantage running both steppers and both endstops independently ?
-
@pauledd said in Anycubic I3 Mega Mod questions:
Thanks, I just run both Z motors togehter with just one endstop and homing seems to work so far. Is there a specific advantage running both steppers and both endstops independently ?
If you only have one Z end stop, you can't be sure that both lead screws end up at the same position when you home the Z axis. My i3 Mega has two Z end stops and it took a lot of adjustment to make sure that the adjusters were set properly so that the X axis is perfectly parallel to the bed, but once I'd adjusted it properly, both Z carriages end up at exactly the same height above the chassis after homing.
If I remember correctly, the fact that you couldn't get the X axis level properly with just one Z end stop was one of the initial criticisms of the i3 Mega. Mine came with two Z end stops and was a later model. It still drives the two Z motors from one stepper, but doesn't stop driving them down until both switches are closed.
-
@jay_s_uk said in Anycubic I3 Mega Mod questions:
M584
Okay, so I'll try now two seperate drivers for the Z-axis.
Z+ stepper (the left one) is plugged into the outer "Z" and I put both
jumpers back on the inner one. Z- stepper (the right one) is now in E1.
Endstop Z+ is in Z and Endstop Z- is in E1.So I change these commands in my "Drives" section in config.g:
;M584 X0 Y1 Z2 E3 ;old

M584 X0 Y1 Z2:4 E3 ;new
Now, do I need to change anything else? Or applies "steps per mm , accelerations etc..." automatically to both Z-drivers?
And do I have to change something in the "endstop" section? It currently
have this code:M574 X1 Y1 Z1 S0 -
Ok, I'll try to follow this guide:
https://duet3d.dozuki.com/Guide/Independent+Z+motors+and+endstop+switches/18?lang=en -
Well, this of cause didnt work...
If I press "Home Z" both Z-Steppers start to move down.
They both hit the endstop and the right stepper (E1) stops moving
but the left stepper (plugged in Z) keeps on moving and makes a great
loud rattling noise. So I immediately press the emergency stop button.I checked both enstops (Z & E1), both leds lit on if pressed.
Under "Machine Properties" the Z endstops shows correctly "yes"
if pressed. The other E1 endstop is not in that list. Instead I have an E0 endstop which is unconnected on my board...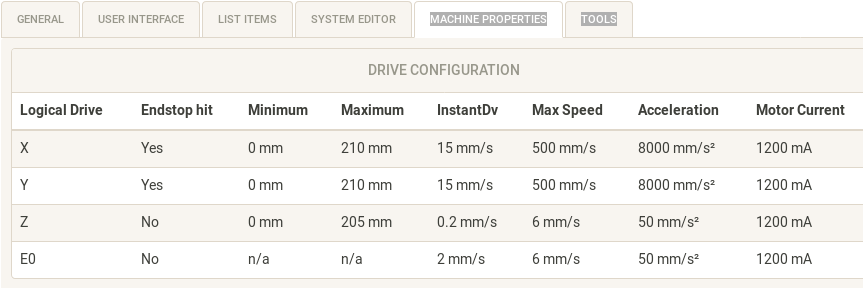
My config.g:
; Axis Limits
M208 X0 Y0 Z0 U0 S1                          ; set axis minima
M208 X210 Y210 Z205 U205 S0                    ; set axis maxima

M584 X0 Y1 Z2:4 U4 E3 P3                          ; set drive mapping

; Endstops
M574 X1 Y1 Z1 U1 S0                          ; set active low and disabled endstops

G90                                       ; send absolute coordinates...
M83                                       ; ...but relative extruder moves
M550 P"Pauls Duet"                        ; set printer name

; Network
M552 S1                                   ; enable network
M586 P0 S1                                ; enable HTTP
M586 P1 S0                                ; disable FTP
M586 P2 S1                                ; enable Telnet

; Drives
M569 P0 S0                                ; physical drive 0 goes backwards
M569 P1 S0                                ; physical drive 1 goes backwards
M569 P2 S1                                ; physical drive 2 goes forwards
M569 P3 S1                                ; physical drive 3 goes forwards
M569 P4 S1				  ; Z- physical drive 4 goes forwards
M350 X16 Y16 Z16 U16 E16 I1                   ; configure microstepping with interpolation
M92 X80.00 Y80.00 Z400.00 U400.00 E92.60          ; set steps per mm
M566 X900.00 Y900.00 Z12.00 Z12.00  E120.00       ; set maximum instantaneous speed changes (mm/min)
M203 X30000.00 Y30000.00 Z360.00 U360.00 E1200.00 ; set maximum speeds (mm/min)
M201 X8000.00 Y8000.00 Z50.00 U50.00 E250.00     ; set accelerations (mm/s^2)
M906 X1200 Y1200 Z1200 U1200 E1200 I30          ; set motor currents (mA) and motor idle factor in per cent
M84 S30                                   ; Set idle timeout

; Z-Probe
M558 P0 H40 F120 T3000                    ; disable Z probe but set dive height, probe speed and travel speed
M557 X15:210 Y15:195 S20                  ; define mesh grid

; Heaters
M305 P0 T100000 B4725 C7.060000e-8 R4700  ; set thermistor + ADC parameters for heater 0
M143 H0 S90                               ; set temperature limit for heater 0 to 90C
M305 P1 T100000 B4725 C7.060000e-8 R4700  ; set thermistor + ADC parameters for heater 1
M143 H1 S245                              ; set temperature limit for heater 1 to 245C

; Fans
M106 P0 S0 I0 F500 H-1                    ; set fan 0 value, PWM signal inversion and frequency. Thermostatic control is turned off
M106 P1 S1 I0 F500 H1 T45                 ; set fan 1 value, PWM signal inversion and frequency. Thermostatic control is turned on

; Tools
M563 P0 D0 H1 F0                          ; define tool 0
G10 P0 X0 Y0 Z0                           ; set tool 0 axis offsets
G10 P0 R0 S0                              ; set initial tool 0 active and standby temperatures to 0C

; Custom settings
M552 S1
My homeall.g
G91                     ; relative positioning
G1 Z30 F3000 H2     	; lift Z relative to current position
G1 X-215 Y-215 F1800 H1 ; move quickly to X and Y axis endstops and stop there (first pass)
G1 X5 Y5 F3000          ; go back a few mm
G1 X-215 Y-215 F360 H1  ; move slowly to X and Y axis endstops once more (second pass)

M98 homez.g
My homez.g
G91 ; relative positioning G1 Z30 F3000 H2 ; lift Z relative to current position ; split Z motor control to Z and U ; for it to work we have to show U (param P4) in the UI M584 Z2 U4 P4 ; Move Z and U down until the switches triggers G1 Z-205 U-205 F1000 H1 ; back to combined axes and hidden U M584 Z2:4 P3 ; Back to absolute positioning G90 ; Tell the firmware where we are G92 Z0 ; lift Z after probing G91 G1 Z10 F1000 G90 -
If you have axes X, Y and Z and then you create a fourth axis, the end stop for that fourth axis will be the first unused end stop in order. So, if you don't have your second Z end stop connected to the E0 end stop input, then you should connect it there.
That's why it's showing you an E0 end stop.
-
@grizewald thanks

Works now!
What I did:- replugged Z(-) stepper into E0 and Z-endstop into E0
config.g:
- moving the M584 code above M208 code
- changed M584 to M584 X0 Y1 Z2:3 U3 E4 P3
- corrected M566 to M566 X900.00 Y900.00 Z12.00 U12.00 E120.00
homeall.g:
- changed M98 to M98 Phomez.g
homez.g:
G91               ; relative positioning

G1 Z10 F3000 H2   ; lift Z relative 10mm

; split Z motor control to Z and U
; for it to work we have to show U (param P4) in the UI
M584 Z2:3 U3 P4

; Move Z and U  down until the switches triggers
G1 Z-205 U-205 F100 H1

; back to combined axes and hidden U
M584 Z2:3 U3 P3

; Back to absolute positioning
G90

; Tell the firmware where we are
G92 Z0

; lift Z after probing
G91
G1 Z10 F1000
G90
Tomorrow I have the fans on my list

-
Great! You're making good progress.
It doesn't matter if you had the second Z motor in E1 or E0, just that you moved the end stop to the next free one in order. It's actually simpler to leave the first extruder in E0 and put the second Z motor in E1 as the firmware expects that you will use E0 for the first extruder.
In the end though, it doesn't really matter, as long as you describe everything correctly for the firmware. It certainly beats re-compiling and flashing firmware every time you want to make a configuration change!
-
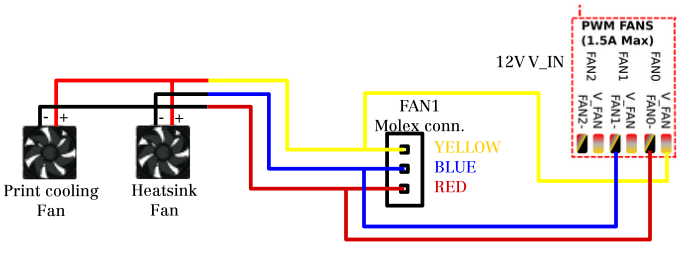
Fans are workin!
Of cause I forgot to put the V_FAN jumper on V_IN as I wondered
why nothing moves...Just for those who stew over how to connect the Anycubic (FAN1) connector, that's how I wired it to the Duet:
-
Hotbed is working!
I measured the current to the hotbed alone and that gave me about 14.3A while heating up to 55°C. The 15A fuse got hot to about 65°C but once the bed reached 55°C it cooled down to about 50°C.Should I go for a 20A fuse?
-
It might be worth thinking about an SSR to control the heated bed so you're not putting all the power through the duet.
-
Yes, I consider that if everything else works perfectly.
----- human being without Windows™ ------
-
Hotend works too!
But now three steps back to Z-Axis problem

Z+ stepper (left) again crashed onto the endstop while doing a Home Z, the Z+ endstop led was even lit up...By the way and quite strange, If I trigger both Z endstopps
earlier with my fingers the homing process finishes every time successfully. I'll try to fiddle a bit more, maybe I get behind that mystery. Maybe I twist both endstops to see if one is kind of faulty... -
Z Axis Problem still not solved but at least the last crash was some time ago... I now monitor the Z endstops IO pins with my oscilloscope to find out if there is something strange if it crashes again.
But I couldnt resist to print my first testcube that came out good, with a LOT room
 for optimization.
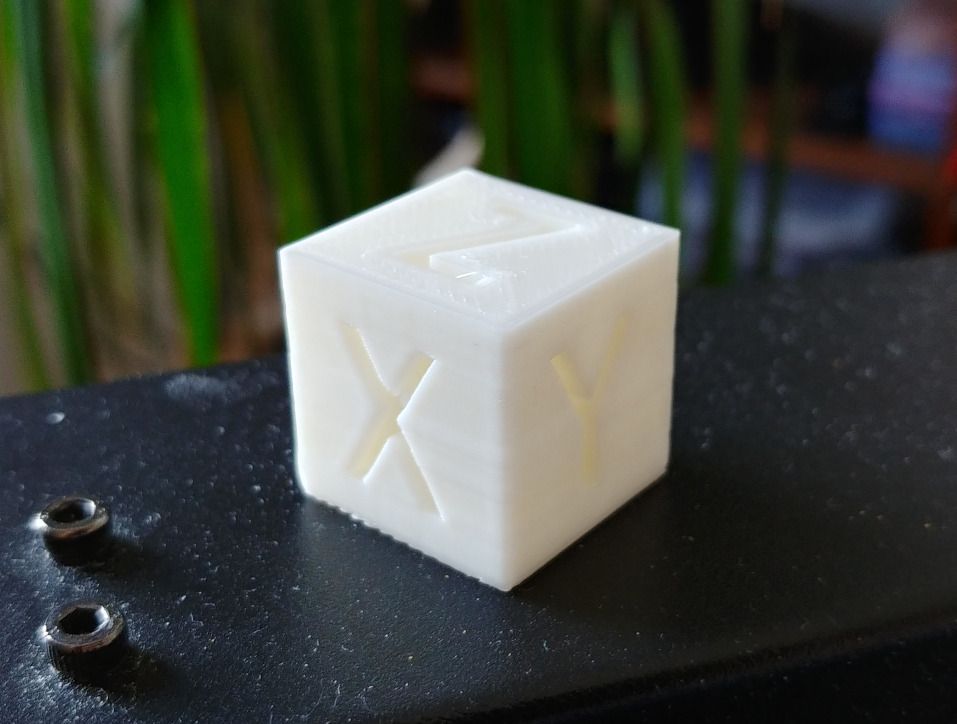
Thermal situation while printing the cube:
(steppers set to 1.2A)https://www.youtube.com/watch?v=Dd4siLtXD9I&feature=youtu.be
-
I noticed something weird if I do a "HOME-Z". That might be the reason
for crashing Z-axis into endstops or my understanding of that process is wrong/incomplete. Just as a side note, I changed the endstops with new ones and checked the endstop signals on my oscilloscope but this did not solve the crashing problem...What I observed:
I move the Z axis up a bit so that I can test both endstops without crashing the axis onto them.
I press HOME-Z.
Z axis moves slowly down. I press the right endstop first, nothing happens, both steppers continue moving until I press the left endstop.
(that would produce a crash if endstops are triggered with delay).Now I test HOME-Z again but this time I press left endstop first.
As I trigger left endstop the RIGHT stepper stops, the left one keeps moving until I trigger the right endstop.
(that would produce a crash too if there is a delay between both endstop triggering...)Is my understanding wrong and this is the intended procedure or is there something wrong?
Shouldn't stop the left stepper if I trigger the left endstop and vice versa? Is this maybe a software problem?
I also recorded a video, you might have problems to see the steppers stop because they move quite slowly...
-
@pauledd How about posting your current config.g and homing files? Also, can you confirm which end stop inputs and motor outputs you have the two Z motors and two Z end stop switches connected to?
-
Sure.
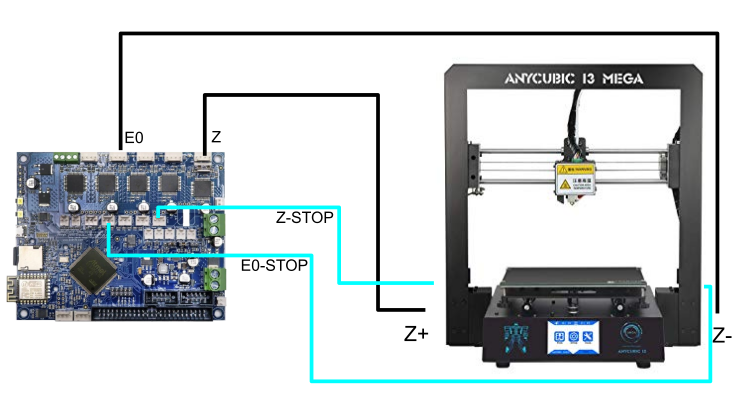
Z+ stepper --> Z
Z- stepper --> E0
Z+ endstop --> Z-STOP
Z- endstop --> E0-STOPconfig.g:
M584 X0 Y1 Z2:3 U3 E4 P3                          ; set drive mapping

M208 X-115:107.5 Y-107.5:107.5 Z0:205 U0:205

; Endstops
M574 X1 Y1 Z1 U1 S0                          ; set active low and disabled endstops

G90                                       ; send absolute coordinates...
M83                                       ; ...but relative extruder moves
M550 P"Pauls Duet"                        ; set printer name

; Network
M552 S1                                   ; enable network
M586 P0 S1                                ; enable HTTP
M586 P1 S0                                ; disable FTP
M586 P2 S1                                ; enable Telnet

; Drives
M569 P0 S0                                ; physical drive 0 goes backwards
M569 P1 S0                                ; physical drive 1 goes backwards
M569 P2 S1                                ; physical drive 2 goes forwards
M569 P3 S1                                ; physical drive 3 goes forwards
M569 P4 S1				  ; Z- physical drive 4 goes forwards
M350 X16 Y16 Z16 U16 E16 I1                   ; configure microstepping with interpolation
M92 X80.02 Y80.07 Z398.00 U398.00 E92.60          ; set steps per mm
M566 X900.00 Y900.00 Z12.00 U12.00 E120.00       ; set maximum instantaneous speed changes (mm/min)
M203 X4000 Y4000 Z360.00 U360.00 E1200.00 ; set maximum speeds (mm/min)
M201 X2000.00 Y2000.00 Z50.00 U50.00 E250.00     ; set accelerations (mm/s^2)
M906 X1200 Y1200 Z1200 U1200 E1200 I30          ; set motor currents (mA) and motor idle factor in per cent
M84 S10                                   ; Set idle timeout

; Z-Probe
M558 P0 H40 F120 T3000                    ; disable Z probe but set dive height, probe speed and travel speed
M557 X15:210 Y15:195 S20                  ; define mesh grid

; Heaters
M305 P0 T100000 B4725 C7.060000e-8 R4700  ; set thermistor + ADC parameters for heater 0
M143 H0 S90                               ; set temperature limit for heater 0 to 90C
M305 P1 T100000 B4725 C7.060000e-8 R4700  ; set thermistor + ADC parameters for heater 1
M143 H1 S245                              ; set temperature limit for heater 1 to 245C

; Fans
M106 P0 S0 I0 F500 H-1                    ; set fan 0 value, PWM signal inversion and frequency. Thermostatic control is turned off
M106 P1 S1 I0 F500 H1 T45                 ; set fan 1 value, PWM signal inversion and frequency. Thermostatic control is turned on

; Tools
M563 P0 D0 H1 F0                          ; define tool 0
G10 P0 X0 Y0 Z0                           ; set tool 0 axis offsets
G10 P0 R0 S0                              ; set initial tool 0 active and standby temperatures to 0C

; Custom settings
M552 S1
homeall.g:
G91                     ; relative positioning
G1 Z10 F3000 H2     	; lift Z relative to current position
G1 X-215 Y-215 F1800 H1 ; move quickly to X and Y axis endstops and stop there (first pass)
G1 X5 Y5 F3000          ; go back a few mm
G1 X-215 Y-215 F360 H1  ; move slowly to X and Y axis endstops once more (second pass)

M98 Phomez.g
home.x:
G91               ; relative positioning
G1 Z10 F3000 H2   ; lift Z relative to current position
G1 X-215 F1800 H1 ; move quickly to X axis endstop and stop there (first pass)
G1 X5 F1800       ; go back a few mm
G1 X-215 F360 H1  ; move slowly to X axis endstop once more (second pass)
G1 Z-10 F1800 H2  ; lower Z again
G90               ; absolute positioning
home.y:
G91               ; relative positioning
G1 Z10 F3000 H2   ; lift Z relative to current position
G1 Y-215 F1800 H1 ; move quickly to Y axis endstop and stop there (first pass)
G1 Y5 F1800       ; go back a few mm
G1 Y-215 F360 H1  ; move slowly to Y axis endstop once more (second pass)
G1 Z-10 F1800 H2  ; lower Z again
G90               ; absolute positioning
home.z:
M98 Phomex.g ; home X first to move head outside G91 ; relative positioning G1 Z10 F3000 H2 ; lift Z relative 10mm M584 Z2:3 U3 P4 G1 Z-205 U-205 F100 H1 M584 Z2:3 U3 P3 G90 G92 Z0 ; lift Z after probing G91 G1 Z10 F1000 G90 -
@pauledd In your homez.g you have:
M584 Z2:3 U3 P4
G1 Z-205 U-205 F100 H1
M584 Z2:3 U3 P3That should be:
M584 Z2 U3 P4
G1 Z-205 U-205 F100 H1
M584 Z2:3 P3 -
@grizewald
Thanks a lot! I changed the lines to your suggestions.If I now HOME-Z and I trigger the left endstop the right stepper stops moving and the left stepper keeps moving until I trigger the right endstop.
And vice versa if I trigger the the right endstop first the left stepper stops moving and the right stepper keeps moving until I trigger the left endstop.

So the behaviour is now much more kind of correct but exactly the opposite of what I expected, that is to say left endstop stops left stepper, right endstop stops right stepper. I double checked that I didnt twist the endstops accidentally but they are in the correct socket as drawn in the image above.
Shall I twist them simply to make them behave correctly or is there still somewhere a misconfiguration perceivable