Configurations for unconventional extruders and materials
-
Hello,
I have been working in a pellet extruder for some time to print directly, my motivations are: large impressions in short times, and the economic one without doubts.
This is an interim job, since it is a hobby in addition to other things, work and study.
Theoretically I have found a limit that is worrying to me, I use a nema 23 engine with a torque of 425 ozin and I use an endless screw speed reducer with a 15: 1 ratio, use an external driver of DQ542MA, and here comes the calculations:
16 microstepping
200 steps per lap
15: 1 reducer
drill bit 19.3mm200 * 16 * 15 / 19.3 = 2487 steps per millimeter
The nozzle I use is 1.8mm in diameter but the extruded filament is 2mm or sometimes a little more depends on how fast the motor rotates, in some tests I have done with the extruder controlled directly from Duet 2, the maximum speed that I can move the extruder without losing steps or stopping, is 10mm / s, that is, this is a real practical and mechanical limit, so when going to the slicing software, in this case Simplify3D, I must indicate this speed, but I don't know if this or all of the chargers do the same, when I generate Gcode I get things like this
G1 X9.392 Y4.504 E0.5595 F600which means that not only the extruder is going to move at 10mm / s but also all other axes, thus making printing very slow.
I would like to hear them, and specifically I would like to know the opinions of those who work with something similar, or clays, chocolate, that do not use a conventional extruder.
-
Hi,
I don't have access to Simplfy3D at the moment. Where are you entering this "speed limit"?
Have you specified the max extruder speed in your Duet config file?
Once I have set the max extruder speed in the config file, I simply check prints for under extrusion. If I see that during printing the extruder is hitting it's max limit then I reduce the printing speed.
Frederick
-
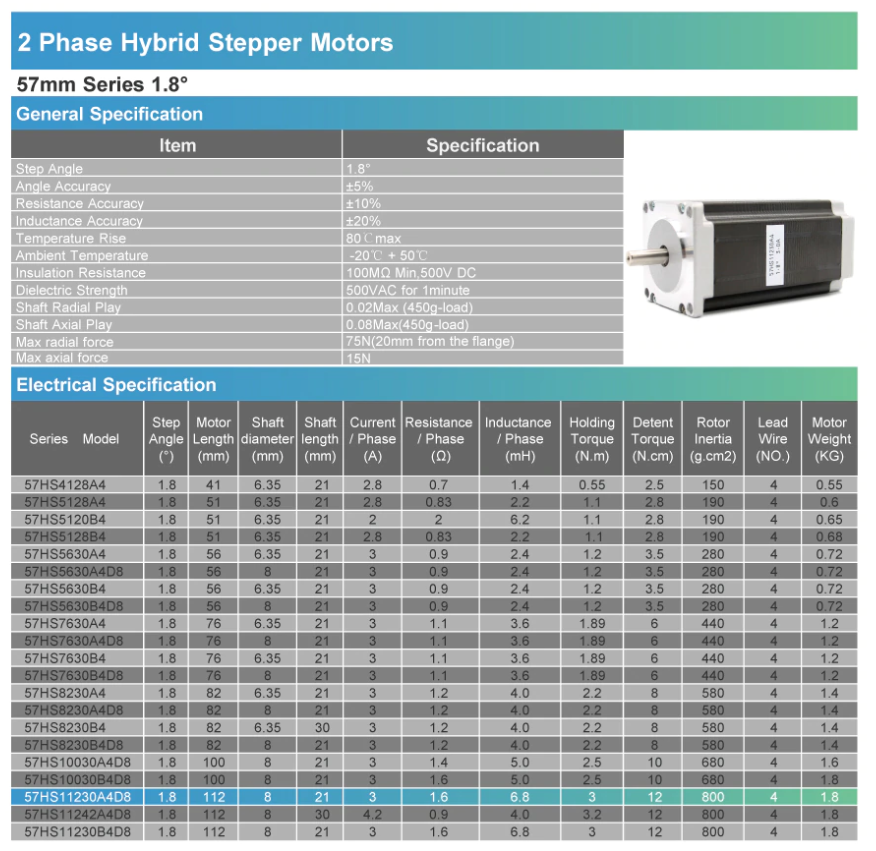
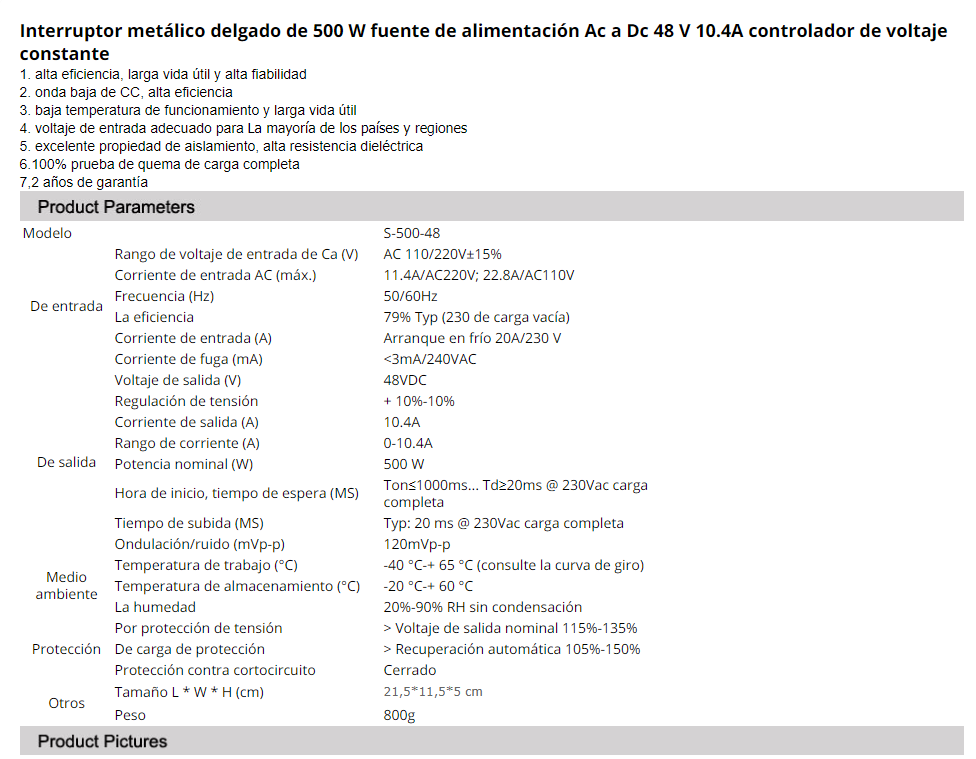
Please provide a link to the Nema 23 motor you are using. What voltage PSU feeds the external stepper drivers? Also post your config.g file.
-
links are marked as spam
Motor
Power supply
this is the configuration file
; Configuration file for Duet WiFi (firmware version 1.21)
; executed by the firmware on start-up
;
; generated by RepRapFirmware Configuration Tool v2 on Fri Mar 15 2019 23:53:22 GMT-0500 (hora estándar de Colombia)

; General preferences
G90                                    		; Send absolute coordinates...
M83                                     	; ...but relative extruder moves
G21						; G21 establece las unidades en mm / G20 establece las unidades en pulgadas
; kinematics type
M669 K1                                		; Select CoreXY mode

; Network

M550 PScorexy                        		; Set machine name
M552 S1                               	 	; Enable network
M586 P0 S1                               	; Enable HTTP
M586 P1 S0                              	; Disable FTP
M586 P2 S0                               	; Disable  Telnet

; Drives
M569 P5 S0                           	 	; Drive 5 goes forwards axis  X
M569 P6 S1                               	; Drive 6 goes forwards axis Y
M569 P7 S1                               	; Drive 7 goes forwards Extrusor
M569 P8 S1                               	; Drive 8 goes forwards Axis z
M569 P9 S1				 	; Drive 9 goes forwards Axis Z
M569 P10 S1				 	; Drive 10 goes forwards axis z
M569 P11 S1 				 	; Drive 11 goes forwards axis z
M584 X5 Y6 Z8:9:10:11 U10 V11 E7   			; Apply custom drive mapping and four Z motors connected to driver outputs 8, 9, 10 and 11 Z
M350 X16 Y16 Z16:16:16:16  E16 I1                ; Configure microstepping with interpolation
M350 U16 V16 W16 I1
M92 X80 Y80 Z400:400:400:400 E2487; 	; Set steps per mm
M92 U400 V400 W400
M566 X900 Y900 Z30:30:30:30 E120  	 	; Set maximum instantaneous speed changes (mm/min)
M566 U30 V30 W30
M203 X18000 Y18000 Z200:200:200:200 E1000  	; Set maximum speeds (mm/min)
M203 U200 V200  W200
M201 X4000 Y4000 Z100:100:100:100 E200   	; Set accelerations (mm/s^2)
M201 U100 V100 W100
M84 S30                                  	; Set idle timeout

; define posiciones de los tornillos
M671 X-321:-321:317:317 Y-144:184:184:-144 S4	;agregar parametro F2

; Axis Limits
M208 X-267 Y-245 Z0 S1                         	; Set axis minima
M208 U0 V0 W0 S1
M208 X267 Y230 Z406 S0                   	; Set axis maxima
M208 U406 V406 W406 S0

; Endstops Makerbot Mechanical Endstop v1.2
M574 X1 Y1 S0                            	; S_ endstop-type: 0 = active low, 1 = active high, 2 = slice-direction-probe, 3 = motor load detection
; MicroSiwch
M574 Z1 U1 V1 W1 S1
:M574 Z1 U1 V1 S1


; Z-Probe
;M574 Z1 S2                               	; Set endstops controlled by probe
;M307 H3 A-1 C-1 D-1                             ; Disable heater on PWM channel for BLTouch
;M558 P9 H5 F120 T18000 A5 R0.2 B1 		;S0.03   R0.75    Set Z probe type to bltouch and the dive height + speeds
;G31 P25 X0 Y33 Z1.13 				; Set Z probe trigger value, offset and trigger height
;M557 X-265:265 Y-207:245 S53:113           	;Define mesh grid

; Heaters
M305 P0 T100000 B4138 R4700              	; Set thermistor + ADC parameters for heater 0
M143 H0 S120                             	; Set temperature limit for heater 0 to 120C
;M305 P1 T100000 B4725 C7.060000e-8 R4700        ; Set thermistor + ADC parameters for heater 1
;M143 H1 S250                             	; Set temperature limit for heater 1 to 250C
M912 P0 S-6.5					; ajuste el calentador 1 ajuste electronico del monitor de temperatura en grados centigrados

;m571 consultar

;Extrusora de tornillo
M305 P1 T100000 B4100 R4700       ; Set thermistor + ADC parameters for heater 1
M143 H1 S250                             	; Set temperature limit for heater 1 to 250C
M305 P2 T100000 B4100 R4700       ; Set thermistor + ADC parameters for heater 1
M143 H2 S250                             	; Set temperature limit for heater 1 to 250C
M305 P3 T100000 B4100 R4700        ; Set thermistor + ADC parameters for heater 1
M143 H3 S250                             	; Set temperature limit for heater 1 to 250C
M305 P4 T100000 B4100 R4700        ; Set thermistor + ADC parameters for heater 1
M143 H4 S250                             	; Set temperature limit for heater 1 to 250C
M305 P5 T100000 B4100 R4700        ; Set thermistor + ADC parameters for heater 1
M143 H5 S250                             	; Set temperature limit for heater 1 to 250C


; Fans
;M106 P0 I0; invertir PWM del ventilador 1
M106 P0 S0 F500 H-1                   		; Set fan 0 value, PWM signal inversion and frequency. Thermostatic control is turned off
M106 P1 S0 I0 F500 H-1              	; Set fan 1 value, PWM signal inversion and frequency. Thermostatic control is turned on
M106 P2 S127 I1 F500 H-1                   	; Set fan 2 value, PWM signal inversion and frequency. Thermostatic control is turned off

; Tools
;M563 P0 D0 H1                            	; Define tool 0
M563 P0 D0 H1:2:3:4 S"Extrusora de Tornillo"
G10 P0 X0 Y0 Z0                          	; Set tool 0 axis offsets
G10 P0 R0:0:0:0 S0:0:0:0                          	; Set initial tool 0 active and standby temperatures to 0C
M563 P1 H5 S"Temperatura Tolva" ; indicador
G10 P1 X0 Y0 Z0                          	; Set tool 1 axis offsets
G10 P1 R0 S0

; Avance de presión unidad extrusora
;M572 D0 S0.06

; Automatic saving after power loss is not enabled
M911 S21 R23 P"M913 X0 Y0 G91 M83 G1 Z3 E-5 F1000" ; Set voltage thresholds and actions to run on power loss


; activar bltouch
;M280 P3 S160 I1 ; Alarm Release and Push-Pin UP
;M280 P3 S140 I1; modo 5v logic zmin


M929 P"eventlog.txt" S1; iniciar el registro en el archivo eventlog.txt

;LEDs
;M307 H4 A-1 C-1 D-1
;M307 H5 A-1 C-1 D-1
;M307 H6 A-1 C-1 D-1
;M307 H7 A-1 C-1 D-1

; GUI config
;M404 N1.75	; display for users nominal-filament-diameter/width of setup, in this case 1.75mm


; seleccionar herramienta
T0


; Load any saved values from last use, that were saved with M500 command
M501	; Ensure that M501 is at the end of config.g in order for the values in config-override.g to be loaded at startup
; config done
;M291 P"Config done" S2 T3	; send message
;M300 S300 P1000	; beep
;M292 ; Hide the message
M80
according to what I could understand and the basis for the calculations these are the screw distances
200 * 16 * 15 / 19.3 = 2487 steps per mm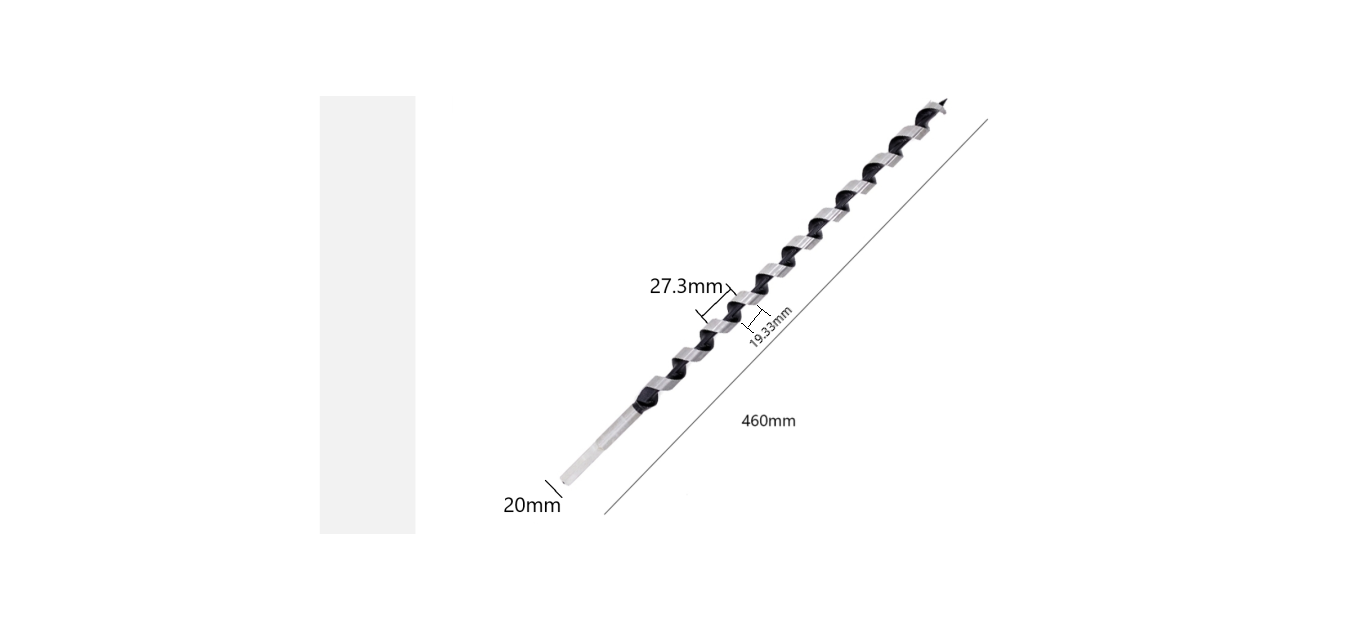
@fcwilt said in Configurations for unconventional extruders and materials:
Hi,
I don't have access to Simplfy3D at the moment. Where are you entering this "speed limit"?
Have you specified the max extruder speed in your Duet config file?
Once I have set the max extruder speed in the config file, I simply check prints for under extrusion. If I see that during printing the extruder is hitting it's max limit then I reduce the printing speed.
FrederickThis is a parameter where I set the maximum speed, any value above this will generate commands G1 X9.392 Y4.504 E0.5595 F600 with speeds higher than F600 and cause the engine to not move

-
I don´t have the right calculation at the hand now.. but think I know.. .
If you try to extrude 10mm and you have mark the filament at a position for checking how many flament is extrude. So you able to check if your calculation is korrekt.Or see here in German:
https://www.youtube.com/watch?v=0FLgeU1Ockk
https://drucktipps3d.de/extruder-esteps-kalibrieren/or in english
https://3daddict.com/3d-printer-extruder-calibration-steps/
https://www.youtube.com/watch?v=LzZZaGmeX8w
https://www.youtube.com/watch?v=YUPfBJz3I6YYour Value in S3D.. is the value for the speed of printing. You have the possibility to abjust it at the WEB-Control.
But the max. mechanical possibility´s are only defined at the config.gIf you use a low value in S3D, you get a very fine Print... if your value in S3D high, you get a rough print.. maybe for testing your construction in real.
You should change your values for the Outline-Speed, the innerfill-speed and so on...I have like 40 or 50% of the First value.
Normaly it deepends on your selection, wich quality you would to print. -
Will be hard to make a mark on pellets
")
-
Why? spray it... or get a tape... a injektion with some color.. use a big Edding... etc.
-
@jhonf441 I am interested in whether you consider mixing the pellet with color also? E. g. using color pigments which are used to produce oil and water colors. Then one could produce true color prints.
-
@jhonf441, you don't need to reduce the speed you set in S3D. All you need to do is set the maximum extruder speed in your M203 command in config.g correctly, then the firmware will slow down moves when necessary to satisfy that limit. Of course, the print time estimated by S3D will be even less accurate than usual.
You could consider reducing microstepping below x16 to reduce the required step rate.
-
@JustD said in Configurations for unconventional extruders and materials:
Why? spray it... or get a tape... a injektion with some color.. use a big Edding... etc.
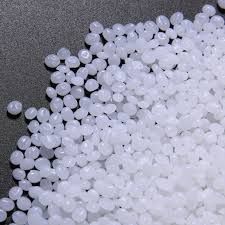
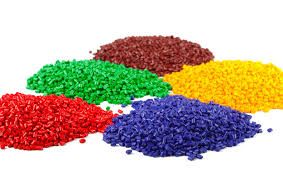
Because it is an unconventional extruder, the plastic that it uses comes in a presentation as in the attached image, the steps are probably a process of error testing and moving the extrusion multiplier
@JoergS5 said in Configurations for unconventional extruders and materials:
@jhonf441 I am interested in whether you consider mixing the pellet with color also? E. g. using color pigments which are used to produce oil and water colors. Then one could produce true color prints.
when working with pellets, obtaining a specific color is very simple, pigment for pellets is used, it consists of a kilogram of pellet with a concentration of one color, its price is about 3 dollars and a single kilo can be enough to give color to 25Kg of virgin pellet, so while it is being extruded, some colored grains can be added and the molten plastic will have color, attached pigment image, but there are also other advantages, mixing pellets of different types of polymers, to obtain a new polymer with one or several physical and mechanical properties of several polymers.
@dc42 said in Configurations for unconventional extruders and materials:
@jhonf441, you don't need to reduce the speed you set in S3D. All you need to do is set the maximum extruder speed in your M203 command in config.g correctly, then the firmware will slow down moves when necessary to satisfy that limit. Of course, the print time estimated by S3D will be even less accurate than usual.
You could consider reducing microstepping below x16 to reduce the required step rate.
That is something that had not occurred to me, it has given me a light on my way I hope to test it and show progress, I am also working on the extruder so that I can make 3mm gauge filament with a feedback controller measuring in filament thickness and varying the speed of the engine to reduce the error and adjust itself, I would like to do it by gcode but I think that would need a gcode loop so that the motor can rotate until some external event breaks the cycle and stops the process; This is so that when the machine is not printing it is making filament for prints that need a lot of quality in the finish and require smaller nozzles.
Thanks to everyone for your replies.
-
Sounds like you need a PID controller on the pellet feed (not gcode).