mesh grid compensation
-
@akisjon said in mesh grid compensation:
i have to look how to straighten the bed and gandry.
I don’t know your printer, so maybe you should do that, but the main question remains: Did you level your bed as described here before you generate a mesh grid?
-
@infiniteloop said in mesh grid compensation:
Did you level your bed as described here before you generate a mesh grid?
with this guide, no i don't ,because I thought that is only for manual bed leveling and not for bltouch and I didn't read it
-
@akisjon Give it a try! Manual bed levelling is less "manual" than it sounds, it's quite comfortable. Finally, to probe a mesh, a levelled bed is a fundamental prerequisite.
-
Hello
I need help again because I can not make sense of it, I have rebuilt the z crane I have put a third axle, now the motion is smoother, added glass on bed , I have made the cables of bltouch (ver.3.0) twisted and the results are worse than before with previous board (mega 2560) with Inductive Sensor it worked well, I ask for your help
Thank you in advancebed.g
G28 ; home
M401 ; deploy Z probe
G30 P0 X30 Y100 Z-99999 ; probe near an adjusting screw
G30 P1 X30 Y250 Z-99999 ; probe near an adjusting screw
G30 P2 X30 Y400 Z-99999 ; probe near an adjusting screw
G30 P3 X200 Y400 Z-99999 ; probe near an adjusting screw
G30 P4 X400 Y400 Z-99999 ; probe near an adjusting screw
G30 P5 X400 Y250 Z-99999 ; probe near an adjusting screw
G30 P6 X400 Y100 Z-99999 ; probe near an adjusting screw
G30 P7 X250 Y100 Z-99999 ; probe near an adjusting screw
G30 P8 X225 Y235 Z-99999 S3 ; probe near an adjusting screw and report adjustments needed
M402 ; retract probeconfig.g
; Configuration file for Duet WiFi (firmware version 2.03)
; executed by the firmware on start-up
;
; generated by RepRapFirmware Configuration Tool v2.0.5 on Sun Oct 27 2019 13:47:05 GMT+0200 (Χειμερινή ώρα Ανατολικής Ευρώπης); General preferences
G21 ; Work in millimetres
G90
M83 ; ...but relative extruder moves ; send absolute coordinates...
M83 ; ...but relative extruder moves
M667 S1 ; Select CoreXY mode
M550 P"Hypercube Evo" ; set printer name; Network
M552 S1 ; enable network
M587 S"COSMOTE-483A22" P"" ; Configure access point. You can delete this line once connec; enable network
M586 P0 S1 ; enable HTTP
M586 P1 S0 ; disable FTP
M586 P2 S0 ; disable Telnet; Drives
M569 P0 S1 ; physical drive 0 goes backwards
M569 P1 S1 ; physical drive 1 goes backwards
M569 P2 S1 ; physical drive 2 goes forwards Z
M569 P3 S1 ; physical drive 3 goes forwards
M584 X0 Y1 Z2 E4 ; set drive mapping
M350 X256 Y256 Z256 E256 I1 ; configure microstepping with interpolation
M92 X1280 Y1280 Z6400 E6500 ; set steps per mm
M566 X900.00 Y900.00 Z290 E120.00 ; set maximum instantaneous speed changes (mm/min)
M203 X6000.00 Y6000.00 Z900.00 E1200.00 ; set maximum speeds (mm/min)
M201 X500.00 Y500.00 Z400.00 E250.00 ; set accelerations (mm/s^2)
M906 X1000 Y1000 Z1500 E800 I30 ; set motor currents (mA) and motor idle factor in per cent
M84 S30 ; Set idle timeout; Axis Limits
M208 X0 Y0 Z0 S1 ; set axis minima
M208 X450 Y470 Z900 S0 ; set axis maxima; Endstops
M574 X1 Y1 S1 ; set active high endstops; Z-Probe
M574 Z1 S2 ; set endstops controlled by probe
M307 H3 A-1 C-1 D-1 ; disable heater on PWM channel for BLTouch
M558 P9 Z1 H5 A10 F160 T5000 ;S0.004 ;R0.5 ; set Z probe type to bltouch and the dive height + speeds
G31 P80 X25 Y50 Z0.2 ; set Z probe trigger value, offset and trigger height
M557 X100:400 Y100:400 S50 ; define mesh grid; Heaters
M305 P0 T100000 B4138 R4700 ; set thermistor + ADC parameters for heater 0
M143 H0 S120 ; set temperature limit for heater 0 to 120C
M305 P1 T100000 B4138 R4700 ; set thermistor + ADC parameters for heater 1
M143 H1 S280 ; set temperature limit for heater 1 to 280C; Fans
M106 P0 S0 I0 F500 H-1 ; set fan 0 value, PWM signal inversion and frequency. Thermostatic control is turned off
M106 P1 S1 I0 F500 H1 T45 ; set fan 1 value, PWM signal inversion and frequency. Thermostatic control is turned on; Tools
M563 P0 D0 H1 F0 ; define tool 0
G10 P0 X0 Y0 Z0 ; set tool 0 axis offsets
G10 P0 R0 S0 ; set initial tool 0 active and standby temperatures to 0C; Custom settings are not defined
; Miscellaneous
M911 S10 R11 P"M913 X0 Y0 G91 M83 G1 Z3 E-5 F1000" ; set voltage thresholds and actions to run on power loss
T0 ; select first
M290 S-0.330
;M564 H0heightmap.csv
RepRapFirmware height map file v2 generated at 2019-12-15 11:29, min error -1.839, max error 1.072, mean -0.343, deviation 0.741
xmin,xmax,ymin,ymax,radius,xspacing,yspacing,xnum,ynum
100.00,400.00,100.00,400.00,-1.00,50.00,50.00,7,7
-1.839, -1.556, -1.394, -1.342, -1.271, -1.342, -1.411
-1.430, -1.152, -0.927, -0.842, -0.817, -0.813, -0.780
-1.194, -0.850, -0.579, -0.447, -0.379, -0.319, -0.251
-0.923, -0.506, -0.215, -0.054, 0.047, 0.127, 0.235
-0.760, -0.339, -0.004, 0.197, 0.316, 0.443, 0.588
-0.617, -0.132, 0.224, 0.456, 0.570, 0.699, 0.900
-0.519, -0.035, 0.311, 0.541, 0.680, 0.831, 1.072 -
@akisjon said in mesh grid compensation:
M290 S-0.330
Why are you setting babystepping in your config.g?
-
What type of printer is this?
-
@Phaedrux Think it is a Hypercube Evo, looking at his M550
P.
-
@Phaedrux M667 CoreXY
-
@akisjon said in mesh grid compensation:
M558 P9 Z1 H5 A10 F160 T5000
The Z1 is deprecated, so remove that.
G31 P80 X25 Y50 Z0.2
The recommended P value for the BLTouch is P25.
Your Z trigger height is very low. When the BLTouch is mounted as described in the Antclabs instructions the base of the probe body should be 8mm above the nozzle tip. This results in a trigger height of ~2mm.
Not that any of that would solve the tilt in your bed.
You say you have 3 lead screws now with 3 motors? Are you doing automatic leveling?
https://duet3d.dozuki.com/Wiki/Bed_levelling_using_multiple_independent_Z_motors
-
@Phaedrux said in mesh grid compensation:
You say you have 3 lead screws now with 3 motors? Are you doing automatic leveling?
3 lead screws and 1 motor
-
@akisjon Have you leveled the bed frame on the lead screws before belting them together? Does your bed have it's own leveling adjustments?
-
@Phaedrux said in mesh grid compensation:
Have you leveled the bed frame on the lead screws before belting them together? Does your bed have it's own leveling adjustments?
no it does not have its own screws on the bed but i think this effect is not a crooked bed . does it have to do with the settings? ,Before i tying them to the strap, i ll check each one with the fixed points of the printer
-
@akisjon said in mesh grid compensation:
i think this effect is not a crooked bed
I think that's exactly what you have. The display exaggerates the amount of tilt. The difference is only 2.5mm from low point to high point. You should be able to verify that by moving the nozzle around the bed with and without mesh compensation active.
How do you plan to level the bed if you don't have adjustment screws for the bed surface and only 1 motor with 3 lead screws?
-
@Phaedrux said in mesh grid compensation:
You should be able to verify that by moving the nozzle around the bed with and without mesh compensation active.
as you will understand i'm pretty much unrelated to this guy tell me how to do it? will i just click disable bed compension....and then ? as far as screws i'll put them back on, i had them removed to put spacers
-
G29 will run a mesh probing routine.
G29 S1 will load the saved heightmap and enable mesh compensation.
G29 S2 will disable mesh compensation.https://duet3d.dozuki.com/Wiki/Gcode#Section_G29_Mesh_bed_probe
-
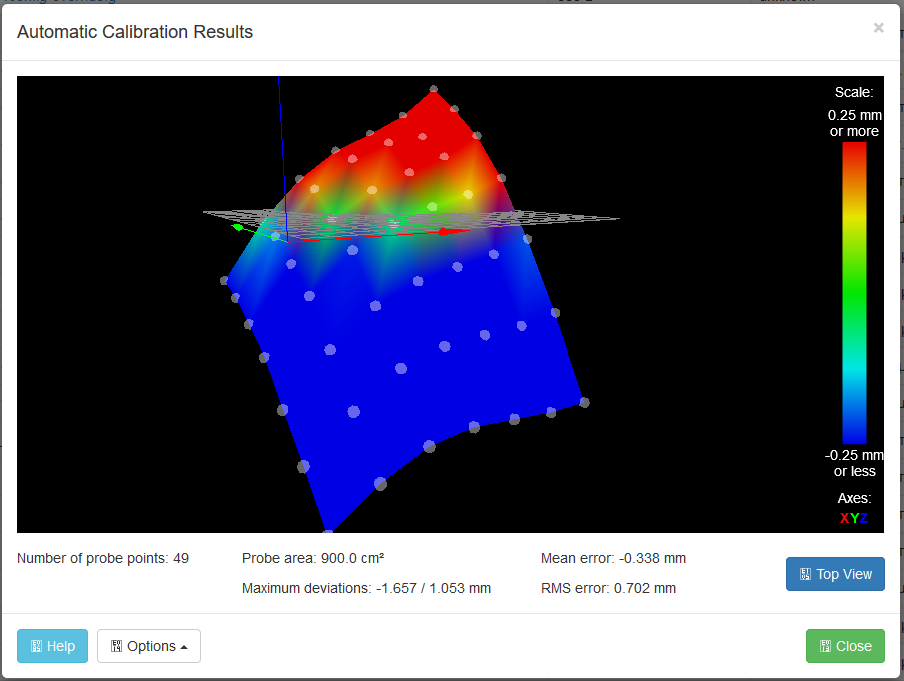
hello and good year everyone i came again with many corrections but that i dont know how to fix it will help me?
is she still out of bed? -
@akisjon That would appear to be sag in the X gantry. No amount of bed leveling will fix that. But mesh compensation should be able to correct for it.
The question is, does the mesh compensation correct for it correctly or not?
You can test with an STL like this to verify your first layer across the bed surface quickly.
bedlevel_nozzle_0.4_200x200-0.3-0.8.stl
Print it twice, once without mesh compensation, and once with.
-
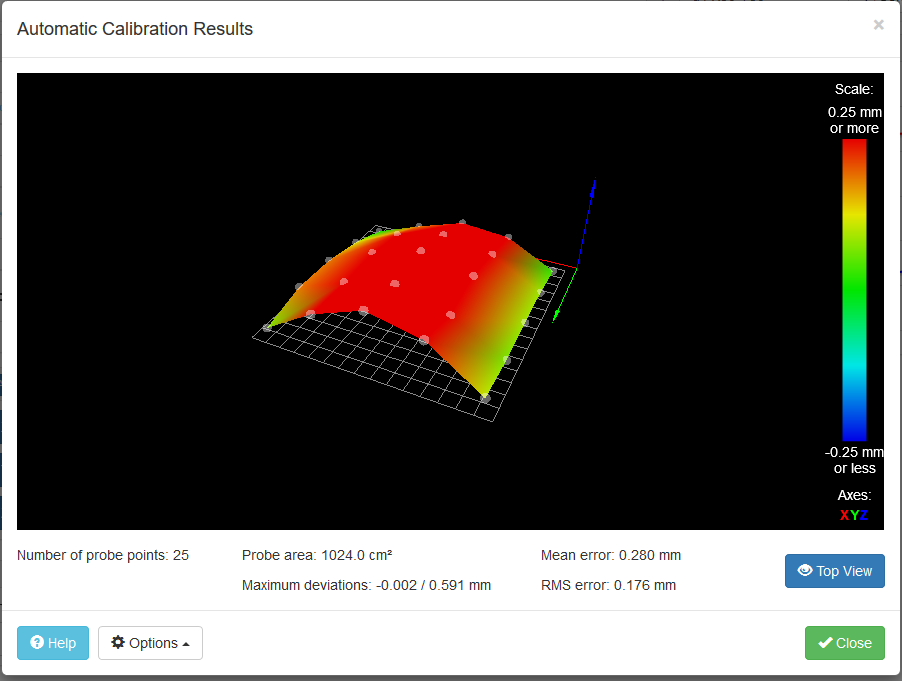
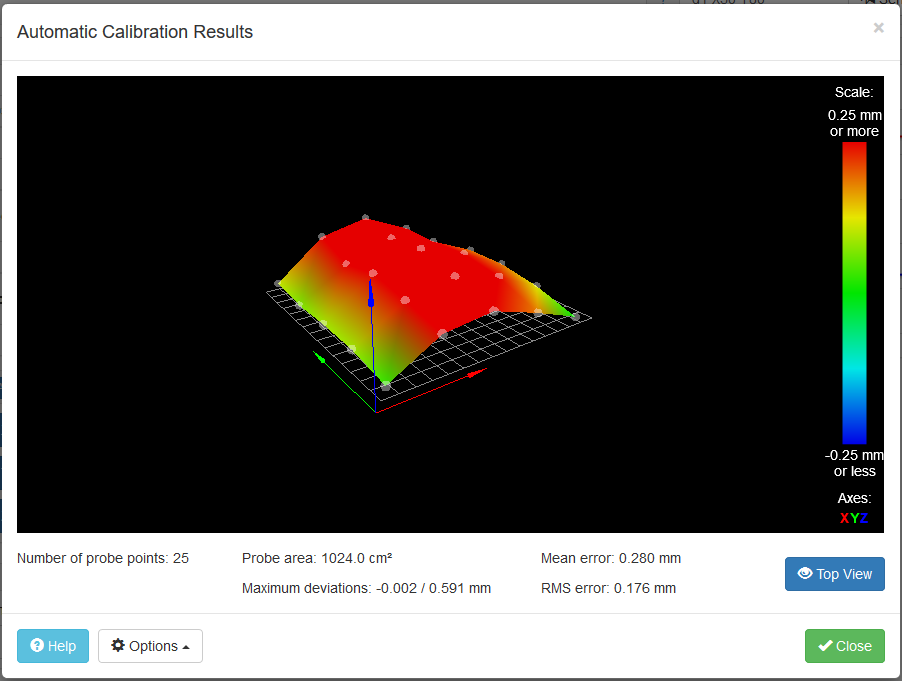
@Phaedrux In a strange case it prints in both cases but better print when the bed compensation is disable . is it possible?
-
Can you post your current config.g and homing files?
Did you incorporate the changes mentioned earlier in the thread?
You may need to do a more detailed mesh with more points.
-
config.g
; Configuration file for Duet WiFi (firmware version 2.03)
; executed by the firmware on start-up
;
; generated by RepRapFirmware Configuration Tool v2.0.5 on Sun Oct 27 2019 13:47:05 GMT+0200 (Χειμερινή ώρα Ανατολικής Ευρώπης); General preferences
G21 ; Work in millimetres
G90
M83 ; ...but relative extruder moves
M669 K1 ; Select CoreXY mode
M550 P"Hypercube Evo" ; set printer name; Network
M552 S1 ; enable network
M552 P192.168.1.69 S1 ; Enable network and set IP address
M553 P255.255.255.0 ; Set netmask
M554 P192.168.1.1 ; Set gateway
M587 S"COSMOTE-483A22" P"" ; Configure access point. You can delete this line once connec; enable network
M586 P0 S1 ; enable HTTP
M586 P1 S0 ; disable FTP
M586 P2 S0 ; disable Telnet; Drives
M569 P0 S1 ; physical drive 0 goes backwards
M569 P1 S1 ; physical drive 1 goes backwards
M569 P2 S1 ; physical drive 2 goes forwards Z
M569 P3 S1 ; physical drive 3 goes forwards
M584 X0 Y1 Z2 E3 ; set drive mapping
M350 X256 Y256 Z256 E256 I1 ; configure microstepping with interpolation
M92 X1280 Y1280 Z6400 E6500 ; set steps per mm
M566 X900.00 Y900.00 Z290 E120.00 ; set maximum instantaneous speed changes (mm/min)
M203 X6000.00 Y6000.00 Z600.00 E1200.00 ; set maximum speeds (mm/min)
M201 X500.00 Y500.00 Z400.00 E250.00 ; set accelerations (mm/s^2)
M906 X1000 Y1000 Z1800 E800 I30 ; set motor currents (mA) and motor idle factor in per cent
M84 S30 ; Set idle timeout
M376 H0.591
;M671 X0:0 Y0:0 S0.5 ; leadscrews at left (connected to Z) and right (connected to E1) of X axis; Axis Limits
M208 X0 Y0 Z0 S1 ; set axis minima
M208 X440 Y460 Z900 S0 ; set axis maxima; Endstops
M574 X1 Y1 S1 ; set active high endstops; Z-Probe
M574 Z1 S2 ; set endstops controlled by probe
M307 H3 A-1 C-1 D-1 ; disable heater on PWM channel for BLTouch
M558 P9 H4 A6 F120 T4000 R0.2 ;S0.004 ; set Z probe type to bltouch and the dive height + speeds
G31 P25 X25 Y35 Z3.930 ; set Z probe trigger value, offset and trigger height
M557 X50:430 Y100:420 S80 ; define mesh grid; Heaters
M305 P0 T100000 B4138 R4700 ; set thermistor + ADC parameters for heater 0
M143 H0 S120 ; set temperature limit for heater 0 to 120C
M305 P1 T100000 B4138 R4700 ; set thermistor + ADC parameters for heater 1
M143 H1 S280 ; set temperature limit for heater 1 to 280C; Fans
M106 P0 S0 I0 F500 H-1 ; set fan 0 value, PWM signal inversion and frequency. Thermostatic control is turned off
M106 P1 S1 I0 F500 H1 T45 ; set fan 1 value, PWM signal inversion and frequency. Thermostatic control is turned on; Tools
M563 P0 D0 H1 F0 ; define tool 0
G10 P0 X0 Y0 Z0 ; set tool 0 axis offsets
G10 P0 R0 S0 ; set initial tool 0 active and standby temperatures to 0C; Custom settings are not defined
; Miscellaneous
M911 S10 R11 P"M913 X0 Y0 G91 M83 G1 Z3 E-5 F1000" ; set voltage thresholds and actions to run on power loss
T0 ; select first
;M290 S-0.330homeall
; homeall.g
; called to home all axes
;
; generated by RepRapFirmware Configuration Tool v2.0.5 on Sun Oct 27 2019 13:47:05 GMT+0200 (Χειμερινή ώρα Ανατολικής Ευρώπης)G91
M280 P3 S160 I1 ; Alarm Release and Push-Pin UP just in case it's in alarm and deployed
;M402 ; Retract probe just in case it's down
M564 H0
G1 Z5 F6000 S2 ; lift Z relative to current position
G1 S1 X-480 F4000 ; move quickly to X and Y axis endstops and stop there (first pass)
G1 S1 Y-480 F4000
G1 X5 Y5 F6000 ; go back a few mm
G1 S1 X-480 F360
G1 S1 Y-480 F360 ; move slowly to X and Y axis endstops once more (second pass)
G90 ; absolute positioning
G1 X220 Y220 F6000 ; go to first bed probe point and home Z
G30 ; home Z by probing the bed
;G29 S1homex
; called to home the X axis
;
; generated by RepRapFirmware Configuration Tool v2.0.5 on Sun Oct 27 2019 13:47:05 GMT+0200 (Χειμερινή ώρα Ανατολικής Ευρώπης)
G91 ; relative positioning
G1 Z5 F6000 S2 ; lift Z relative to current position
G1 S1 X-485 F1800 ; move quickly to X axis endstop and stop there (first pass)
G1 X5 F6000 ; go back a few mm
G1 S1 X-485 F360 ; move slowly to X axis endstop once more (second pass)
G1 Z-5 F6000 S2 ; lower Z again
G90 ; absolute positioninghomey
; homey.g
; called to home the Y axis
;
; generated by RepRapFirmware Configuration Tool v2.0.5 on Sun Oct 27 2019 13:47:05 GMT+0200 (Χειμερινή ώρα Ανατολικής Ευρώπης)
G91 ; relative positioning
G1 Z5 F6000 S2 ; lift Z relative to current position
G1 S1 Y-485 F1800 ; move quickly to Y axis endstop and stop there (first pass)
G1 Y5 F6000 ; go back a few mm
G1 S1 Y-485 F360 ; move slowly to Y axis endstop once more (second pass)
G1 Z-5 F6000 S2 ; lower Z again
G90 ; absolute positioninghomez
; homez.g
; called to home the Z axis
;
; generated by RepRapFirmware Configuration Tool v2.0.5 on Sun Oct 27 2019 13:47:05 GMT+0200 (Χειμερινή ώρα Ανατολικής Ευρώπης)
M280 P3 S160 I1 ; Alarm Release and Push-Pin UP just in case it's in alarm and deployed
M402 ; Retract probe just in case it's down
G91 ; relative positioning
G1 Z5 F6000 S2 ; lift Z relative to current position
G90 ; absolute positioning
G1 X210 Y210 F6000; Move x and Y axis over to bed center so probe is on top of bed
G30 ; home Z by probing the bed