RepRapFirmware 3.0 is released!
-
@matej1006 said in RepRapFirmware 3.0 is released!:
@dc42
Like that:;Water temp M308 S5 P"e1temp" Y"thermistor" T100000 B4138 ;configure sensor 5 as thermistor on pin e1temp ; Fans M950 F0 C"!Fan0+exp.pb6" Q25000 ; fan 0 is a 4-wire PWM fan so invert it, use high PWM frequency, tacho connected to PB6 on expansion connector M106 H0 S1 T25and can i control 3 fan with one PWM output and one tacho input?
You've created sensor 5 to read the water temperature and fan 0 to control the pump. So you need P0 H5 in the M106 command, not H0.
Yes you can parallel the wires of multiple 4-wire fans except for the tacho wires.
Duet WiFi hardware designer and firmware engineer
Please do not ask me for Duet support via PM or email, use the forum
http://www.escher3d.com, https://miscsolutions.wordpress.com -
I just noticed that the PWM frequency for the heated bed seems a bit fast (I can see the LED dimming instead of flashing), especially for a 230VAC heater controlled by an SSR.
I see in the documentation that I can change the PWM frequency using the Q parameter in the M950 that creates the bead heater output, but what is the default frequency, and what is the minimum frequency? I would like to use a 2Hz or so, which is plenty in my case (10mm aluminium heated bed).
Maybe another thing for the RRF configurator, to add the Q parameter to the M950 that creates the bed heater?
-
My questions are about z-probe and bed leveling.
I updated my Duet wifi 1.02 with these new firmware.
z-probe: if I understood correctly there are no g-code modification if I'm using Smart Effector ...it's true? ( I'm talking about gcode for zprobe)
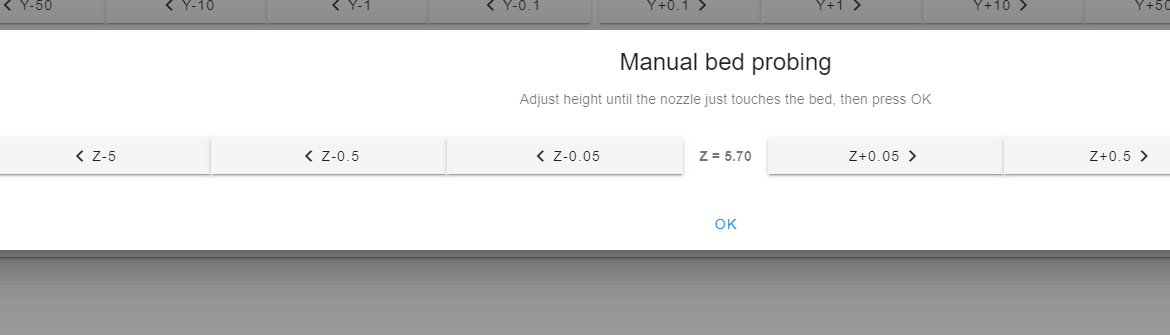
bed leveling: the automatic leveling was removed? I tried to run the leveling from web interface and started with a manual leveling.
Thanks
Giulio
-
@bulka said in RepRapFirmware 3.0 is released!:
I tried to run the leveling from web interface and started with a manual leveling.
This indicates the firmware thinks that a probe is NOT defined. Which sort of answers your first question.
I believe you will, at minimum, need to add C"zstop" to your M558. That's assuming you have the smart effector plugged into the Z endstop pin.
Could you post your existing M558 please?
Delta / Kossel printer fanatic
-
@DaBit I don't have that problem with my bed heater which is mains powered via SSR but I'm currently the other side of the world to my printer so can't say how it's configured. But IIRC, the default frequency for a bed heater is 10 Hz.
-
I keep running into error when homingall
G28 SetPosition called when DDA ring not empty
-
@Adamfilip said in RepRapFirmware 3.0 is released!:
I keep running into error when homingall
G28 SetPosition called when DDA ring not empty
Please confirm that you are running version 3.0 (not beta or RC), and post your config.g file, homeall.g file, deployprobe.g and retractprobe.g files if you have them, and any other files that homeall.g calls.
Duet WiFi hardware designer and firmware engineer
Please do not ask me for Duet support via PM or email, use the forum
http://www.escher3d.com, https://miscsolutions.wordpress.com -
@deckingman: I think RRF3 is a lot more generalised / has a lot less notion of specific pin functions than RRF2. It would not surprise me that a 'create heater output' M950 does not differentiate between different kind of heaters. Which is, IMHO, a good thing.
But the flipside is that the PWM frequency is also default, and probably quite high. Which does not work well for SSR's and especially the zero-crossing types; you can turn them on or off 100 times a second maximum (in the 50Hz EU). Thus, if one uses a 10Hz PWM frequency, the power can be regulated in 10% increments only, which is already not very high resolution. With a 500Hz PWM frequency the triggering of the SSR becomes a statistical function; a higher duty cycle makes it more likely that the SSR triggers at the zero crossing. It will regulate, but more in a bang-bang like fashion than a nicely controlled proportional fashion.
Since the thermal time constant of my heated bed is so large, I could easily get away with a 0.1Hz PWM frequency, but that increases thermal stress (wires in the heater heating up - cooling down - heating up - cooling down...), so 2-5Hz is a better option.
Which made me search for the limits on PWM frequency, which I did not find.
@Adamfilip : I got those 'G28 SetPosition called when DDA ring not empty' messages too after upgrading to RRF3, and in my case it had something to do with the endstop switches being setup in the wrong polarity. They were already triggered when the homing move started.
After fixing this, the message went away. -
@DaBit said in RepRapFirmware 3.0 is released!:
@Adamfilip : I got those 'G28 SetPosition called when DDA ring not empty' messages too after upgrading to RRF3, and in my case it had something to do with the endstop switches being setup in the wrong polarity. They were already triggered when the homing move started.
After fixing this, the message went away.I still want to find out exactly what is causing this, so that I can fix it.
-
In case it helps: here is my config bundle, or at least the latest backup: https://nextcloud.icecoldcomputing.com/s/YQo7Z7iEqfzDcXF
When I invert the endstop polarity in de M574's at line 40-41 of config.g so that they are triggered when the printhead is nowhere near them, I also get this DDA ring error. It also shows up in the eventlog (also included in the ZIP), but no more information is logged there.
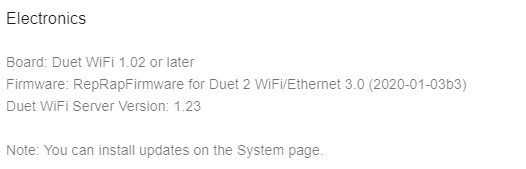
RRF is the stable release ((2020-01-03b3), board is Duet2Wifi 1.02 or later, DWC is 2.0.4If you want access to the board to run tests or do some debugging, just ask and I will setup temporary SSH access that allows you to tunnel to the Duet.
-
Yes running 3.0 not beta
Here are config and homeall
I dont have the others at the momentConfig.------------------------------------------------------------
; Configuration file for Duet WiFi (firmware version 3)
; executed by the firmware on start-up
;
; generated by RepRapFirmware Configuration Tool v2.1.5 on Wed Jan 08 2020 19:38:55 GMT-0500 (Eastern Standard Time); General preferences
G90 ; send absolute coordinates...
M83 ; ...but relative extruder moves
M550 P"TitanXY" ; set printer nameM667 S1 ; select CoreXY mode
; Network
M552 S1 ; enable network
M586 P0 S1 ; enable HTTP
M586 P1 S0 ; disable FTP
M586 P2 S0 ; disable Telnet; Drives
M569 P0 S0 ; physical drive 0 goes backwards
M569 P1 S0 ; physical drive 1 goes backwarsa
M569 P2 S0 ; physical drive 2 goes backwards
M569 P3 S0 ; physical drive 3 goes backwards
M584 X0 Y1 Z2 E3 ; set drive mapping
M350 X32 Y32 Z32 I0 ; configure microstepping without interpolation
M350 E16 I1 ; configure microstepping with interpolation
M92 X400 Y400 Z1593 E409 ; set steps per mm
M566 X600 Y600 Z20 E800 ; Set maximum instantaneous speed changes (mm/min)
M203 X9000 Y9000 Z1500 E10000 ; Set maximum speeds (mm/min)
M201 X1000 Y1000 Z250 E5000 ; Set accelerations (mm/s^2)
M906 X1200 Y1200 Z1500 E1100 I30 ; Set motor currents (mA) and motor idle factor in per cent
M84 S30 ; Set idle timeout
M572 D0 S0.15 ; Pressure Advance ; Set idle timeout; Axis Limits
M208 X0 Y0 Z0 S1 ; set axis minima
M208 X270 Y270 Z300 S0 ; set axis maxima; Endstops
M574 X1 S3 ; configure sensorless endstop for low end on X
M574 Y1 S3 ; configure sensorless endstop for low end on Y; BLTouch
; Z-Probe
M950 H3 C"nil" ; Disable heaters h7 to free up pins
M950 S0 C"exp.heater3" ; create servo pin 0 for BLTouch
M558 P9 C"^zprobe.in" H10 F800 T2000 ; set Z probe type to bltouch and the dive height + speeds
G31 X20 Y0 Z3.3 P25 ; Z probe trigger value, offset in relation to nozzle. And trigger height adjustment
M557 X15:215 Y15:195 S20 ; define mesh grid; Heaters
M308 S0 P"bedtemp" Y"thermistor" T100000 B4138 ; configure sensor 0 as thermistor on pin bedtemp
M950 H0 C"bedheat" T0 ; create bed heater output on bedheat and map it to sensor 0
M143 H0 S120 ; set temperature limit for heater 0 to 120C
M307 H0 A61.9 C160.5 D1.3 B0 S0.5 v24.4 ; disable bang-bang mode for the nozzle heater and set PWM limit
M308 S1 P"e0temp" Y"thermistor" T100000 B4725 C7.06e-8 ; configure sensor 1 as thermistor on pin e0temp
M950 H1 C"e0heat" T1 ; create nozzle heater output on e0heat and map it to sensor 1
M143 H1 S285 ; set temperature limit for heater 1 to 280C
M307 H1 A583.7 C261.1 D3.9 B0 S1.0 v24.3 ; disable bang-bang mode for the nozzle heater and set PWM limit; Fans
M950 F0 C"fan0" Q500 ; create fan 0 on pin fan0 and set its frequency
M106 P0 S0 H-1 ; set fan 0 value. Thermostatic control is turned off
M950 F1 C"fan1" Q500 ; create fan 1 on pin fan1 and set its frequency
M106 P1 S1 H1 T45 ; set fan 1 value. Thermostatic control is turned on
M950 F2 C"fan1" Q500 ; create fan 2 on pin fan1 and set its frequency
M106 P2 S1 H1 T45 ; set fan 2 value. Thermostatic control is turned on; Tools
M563 P0 D0 H1 F0 ; define tool 0
G10 P0 X0 Y0 Z0 ; set tool 0 axis offsets
G10 P0 R0 S0 ; set initial tool 0 active and standby temperatures to 0C; Custom settings are not defined
Homeall ----------------------------------------------------------
; homeall.g
; called to home all axes
;
; generated by RepRapFirmware Configuration Tool v2.1.5 on Wed Jan 08 2020 19:38:55 GMT-0500 (Eastern Standard Time)M913 X75 Y75 Z100 ; reduce motor power
M400 ; make sure everything has stopped before we make changes
M915 H400 X Y S0 R0 F0 ; set X and Y to sensitivity 0, do nothing when stall, unfiltered
M574 X1 Y1 S3 ; set endstops to use motor stallG91 ; use relative positioning
G1 H2 Z5 F6000 ; lift Z relative to current positionG4 P500 ; wait 500msec
G1 H1 X-285 F2000 ; move quickly to X axis endstop and stop there (first pass)
G4 P500 ; wait 500msec
G1 X5 ; move away from home
G4 P500 ; wait 500msec
M400 ; make sure everything has stopped before we make changesG4 P500 ; wait 500msec
G1 H1 Y-285 F2000 ; move quickly to Y axis endstop and stop there (first pass)
G4 P500 ; wait 500msec
G1 Y5 ; move away from home
G4 P500 ; wait 500msec
G1 H1 Y-285 F2000 ; move quickly to Y axis endstop and stop there (first pass)G1 H2 Z10 F6000 ; lift Z relative to current position
G1 X150 Y150 F1200 ; Centre Print head
G1 H1 Z-305 F1800 ; move Z down until the endstop is triggered
G92 Z0 ; set Z position to axis minimum (you may want to adjust this)G1 H2 Z10 F6000 ; lift Z relative to current position
M400 ; make sure everything has stopped
M913 X100 Y100 ; XY motors to 100% current
G90 ; back to absolute positioning -
-
This is the config;
; Endstops
M574 X2 S1 P"xstop" ; Set active high endstops
M574 Y2 S1 P"ystop"
M574 Z2 S1 P"zstop"; Z-Probe
M558 P5 C"zstop" R0.4 H1 F120 T6000 ; Set Z probe type to effector and the dive height + speeds
G31 P100 X0 Y0 Z-0.252 ; Set Z probe trigger value, offset and trigger height
M557 R85 S20 ; Define mesh grid; Heaters
M308 S0 P"bed_temp" Y"thermistor" T100000 B4138 C0 R4700 ;
M950 H0 C"bed_heat" T0 ; heater 0 uses the bed_heat pin, sensor 0
M308 S1 P"spi.cs1" Y"rtd-max31865" ; define E0 temperature sensor
M950 H1 C"e0_heat" T1 ; heater 1 uses the e0_heat pin and sensor 1; Fans
M950 F0 C"fan0" ;
M106 P0 S0 Q500 H-1 ;
M950 F1 C"fan1" ;
M106 P1 S1 Q500 H1 T45 ;
M950 F2 C"fan2" ;
M106 P2 S1 Q500 H1 ;added the bold part as you suggest but if try to run Delta calibration start on Manual calibration
-
@bulka said in RepRapFirmware 3.0 is released!:
M558 P5 C"zstop" R0.4 H1 F120 T6000 ; Set Z probe type to effector and the
added the bold part as you suggest but if try to run Delta calibration start on Manual calibration
This depends on where you have the probe plugged in, if it's the Smart Effector and plugged into the z endstop connector, that would be correct. But, usually it's plugged into the probe connector next to the expansion header. In that case what you put would be incorrect.
If the probe connector, it should be
M558 P5 R0.4 C"zprobe.in+zprobe.mod" H1 F120 T6000
My 3D Printing YouTube Channel
Better Living Through 3D Printing -
-
@bulka is this a Duet Wifi or Duet3? and Am I right in thinking it is a smart effector?
-
-
@bulka ok here is my config file using the same hardware.
; Configuration file for Duet WiFi (firmware version 1.17)
; executed by the firmware on start-up
;
; generated by RepRapFirmware Configuration Tool on Fri Jul 07 2017 14:49:07 GMT+0100 (BST)

; General preferences
M111 S0 ; Debugging off
G21 ; Work in millimetres
G90 ; Send absolute coordinates...
M83 ; ...but relative extruder moves
M555 P2 ; Set firmware compatibility to look like Marlin

;*** The homed height is deliberately set too high in the following - you will adjust it during calibration.
M665 L450.570 R239.241 H400.083 B175.0 X0.081 Y0.091 Z0.000    ; Set delta radius, diagonal rod length, printable radius and homed height
M666 X0.315 Y0.808 Z-1.123 A0.20 B0.02                         ; Put your endstop adjustments here, or let auto calibration find them

;M665 L450.570 R239.403 H400.898 B175.0 X0.191 Y0.213 Z0.000  ; Set delta radius, diagonal rod length, printable radius and homed height
;M666 X0.392 Y0.645 Z-1.037 A0.12 B-0.07  ; Put your endstop adjustments here, or let auto calibration find them
M208 Z0 S1 ; Set minimum Z

; Endstops
M574 X2 Y2 Z2 S1 ; Define active high microswitches
M558 P5 C"^zprobe.in" X0 Y0 Z0 H5 R0.4 F1200 T6000 ; Set Z probe type to unmodulated, the axes for which it is used and the probe + travel speeds
G31  P100 X0 Y0 Z-0.05; Set Z probe trigger value, offset and trigger height
M557 R160 S20 ; Define mesh grid

; Drives
M569 P0 S0 ; Drive 0 goes forwards
M569 P1 S0 ; Drive 1 goes forwards
M569 P2 S0 ; Drive 2 goes forwards
M569 P3 S1 ; Drive 3 goes forwards
M92 X200 Y200 Z200 E1667 ; Set steps per mm
M350 X16 Y16 Z16 E16 I1 ; Configure microstepping with interpolation
M566 X900 Y900 Z900 E40 ; Set maximum instantaneous speed changes (mm/min)
M203 X18000 Y18000 Z18000 E2400 ; Set maximum speeds (mm/min)
M201 X1000 Y1000 Z1000 E120 ; Set accelerations (mm/s^2)
M906 X1000 Y1000 Z1000 E500 I30 ; Set motor currents (mA) and motor idle factor in per cent
M84 S30 ; Set idle timeout

; Heaters
M143 S300 ; Set maximum heater temperature to 300C
;M305 P0 X201 ; Set thermistor + ADC parameters for heater 0 and remap it to channel 201
;M305 P1 X200 ; Set thermistor + ADC parameters for heater 1 and remap it to channel 200
M308 S0 P"spi.cs2" Y"rtd-max31865" F50
M308 S1 P"spi.cs1" Y"rtd-max31865" F50
M950 H0 C"bed_heat" T0
M950 H1 C"e0_heat" T1
;M307 H0 A199.0 C962.6 D5 B0
;M307 H1 A409.7 C232.2 D4.5 B0
;M307 H0 A161.6 C1109.8 D5.8 S1.00 V24.4 B0
M307 H0 A449.1 C783.3 D9.8 S1.00 V24.4 B0
M307 H1 A544.9 C280.1 D4.2 S1.00 V24.4 B0

; Tools
M563 P0 D0 H1 F2; Define tool 0
G10 P0 X0 Y0 Z0 ; Set tool 0 axis offsets
G10 P0 R0 S0 ; Set initial tool 0 active and standby temperatures to 0C

; Network
M550 PDelta ; Set machine name
M552 S1 ; Enable network
; Access point is configured manually via M587 by the user
M586 P0 S1 ; Enable HTTP
M586 P1 S1 ; Enable FTP
M586 P2 S0 ; Disable Telnet

; Fans
M106 P0 H-1 ; Set fan 0 value, PWM signal inversion and frequency. Thermostatic control is turned off
;M106 P1 S1 I0 F500 H1 T45 ; Set fan 1 value, PWM signal inversion and frequency. Thermostatic control is turned on
;M106 P2 S1 I0 F500 H-1 ; Set fan 2 value, PWM signal inversion and frequency. Thermostatic control is turned off
M563 P0 D0 H1
M564 H0
; Custom settings are not configured
T0
G28
;G29 S1
;M572 D0 S0.05    ; set pressure advance
M501
This works I am on RRF 3.0 on my Wifi board
Hopefully this will help you
note the probe settings for the smart effector
M558 P5 C"^zprobe.in" X0 Y0 Z0 H5 R0.4 F1200 T6000 ; Set Z probe type to unmodulated, the axes for which it is used and the probe + travel speeds
G31 P100 X0 Y0 Z-0.05; Set Z probe trigger value, offset and trigger height -
@DaBit I'll check my settings when I get back home in 8 days or so. I suspect that I'm using 10Hz because that is what I've always used. IIRC that figure of 10Hz was chosen specifically to suit SSRs. However, do not confuse the PWM frequency with the mark-space ratio that is PWM itself. And also, don't forget that the thermal mass of the aluminium plate acts as a huge damper to the conduction of heat through the plate, which makes the PWM frequency largely irrelevant.
-
You have a bed.g file?
My 3D Printing YouTube Channel
Better Living Through 3D Printing