Problems with Mesh compansation
-
Hi,
I'm a bit confused with the bed compensation, but I'll report from beginning.
I've built a cartesian Duet 2 wifi machine, z-probe is BLTouch 3.1 (original one). My first configuration was with independant z-motors. I've had a good leveld bed and made manual corrections to optimize. For reasons I won't go deeper, I switched back to a normal configuration where both z-motors are connected in parallel.
Now, the printer starts a mesh probe sequence. The bed looks great leveld (+/- 0.02 to 0.04 max.). But when a print is running, the right side is much to close - it looks like, the compansation doesen't work proper.
Then I tried to run a print without any compansation (the bed was leveld good) - and then I got perfect results in every corner and sides...
So my questions:
- is it it possible, that there are some vaules are left somewhere from my former independant z-Configuration?
- if not - what can went wrong with my bed compensation?
Within my slicer startcode I have:
M561 ; Clear any bed transform
G29 S2 ; Clear bed height map
G28 ; Home-All
G29 ; Start Bed-Level
I checked also during the print, if the mesh compansation is active, what it was...
So - where could it problem be?
Thank you for help! -
do you have an offset configured for your probe in the G31 command? if not measure it.
otherwise the result that you are seeing can be because of varying trigger height depending on the position. To check calibrate the trigger height at different positions on your bed.
-
@tom_Nbg Can you post your full config.g, bed.g and homeall.g? Also send M115 and post the response (will report firmware version), and perhaps a screenshot of the bed mesh. This should help diagnose where the issue is.
The G29 in your slicer start code means you're creating a new bed mesh each time you print, which is probably unnecessary. Unless your Z motors are moving inconsistently, you can create a bed mesh beforehand (say, with bed heated up), save it, then load it after G28 homing with G29 S1. It's also usually a good idea to do a G30 in the centre of the bed after this, to set the Z datum.
Ian
-
IMHO I do not think you need to clear each time, takes time, depending how many points you are measuring.
I run a mesh from DWC to create the mesh, and unless anything significantly changes I do not do a new one. If I am getting bad adhesion or think the bed has moved, I will manually re-level the bed, then probe it.In your slicer you need to call the meshmap with G29 S1, that is all.
I do not think you need to create a mesh each time, takes time, depending how many points you are measuring.Also looking at your post, you need to activate it, (might be wrong)
HTH
Paul.
EDIT : Ian beat me!
-
Thank you for your replies!
I know that I don't need to mesh every print - this is the startcode for a test pattern I use till I got a working compensation - if it works I'll just home-all and load the saved mesh.
The issue is, that when mesh probing is active the right bed side (about 5cm) is ugly (the nozzle is much too close to the bed)!
If I deactivate mesh compansation (just home-all and print) then I got nice prints...
My thought was, if there are somewhere stored old values from a tilted bed from my former config with independent z-motors? (even though I used M561??) The right side was a bit to low so the nozzle had to move closer to the bed...)?
Thank you again for your help.
Running FW is RRF 2.05
Here are my config Files:Config.g
G90                                              ; send absolute coordinates...
M83                                              ; ...but relative extruder moves
M550 P"Mjollnir"                                 ; set printer name

; Network
M552 S1                                          ; enable network
M586 P0 S1                                       ; enable HTTP
M586 P1 S1                                       ; enable FTP
M586 P2 S0                                       ; disable Telnet

; Drives
M569 P0 S0                                       ; physical drive 0 goes backwards - x-axis
M569 P1 S0                                       ; physical drive 1 goes backwards - y-axis
M569 P2 S0                                       ; physical drive 2 goes backwards - z-axis left
M569 P3 S1                                       ; physical drive 3 goes forwards  - Extruder

M584 X0 Y1 Z2 E3                                 ; set drive mapping: two Z motors connected to driver outputs Z and E1
M350 X16 Y16 Z16 E 16 I1                         ; configure microstepping XYZ with interpolation
M92 X100.00 Y100.00 Z400.00 E830.00              ; set steps per mm
M566 X600.00 Y600.00 Z12.00 E300.00              ; set maximum instantaneous speed changes (mm/min)
M203 X7200.00 Y7200.00 Z400.00 E3000.00        	 ; set maximum speeds (mm/min)
M201 X1000.00 Y1000.00 Z200.00 E3600.00          ; set accelerations (mm/s^2)
M906 X800 Y800 Z550 E800 I30                     ; set motor currents (mA) and motor idle factor in per cent
M84 S30                                          ; Set idle timeout

; Axis Limits
M208 X-1 Y-7.5 Z0 S1                             ; set axis minima
M208 X254 Y212 Z318 S0                         	 ; set axis maxima

; Endstops
M574 X1 Y1 S3                                    ; set endstops controlled by motor stall detection
M574 Z1 S2                                       ; set endstops controlled by probe
M591 D0 P2 C3 S1                                 ; Filament Sensor an E0, Endstop 3

; Stallgaurd Sensitivy
M915 X S2 F0 H200 R0		                 ; Set X axis Sensitivity
M915 Y S2 F0 H200 R0		                 ; Set y axis Sensitivity

; Z-Probe
M307 H3 A-1 C-1 D-1                              ; disable heater3 on PWM channel for BLTouch. Heater 3 - Pin-Out 8!
M558 P9 H5 F360 T9000                            ; set Z probe type to bltouch and the dive height + speeds
G31 P25 X-23.5 Y-36.0 Z2.410                     ; set Z probe trigger value, offset y=-36.0, x=-23.5
M557 X5:230 Y5:175 P5:5                          ; define mesh grid

; Heaters
M307 H0 B0 S1.00                                 ; disable bang-bang mode for the bed heater and set PWM limit
M305 P0 T100000 B4138 R4700                      ; set thermistor + ADC parameters for heater 0
M143 H0 S120                                     ; set temperature limit for heater 0 to 120C
M305 P1 T500000 B4723 C1.196220e-7 R4700         ; set thermistor + ADC parameters for heater 1
M143 H1 S280                                     ; set temperature limit for heater 1 to 280C
M305 P100 S"MCU"			         ; set virtual heater for the MCU
M305 P101 S"Drivers"				 ; set virtual heater for stepper drivers

; Fans
M106 P1 S1 I0 F500 H1 T45                        ; set fan 0 value, PWM signal inversion and frequency. Thermostatic control is turned on
M106 P0 S0 I0 F500 H-1                           ; set fan 1 value, PWM signal inversion and frequency. Thermostatic control is turned off

; Tools
M563 P0 D0 H1 F0                                 ; define tool 0
G10 P0 X0 Y0 Z0                                  ; set tool 0 axis offsets
G10 P0 R0 S0                                     ; set initial tool 0 active and standby temperatures to 0C
M302 S190 R190					 ; set Min-Temp for extruder and retract to 190C
homez.g
G91                   ; relative positioning
G1 H2 Z5 F7200        ; lift Z relative to current position
G90                   ; absolute positioning
G1 X151 Y141 F4000    ; Move probe to middle of bed - first probing point
G30                   ; home Z by probing the bed
G91                   ; relative positioning
G1 H2 Z5 F480         ; lift Z relative to current position
G90                   ; absolute positioning
homex.g
G91                ; relative positioning
G1 Z5 F6000 S2     ; lift Z relative to current position
G1 H1 X5 F1000     ; move slowly away
M913 X30           ; lower motor current to 30% for senserless homing
G1 H1 X-260 F4000  ; move to X axis endstop and stop there (first pass)
G1 X5 F1000        ; go back a few mm
G1 H1 X-260 F4000  ; move to X axis endstop once more (second pass)
M913 X100          ; Rise motor current to 100% again after sensorless homing
G1 Z-5 F6000 S2    ; lower Z again
G90                ; absolute positioning
G1 X15 F1000
homey.g
G91                ; relative positioning
G1 Z5 F6000 S2     ; lift Z relative to current position
G1 H1 Y5 F1000     ; move slowly away
M913 Y30           ; lower motor current to 50% for senserless homing
G1 H1 Y-230 F4000  ; move to Y axis endstop and stop there (first pass)
G1 Y5 F1000        ; go back a few mm
G1 H1 Y-230 F4000  ; move to Y axis endstop once more (second pass)
M913 Y100          ; Rise motor current to 100% again after sensorless homing
G1 Z-5 F6000 S2    ; lower Z again
G90                ; absolute positioning
G1 Y0 F1000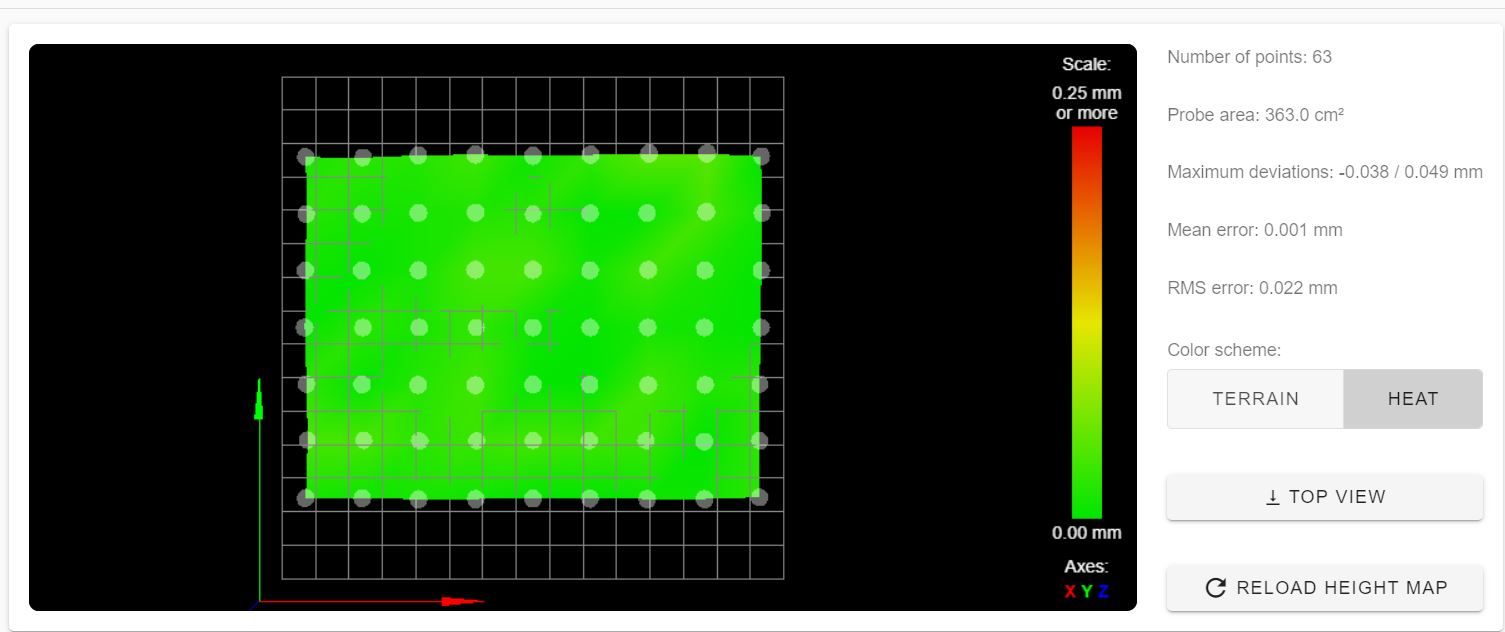
-
in addition:
With my former config with independent z - it mesh compansation has worked well over the whole bed. The problem came up from the moment I switched back zu run the z-motors in parallel.... -
@tom_Nbg said in Problems with Mesh compansation:
Does your homeall.g call homex.g, homey.g and homez.g?
Are your Z motors wired in PARALLEL, or are they just plugged into ZA and ZB (which is in series)? If they are truly wired in parallel, then your motor current on Z is probably too low:M906 X800 Y800 Z550 E800 I30
And any faster move may cause one of them to skip, perhaps particularly if the X carriage is fully over on one side when it moves. If your Z motors ARE wired in parallel, you should double the current. Your probing move moves at T9000 (150mm/s), the Z lift move in homez.g moves at F7200 (120mm/s), the other homing scripts move it at F6000 (100mm/s). Which shouldn't matter as Z is limited by M203 Z400 (6.66mm/s), but will be running all these at full speed, so could make the motor skip anywhere.
I can't see anything obviously left over from when your Z motors were independent.
Your bed looks pretty flat, but it may not mean anything if the Z motors are loosing steps.
Ian
-
Thank you!
Yes: Homeall.g calls homex, homey and homezThe z-motors are plugged into zA and zB.
The different speed settings are a result from former test for best speeds with stallguard. But you're right - I should have a look there. I wonder only, why it is only on the right side oft the bed, whereas the rest is fine.... it drives me crazy")
I didn't know "where" the values are getting stored - and maybe some old values are left deep in the Flash-RAM from the former config (this was my thought)?
-
@tom_Nbg Are you trying to use Stallgaurd on Z? Generally not a good idea. If the motors are plugged in to ZA and ZB, they're in series, not parallel. But 550mA is still pretty low, so if one motor is weaker than the other, it may just be skippng. What motors are they? Unless they're tiny, they should be okay with 800mA.
Ian
-
@droftarts No - I'm using BLTouch on z as endstop. I had LDO/Nema17 Steppers on z (rated to 1A).
-
@tom_Nbg said in Problems with Mesh compansation:
I had LDO/Nema17 Steppers on z (rated to 1A).
Try setting motor current to
M906 Z800.Ian