Guide to Marlin's Fast BLTouch Probing feature on Duet
-
If you're tired of the clicking noise of the probe this guide is written for you
First let's declare that I'm not responsible if you break your probe or ram your nozzle into the heatbed. I tried to write an universal guide with safety in mind but we all know s&@t happens sometimes. That's why I ask you to double check yourself if you want this feature. No typos.
It's pretty unsafe to move around with a deployed probe, or probe the heatbed with a probe not deployed.
READ THIS GUIDE CAREFULLY FIRST AND IF UNSURE DON'T DO IT!
This guide suggests that you have the following properly configured:
- BLTouch (works as it should without issues)
- Probe offset (obviously)
- Printer boundaries/Axis limits are set correctly (G1 X0 Y0 F3000 moves your nozzle over the corner of your heatbed, or that is your axis minima)
- Mesh grid (the probe only probes printable area, no obstruction between probe points)
If any of the above is untrue please fix before you go on with this guide.
The base of this feature lies on modular config.g. This means that some parts of the configuration are in separate files called by M98 in config.g (and anywhere else). In this way it's possible to store the probe settings in one place and reset to these settings with M98 after any modification.
In these separate files we can change the probe type from P9 to P5 and deploy the probe manually just before probing then retract and change it back afterwards.
First of all a config subfolder needed to be created in the System folder (sys) and a probe folder inside the config folder.
(You can name it anything, but you have to modify the code below accordingly.)

In /config/probe/ you have to create 4 files:
probe_config.g
probe_config_fast.g
probe_offset.g
mesh_grid.g
Now you have to copy your probe configuration from your config.g into these files as below:
============================================================
-
probe_offset.g : Here goes your probe offset G31 from your config.g so you have to copy that single line here. Later on if you need to modify offsets you have to do it in this file.
Copy your own offset, don't copy mine.
Grab a piece of paper/notepad and write/type down your X and Y offsets. You will need it later.
For example in my case:
G31 P1000 X68.9 Y -1.5 Z3.24Probe_Offset_X= 68.9
Probe_Offset_Y= -1.5
============================================================
-
mesh_grid.g : Copy your M557 line here. Same as above, if you ever need to modify your default mesh grid you have to do it in this file.
Write down your grid's X and Y minimums on the paper/notepad.
For example:
M557 X22:198 Y30:190 P21:21
In this case:
Mesh_First_X= 22
Mesh_First_Y= 30
Use your own coordinates, don't copy this.

============================================================
- probe_config.g : Copy your M558 line here and make two new lines:
M98 P"config/probe/probe_offset.g
M98 P"config/probe/mesh_grid.g
This way probe_offset.g and mesh_grid.g will be called when you call probe_config.g. (Needed because probe type change zeroes probe offset.)

============================================================
-
probe_config_fast.g : Repeat what you did in probe_config.g but change the probe type from P9 to P5.
You might need to add 0.1 sec settle time (R0.1) if you have issues

============================================================
Now you have your default probe config (probe_config.g), which is a type 9 and your fast probe config (probe_config_fast.g) type 5.
Lets head to config.g and add your default probe config by adding the following line to your probe section:
M98 P"config/probe/probe_config.g"The 3 lines of the old probe configuration have to be commented out(it can be deleted later if you got used to modular config).
I advise to put at least five " ; " just to make it visible because from now on if you want to modify your probe config you have to do it in the 4 files you created earlier.Keep the line which defines your BLTouch Pin Servo!

Grab your paper and do a simple math with your probe offset and mesh grid minimas (this will help you to move your probe ower the first point before the probe pin gets deployed):
First_Point_X = Mesh_First_X - (Probe_Offset_X)
In my case:
First_Point_X = 22 - (68.9) = -46.9First_Point_Y = Mesh_First_Y - (Probe_Offset_Y)
In my case:
First_Point_Y = 30 - (-1.5) = 31.5You will need the values in the upcoming macro in a way like this:
G1 X-46.9 Y31.5 F9000
Again, don't use my values, calculate your own.
============================================================
Now head to your macro folder and create a file called Fast BLtouch Mesh.g (or whatever) and copy the following:
(don't forget to edit line 4 with your calculated positions, and check that "Raise and Return Z" commands suits your machine.)G91 ;Relative positioning
G1 Z5 F1500 ;Raise Z 5mm
G90 ;Absolute positioning
G1 X-46.9 Y31.5 F9000 ;Here goes First_Point_X and First_Point_Y positions you calculated above
G91 ;Relative positioning
G1 Z-5 F1500 ;Return Z 5mm
G90 ;Absolute positioning
M98 P"config/probe/probe_config_fast.g" ;Call probe_config_fast.g module (Switch to Fast Probe Mode)
M98 P"deployprobe.g" ;Deploy the probe
G29 ;Probe the heatbed and generate heightmap
M98 P"retractprobe.g" ;Retract the probe
M98 P"config/probe/probe_config.g" ;Call probe_config_fast.g module (Switch to Default Probe Mode)
G91 ;Relative positioning
G1 Z5 F1500 ;Raise Z 5mm
G90 ;Absolute positioning
G1 X-9999 Y-9999 F9000 ;Go to Parking Position
G91 ;Relative positioning
G1 Z-5 F1500 ;Return Z 5mm
G90 ;Absolute positioning
You're ready to go. Do some tests with the mouse pointer over the Emergency Stop button just to be safe.
Also make sure the pin of the probe doesn't touch the heatbed while moving.
============================================================
============================================================
GCode References:
G31: Set or Report Current Probe status
M557: Set Z probe point or define probing grid
M558: Set Z probe type
M98: Call Macro/Subprogram============================================================
============================================================
Even tough we can have Marlin's Fast BLTouch Probing feature on the Duet/RRF like this, it would be nice to have a new parameter for G29 and G30 that only retracts the probe after a probing sequence/move.
============================================================
============================================================
-
reserved
-
-
Best writeup I've ever seen on this forum.
-
Would you mind if we made it into a wiki page?
To expedite that, would you mind sending me the "source" of the post (edit, Ctl-A, Ctl-C)
danal (dot) estes (at) gmail (dot) com -
Neat trick. So few people exploit runtime configuration changes. Very nice.
-
Bravo!!
-
-
Two words of caution:
-
RRF used to keep the BLTouch deployed throughout probing sequences. Unfortunately that doesn't always work. The reason is that when the probe triggers, it retracts the pin automatically. If it is then commanded to deploy again (by using probe type P5 instead of P9), then if the print head hasn't risen enough (or the bed dropped far enough) so that the pin touches the bed and triggers again, the BLTouch enters the error state. That's why we introduced probe type 9, which keeps the pin retracted until ready to probe the next point.
-
You should not call deployprobe.g or retractprobe.g using M98. Use M401 and M402 instead, so that RRF can track the deployment state.
How much time does this save?
Duet WiFi hardware designer and firmware engineer
Please do not ask me for Duet support via PM or email, use the forum
http://www.escher3d.com, https://miscsolutions.wordpress.com -
-
@Hernicz Apologize for necroposting, but I think there is an error with your config above, or at least it assumes "M280 Px S60" is in deployprobe.g which is probably not recommended. This was tested on a Duet 3 with the latest RRF version at the moment (3.01 RC10).
In my case, using the following worked in the "fast probe config" macro.
M98 P"0:/macros/Utilities/Config/bltouch_fastprobe_config" ;Call probe_config_fast.g module (Switch to Fast Probe Mode)
M401 ;Deploy the probe
G4 P200
M280 P0 S60 ; Enable BLTouch Touch SW Mode
G29 ;Probe the heatedbed and generate the heightmap
M402 ;Retract the probe
M98 P"0:/macros/Utilities/Config/bltouch_config" ;Call probe_config_fast.g module (Switch to Default Probe Mode)
Here is my deployprobe.g
; deployprobe.g
; called to deploy a physical Z probe
;
; generated by RepRapFirmware Configuration Tool v2 on Thu Jul 04 2019 16:10:02 GMT-0700 (PDT)
M280 P0 S10
Duet wiki does not mention adding M280 Px S60 to deployprobe.g https://duet3d.dozuki.com/Wiki/Connecting_a_Z_probe and it's probably better if it is not.
@dc42 It appears to be about 17s quicker to do a P5 probe on a 36 point mesh, or about half a second faster per point. On a 400 point mesh this would be over three minutes quicker and be less wear on the BLTouch.
Probe mode P9

Probe mode P5

-
@dc42 said in Guide to Marlin's Fast BLTouch Probing feature on Duet:
Two words of caution:
- RRF used to keep the BLTouch deployed throughout probing sequences. Unfortunately that doesn't always work. The reason is that when the probe triggers, it retracts the pin automatically. If it is then commanded to deploy again (by using probe type P5 instead of P9), then if the print head hasn't risen enough (or the bed dropped far enough) so that the pin touches the bed and triggers again, the BLTouch enters the error state. That's why we introduced probe type 9, which keeps the pin retracted until ready to probe the next point.
I'm not experiencing this behavior. When I use my BLTouch in P5 mode, it does not retract when triggered, so I keep it configured that way.
-
@mwolter I haven't utilised Touch Switch Mode for this to work. I haven't added M280 Px S60 anywhere.
Best to represent the difference with a video: BLTouch P5 vs P9
For P9 I had to set a delay of 0.3s otherwise it triggers an alarm immediately. At this speed I wouldn't trust it.Interestingly if you set the trigger value low (25 for example) then it skips retraction sometimes in P9 mode. (Possibly needs higher trigger to retract)
I prefer probing the heatbed as slow as possible, but the clicking... If I probe the bed at 441 points and it manages do it by 2 tries/point that means 882 times deploy and retract = 1764 clicks minimum.
My main goal was to give an idea of having different probe profiles for different needs.
For example for home Z I use a P5 fast speed no retry probe profile and then probe precisely with a P5 slow 30 retry profile: BLTouch Modular Z Homing@dc42 I would edit my first post according to your comment but I can't.
-
@Hernicz, I wrote a macro to probe the same point on the bed repeatedly and saw very little change in the repeatability of the BLTouch in regards to probing speed.
I did find there was a speed/dive distance limit for the probe to be ready for the next hit (probably a time limitation). So, I settled on these settings having the same repeatability as ultra slow probing moves:
M558 P5 C"^zprobe.in" H5 F500 T6000 -
@CCS86 said in Guide to Marlin's Fast BLTouch Probing feature on Duet:
saw very little change in the repeatability of the BLTouch in regards to probing speed.
Definitely not my experience, so could be dependent on mechanics, etc, etc.
-
-
@Hernicz Interesting that you do not need the M280 Px S60. For me, it wouldn’t leave the pin extended without it. I also use a trigger value of 25.
I’m thinking we could have a different hardware and or software version. I’ve tested this on a duet 2 Ethernet 1.04 and Duet 3 1.0 with RRF 3.01 RC10 and BlTouch v2.2.
-
@mwolter I currently have a Duet 2 WiFi 1.04b RRF 3.01 RC3
I have a Duet 3 6HC 1.0 as well with RRF 3.01 RC11, but the printer is under construction, so I can't test it for a while.
It may be different BLTouch as well. -
I should clarify, I did see a reduction in precision at higher speeds (in some tests, but not others). You have to draw the line somewhere, at what is, and is not, a change you could even notice.
Here are the results I got probing at F500 and F50:
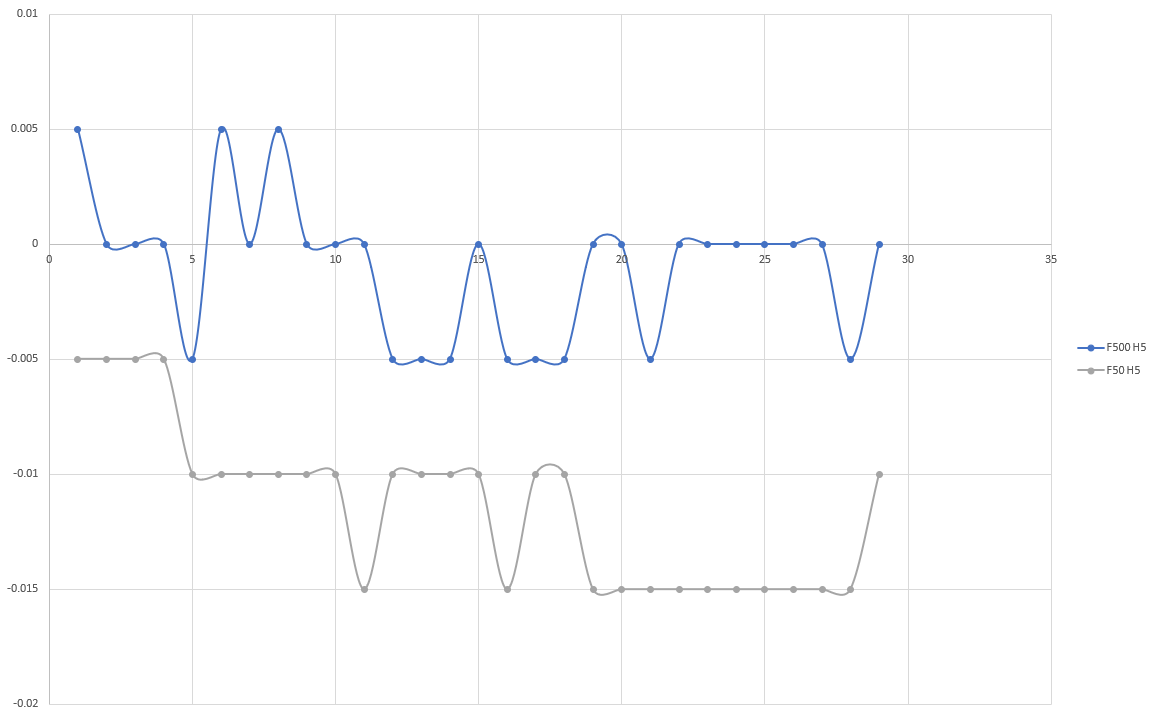
Observations:
-
The slower speed offsets the reported values in a negative direction (~0.010mm)
-
The min/max spread at F500 and F50 is 0.010mm
-
There appears to be a resolution of 0.005mm, even though I have 400 steps/mm on Z, which would give 0.0025mm full steps, plus x8 microstepping and interpolation
I'm curious to hear thoughts on this test. I wanted to gather larger sample sizes, but there seems to be a limitation in RRF for the number of points you can define and report via probing. Plus, I have to copy the data out of the console and manipulate it in excel to get it in a column (kind of a pain). If you have suggestions on how to improve the probing resolution, or increase the number of hits and write directly to a file, that would be awesome.
Here is my macro:
;probe testing single point M558 P5 C"^zprobe.in" H5 F50 T6000 G31 P25 X12 Y-18 Z2.37 G91 ; relative positioning G1 H2 Z5 F6000 ; lift Z relative to current position G1 H1 X-210 Y-200 F1800 ; move quickly to X and Y axis endstops and stop there (first pass) G1 H2 X5 Y5 F6000 ; go back a few mm G1 H1 X-210 Y-200 F360 ; move slowly to X and Y axis endstops once more (second pass) G90 ; absolute positioning G1 X0 Y178 F4000 ; go to first bed probe point G30 ; home Z by probing the bed G1 F2000 G30 P0 X12 Y160 Z-99999 G30 P1 X12 Y160 Z-99999 G30 P2 X12 Y160 Z-99999 G30 P3 X12 Y160 Z-99999 G30 P4 X12 Y160 Z-99999 G30 P5 X12 Y160 Z-99999 G30 P6 X12 Y160 Z-99999 G30 P7 X12 Y160 Z-99999 G30 P8 X12 Y160 Z-99999 G30 P9 X12 Y160 Z-99999 G30 P10 X12 Y160 Z-99999 G30 P11 X12 Y160 Z-99999 G30 P12 X12 Y160 Z-99999 G30 P13 X12 Y160 Z-99999 G30 P14 X12 Y160 Z-99999 G30 P15 X12 Y160 Z-99999 G30 P16 X12 Y160 Z-99999 G30 P17 X12 Y160 Z-99999 G30 P18 X12 Y160 Z-99999 G30 P19 X12 Y160 Z-99999 G30 P20 X12 Y160 Z-99999 G30 P21 X12 Y160 Z-99999 G30 P22 X12 Y160 Z-99999 G30 P23 X12 Y160 Z-99999 G30 P24 X12 Y160 Z-99999 G30 P25 X12 Y160 Z-99999 G30 P26 X12 Y160 Z-99999 G30 P27 X12 Y160 Z-99999 G30 P28 X12 Y160 Z-99999 S-1 G91 ; relative positioning G1 H2 Z5 F6000 ; lift Z relative to current position G1 H1 X-210 Y-200 F4000 ; move quickly to X and Y axis endstops and stop there (first pass) G1 H2 X5 Y5 F6000 ; go back a few mm G90 ; absolute positioning M558 P5 C"^zprobe.in" H5 F500 T6000 G31 P25 X12 Y-18 Z2.37 M18 -
-
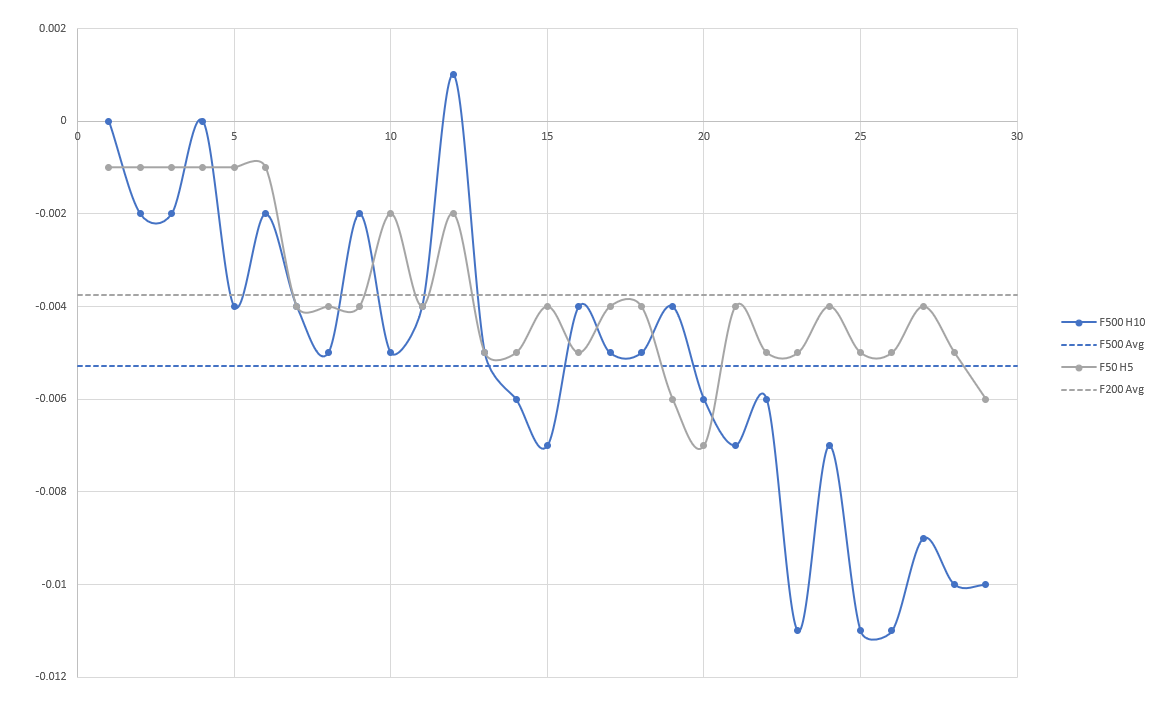
Okay, on the resolution: I was setting 400 steps/mm first (which assumes a default x16 microstepping, then I was switching to x8. That gives me 200 steps/mm. Switching to x16 doubled my resolution, but the console only reports to 3 decimal places, and I am seeing 0.003 and 0.002 values reported, which seems odd.
Re-running the same test in x16, gives this result:

I noticed the downward trend, especially in the slow probing, and wondered if the MCU/drivers heating up could be causing it. So, I kicked my board cooling fan onto full, to stabilize all board temps, and I also kicked Z into x32, to run again. Results:

Downward trend is still there, and I still see very little reason to probe slowly.
.
.
.I decided to try it out in P9 mode and see if it made a difference. I had to increase the dive distance for the fast probing, so it had enough time to recover. I left it in x32 as well:
-
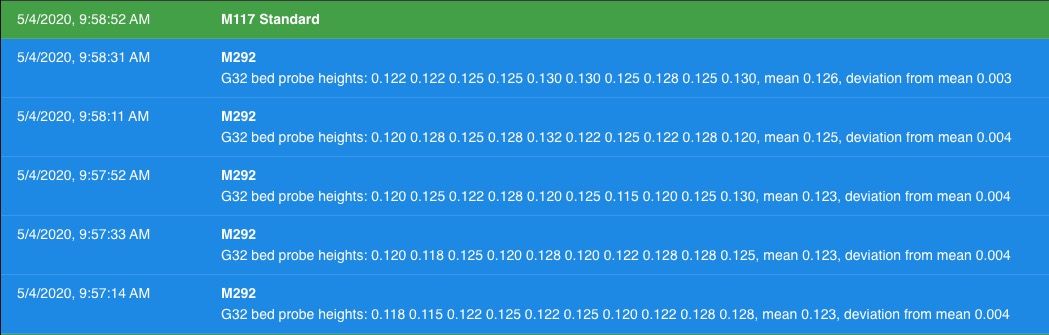
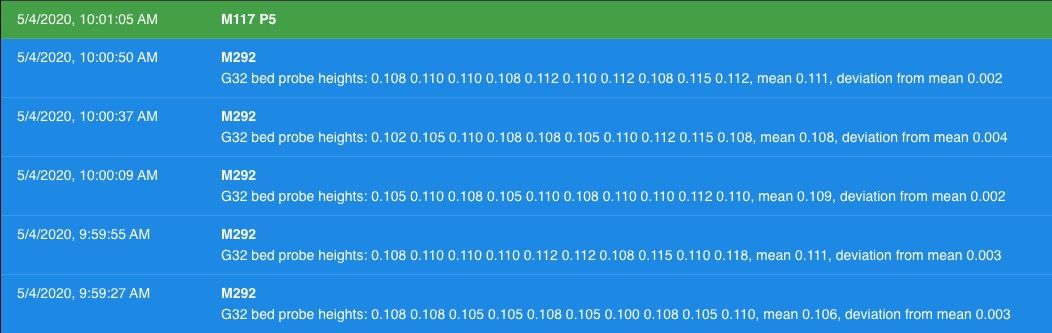
Interestingly, P5 appears to be more accurate in my case. Below are five deviation tests for each P5 and P9. We're talking small fractions of a millimeter, but still. Maybe because the pin does not have to reset each time? Also the probe height can be lower with P5 at 1mm and P9 has to be 2mm or it errors because the probe can't extend. Also the P5 test is easily twice as fast as P9. IMO P5 is better as long as the machine is calibrated to reduce the chance of the pin breaking.
P9
P5
-
@mwolter What is your M558 and G31 for those tests?
-
@Phaedrux
P5M558 P5 C"^zprobe.in" H1 F120 T24000 G31 X25 Y-12.6 Z3.8 P500Here's how I'm invoking it.
G1 Z{move.axes[2].userPosition+5} F600		; move z up 5mm
M558 P5 C"^zprobe.in" H1 F120 T24000
M401
G4 P200			; pause for 200ms
M280 P0 S60		; enable BLTouch Touch SW Mode
G30 P0 X105 Y105 Z-9999
G30 P1 X105 Y105 Z-9999
G30 P2 X105 Y105 Z-9999
G30 P3 X105 Y105 Z-9999
G30 P4 X105 Y105 Z-9999
G30 P5 X105 Y105 Z-9999
G30 P6 X105 Y105 Z-9999
G30 P7 X105 Y105 Z-9999
G30 P8 X105 Y105 Z-9999
G30 P9 X105 Y105 Z-9999 S-1
M402
M558 P9 C"^zprobe.in" H2 F120 T24000
P9
M558 P9 C"^zprobe.in" H2 F120 T24000 G31 X25 Y-12.6 Z3.8 P500 -
@mwolter said in Guide to Marlin's Fast BLTouch Probing feature on Duet:
P500
Have you tried with P25?
-
@Phaedrux said in Guide to Marlin's Fast BLTouch Probing feature on Duet:
Have you tried with P25?
Yes, didn't notice a difference. No difference with the accuracy or functionality (not needing M280 P0 S60). It has been P500 for a while, so left it there.
-
Sorry to bring this back from the dead, but for those using a Duet 3 and Toolboards, this will NOT work. "Only Z probe types 8 and 9 are supported on expansion boards"
I wasn't paying attention when I was setting everything up. When I tried to actually do a fast probe, I got the error message quoted above.