Yet another Duet 3 wiring questions
-
Hello all!
This is my first post in this forum. So I guess I should introduce
")
I'm new in 3d printing and basically dummy in this part of electronics in which I just stepped in")
I'm on the mission of reviving old "BFB 3D Touch" printer into something more modern.So I did buy Duet 3 (as well as Pi 4 for it), which I choose due to amount of stepper drivers as my BFB does have 3 extruders
 But now it seems an overkill. But, well
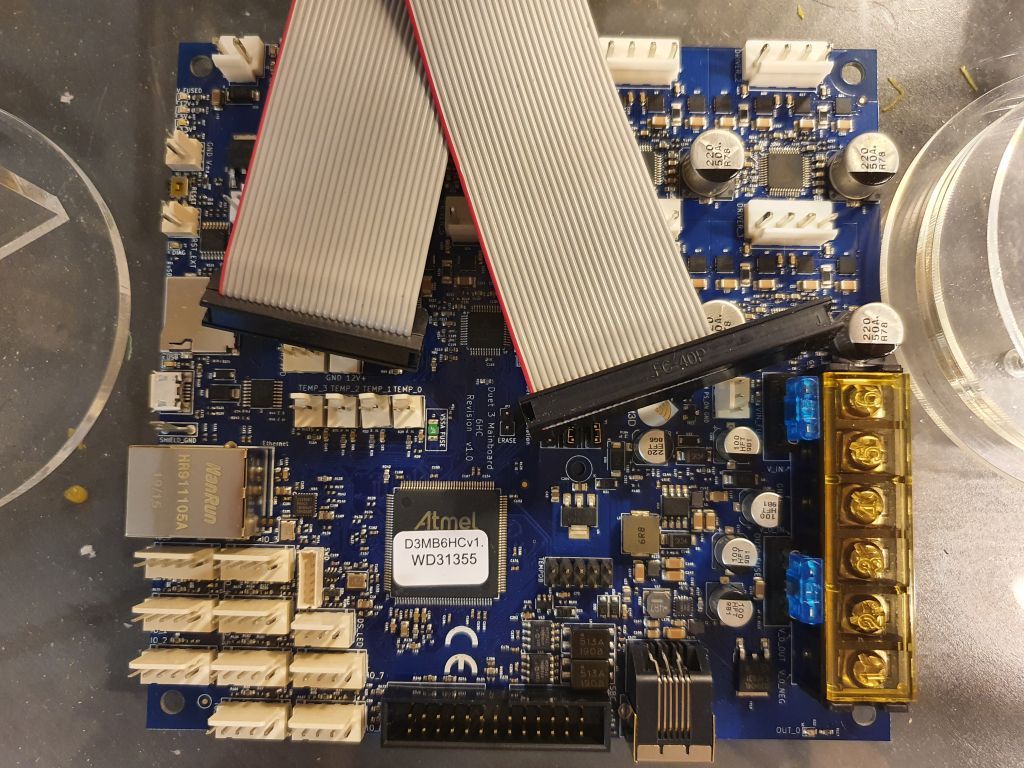
Here is a picture.
Before asking I did read following posts;
https://forum.duet3d.com/topic/13369/duet-3-wiring-and-power-questions
https://forum.duet3d.com/topic/14639/duet-3-vh-stepper-connector-wire-size-options
https://forum.duet3d.com/topic/14429/duet-3-connectors
https://forum.duet3d.com/topic/14431/duet-3-motor-wiring
https://forum.duet3d.com/topic/14369/duet-3-power-supplies
https://forum.duet3d.com/topic/14273/duet-3-sbc-ribbon-wiring-and-power-related-questions
https://forum.duet3d.com/topic/13971/duet-3-wiring-questions
https://forum.duet3d.com/topic/13478/duet-3-6hc-connection-confusion
https://forum.duet3d.com/topic/15021/nema-23-with-duet-3-expansion-board
https://forum.duet3d.com/topic/14951/duet-3-wiring-for-fans
and the last one which gives me some hope
https://forum.duet3d.com/topic/14873/duet-3-standard-stepper-motor-wiring-to-thick-wiring
but probably due to the reasons I've mentioned in introduction - I wasn't able to find definitive answer.Q0.5 Before going to main question, is it good idea to remove that sticker from the chip and put there a radiator? And am I right that this cable I use to connect to Pi? Bit of strange cable should I say
Q1 The question of questions
 Motors I have in my printer are small! Only Z axis has NEMA 17 and X & Y axis's has even smaller motors (Y axis has 2 of them) (Nema 12 I guess?)
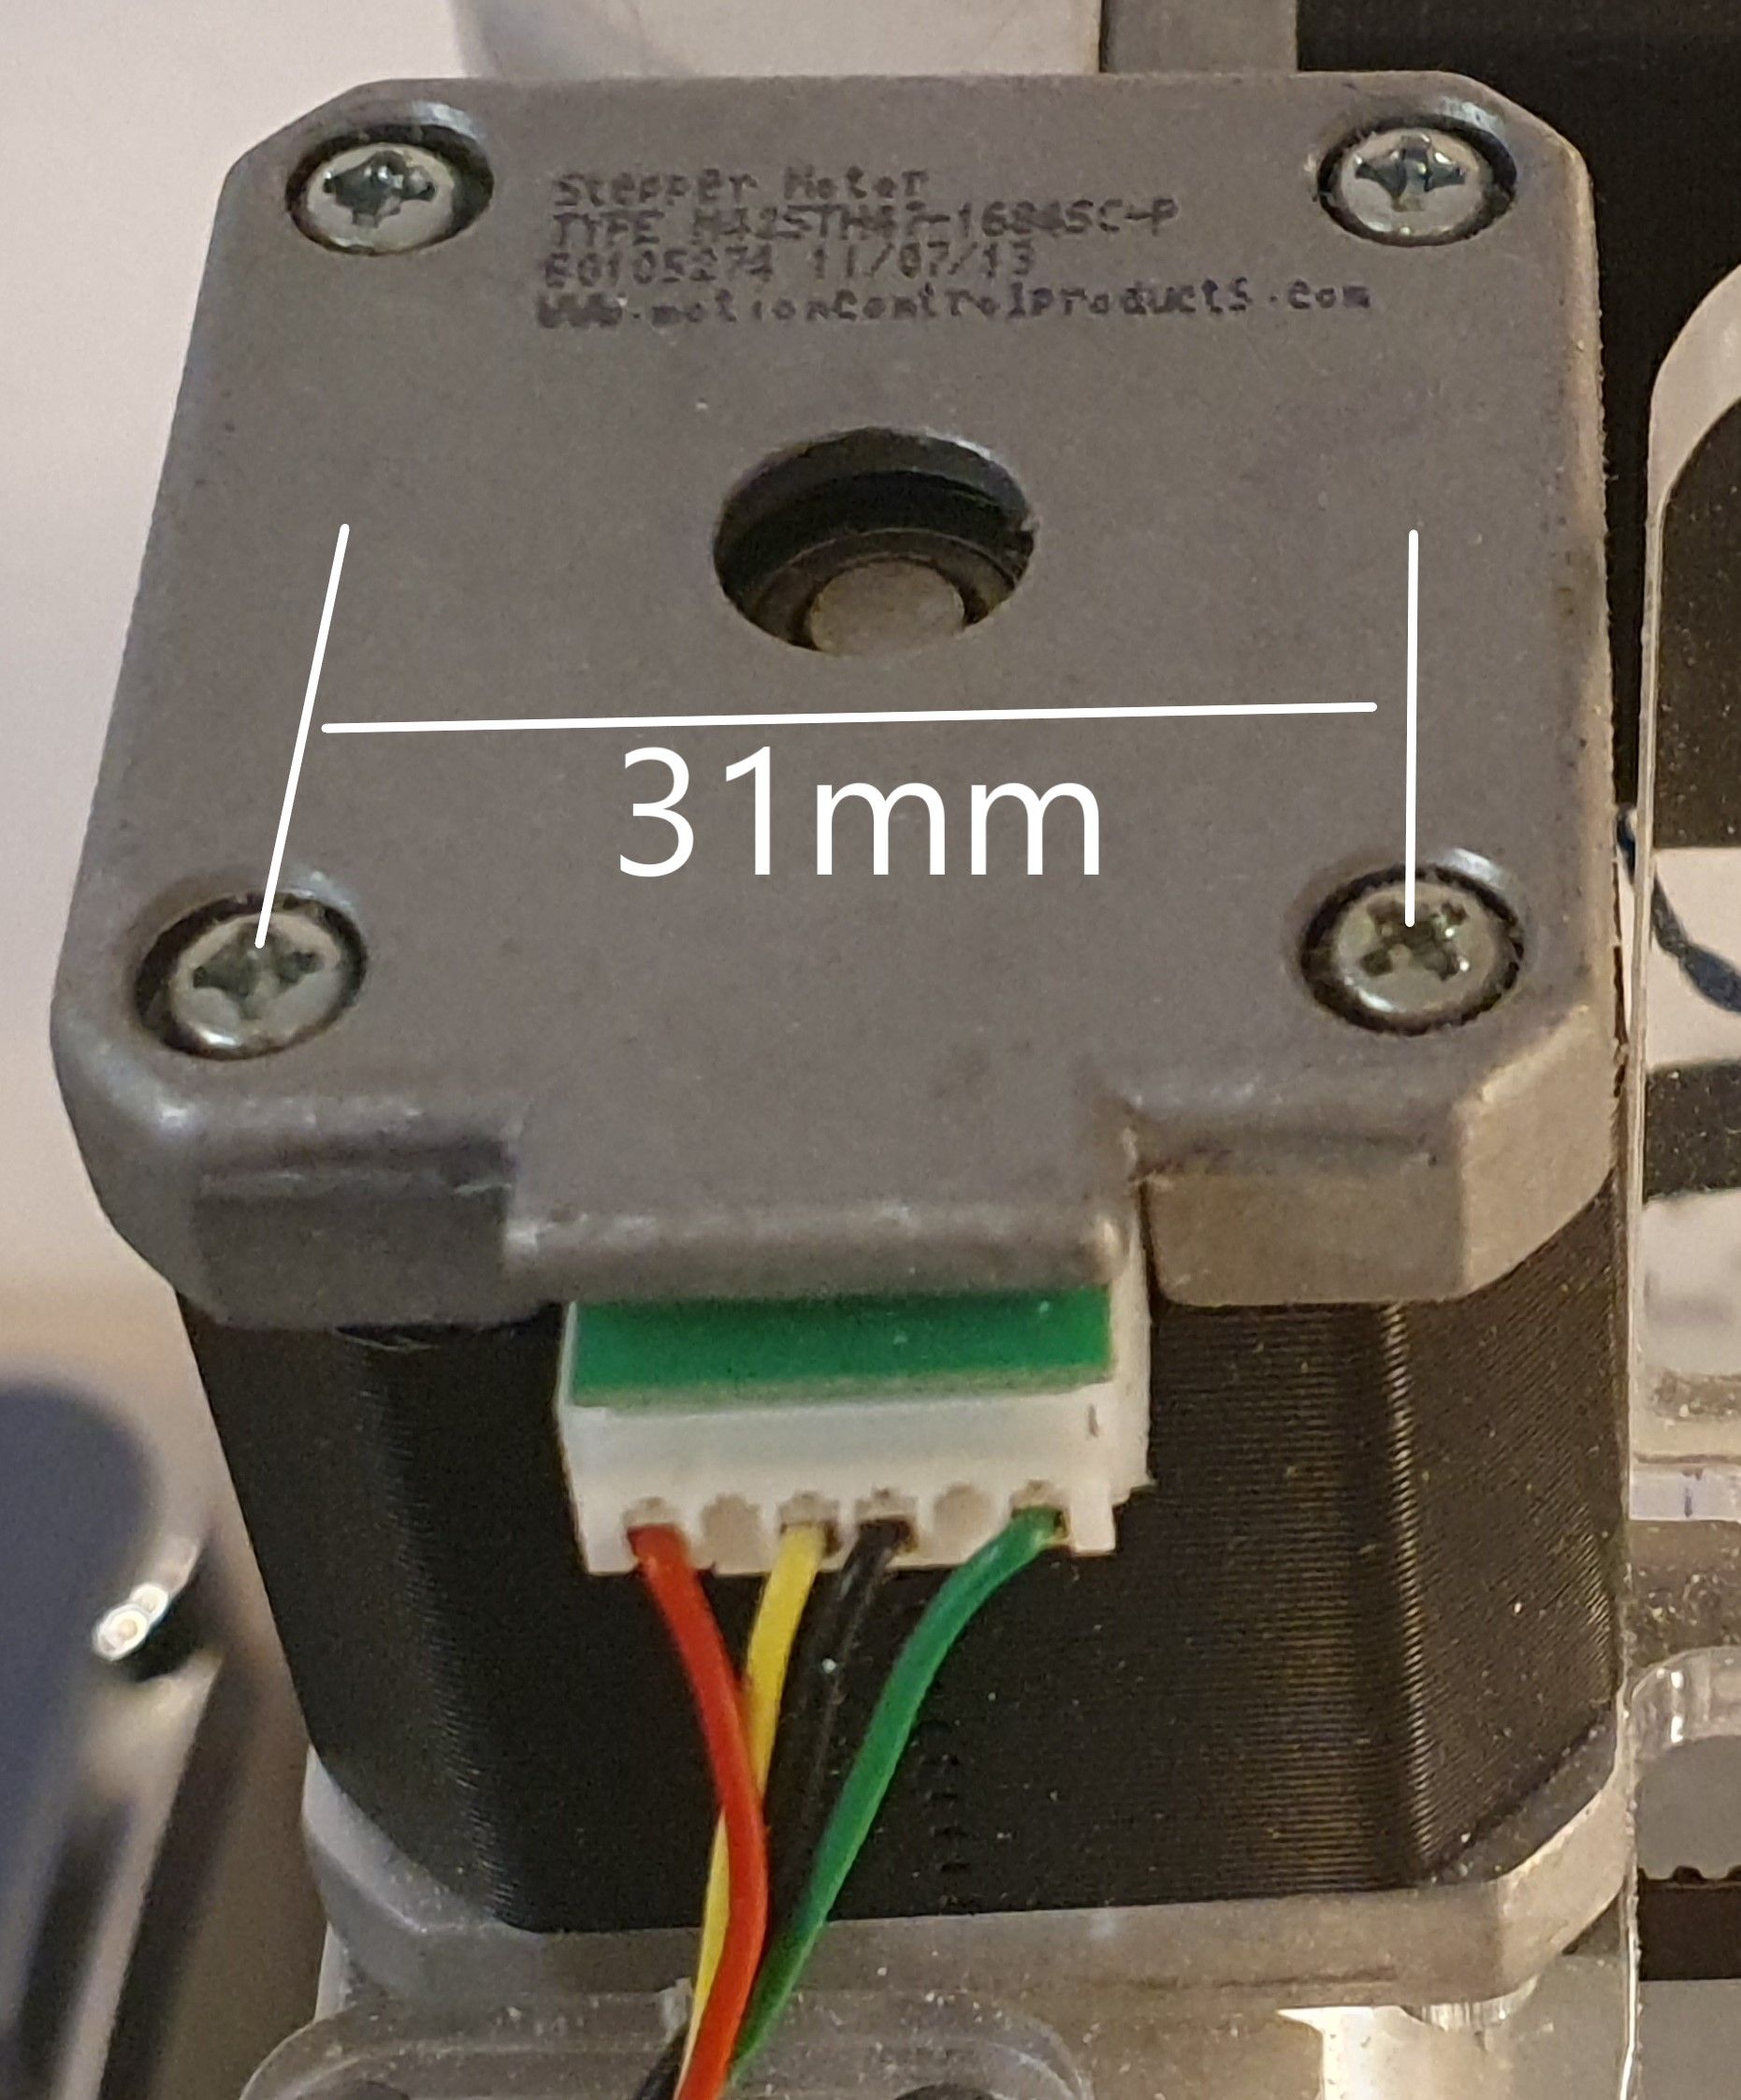
And those wires almost as thick as my hair
How do I wire this?
My first though was - "Get thicker (0.5mm) wires and rewire it all. Some work, by hey I wanted some DIY"
But then will these motors actually handle the current that Duet 3 sending?
I keep asking myself why such advanced and may I say expensive board can't lover current for smaller installations, and keep answering myself that use case for it something more powerful and usually everyone wants more current to their motors
Q2 The printer has 15V 6A 90W power supply. (no heated bed)
Can I use this power supply for now? Until I get heated bed at least. After that I probably switch to PC ATX power supply or something else.
Or would you strongly recommend some particular power supply for long run?I guess in order to achieve "milestone 1" with this project I should get connected all 3 axis motors, connect Pi with Octoprint and get extruders running vai WEB interface. Would you agree?
BTW since I have 2x steppers for axis Y should I just connect them parallel to same Duet 3 port? At least those two probably will share the current and won't burn
-
@monster said in Yet another Duet 3 wiring questions:
Q0.5 Before going to main question, is it good idea to remove that sticker from the chip and put there a radiator?
No
And am I right that this cable I use to connect to Pi? Bit of strange cable should I say
Yes.
Q1 The question of questions
Motors I have in my printer are small! Only Z axis has NEMA 17 and X & Y axis's has even smaller motors (Y axis has 2 of them) (Nema 12 I guess?)
And those wires almost as thick as my hair
How do wire this?
My first though was - "Get thicker (0.5mm) wires and rewire it all. Some work, by hey I wanted some DIY"
But then will these motors actually handle the current that Duet 3 sending?Current is settable. It can be configured down.
Wiring is a challenge when it is thin. Depending on the crimpers you use and skill, it may be best to solder on some thicker wires. Leave the thin wires at the motor, because you don't have shells and pins for the motor connector. Somewhere a few inches (a few cm) away, cut them and attach the thicker wires. Crimp those thicker wires into the Duet 3 connectors.
I have succeeded in crimping wires like you show directly into the heavy duty connectors on the Duet 3. But, again, it depends on comfort level.
I keep asking myself why such advanced and may I say expensive board can't lover current for smaller installations, and keep answering myself that use case for it something more powerful and usually everyone wants more current to their motors
Current is settable. It can be dialed down, per motor, to whatever you want.
Q2 The printer has 15V 6A 90W power supply. (no heated bed)
Can I use this power supply for now? Until I get heated bed at least. After that I probably switch to PC ATX power supply or something else.Even with no bed, that's a little marginal. But, with no bed, and only one tool, it will probably be OK. I would at least try it.
Or would you strongly recommend some particular power supply for long run?
Meanwell brand, 24V, 400 to 500W if you have a heated bed, 300 if you don't and/or you decide to go with a 110V/220V (i.e. "mains") bed and an SSR to control it. Long topic...
I guess in order to achieve "milestone 1" with this project I should get connected all 3 axis motors, connect Pi with Octoprint and get extruders running vai WEB interface. Would you agree?
Start your configuration here: https://configtool.reprapfirmware.org/
NO OCTOPRINT. No, no, no. You absolutely do not need or want it. Use the SD that came with the Duet in your Pi. Or see here: https://duet3d.dozuki.com/Wiki/Getting_Started_With_Duet_3
(I absolutely love Oct for non-Duet printers. It simply does not apply to Duets)
BTW since I have 2x steppers for axis Y should I just connect them parallel to same Duet 3 port?
No. When you configure drivers for a given axis, you say something like X0 Y1:2 Z3, or similar, and plug the motors in like that.
-
@Danal said in Yet another Duet 3 wiring questions:
Current is settable. It can be configured down.
Wiring is a challenge when it is thin. Depending on the crimpers you use and skill, it may be best to solder on some thicker wires. Leave the thin wires at the motor, because you don't have shells and pins for the motor connector. Somewhere a few inches (a few cm) away, cut them and attach the thicker wires. Crimp those thicker wires into the Duet 3 connectors.
I have succeeded in crimping wires like you show directly into the heavy duty connectors on the Duet 3. But, again, it depends on comfort level.
I keep asking myself why such advanced and may I say expensive board can't lover current for smaller installations, and keep answering myself that use case for it something more powerful and usually everyone wants more current to their motors
Current is settable. It can be dialed down, per motor, to whatever you want.
This is best news of the day (or actually a night at the moment
)
Do I set it in that config tool which you linked below?
Or somewhere else? I must admit that I have slightest idea about configuration part
Q2 The printer has 15V 6A 90W power supply. (no heated bed)
Can I use this power supply for now? Until I get heated bed at least. After that I probably switch to PC ATX power supply or something else.Even with no bed, that's a little marginal. But, with no bed, and only one tool, it will probably be OK. I would at least try it.
Or would you strongly recommend some particular power supply for long run?
Meanwell brand, 24V, 400 to 500W if you have a heated bed, 300 if you don't and/or you decide to go with a 110V/220V (i.e. "mains") bed and an SSR to control it. Long topic...
When speaking about ATX power supply I was thinking about good a powerful one like 700W or more, but ofc that one will not give 24V and it seems that you do recommend 24V, so I'll go for that model you linked. Thank you!
I guess in order to achieve "milestone 1" with this project I should get connected all 3 axis motors, connect Pi with Octoprint and get extruders running vai WEB interface. Would you agree?
Start your configuration here: https://configtool.reprapfirmware.org/
NO OCTOPRINT. No, no, no. You absolutely do not need or want it. Use the SD that came with the Duet in your Pi. Or see here: https://duet3d.dozuki.com/Wiki/Getting_Started_With_Duet_3
(I absolutely love Oct for non-Duet printers. It simply does not apply to Duets)
Got it! Yes I did received a card with Duet 3 board, I didn't know that the card meant for Pi actually
btw I believe I did see the "getting started with duet 3" before buying the board and I thought that from somewhere there I picked up the Octopi idea. Good that you pointed it out!
Perhaps I should rather sleep night and do readings during the day
I'll see that one again, thank you!BTW since I have 2x steppers for axis Y should I just connect them parallel to same Duet 3 port?
No. When you configure drivers for a given axis, you say something like X0 Y1:2 Z3, or similar, and plug the motors in like that.
But that way I'll be running out of stepper drivers, isn't?
I have 7 motors in this box:
3x - 1per each of 3 heads (Nema 12)
1x - Z axis (Nema 17)
1x - X axis (Nema 12)
2x - Y axis (Nema 12)At least in original "BFB" controller setup 2x Y axis motors are connected parallel, I just double checked it with multi-meter.
-
You will love the configuration, it is all command based and dynamic. Current is set by a specific command, and a file of all commands (called config.g) is run at power up. If you want to experiment with changing any configuration items, you can try them out 'live' on the console, and put them in config.g if you like them.
The online config tool just builds you a "starter set" of files, including config.g. You will tweak from there.
If you need all drivers, then yes, hookup Y as two in parallel.
Power supply: ATX is OK for 12V, but almost all printers are moving to 24V now. There are many advantages. And good meanwell power supplies are quite reasonably priced.
-
@Danal said in Yet another Duet 3 wiring questions:
You will love the configuration, it is all command based and dynamic. Current is set by a specific command, and a file of all commands (called config.g) is run at power up. If you want to experiment with changing any configuration items, you can try them out 'live' on the console, and put them in config.g if you like them.
Ahaa! Thank you!
I did "experemental" configuration
Noticed, though, that UI didn't allow me to add 3rd extruder, but I figured that it gets done right in gonfig.g, right?
And so I did edit config.g; Drives M569 P0 S1 ; physical drive 0 goes forwards M569 P1 S1 ; physical drive 1 goes forwards M569 P2 S1 ; physical drive 2 goes forwards M569 P3 S1 ; physical drive 3 goes forwards M569 P4 S1 ; physical drive 4 goes forwards M569 P5 S1 ; physical drive 4 goes forwards M584 X0 Y1 Z2 E3:4:5 ; set drive mapping M350 X16 Y16 Z16 E16:16:16 I1 ; configure microstepping with interpolation M92 X80.00 Y80.00 Z4000.00 E420.00:420.00:420.00 ; set steps per mm M566 X900.00 Y900.00 Z12.00 E120.00:120.00:120.00 ; set maximum instantaneous speed changes (mm/min) M203 X6000.00 Y6000.00 Z180.00 E1200.00:1200.00:1200.00 ; set maximum speeds (mm/min) M201 X500.00 Y500.00 Z20.00 E250.00:250.00:250.00 ; set accelerations (mm/s^2) M906 X200 Y200 Z400 E200:200:200 I30 ; set motor currents (mA) and motor idle factor in per cent M84 S10 ; Set idle timeout Main thing there is I set motor currents like 4 times less =200mA (no idea what they should be as BFB documents are hard to find).
And added 3rd extruder by simply copy/pasting values for 2nd extruder like so: M350 X16 Y16 Z16 E16:16 :16 I1And yes I see what you say about configuration! Beginning to love it
Many thanks again!
Looks like g-code learning lays ahead of mewith kind regards
-
You grasp the concept perfectly; the online tool gets you started, and you edit from there.
Also, most config commands will tell you their active state if you enter just the command in the console. Example: M906 with nothing else will show all currents.
Some commands you need to specify one parm as an identifier. Example: M569 P0