• Tags
  • Documentation
  • Order
  • Register
  • Login
Duet3D Logo Duet3D
  • Tags
  • Documentation
  • Order
  • Register
  • Login

Auto bed compensation working just not very well

Scheduled Pinned Locked Moved
General Discussion
6
37
2.3k
Loading More Posts
  • Oldest to Newest
  • Newest to Oldest
  • Most Votes
Reply
  • Reply as topic
Log in to reply
This topic has been deleted. Only users with topic management privileges can see it.
  • undefined
    luckyflyer
    last edited by luckyflyer 13 Jun 2020, 21:48

    I've made the changes, copied and pasted. G32 ended up@ .01 and .01. Did G29, took a long time Here is the new print.
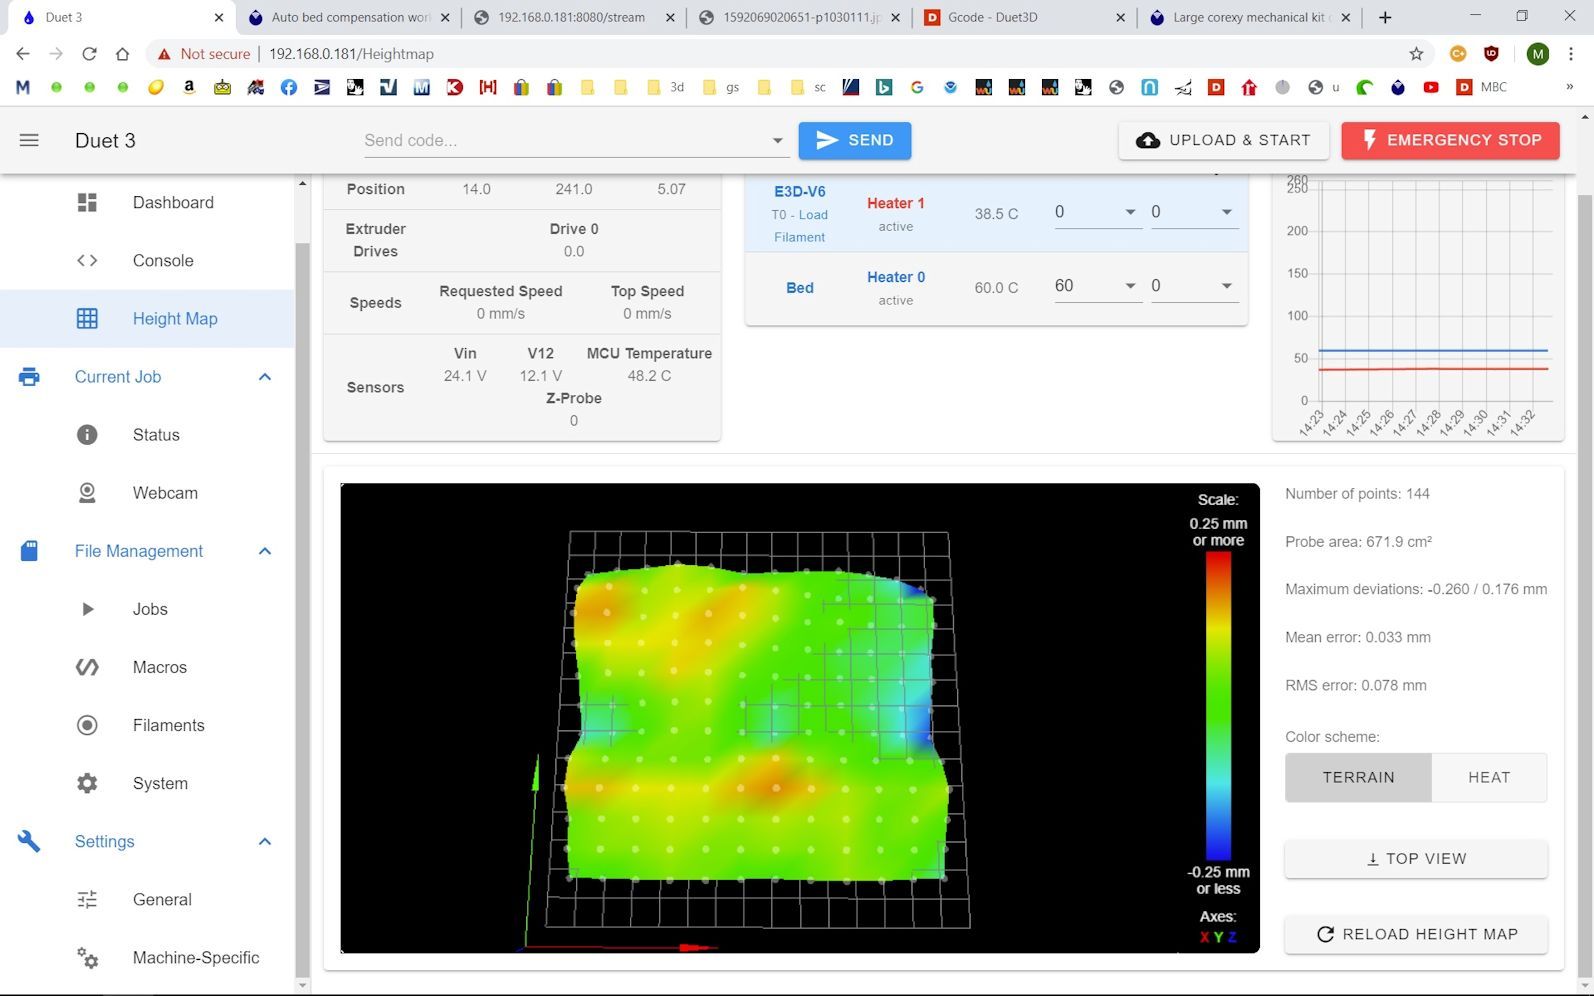
    P1030113.JPG

    Height map
    Height map2.jpg

    1 Reply Last reply Reply Quote 0
    • undefined
      Phaedrux Moderator
      last edited by 13 Jun 2020, 21:53

      have you tuned the extruder? The second half of a good first layer is the right flow rate for the height from the bed.

      Z-Bot CoreXY Build | Thingiverse Profile

      undefined 1 Reply Last reply 13 Jun 2020, 21:57 Reply Quote 0
      • undefined
        Phaedrux Moderator
        last edited by 13 Jun 2020, 21:56

        Now that you've got a good height map generated you can use G29 S1 to load a saved heightmap instead of redoing it every time.

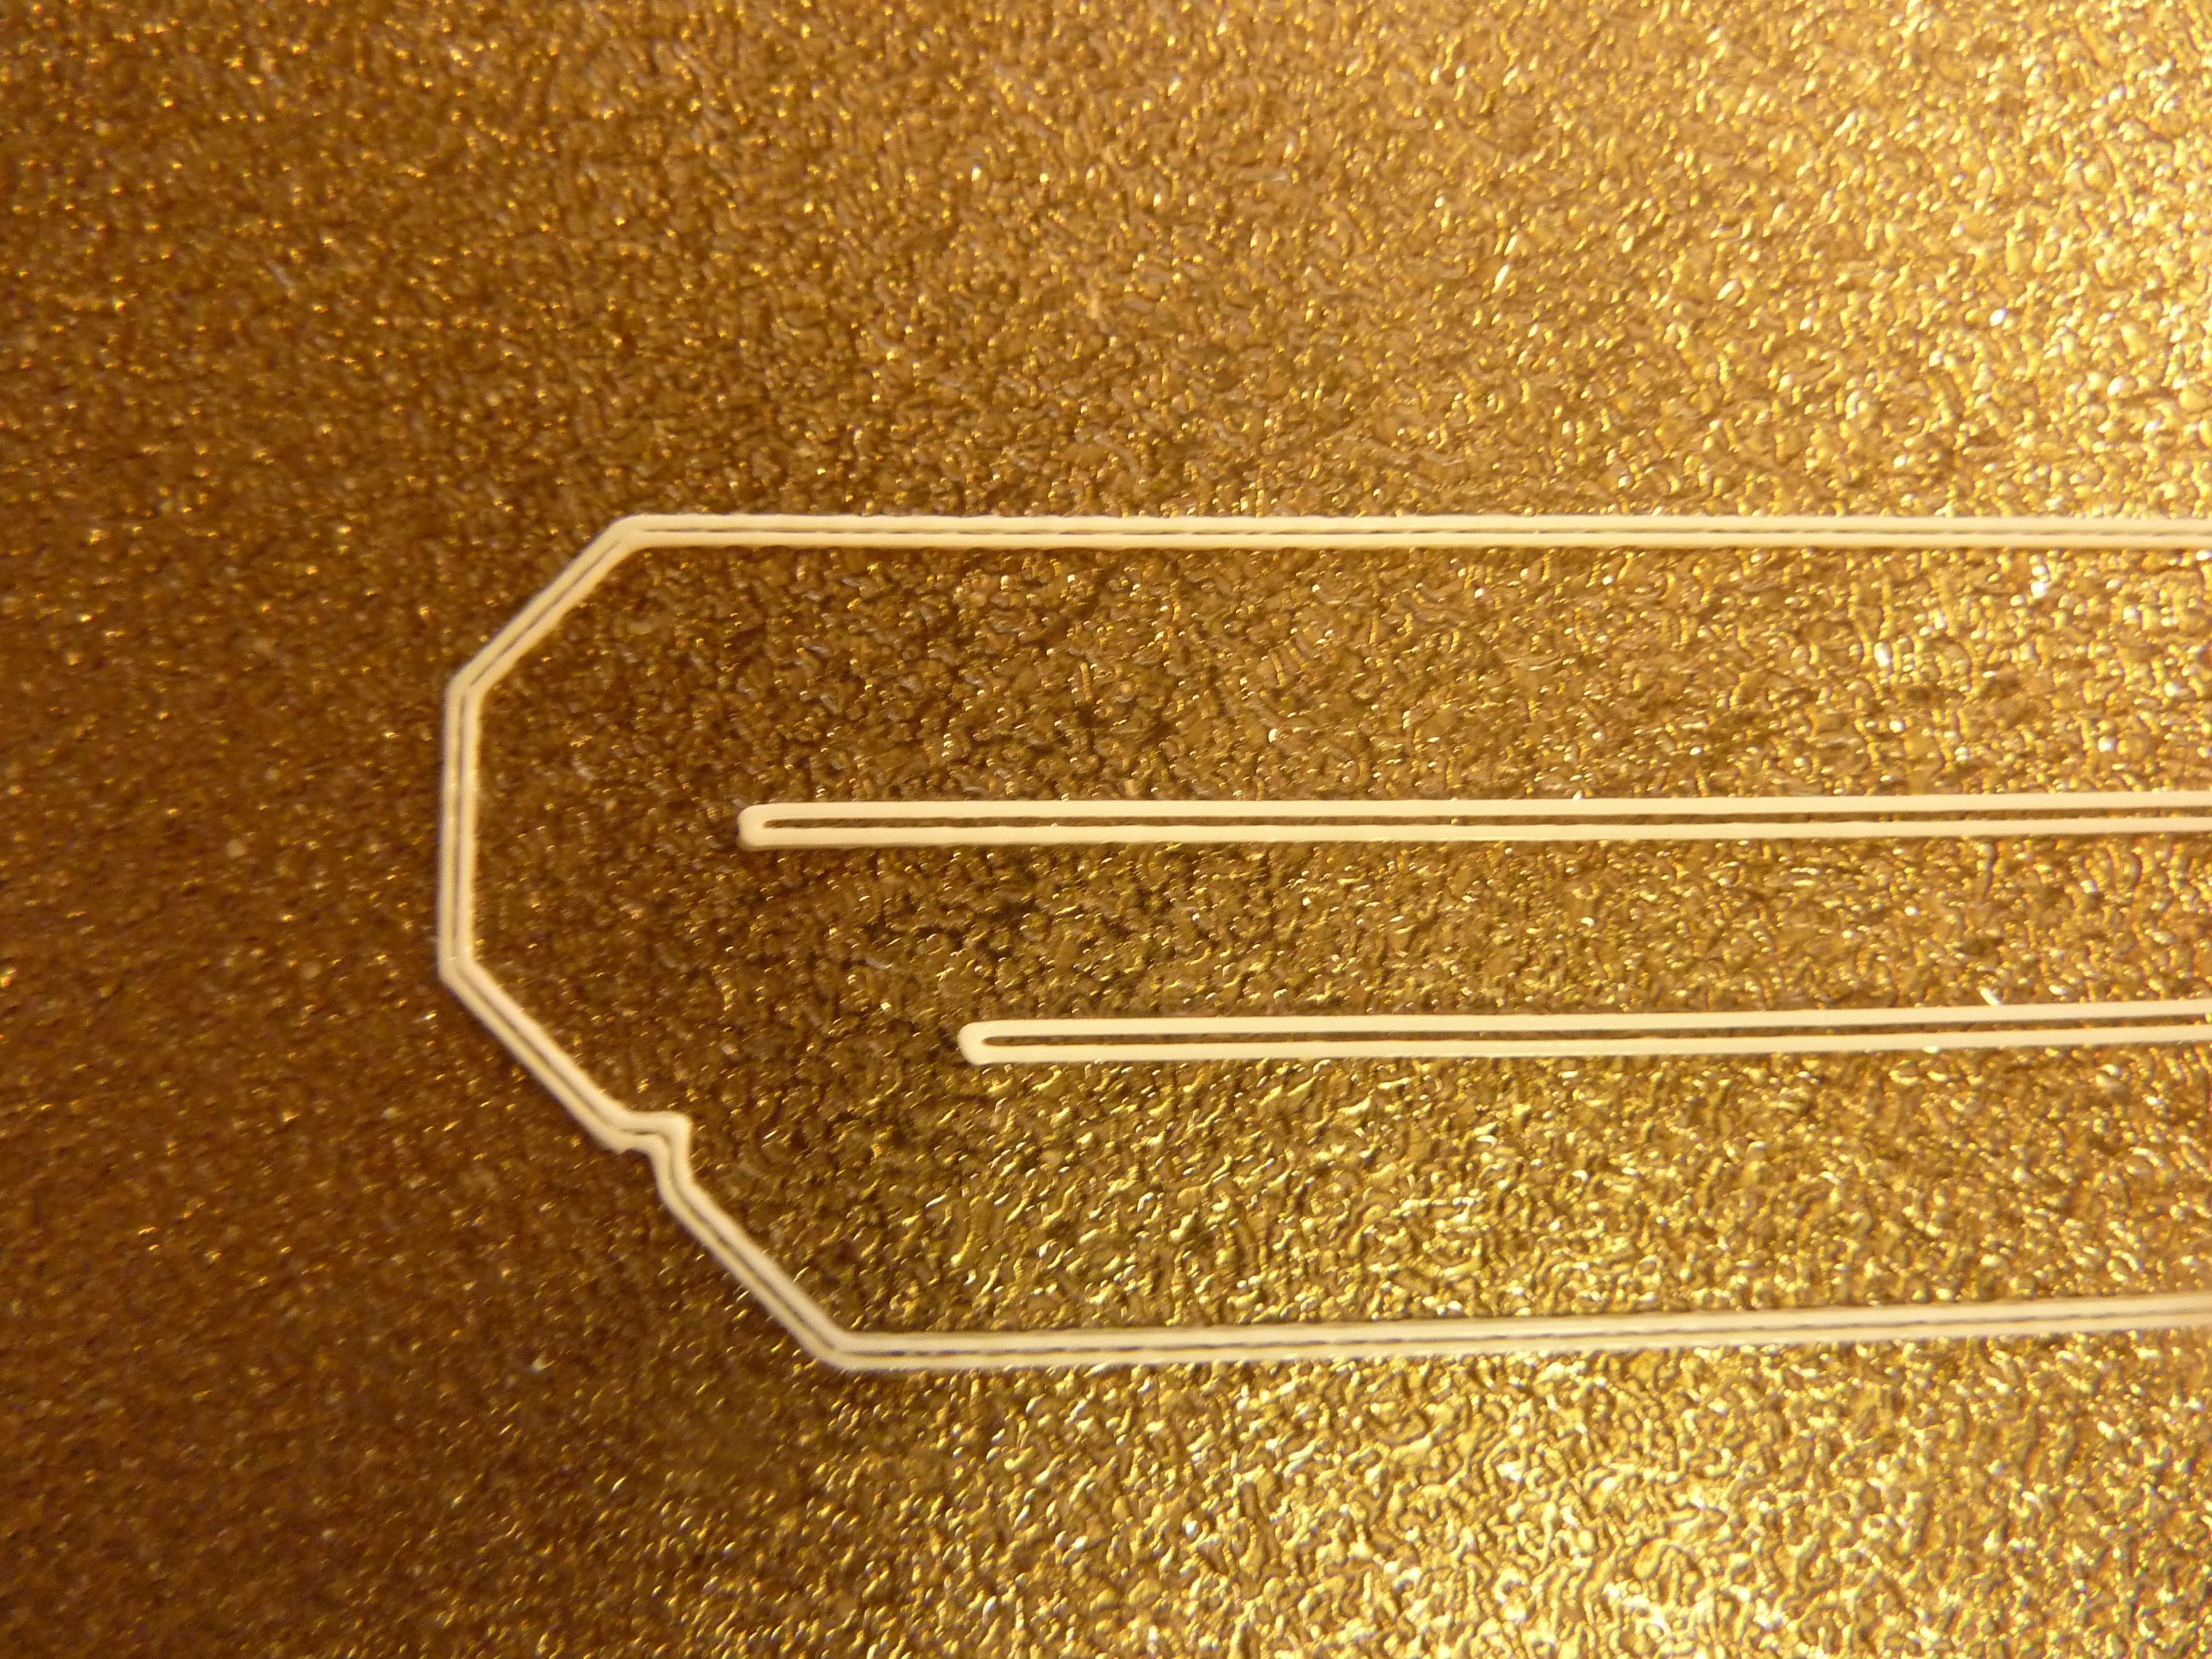
        Print something like this to test the heightmap over the entire surface of the bed rather than a full print of a small section. Much faster this way and will give a better idea if the mesh compensation is working.

        bedlevel_nozzle_0.4_200x200-0.3-0.8.stl

        Z-Bot CoreXY Build | Thingiverse Profile

        1 Reply Last reply Reply Quote 0
        • undefined
          luckyflyer @Phaedrux
          last edited by 13 Jun 2020, 21:57

          @Phaedrux I have confirmed the amount extruded by measuring 100mm of filament and then extruding 100mm. Comes out to within about a mm.

          1 Reply Last reply Reply Quote 0
          • undefined
            luckyflyer
            last edited by luckyflyer 13 Jun 2020, 23:16

            @Phaedrux
            New test print, Since this is a 3 layer print the pictures mask what the first layer looks like. As I watched the first layer being put down generally speaking the right side of the print was laid more closely to the bed than the left. On the left the layer lines were thinner and rounded under a magnifier. As the nozzle progressed from right to left I watched the Z stepper wheel lower the bed. This is what was happening with the previous print with the holes, started good on the right and got worse as it went left. Is there anything left that can be done?
            And I do appreciate your time and effort to help me out on this!

            Front of printer is on the left, did it that way to avoid shadows, but got some anyway.
            Want to mention that h.e. is a genuine e3dv6 and the Z lead screws are T8-2 instead of the more common T8-8. More turns per inch as opposed to T8's = better resolution I'm told.

            P1030115.JPG

            Lower right
            P1030118.JPG

            Lower left
            P1030120.JPG

            Upper left
            P1030121.JPG

            Upper right

            P1030122.JPG

            1 Reply Last reply Reply Quote 0
            • undefined
              Phaedrux Moderator
              last edited by 14 Jun 2020, 02:16

              Just to confirm, you have 3 motors for your 3 bed lead screws for the auto leveling, right?

              Are you sure the positions are correct?

              Is there much deviation after each iteration of G32?

              Z-Bot CoreXY Build | Thingiverse Profile

              1 Reply Last reply Reply Quote 0
              • undefined
                luckyflyer
                last edited by 14 Jun 2020, 02:27

                Just 2 lead screws and 1 stepper , I use G32 to adjust the 3 spring loaded bed leveling screws. Very little variation between iterations, day to day = some change, .03 +or-.

                1 Reply Last reply Reply Quote 0
                • undefined
                  Phaedrux Moderator
                  last edited by 14 Jun 2020, 02:32

                  What is your nozzle width? What slicer are you using? What line width and layer height are you using for the first layer?

                  Z-Bot CoreXY Build | Thingiverse Profile

                  1 Reply Last reply Reply Quote 0
                  • undefined
                    Phaedrux Moderator
                    last edited by 14 Jun 2020, 02:34

                    The only other thing I noticed is the trigger height is a bit high.
                    G31 P25 X-4 Y59 Z3.20

                    When the BLTouch is mounted correctly the base of the probe should be ~8mm above the nozzle tip which leads to a trigger height of ~2mm, when you get too far away from that the BLtouch can be a bit off sometimes. It has a sweet spot.

                    Z-Bot CoreXY Build | Thingiverse Profile

                    1 Reply Last reply Reply Quote 0
                    • undefined
                      luckyflyer
                      last edited by luckyflyer 14 Jun 2020, 04:59

                      Nozzle .4mm, S3d V4.12, flh 90%, flw 100%
                      Bltouch base is now 8.25mm above bed (mechanical limitation prevents 8mm) with nozzle touching bed, new trigger height = 1.40mm.

                      1 Reply Last reply Reply Quote 0
                      37 out of 37
                      • First post
                        37/37
                        Last post
                      Unless otherwise noted, all forum content is licensed under CC-BY-SA