bltouch
-
@nemecek if you set P9 mode, I would set P value of G31 lower:
G31 P500 X-45.712 Y36.357 Z2.5
=>
G31 P25 X-45.712 Y36.357 Z2.5The 500 was an example in the G31 section, but P25 is used in most documentation about BLTouch P9 examples.
-
@JoergS5
ok and for this reason that did not work in P9? I'll try tomorrow thanks -
sorry how do you save the delta calibration?
when i turn the printer off and on again i lose the g32 i had made ...
what do you think you can print like this? or it is too wrong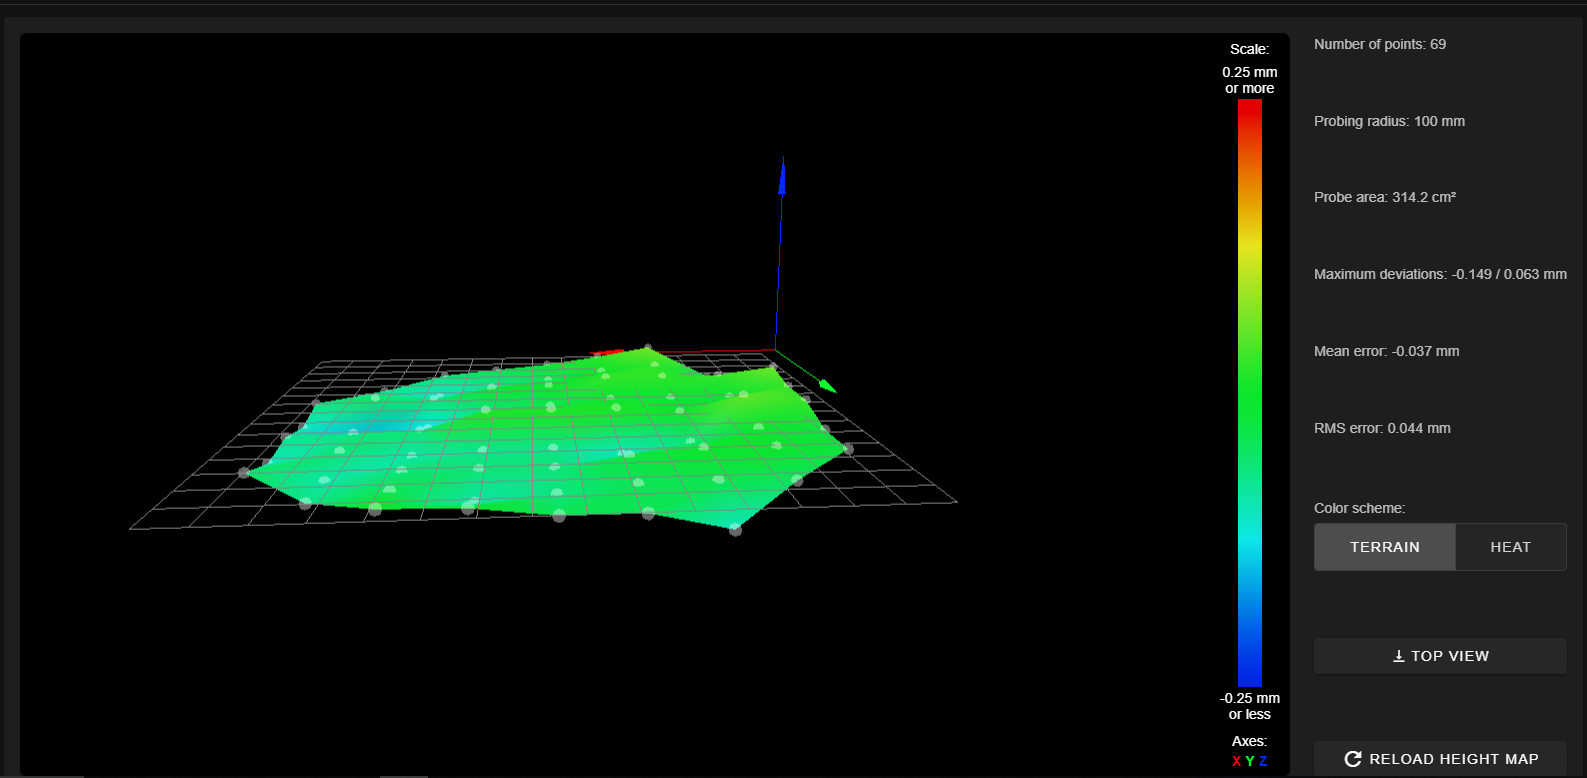
-
sorry how do you save the delta calibration?
M500 will save the calibration to the config-override.g file and you will need to add M501 to the end of your config.g to load the config-override.g file at boot time.
I don't have M401 in my bed.g How come? maybe that's why it doesn't work
With P9 the probe should be deployed automatically when needed, so no need to manually call M401, etc.
-
-
ok thanks for the assistance I will try today as joerg55 told me to set P25 instead of P500. if even this attempt doesn't work, I stay at P5. the bltouch does not lose quality right? and equal P5 or P9
-
@nemecek P9 has deploy/retract probing for the BLtouch and if there are firmware improvements, I am sure P9 will include improvements for BLtouch, but P5 not, because P5 is used for other probe types also. But if only P5 works, you have to decide and maybe go on with P5 until you know the reason why P9 doesn't work.
yes the best solution
-
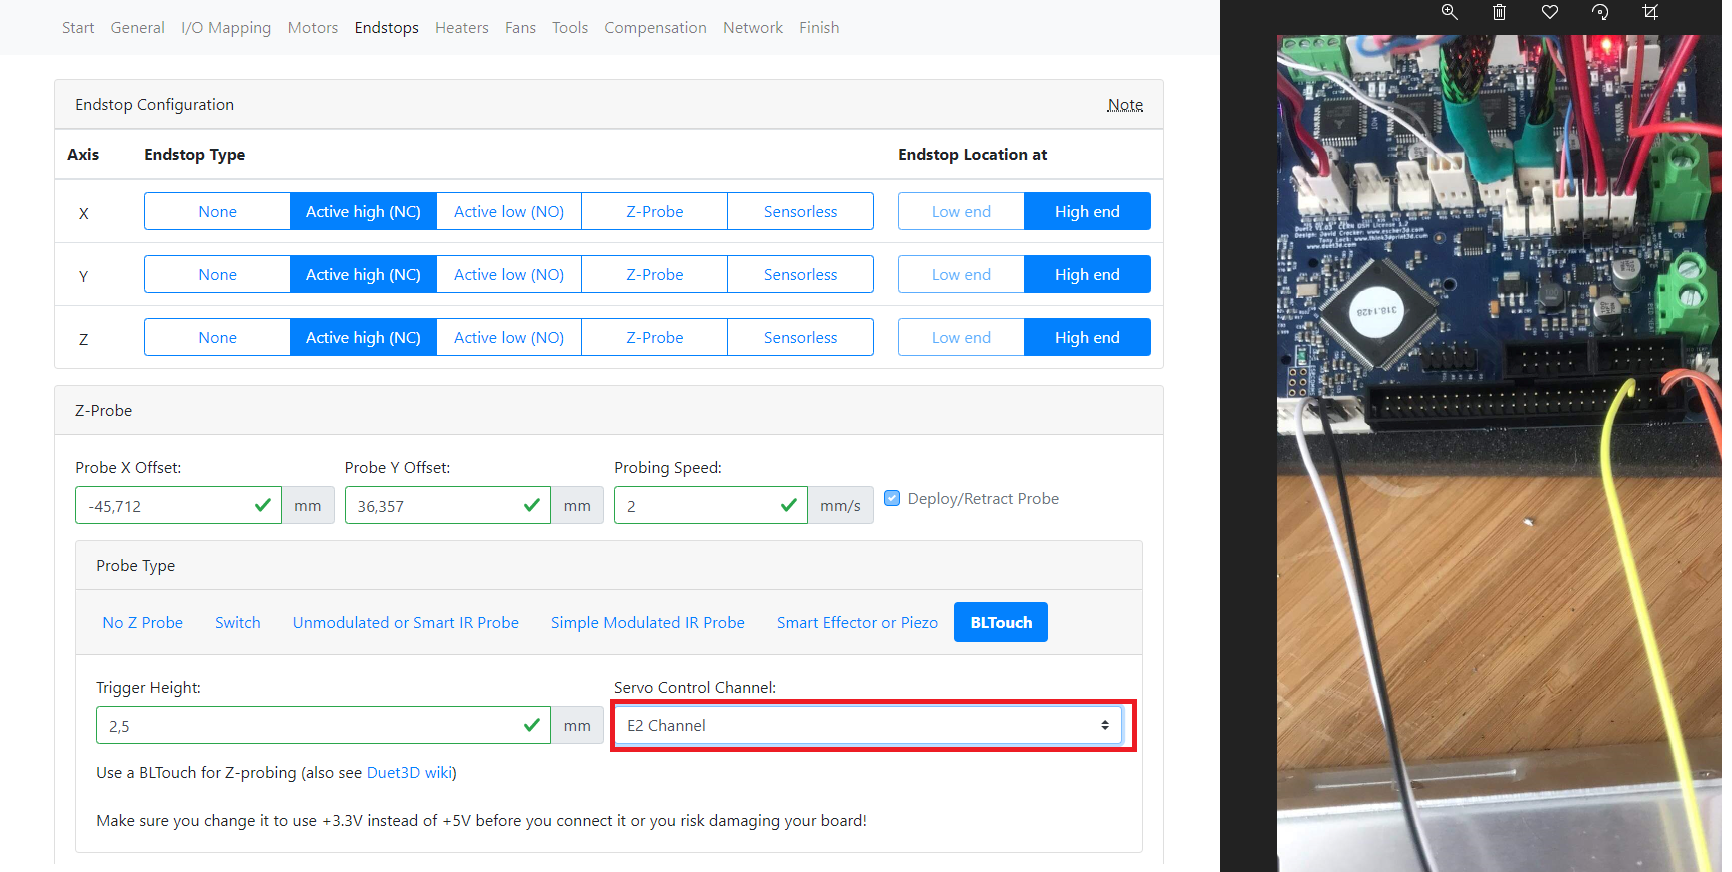
hi i also tried p25 without success. sorry but here it must be inserted on channel 2 and correct?
-
@nemecek Yes that combination should work and result in
; Z-Probe
M307 H3 A-1 C-1 D-1 ; disable heater on PWM channel for BLTouch
M558 P9 H5 F120 T6000 ; set Z probe type to bltouch and the dive height + speeds
M280 P3 S10 I1 ; deploy BLTouch -
You must also check your config-override.g for a M307 H3 command that would overwrite your M307 H3 A-1 C-1 D-1 ; disable heater on PWM channel for BLTouch in config.g and comment it out.
-
I finally found the problem if I understood correctly H5 means that the pin comes out at 5 mm from the plate so the z goes down too much before letting out the pin if I put H50 then it's fine
but now i don't understand why i have 2 M558 this from errors one and to H30
the other is at H5; Z-Probe
M307 H3 A-1 C-1 D-1 ; disable heater on PWM channel for BLTouch
M558 P9 H5 F120 T6000 ; set Z probe type to bltouch and the dive height + speeds
M558 H30 ;*** Remove this line after delta calibration has been done and new delta parameters have been saved
G31 P500 X-45.712 Y36.357 Z2.5 ; set Z probe trigger value, offset and trigger height
M557 R180 S20 ; define mesh grid -
-
-
good morning i need you. When I run the G29 after the G32 with the exception of the M500, then I go to check I go down with the z and touch the
flat even when I move to check if it is well leveled in some parts the sheet passes well and in some parts also tight. So my question is this: does it compensate only during printing? Or was the calibration not performed correctly?
do you need photos? let me know, thanks -
https://duet3d.dozuki.com/Wiki/Using_mesh_bed_compensation
Mesh compensation is active after you've run G29 to create a new mesh, or after using G29 S1 to load a saved mesh.
You can also send M122 in the console and look for "Compensation: mesh" or something like that to verify it's enabled.
If you're noticing that the mesh isn't adapting the height accurately where it should, double check your X Y offsets in G31 are correct.
https://duet3d.dozuki.com/Wiki/Test_and_calibrate_the_Z_probe#Section_Measuring_Probe_X_Y_Offset
-
I can not I have a problem after the G32 I go down manually then I move with x but there is a difference in height so I do a G29 I try again manually but it does not compensate for anything because it does so?
; config-override.g file generated in response to M500 at 2020-07-04 21:55
; This is a system-generated file - do not edit
; Delta parameters
M665 L520.889:520.889:520.889 R272.296 H365.630 B200.0 X-0.273 Y-0.895 Z0.000
M666 X2.672 Y-0.944 Z-1.727 A-0.99 B-1.14
; Heater model parameters
M307 H0 A90.0 C700.0 D10.0 S1.00 V0.0 B1
M307 H1 A340.0 C140.0 D5.5 S1.00 V0.0 B0
M307 H2 A340.0 C140.0 D5.5 S1.00 V0.0 B0
M307 H4 A340.0 C140.0 D5.5 S1.00 V0.0 B0
M307 H5 A340.0 C140.0 D5.5 S1.00 V0.0 B0
M307 H6 A340.0 C140.0 D5.5 S1.00 V0.0 B0
M307 H7 A340.0 C140.0 D5.5 S1.00 V0.0 B0
G10 L2 P1 X0.00 Y0.00 Z0.00
G10 L2 P2 X0.00 Y0.00 Z0.00
G10 L2 P3 X0.00 Y0.00 Z0.00
G10 L2 P4 X0.00 Y0.00 Z0.00
G10 L2 P5 X0.00 Y0.00 Z0.00
G10 L2 P6 X0.00 Y0.00 Z0.00
G10 L2 P7 X0.00 Y0.00 Z0.00
G10 L2 P8 X0.00 Y0.00 Z0.00
G10 L2 P9 X0.00 Y0.00 Z0.00 -
RepRapFirmware height map file v2 generated at 2020-07-04 22:16, min error -0.350, max error -0.048, mean -0.185, deviation 0.068
xmin,xmax,ymin,ymax,radius,xspacing,yspacing,xnum,ynum
-80.00,80.10,-80.00,80.10,100.00,20.00,20.00,9,9
0, 0, -0.101, -0.080, -0.100, -0.124, -0.125, 0, 0
0, -0.189, -0.162, -0.203, -0.217, -0.238, -0.322, -0.216, 0
-0.134, -0.091, -0.088, -0.090, -0.103, -0.086, -0.185, -0.208, -0.141
-0.138, -0.163, -0.162, -0.192, -0.251, -0.273, -0.350, -0.323, -0.264
-0.135, -0.048, -0.075, -0.100, -0.072, -0.116, -0.175, -0.190, -0.250
-0.163, -0.172, -0.213, -0.250, -0.212, -0.286, -0.276, -0.264, -0.304
-0.150, -0.128, -0.136, -0.176, -0.184, -0.205, -0.188, -0.223, -0.246
0, -0.165, -0.172, -0.176, -0.239, -0.252, -0.237, -0.289, 0
0, 0, -0.211, -0.189, -0.223, -0.198, -0.173, 0, 0 -
; bed.g
; called to perform automatic delta calibration via G32
;
; generated by RepRapFirmware Configuration Tool v3.1.3 on Sat Jul 04 2020 14:57:29 GMT+0200 (heure d’été d’Europe centrale)
M561 ; clear any bed transform
G28 ; home all towers
; Probe the bed at 10 peripheral and 6 halfway points, and perform 9-factor auto compensation
; Before running this, you should have set up your Z-probe trigger height to suit your build, in the G31 command in config.g.
G30 P0 X0 Y88.34 H0 Z-99999
G30 P1 X62.31 Y85.77 H0 Z-99999
G30 P2 X114.13 Y37.08 H0 Z-99999
G30 P3 X114.13 Y-37.08 H0 Z-99999
G30 P4 X70.53 Y-97.08 H0 Z-99999
G30 P5 X0 Y-120 H0 Z-99999
G30 P6 X-64.49 Y-88.76 H0 Z-99999
G30 P7 X-85.63 Y-27.82 H0 Z-99999
G30 P8 X-77.81 Y25.28 H0 Z-99999
G30 P9 X-47.8 Y65.79 H0 Z-99999
G30 P10 X0 Y33.72 H0 Z-99999
G30 P11 X46.71 Y26.97 H0 Z-99999
G30 P12 X51.96 Y-30 H0 Z-99999
G30 P13 X0 Y-60 H0 Z-99999
G30 P14 X-31.82 Y-18.37 H0 Z-99999
G30 P15 X-26.38 Y15.23 H0 Z-99999
G30 P16 X0 Y0 H0 Z-99999 S9
; Use S-1 for measurements only, without calculations. Use S4 for endstop heights and Z-height only. Use S6 for full 6 factors
; If your Z probe has significantly different trigger heights depending on XY position, adjust the H parameters in the G30 commands accordingly. The value of each H parameter should be (trigger height at that XY position) - (trigger height at centre of bed)