Duet3D Logo Duet3D
    • Tags
    • Documentation
    • Order
    • Register
    • Login

    Splitting Z-axis steppers

    Scheduled Pinned Locked Moved
    Tuning and tweaking
    7
    19
    884
    Loading More Posts
    • Oldest to Newest
    • Newest to Oldest
    • Most Votes
    Reply
    • Reply as topic
    Log in to reply
    This topic has been deleted. Only users with topic management privileges can see it.
    • StevePS3undefined
      StevePS3
      last edited by

      Maybe this is the problem, I did not change any jumpers. I didn't think I needed to. I thought that I could just do the M584 X0 Y1 Z2:4 E3. I've not read anywhere that said I needed to change jumpers.

      fcwiltundefined engikeneerundefined 2 Replies Last reply Reply Quote 0
      • fcwiltundefined
        fcwilt @StevePS3
        last edited by fcwilt

        @StevePS3

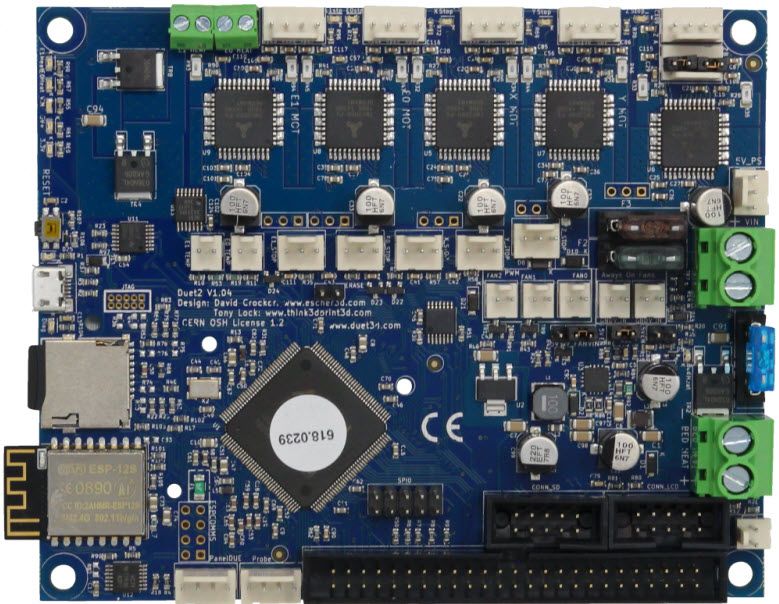
        Well IF you had both Z steppers connected to the two Z connectors you had to remove the two little black jumpers on the second Z connector.

        IF you removed a cable to a Z stepper from the second Z connector you need to restore the jumpers.

        See the upper right corner of this screen shot of the Duet WiFi board.

        Frederick

        Duet WiFi Board.jpg

        Printers: a small Utilmaker style, a small CoreXY and a E3D MS/TC setup. Various hotends. Using Duet 3 hardware running 3.4.6

        1 Reply Last reply Reply Quote 1
        • engikeneerundefined
          engikeneer @StevePS3
          last edited by

          @StevePS3 What @fcwilt said...

          FYI, the two Z-motor headers on the Duet are wired in series, hence the need for the jumpers to complete the circuit. There's a note about this on the Duet wiring diagrams:
          https://duet3d.dozuki.com/Wiki/Duet_Wiring_Diagrams

          @Phaedrux (/someone with the power) - Might be worth putting a quick reminder about this on the Independent Z motor's page to make things clearer 🙂

          E3D TC with D3Mini and Toolboards.
          Home-built CoreXY, Duet Wifi, Chimera direct drive, 2x BMG, 300x300x300 build volume
          i3 clone with a bunch of mods

          1 Reply Last reply Reply Quote 1
          • StevePS3undefined
            StevePS3
            last edited by

            Ahhhh. That makes sense. Thanks, let me try that.

            1 Reply Last reply Reply Quote 0
            • StevePS3undefined
              StevePS3
              last edited by

              OK, So I have put the jumpers back and I've updated the config.g

              ; Drives
              M569 P1 S1 ; physical drive 1 goes forwards
              M569 P0 S1 ; physical drive 0 goes forwards
              M569 P2 S0 ; physical drive 2 goes backwards
              M569 P3 S0 ; physical drive 3 goes forwards
              M584 X1 Y0 Z2:4 E3 ; set drive mapping
              M671 X0:0 Y-20:220 S0.5 ; leadscrews at front (connected to Z) and back (connected to E1) of Y axis
              M350 X16 Y16 Z16 E16 I1 ; configure microstepping with interpolation
              M92 X100.00 Y100.00 Z400.00 E420.00 ; set steps per mm
              M566 X900.00 Y900.00 Z12.00 E120.00 ; set maximum instantaneous speed changes (mm/min)
              M203 X18000.00 Y18000.00 Z180.00 E1200.00 ; set maximum speeds (mm/min)
              M201 X500.00 Y500.00 Z20.00 E250.00 ; set accelerations (mm/s^2)
              M906 X900 Y900 Z1100 E800 I30 ; set motor currents (mA) and motor idle factor in per cent
              M84 S30

              Other than that I've done nothing so far. I though that it was best to get the leadscrews working before I worries about endstops.

              Now the stepper plugged into the E2 is working but the stepper plugged into Z is totally passive.

              1 Reply Last reply Reply Quote 0
              • StevePS3undefined
                StevePS3
                last edited by

                OK, I saw one of the comments and I swapped it to 4:2 and that works.

                1 Reply Last reply Reply Quote 0
                • StevePS3undefined
                  StevePS3
                  last edited by

                  I now have the two endstop positions working but with each enstop probe, both motors are turning. Is that correct? If so then how is this levelling the bed?

                  1 Reply Last reply Reply Quote 0
                  • StevePS3undefined
                    StevePS3
                    last edited by

                    OK, sorted. I had to change the M574 command to use an S2 probe rather than an S1. All working now, thanks everyone.

                    1 Reply Last reply Reply Quote 0
                    • Phaedruxundefined
                      Phaedrux Moderator
                      last edited by

                      Glad you got it sorted. I'll add a note to the page about adding the jumpers back to the second Z driver port as it certainly may not be obvious to the uninitiated.

                      By the way, if you already have a probe you don't really need to use the dual z endstop method at all, but if it's working for you, rock on.

                      Z-Bot CoreXY Build | Thingiverse Profile

                      1 Reply Last reply Reply Quote 0
                      • A Former User?
                        A Former User @StevePS3
                        last edited by

                        This post is deleted!
                        1 Reply Last reply Reply Quote 0
                        • First post
                          Last post
                        Unless otherwise noted, all forum content is licensed under CC-BY-SA