Standby temperature definition in dual extruder
-
@bot That looks like a significant step in the right direction. Ultimately we need a look ahead function but it's awkward because it would need to be done on a time basis. i.e. we need to start heating a tool from standby to active nnn minutes before we need to use it. How does one work out nn minutes back from a Tn command in gcode file? Is that how IceSL does it? - If so, that's a very clever trick!
-
Looks like SlicerPE also has the capability to do this. Very clear how you turn it off/on, it is called "ooze prevention".
Typical G-Code snip. In this case, the comments were already there.
G1 E-4.96836 F2400.00000 ; Filament-specific end gcode G1 X128.341 Y161.138 F7800.000 M104 S235 T1 ; set temperature ; perform tool change wipe retract G91 G1 X2.5 Y2.5 E-0.25 ; complete remainder of retraction at defined speed G1 F2400 E-4.75 ; return to absolute coordinates and perimeter printing speed G90 G1 F3600 M106 S255 T0 M900 K30 ; Filament gcode M109 S210 T0 ; set temperature and wait for it to be reached G1 X147.977 Y147.194 F7800.000 G1 E10.00000 F2400.00000 G1 F1800.000 -
@deckingman Yeah, IceSL keeps track of its estimated time, and presumably uses these estimates to inject the commands at "the right moment" based on the rate that you say it can heat/cool.
It's not precise, because you can only provide one value for both heating and cooling. But, if the estimates of the movement time are close enough to the reality of the machine, it gets us closer to wasting less time.
The only "issue" is that it's going nuts setting the standby temp to whatever it pleases. It seems to make very sensible decisions based on my initial observations, but it will be best to keep a close eye on it during first prints.
-
@bot Clever

-
Yeah, @bot that sounds pretty darn clever, and sounds like exactly what the Jubilee group (toolchanger) is seeking. Where can I take a look at detail?
-
@Danal here: https://icesl.loria.fr/
It doesn't seem super straightforward at first, but once you get acquainted with it, it's very streamlined and powerful.
I'm working on a printer profile for RRF, since most of the other profiles leave some things to be desired in terms of the gcode output. If you would like to play with it before I finish it and release it, let me know I can link you to an almost-complete profile that will give more familiar looking gcode.
-
Hi fellows.
"we do it not because it is easy but because it is hard" -JFK
I found one cure for cura: setting "final printing temperature" to 170C (195)
Now my printer seems to survive from dualprinting a wall with small windows.
Thanks for mental and real help. -
Maybe a comment better suited for the tool changing thread from the other day -
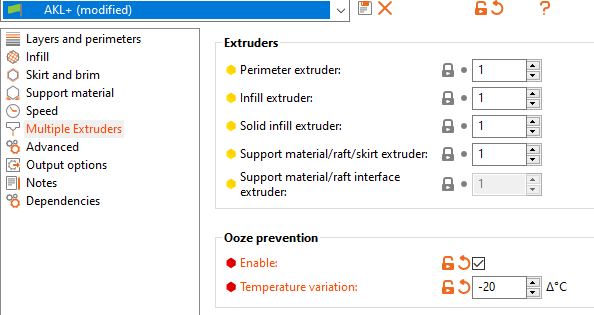
Cura (with the "Machine Settings" plugin) has the capability to fine tune the standby temperature as well as the "expected" heat up and cool down rates.
Much like IceSL's "Heating/cooling rate (C/sec)" setting, the plugin allows you to set both heat up and cool down speeds (C/sec), as well as minimum standby times.
When the M104 commands are injected into the GCODE is driven by the layer time / print speed, as well as the heat up and cool down values entered. Changing the heat up speed from, for example, 1°C/s to 4°C/s will result in the M104 Tx command being injected a number of lines later. It appears that, if the layer time where the heat up would occur is too short to allow for the nozzle to heat up from the standby temperature to active temperature, Cura will modify the standby temperature so that the nozzle will be ready in time.
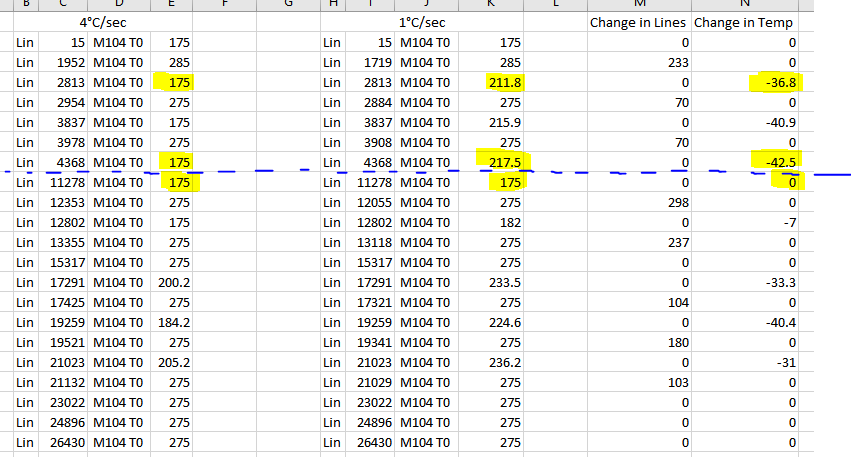
Left columns are at 4°C/s, right is at 1°C/s. You can see that the print temperature for T0 is set many layers (233, 237, 104, etc) later in the file for hotends that can heat up faster. Looking at some of the highlighted cells you can see where Cura modulated the standby temperature to account for the limiting heat up speed.
Obviously a hotends heat up/cool down speed is not some magic, made up number - its based on the actual heater performance. I believe* that where the M104 commands are injected is based on print speed and the heat up/cool down values, and is not impacted by acceleration, jerk, etc. These heating values can get someone really close to reducing time spent waiting during tool changes, but really Cura (or any software) doesn't have a clue what the "machine model" (acceleration, jerk, dynamic acceleration, tool change files, etc) is.
*I tried adjusting acceleration values in Cura and saw no change in where the lines were inserted.
As far as firmware looking ahead - I think that this would be the best solution, as the firmware should know what the "machine model" is - the config.g is loaded on the machine anyways
 ! However, how far should the firmware look ahead? Is the real solution to determining when to heat up hotends, priming the a different tools extruder, etc, to simulate a print file, and allow the firmware to rewrite the print file to include the relevant lines needed - a similar approach that is taken to determine realistic print times by simulating the print first. I am far from an expert, but I feel that there would be limits to looking ahead, and a full simulation of a print file would be needed.
 -
well seen !! I didn’t notice how fast it was going to the axis of the abscissas, the seconds that pass while print
-
Hi Pertti
I see you have been working with a Leapfrog 3D printer. I inherited a Leapfrog Creatr HS with dual extruders from a colleague. I am thinking of making the change to Duet3D. How did you manage the two stepper motors on the Y axis - did you just wire them in parallel? I am thinking of using the Duet 2 Ethernet or Duet Maestro board. Any help/advice you can give will be much appreciated as I am new to Duet! Thank you, Peter -
Hi Peter
Sorry I did not notice Your Reply earlier.
Yes, I wired them parallel , it works also serial. I have a Duet wifi. In my machine I changed the printhead to a bowden style CR-10. I also got some help from this blog:
https://passion-impression3d.jimdo.com/
I think Leapfrog has a rigid hardware but anything else needs rebuilding. I have no experience of HS printhead because Creator uses a massive straight drive solution.
Anyway the Duet Wifi is a good choise in my opinion. I have never done this kind of operation but thanks to the forum and instructions all went ok. Making changes to the configuration is easy with the web interface. I hope You get good results with Your machine.