Unable to home z axis
-
Thanks for your points droftarts, much appreciated.
Yes, I did mean hot end, sorry. My head is currently spinning out of control, I still feel like pulling my hair out
") but I do still need to change the 'polarity' of the movement. I enter Z-5 to move the bed downwards. Apart from this Bigbox the only other 3D printer I've had is the one I built 10 years or so back, I think it was 2011. I can't remember the design name off hand, there were so many different types built around Adrian original Reprap model (such as the tiny Huxley) but what I built was a Cartesian but the bed only moved in X and Y, the hot end moved in Z. Still, that was then I shouldn't talk about things gone past, it doesn't really help and the assistance you given and tips you've passed on have been very helpful and I'm grateful.
but I do still need to change the 'polarity' of the movement. I enter Z-5 to move the bed downwards. Apart from this Bigbox the only other 3D printer I've had is the one I built 10 years or so back, I think it was 2011. I can't remember the design name off hand, there were so many different types built around Adrian original Reprap model (such as the tiny Huxley) but what I built was a Cartesian but the bed only moved in X and Y, the hot end moved in Z. Still, that was then I shouldn't talk about things gone past, it doesn't really help and the assistance you given and tips you've passed on have been very helpful and I'm grateful.Thanks for the info on configuring the PT100, it definitely helps, saves me having to modify the file afterwards and also increases my learning of using the config tool, which is of course what I want.
I had configured the hot end temperature through the tool and it shows in the config.g as M143 H1 S300 but it doesn't show in the list of temps available for the Tool0, that was my query, I thought it should do but wasn't sure, can you clarify if Add New Temp will add it and work in the same way as using M143. I'll adjust the temp to S320 as you suggest. I'd read somewhere amongst the guides that the max for the tool temps had been changed and if I'm right it's currently 300.
Going back to the situation of changing the Z movement to - to make the bed move down, should I change the direction command to M569 S0 (or leave it the S off) instead, would that solve the Z direction issue so I don't have to alter the Z figures in the various homing files?
Y did home or at least it shows so on the DWC.
I'll display my config.g and homeall.g files as they stand at the moment after I've made new ones with the new info on using the tool that you've given me. I feel like my grandchild on Christmas morning, lots of new toys to play with
I'll try out displaying those files, I think I must have made and error last time, I copied the files as you describe but when I pasted them into the message it told me I was posting spam and wouldn't let me. It's bound to be me, gotta be but I shall persevere.
Thanks again for your help, I'm very grateful, thumbs up !
Keith
-
;Config.g

; General preferences
G90                                     ; send absolute coordinates...
M83                                     ; ...but relative extruder moves
M550 P"Bigbox1"              ; set printer name

; Network
M552 P0.0.0.0 S1                        ; enable network and acquire dynamic address via DHCP
M586 P0 S1                              ; enable HTTP
M586 P1 S0                              ; disable FTP
M586 P2 S0                              ; disable Telnet

; Drives
M569 P0 S1                              ; physical drive 0 goes forwards
M569 P1 S1                              ; physical drive 1 goes forwards
M569 P2 S0                              ; physical drive 2 goes backwards
M569 P3 S1                              ; physical drive 3 goes forwards
M584 X0 Y1 Z2 E3                        ; set drive mapping
M350 X16 Y16 Z16 E16 I1                 ; configure microstepping with interpolation
M92 X80.00 Y80.00 Z400.00 E420.00       ; set steps per mm
M566 X900.00 Y900.00 Z12.00 E120.00     ; set maximum instantaneous speed changes (mm/min)
M203 X6000.00 Y6000.00 Z180.00 E1200.00 ; set maximum speeds (mm/min)
M201 X500.00 Y500.00 Z20.00 E250.00     ; set accelerations (mm/s^2)
M906 X800 Y800 Z800 E800 I30            ; set motor currents (mA) and motor idle factor in per cent
M84 S30                                 ; Set idle timeout

; Axis Limits
M208 X0 Y0 Z0 S1                        ; set axis minima
M208 X300 Y200 Z200 S0                  ; set axis maxima

; Endstops
M574 X1 Y1 S1                           ; set active high endstops
M574 Z1 S2                              ; set endstops controlled by probe

; Z-Probe
M558 P1 H5 F120 T6000                   ; set Z probe type to unmodulated and the dive height + speeds
G31 P500 X-25 Y0 Z2.5                   ; set Z probe trigger value, offset and trigger height
M557 X15:215 Y15:195 S20                ; define mesh grid

; Heaters
M307 H0 B0 S1.00                        ; disable bang-bang mode for the bed heater and set PWM limit
M305 P0 T100000 B4138 R4700             ; set thermistor + ADC parameters for heater 0
M143 H0 S120                            ; set temperature limit for heater 0 to 120C
M305 P1 X200		                ; set parameters to PT100 for heater 1
M143 H1 S300                            ; set temperature limit for heater 1 to 300C

; Fans
M106 P0 S0 I0 F500 H-1                  ; set fan 0 value, PWM signal inversion and frequency. Thermostatic control is turned off
M106 P1 S1 I0 F500 H1 T45               ; set fan 1 value, PWM signal inversion and frequency. Thermostatic control is turned on

; Tools
M563 P0 H1 F-1                          ; define tool 0
G10 P0 X0 Y0 Z0                         ; set tool 0 axis offsets
G10 P0 R0 S0                            ; set initial tool 0 active and standby temperatures to 0C

; Custom settings are not defined
Changing M569 P2 S0 has cured my Z direction issue
Keith
-
; homeall.g ; called to home all axes ; ; generated by RepRapFirmware Configuration Tool v3.1.4 on Wed Aug 05 2020 09:56:58 GMT+0100 (British Summer Time) G91 ; relative positioning G1 H2 Z-5 F6000 ; drop Z relative to current position G1 H1 X-305 Y-205 F1800 ; move quickly to X and Y axis endstops and stop there (first pass) G1 H2 X5 Y5 F6000 ; go back a few mm G1 H1 X-305 Y-205 F360 ; move slowly to X and Y axis endstops once more (second pass) G90 ; absolute positioning G1 X150 Y100 F6000 ; go to first bed probe point and home Z G30 ; home Z by probing the bed ; Uncomment the following lines to lift Z after probing G91 ; relative positioning G1 Z-5 F100 ; drop Z relative to current position G90 ; absolute positioning -
These files don't help, unfortunately, it still stops just before probing Z. So I still have a config error somewhere
There is also another problem arisen, even though I have
G1 X150 Y100 F6000 ; go to first bed probe point and home ZThe position it reaches before stopping is X100, Y20. Strange and I can't see why.
Looking at how my posting of the G1 line above I can now see how I should post the whole of the config.g and homeall.g files should have been done. I'll edit them now.
Keith
-
@Kayjay said in Unable to home z axis:
Changing M569 P2 S0 has cured my Z direction issue
Yes, that was the right thing to do.
can you clarify if Add New Temp will add it and work in the same way as using M143.
No, Add New Temp just adds a temperature preset to either the active or the standby drop down menu. The default maximum is 275C, but setting M143 overrides this.
; homeall.g
...
G1 H2 Z-5 F6000          ; drop Z relative to current position
...
Change the Z-5 to Z5 in your homeall.g. You can also comment out (put ; at the front of the line) the last three lines (the Z also goes the wrong way there), as the probe (once it works) will lift drop the bed away from the nozzle.
G1 X150 Y100 F6000 ; go to first bed probe point and home ZIt's possible that the Y axis cannot move at F6000 (100mm/s). If it homes okay, try changing the F parameter to F1800.
Is this the E3D BigBox printer? https://www.kickstarter.com/projects/e3dbigbox/the-e3d-bigbox-3d-printer
I think the Y axis moves the whole X gantry, so there is quite some load on it. The motors are also quite big, by the look of it, and you have the motor current set to 800mA. Check what motors are fitted to the X and Y axis (take a picture or quote model number), I expect it's just that the motor speeds and accelerations need tuning.Finally, for the G30 probe. Is there any LED on the probe to indicate it's triggering, or on? Check your wiring, then test the probe. See https://duet3d.dozuki.com/Wiki/Test_and_calibrate_the_Z_probe
Also, perhaps post a picture of the probe.Ian
-
Sorry, I missed changing the Z back to Z5 from Z-5, just an error rather than a permanent setting, as I said my mind is in a flippin' whirl at the moment
I thought I was doing the right thing uncommenting the last 3 lines rather than having the hot end close to bed, I've had so many crashes in very early days with the Reprap printer parking Z off the bed became a normal thing to do. Still I suppose it doesn't really matter either way as long as the coding takes it into account when the printing starts proper but it is something to be aware of I agree.
Yes, it's the Kickstarter Bigbox from E3D, I was (I think) no.189 in the queue to get mine and you're correct about the Y axis, it moves the whole of the X axis assembly forwards and backwards. The motors are all the spec quoted by E3D. Just checked the manual, there are 3 x 400 step motors and 2 x 200 step (for Z), all , I think, Nema 17 and all supplied by E3D, in fact everything is O.E. if I can say that though going off they're latest company set up you definitely get what they say it is. I recently watched one of Thomas S videos where he was taken around their new complex by Sanjay and it's amazing, they definitely have a good company there! All four of them are very business minded lads amazing for such young lads when they originally set up. I recommend you have a look at the vid on You Tube, it's amazing, about 30 minutes long but Sanjay explains everything from where stock and orders come in to the point where they leave the complex, I was stunned how large they have become in a few short years..
Anyway, I digress, the motors are all full spec. The figures in the config file I'm afraid are what is in there as default, again this is my own fault for not fully understanding what's required, I am learning each time I read a post! Could you possibly give me some indication as to what figures I need there.The probe, yes, it works, it was one of the first things I checked. The LED lights when something comes close to the sensors, say my finger. The probe is the one designed by David and E3D picked it up to include in the Bigbox design. Given these facts is a photo still needed? I can post one if required.
Could you give me a little more info on the motor specs and data I should enter in those relevant areas for the config.g file. I remember when creating the similar file from Repetier for my old printer that I have to create steps per mm by a small calculation, that worked for X and Y and there was a different calculation for Z. To be honest I don't remember what the calculation was now, it was a good few years ago. Do I need to do a similar thing for the dubious data which I'm using default for now.
I understand why you mentioned the use of ; for commenting, of course you are unaware of how much knowledge I have on the topic so it's better to be safe and I thank you.
So, for now I'll check out the settings for X and Y steppers, they can handle 1.2A per coil so I could go a little higher and see if that helps.
Thanks for all the help
Keith
-
Just a point I forgot to mention. In the many attempts to 'homeall' there were 3 or four times, consecutively, that a dialogue popped up. After homing X and Y a dialogue came up asking asking to adjust Z using the various measurements shown, Z+25, Z+10, Z+1, Z+01 etc and the same in negative figures, it said once the hot end was touching the bed (with a piece of paper I assume) click ok and Z would be homed. It worked four or five times on the trot then it hasn't shown since even though every setting was the same, strange stuff.
I've also looked at the motors, Z motors are 0.9 degs 1.7A and all the others are 1.8 degs and same current per coil.
Keith
-
Looks like you've made some progress on the config.
Were you able to update the firmware to 2.05.1 yet as described earlier? If not, now would be a good time.
800ma current for those motors should be alright to move at the very least. The usual recommendation is to set the current between 60% and 85% of the rated current. Setting them to 1200 might be a good balance.
@Kayjay said in Unable to home z axis:
After homing X and Y a dialogue came up asking asking to adjust Z using the various measurements shown, Z+25, Z+10, Z+1, Z+01 etc
That describes manual probing, which is set by M558 P0. Your new config is using M558 P1, which is correct for the IR probe which you described. So that should be correct.
To test your motors we need to check if they are moving at all first, and then moving the right direction and amount.
This commissioning guide may prove helpful in testing the basics.
https://duet3d.dozuki.com/Guide/Ender+3+Pro+and+Duet+Maestro+Guide+Part+3:+Commissioning/39#s145
Let me know how you get on with updating the firmware and testing the motors.
-
@Kayjay According to this https://wiki.e3d-online.com/images/5/53/Y-AXIS_MOTOR.jpg motors are "42BYGHM809", eg https://www.aliexpress.com/item/562360153.html so they are 1.7A motors. We recommend running stepper motors at 50-85% of rated current, so set M906 to 1400mA maximum. Running them at 800mA is probably the problem with the Y axis not moving correctly.
For the steps per mm, I followed a link in the Kickstarter updates to the official-looking github repository. This part of the Marlin config has those settings, and motor settings. https://github.com/joshuarowley42/BigBox-Pro-Marlin/blob/master/Marlin/Configuration.h#L598
Note that Marlin uses mm/second, while RepRapFirmware uses mm/minute for everything except acceleration (M201, in mm/s^2). Let me know if you need help converting the numbers. For the steps per mm, I assume you haven't changed any of the hardware supplied with the kit, eg belts, pulleys or leadscrews. For the leadscrews, it looks like they supplied an 8mm-pitch leadscrew, so 400 may be correct for Z, rather than 1600. Without seeing your machine it's hard to know. But if asking the printer to move 10mm in Z results in 10mm of movement, it's probably right!Tuning the speeds and accelerations is, unfortunately, very dependent on your machine. I think you're starting with conservative values that should work, so it's really up to you to test if it can stand running faster.
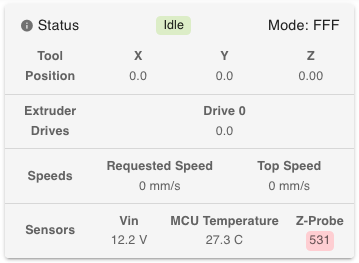
For the probe, if the light comes on with your finger under it, that's good. But what does the probe report in DWC? Is it 0 when something is not under it, and something like 530 when there is something, and the LED is lit? This is what mine looks like (I use a DC42 IR probe, too) when the probe is close to the bed and LED is lit, Z Probe readout bottom right:
Again, I urge you to look at the link I posted earlier for setting up your probe: https://duet3d.dozuki.com/Wiki/Test_and_calibrate_the_Z_probe@Phaedrux has answered your other queries.
Ian
-
This is amazing, thank you both so much! Some of it is bringing back memories, the leadscrew setting for one, yes, they are 8mm pitch but as you say it's easy to see what distance it's travelling ( once I get it all going!) and the motor numbers are as you quoted.
The probe does report 0 when not activated, I remember seeing that earlier (I'm not with the printer right now) I'll check the readout when activated tomorrow too.
I have looked at the probe calibrating page but haven't been able to actually use it successfully because of the issues, hopefully making the changes tomorrow will hopefully sort all that.
Thanks again, I'll report back tomorrow with my results.
Keith
-
@Phaedrux
Thank you for the help, regarding the motor current you suggested 1200mA and Ian suggested 1400mA so I thought 1300mA would be a happy medium.Going to the motor commissioning, I've done this, X and Y behave correctly and Z moves correctly whilst doing the small moves in the homing routines, beyond this is the wall I've hit where Z doesn't home but hopefully this may be overcome a little later today by entering the correct data in to Motors section of the config tool.
Not sure how I got M558 set with P0 but because of subsequent file creation in the config tool I have got the correct P setting but it was interesting to find out what was happening. I am definitely learning a LOT from these discussions.
@droftarts
I remember reading somewhere in the guides that Reprap firmware handles floating point maths so I divided the appropriate figures by 60 to convert from mm per sec to mm per min. Assuming that is correct I just now need to determine what data in Josh's Github data goes where in the config tool as there appears to be more data than spaces in the tool (I'm clearly missing something). You wouldn't believe I got an A level in maths back in 1968, I was all set for uni and my dad died aged 47 and I was 17, I was devastated, totally and my education fell away to zero, nothing mattered and that went on for years. Sorry, I'm digressing again, I'm posting the figures I calculated, could you cast an eye over them and if I'm right could you guide me as to where I should enter them in the tool.#define DEFAULT_AXIS_STEPS_PER_UNIT {2.66,3,26.66,5.06} // default steps per unit for BigBox #define DEFAULT_MAX_FEEDRATE {2.5, 2.5, 0.1, 0.42} // (mm/sec) #define DEFAULT_MAX_ACCELERATION {12.5,12.5,1.66,83.33} // X, Y, Z, E maximum start speed for accelerated moves. E default values are good for Skeinforge 40+, for older versions raise them a lot. *#define DEFAULT_ACCELERATION 750 // X, Y, Z and E acceleration in mm/s^2 for printing moves *#define DEFAULT_RETRACT_ACCELERATION 5000 // E acceleration in mm/s^2 for retracts *#define DEFAULT_TRAVEL_ACCELERATION 750 // X, Y, Z acceleration in mm/s^2 for travel (non printing) moves // The speed change that does not require acceleration (i.e. the software might assume it can be done instantaneously) #define DEFAULT_XYJERK 0.13 // (mm/sec) #define DEFAULT_ZJERK 0.066 // (mm/sec) #define DEFAULT_EJERK 0.083 // (mm/sec)I've not altered the comments just the data.
Also the probe data shown in DWC, I get the correct readings, 0 when not activated and 537 when I put something under the probe.
Once again I have to thank you for your help, you've both been a great help.
Keith
-
@Kayjay to go from mm/s to mm/min, you need to multiply by 60, not divide. This only applies to max Feedrate M203 and jerk (RRF calls this max instantaneous speed change M566), everything else should stay the same. So I think your settings should be:
M350 X16 Y16 Z16 E16 I1                 ; configure microstepping with interpolation
M92 X160.00 Y180.00 Z400.00 E304.00       ; set steps per mm
M566 X480.00 Y480.00 Z24.00 E300.00     ; set maximum instantaneous speed changes (mm/min)
M203 X9000.00 Y9000.00 Z360.00 E1500.00 ; set maximum speeds (mm/min)
M201 X750.00 Y750.00 Z100.00 E5000.00     ; set accelerations (mm/s^2)
M906 X1300 Y1300 Z1300 E1300 I30            ; set motor currents (mA) and motor idle factor in per cent
Try these figures, and report back.
Edit: sounds like your probe should work. Test the above, and if it works try sending G30 with the probe over the bed.
Ian
-
Thanks for doing the calculations for me Ian, it has been half a century since I studied maths in anger
Seriously though looking at your results it's clear why it's multiply and not divide, I have no excuse!Anyway the Z homing, unfortunately it's still the same. I thought things would be right now, ah well.... I'll post the files again, if you could take a look to ensure I have everything correct and that commands are in the correct order where they need to be.
In homez.g and homeall.g I have a line set to move the hot-end to centre of the board X150, Y100, the line before G30 to ensure the probe and hot-end are over the bed. Running either file moves the hot-end to X170, Y50 and stops at that point without executing G30.
; General preferences
G90                                     ; send absolute coordinates...
M83                                     ; ...but relative extruder moves
M550 P"Bigbox1"                         ; set printer name

; Network
M552 P0.0.0.0 S1                        ; enable network and acquire dynamic address via DHCP
M586 P0 S1                              ; enable HTTP
M586 P1 S0                              ; disable FTP
M586 P2 S0                              ; disable Telnet

; Drives
M569 P0 S1                              ; physical drive 0 goes forwards
M569 P1 S1                              ; physical drive 1 goes forwards
M569 P2 S0                              ; physical drive 2 goes backwards
M569 P3 S1                              ; physical drive 3 goes forwards
M584 X0 Y1 Z2 E3                        ; set drive mapping


M350 X16 Y16 Z16 E16 I1                 ; configure microstepping with interpolation
M92 X160.00 Y180.00 Z400.00 E304.00     ; set steps per mm
M566 X480.00 Y480.00 Z24.00 E300.00     ; set maximum instantaneous speed changes (mm/min)
M203 X9000.00 Y9000.00 Z360.00 E1500.00 ; set maximum speeds (mm/min)
M201 X750.00 Y750.00 Z100.00 E5000.00   ; set accelerations (mm/s^2)
M906 X1300 Y1300 Z1300 E1300 I30        ; set motor currents (mA) and motor idle factor in per cent

M84 S30                                 ; Set idle timeout

; Axis Limits
M208 X0 Y0 Z0 S1                        ; set axis minima
M208 X300 Y200 Z200 S0                  ; set axis maxima

; Endstops
M574 X1 Y1 S1                           ; set active high endstops
M574 Z1 S2                              ; set endstops controlled by probe

; Z-Probe
M558 P1 H5 F120 T6000                   ; set Z probe type to unmodulated and the dive height + speeds
G31 P500 X0 Y0 Z2.5                     ; set Z probe trigger value, offset and trigger height
M557 X15:215 Y15:195 S20                ; define mesh grid

; Heaters
M305 P0 T100000 B4138 R4700             ; set thermistor + ADC parameters for heater 0
M143 H0 S120                            ; set temperature limit for heater 0 to 120C
M305 P1 X200                            ; configure PT100 for heater 1
M143 H1 S320                            ; set temperature limit for heater 1 to 320C

; Fans
M106 P0 S0 I0 F500 H-1                  ; set fan 0 value, PWM signal inversion and frequency. Thermostatic control is turned off
M106 P1 S1 I0 F500 H1 T45               ; set fan 1 value, PWM signal inversion and frequency. Thermostatic control is turned on

; Tools
M563 P0 D0 H1 F0                        ; define tool 0
G10 P0 X0 Y0 Z0                         ; set tool 0 axis offsets
G10 P0 R0 S0                            ; set initial tool 0 active and standby temperatures to 0C
; homeall.g ; called to home all axes ; ; generated by RepRapFirmware Configuration Tool v3.1.4 on Thu Aug 06 2020 10:36:11 GMT+0100 (British Summer Time) G91 ; relative positioning G1 H2 Z5 F6000 ; lift Z relative to current position G1 H1 X-305 Y-205 F1800 ; move quickly to X and Y axis endstops and stop there (first pass) G1 H2 X5 Y5 F6000 ; go back a few mm G1 H1 X-305 Y-205 F360 ; move slowly to X and Y axis endstops once more (second pass) G90 ; absolute positioning G1 X150 Y100 F6000 ; go to first bed probe point and home Z G30 ; home Z by probing the bed ; Uncomment the following lines to lift Z after probing ;G91 ; relative positioning ;G1 Z5 F100 ; lift Z relative to current position ;G90 ; absolute positioning; homez.g G91 ; relative positioning G1 H2 Z5 F6000 ; lift Z relative to current position G90 ; absolute positioning G1 X150 Y100 F6000 ; go to first probe point G30 ; home Z by probing the bed ; Uncomment the following lines to lift Z after probing ;G91 ; relative positioning ;G1 Z5 F100 ; lift Z relative to current position ;G90 ; absolute positioning -
@Kayjay I can’t see any particular problem with your config.g or homeall.g. What position does the Y axis say it’s at when it moves only 50mm? There may be a mechanical issue that is stopping the Y axis moving the full distance at 100mm/s; as it pulls two belts, one each side of the machine, these need to have no backlash in them or the X axis will twist and catch (called racking). The X carriage must be set at 90 degrees to the Y rails, or again there will be resistance to movement. The two Y rails must also be parallel; check by moving the axis by hand (with power off) and feel if it gets more difficult to move at one end of the axis compared to the other.
Test X, Y and Z axis movement individually, in both directions, and that each moves the correct distance (ie G91 G1 X50 G90 moves the X axis 50mm, and 50mm of movement is reported in DWC), as @Phaedrux suggested (see the link he posted).
Then, make sure there is enough space between nozzle and bed so the probe is not triggered (no LED lit, reads 0 in DWC), and with the probe over the bed, send G30.
Report what happens, how far each axis moves, any error messages etc.
Ian
-
DWC reports the head position as should be, X150,Y100,Z5. This last attempt left the physical position as X170,Y40,Z5.
I've run through the set up process as per the Bigbox manual, tensioning the belts etc. The X gantry runs sweet and true as does the X Carriage, the belts are correctly tensioned. The odd thing with this (I think I mentioned it at the start) is that the printer was working fine until I took out the SD card to make a full copy of it on my pc and I accidentally dropped it in a point where I couldn't recover it, basically it dropped below the floorboards, at least I think it did, I searched everywhere else without success and the floorboards have a gap close to my pc/laptop setup. I wish I could find it, oh boy do I !!
Anyway, the tensions and mechanical alignments are all ok. I can also get X and Y to their full extents safely. If I homeall from this position then X and Y again arrive at X170,Y40,Z5 and DWC reports the positions as correct as programmed. I checked the movement of X and Z using head movement tool in DWC, X moved correctly but Y was only moving 50% of the requested setting. I checked config.g M92 and changed Y from 180 to 360, that has cured the Y being incorrect against the distance requested although X is still a little out physically reaching X170 where DWC reports the head at X150, I'll work out the margin of error and change the X setting in M92 to suit. This of course doesn't explain why it won't execute G30 after moving to the centre of the bed.
There is one error message, after X and Y have homed the head moves to X150,Y100 and stops. If I then select HomeZ this error appears - G28 Z G0/G1: Insufficient axes homed
Keith
-
@Kayjay hmm, sounds like the steps per mm from that github page are wrong for your machine, for some reason. The way to check is to count how many teeth are on the X and Y pulleys, and know the tooth pitch of the belts. Then use the formula
steps per mm = (motor steps per revolution x microsteps) / (belt pitch x pulley number of teeth)
From the build instructions, it should be a 20 tooth pulley on X, with a 2mm belt pitch, and a 400 step motor at 16x microstepping, giving (400x16)/(2x20)=160. If the X axis is moving 170mm rather than 150, this points to a 22-tooth pulley, and steps per mm of 145.4545. This would move the X axis 165mm for same number of steps. But seems rather strange; measure the movement again, and count the number of teeth on the pulley. Did you change the pulley?360 steps per mm on Y seems correct; the pulley on the Y motor is 16 tooth, driving a 36 tooth pulley on the Y drive shaft. This drives the Y axis with two 20 tooth pulleys. So steps per mm are (400x16)/(2x20) x 2.25 (which is the gear ratio between the 16 and 36 tooth pulleys), which equals 360. I guess they originally specified a 200 steps per revolution motor.
Still not sure why your probe isn’t working, though. Have you tried sending just G30?
The error from homez.g is probably because it has not been updated to use the probe. Post the file.
Ian
-
It's a really weird situation isn't it. I'll go through all the checks you suggest of course but all the parts are as per supplied by E3D and the even weirder thing is it worked until I lost the sd card which was why I thought it was a software prob rather than hardware maybe these quirks were accounted for when I got the printer.
I've tried G30 after using homex and homey and it's the same, a no go.
When you say post the file do you mean homez.g? if so I posted it yesterday, it's just above, if it's any other then I'll post the others below.
; homeall.g
; called to home all axes
;
; generated by RepRapFirmware Configuration Tool v3.1.4 on Thu Aug 06 2020 10:36:11 GMT+0100 (British Summer Time)
G91                     ; relative positioning
G1 H2 Z5 F6000          ; lift Z relative to current position
G1 H1 X-305 Y-205 F1800 ; move quickly to X and Y axis endstops and stop there (first pass)
G1 H2 X5 Y5 F6000       ; go back a few mm
G1 H1 X-305 Y-205 F360  ; move slowly to X and Y axis endstops once more (second pass)
G90                     ; absolute positioning
G1 X150 Y100 F6000        ; go to first bed probe point and home Z
G30                     ; home Z by probing the bed

; Uncomment the following lines to lift Z after probing
;G91                    ; relative positioning
;G1 Z5 F100             ; lift Z relative to current position
;G90                    ; absolute positioning
; homex.g G91 ; relative positioning G1 H2 Z5 F6000 ; lift Z relative to current position G1 H1 X-305 F1800 ; move quickly to X axis endstop and stop there (first pass) G1 H2 X5 F6000 ; go back a few mm G1 H1 X-305 F360 ; move slowly to X axis endstop once more (second pass) G1 H2 Z-5 F6000 ; lower Z again G90 ; absolute positioning; homey.g ; called to home the Y axis ; G91 ; relative positioning G1 H2 Z5 F6000 ; lift Z relative to current position G1 H1 Y-205 F1800 ; move quickly to Y axis endstop and stop there (first pass) G1 H2 Y5 F6000 ; go back a few mm G1 H1 Y-205 F360 ; move slowly to Y axis endstop once more (second pass) G1 H2 Z-5 F6000 ; lower Z again G90 ; absolute positioning; homez.g ; called to home the Z axis ; G91 ; relative positioning G1 H2 Z5 F6000 ; lift Z relative to current position G90 ; absolute positioning G1 X150 Y100 F6000 ; go to first probe point G30 ; home Z by probing the bed ; Uncomment the following lines to lift Z after probing ;G91 ; relative positioning ;G1 Z5 F100 ; lift Z relative to current position ;G90 ; absolute positioningI may be a while coming back with the results as I'm not feeling too well, I hope it's not the dreaded but I'm feeling as though it may be and having COPD I need to be very careful and look after myself. At the moment I'm lacking energy in a big way so I've spent the majority of today in bed and intend returning there in a few minutes. THe good thing is it will give your possibly (given my problem with the Bigbox) overstretched mind a well earned rest
I'll get back to you with the pulley counts etc when I'm feeling a little better.At least I can't pass Covid by the internet unlike some people who think owning a 5G phone is a certain way of getting the virus direct from China
I shall mention no more politically linked topics, don't worry.Keith
-
Good day all, I'm happy to say I'm not suffering from covid or at least I don't think I am, which is such a happy thing for me and probably those around me. I think it was more a case of over-tiredness (it's been almost 22 hours since I slept, a problem I suffer with occasionally and also being a sufferer of COPD I have a regular cough). Today I feel 'almost' on top of the world so to speak, certainly a lot better than yesterday apart from my headache over my Bigbox.
I have taken the machine apart as far as necessary to get at all the pulleys and counted their teeth, each one is as expected especially the possible mix up between the one 16 tooth pulley and the rest of the 20 tooth variants, that each was selected and applied correctly. The belt pitch is also correct, 2mm, in fact all spec is as it should be as shown in the last iteration of the manual, I'm totally at a loss as to why the darned thing doesn't work. I could understand something being 400mm and coming out 200mm, it would be a simple issue to find and fix but the way it's showing up is almost crazy, maybe Lord Voldemort has been waving his wand
I did have a thought of temporarily hooking up RAMPS to it to prove various points, it would either work correctly or have the same problem, hopefully it wouldn't add problems, I may just do that tomorrow.
-
Does anyone have any negative or positive thoughts on this temporary process? It's simply meant to prove a point. Of couse I intend to return to the far superior Duet board I just want to see if I can make the Bixbox work correctly using RAMPS.
If RAMPS works successfully then it gives grounds to work on and where to set about making alterations
-
@Kayjay I don’t see a problem fitting the RAMPS temporarily to check the steps per mm on X. It’s a shame you lost your old SD card; that would have answer on it! I still can’t fathom why the X moves further than it should. When it homes in X, is X=0 with the nozzle on the left edge of the bed? If it homes with the nozzle over the bed (say 20mm in from the edge) then moving it 150mm would put it at 170mm from the edge. The other way to check steps per mm is to measure (with ruler or tape measure) from a fixed point on the printer to the X carriage (in line with X movement), move X 100mm, and measure again.
Maybe post a picture of the printer, or even better a video of the homing.
The other thing that occurs to me is the homing direction. When standing in front of the printer, X0 Y0 should be front left of the bed. The X endstop should be on the left, and Y endstop on the front. Is that how yours is set up? I haven’t looked at the BigBox build manual to check myself.
Ian
Bed-slinger - Mini5+ WiFi/1LC | RRP Fisher v1 - D2 WiFi | Polargraph - D2 WiFi | TronXY X5S - 6HC/Roto | CNC router - 6HC | Tractus3D T1250 - D2 Eth