nozzle not primed after retraction (I think..)
-
Thanks. I am using a direct drive extruder (single gear). I have tried using pressure advance, setting it from 0.005 to 0.030 but it did not help with gap. Do you think I should increase the value? If so what value would you recommend?
-
@skezo, I would suggest you run one of the pressure advance calibration routines. I do not have a direct drive extruder so I am not qualified to answer the question directly.
-
@jens55 Thanks, I will run through more test with PA to see if it helps.
-
@skezo If you're using prusaslicer or similar, you can add gcode (to the layer gcode option) to change PA with the advancement in layers - you can read about it here: https://duet3d.dozuki.com/Wiki/Pressure_advance
Although everyone's machine is a bit different, I'm running a Bondtech BMG/ direct drive with the following.
M572 D0 S0.07 ; set pressure advance -
@Kolbi Thanks. I have tried changing the PA from
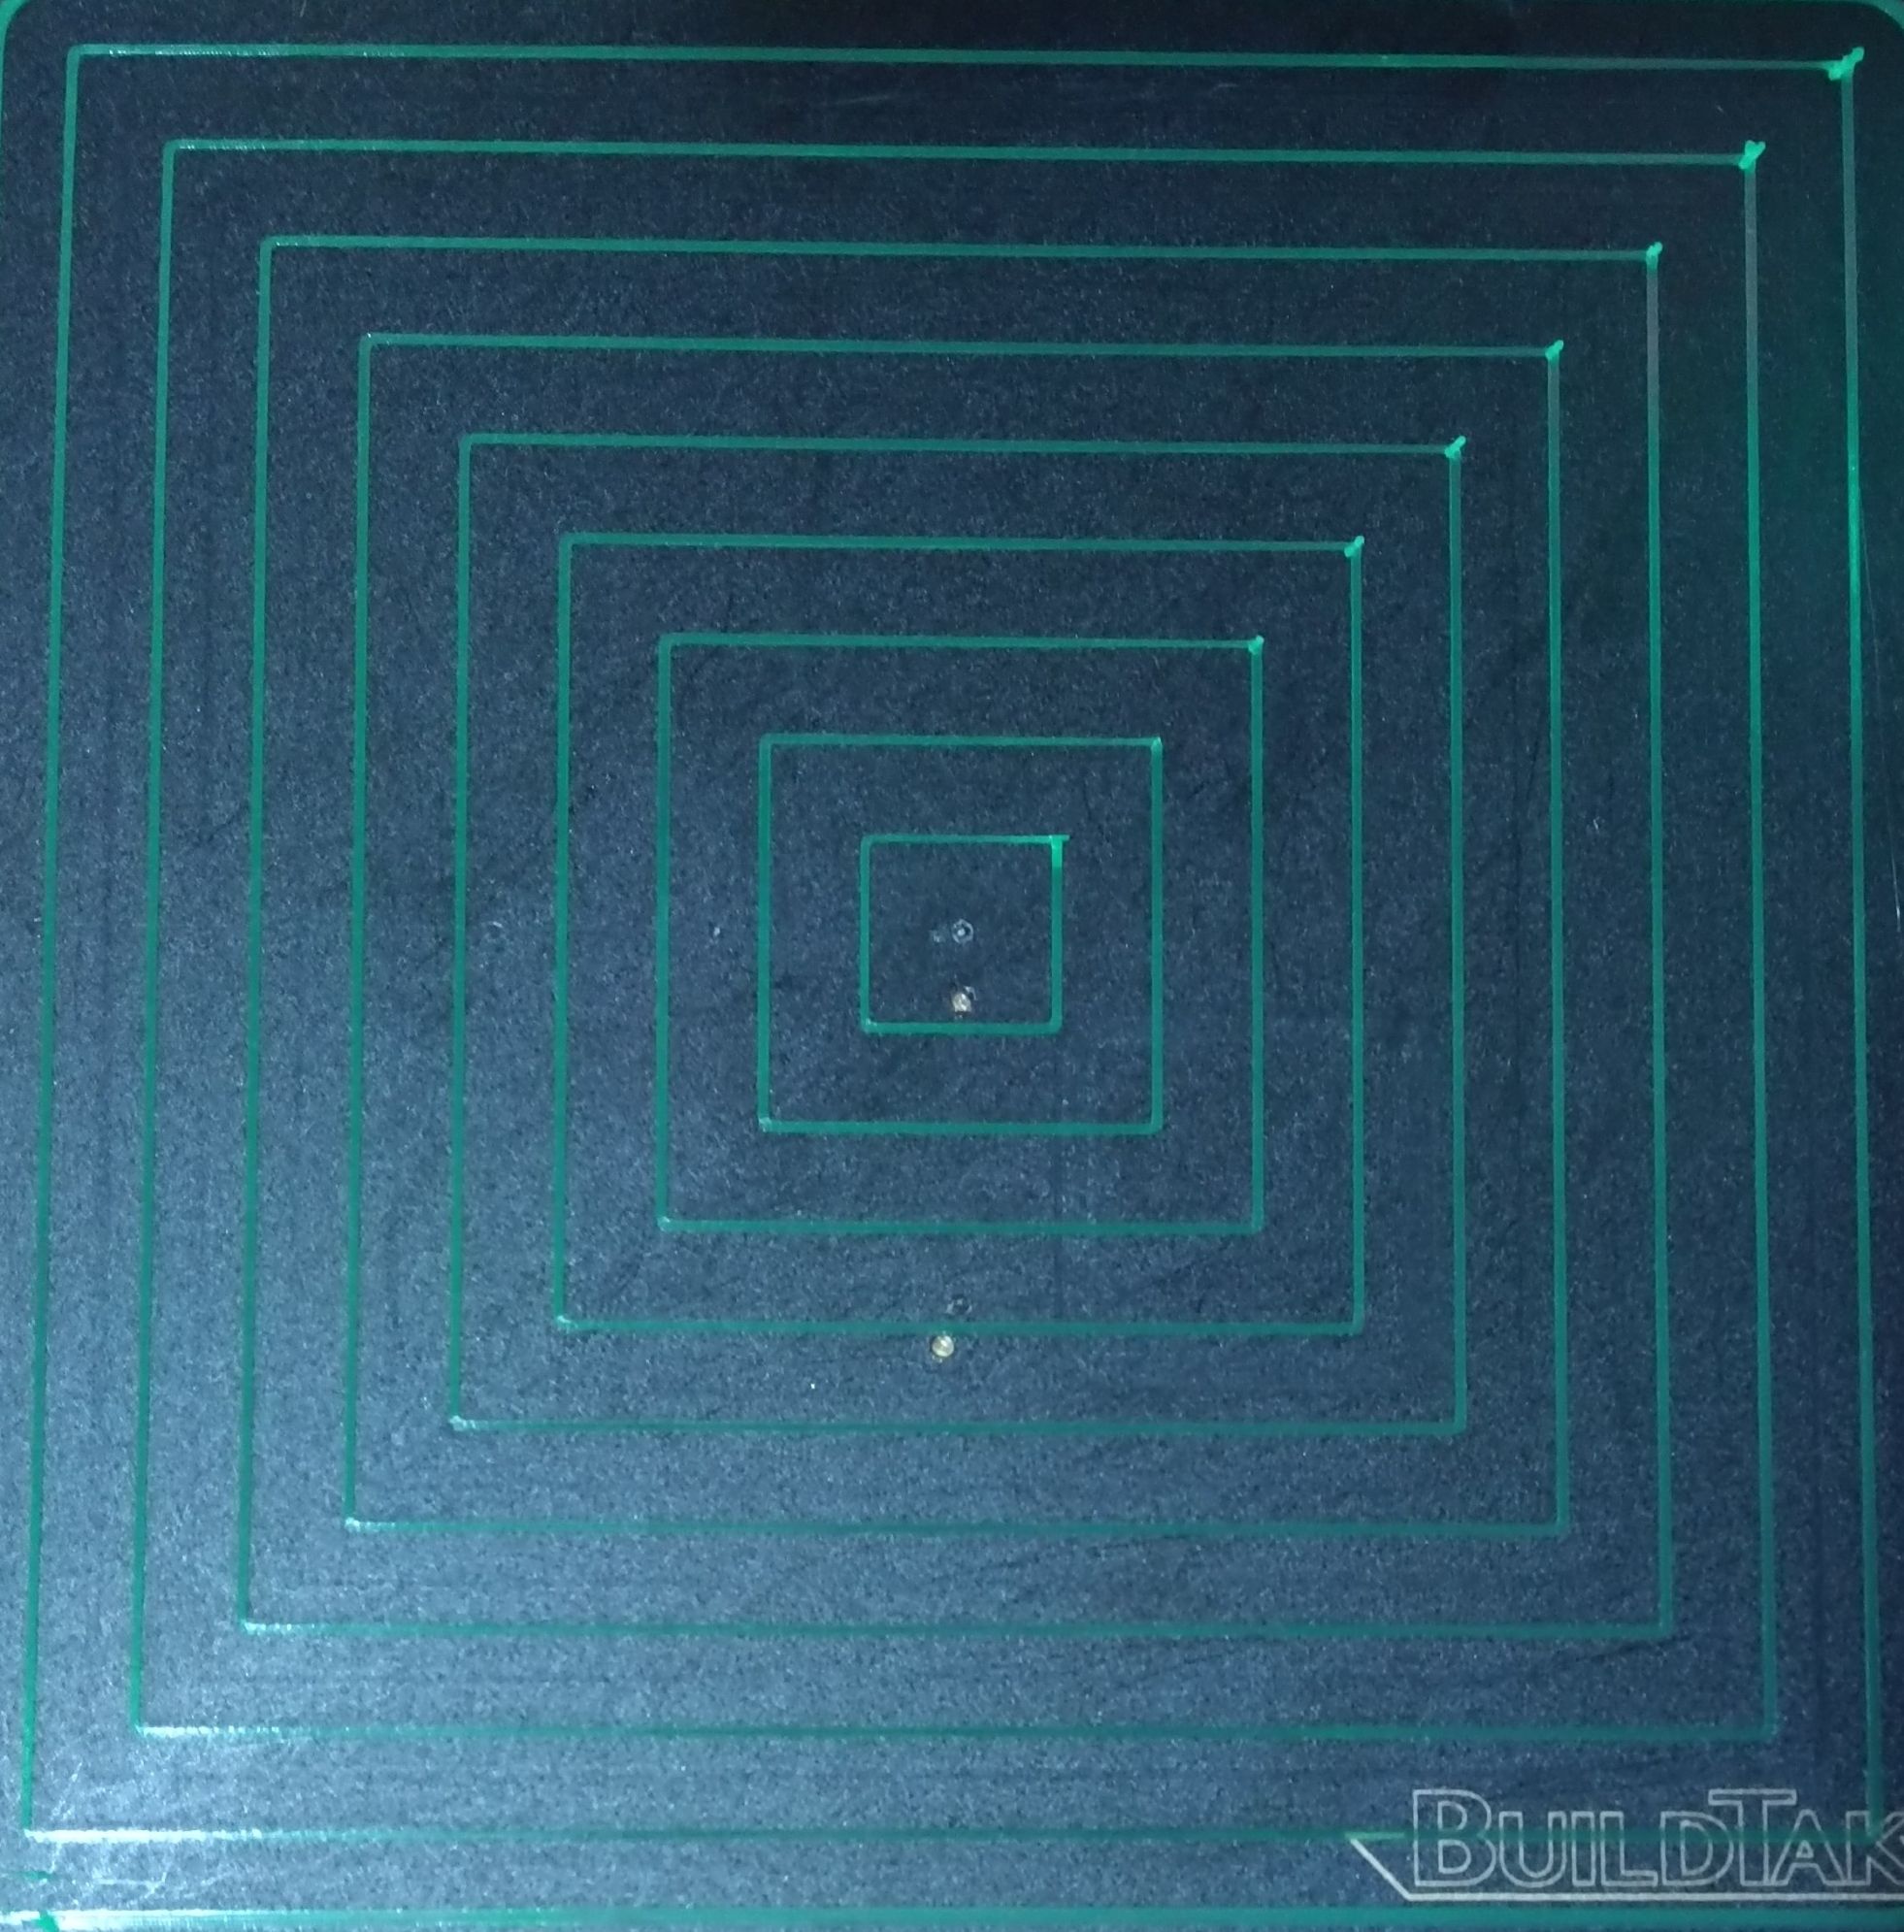
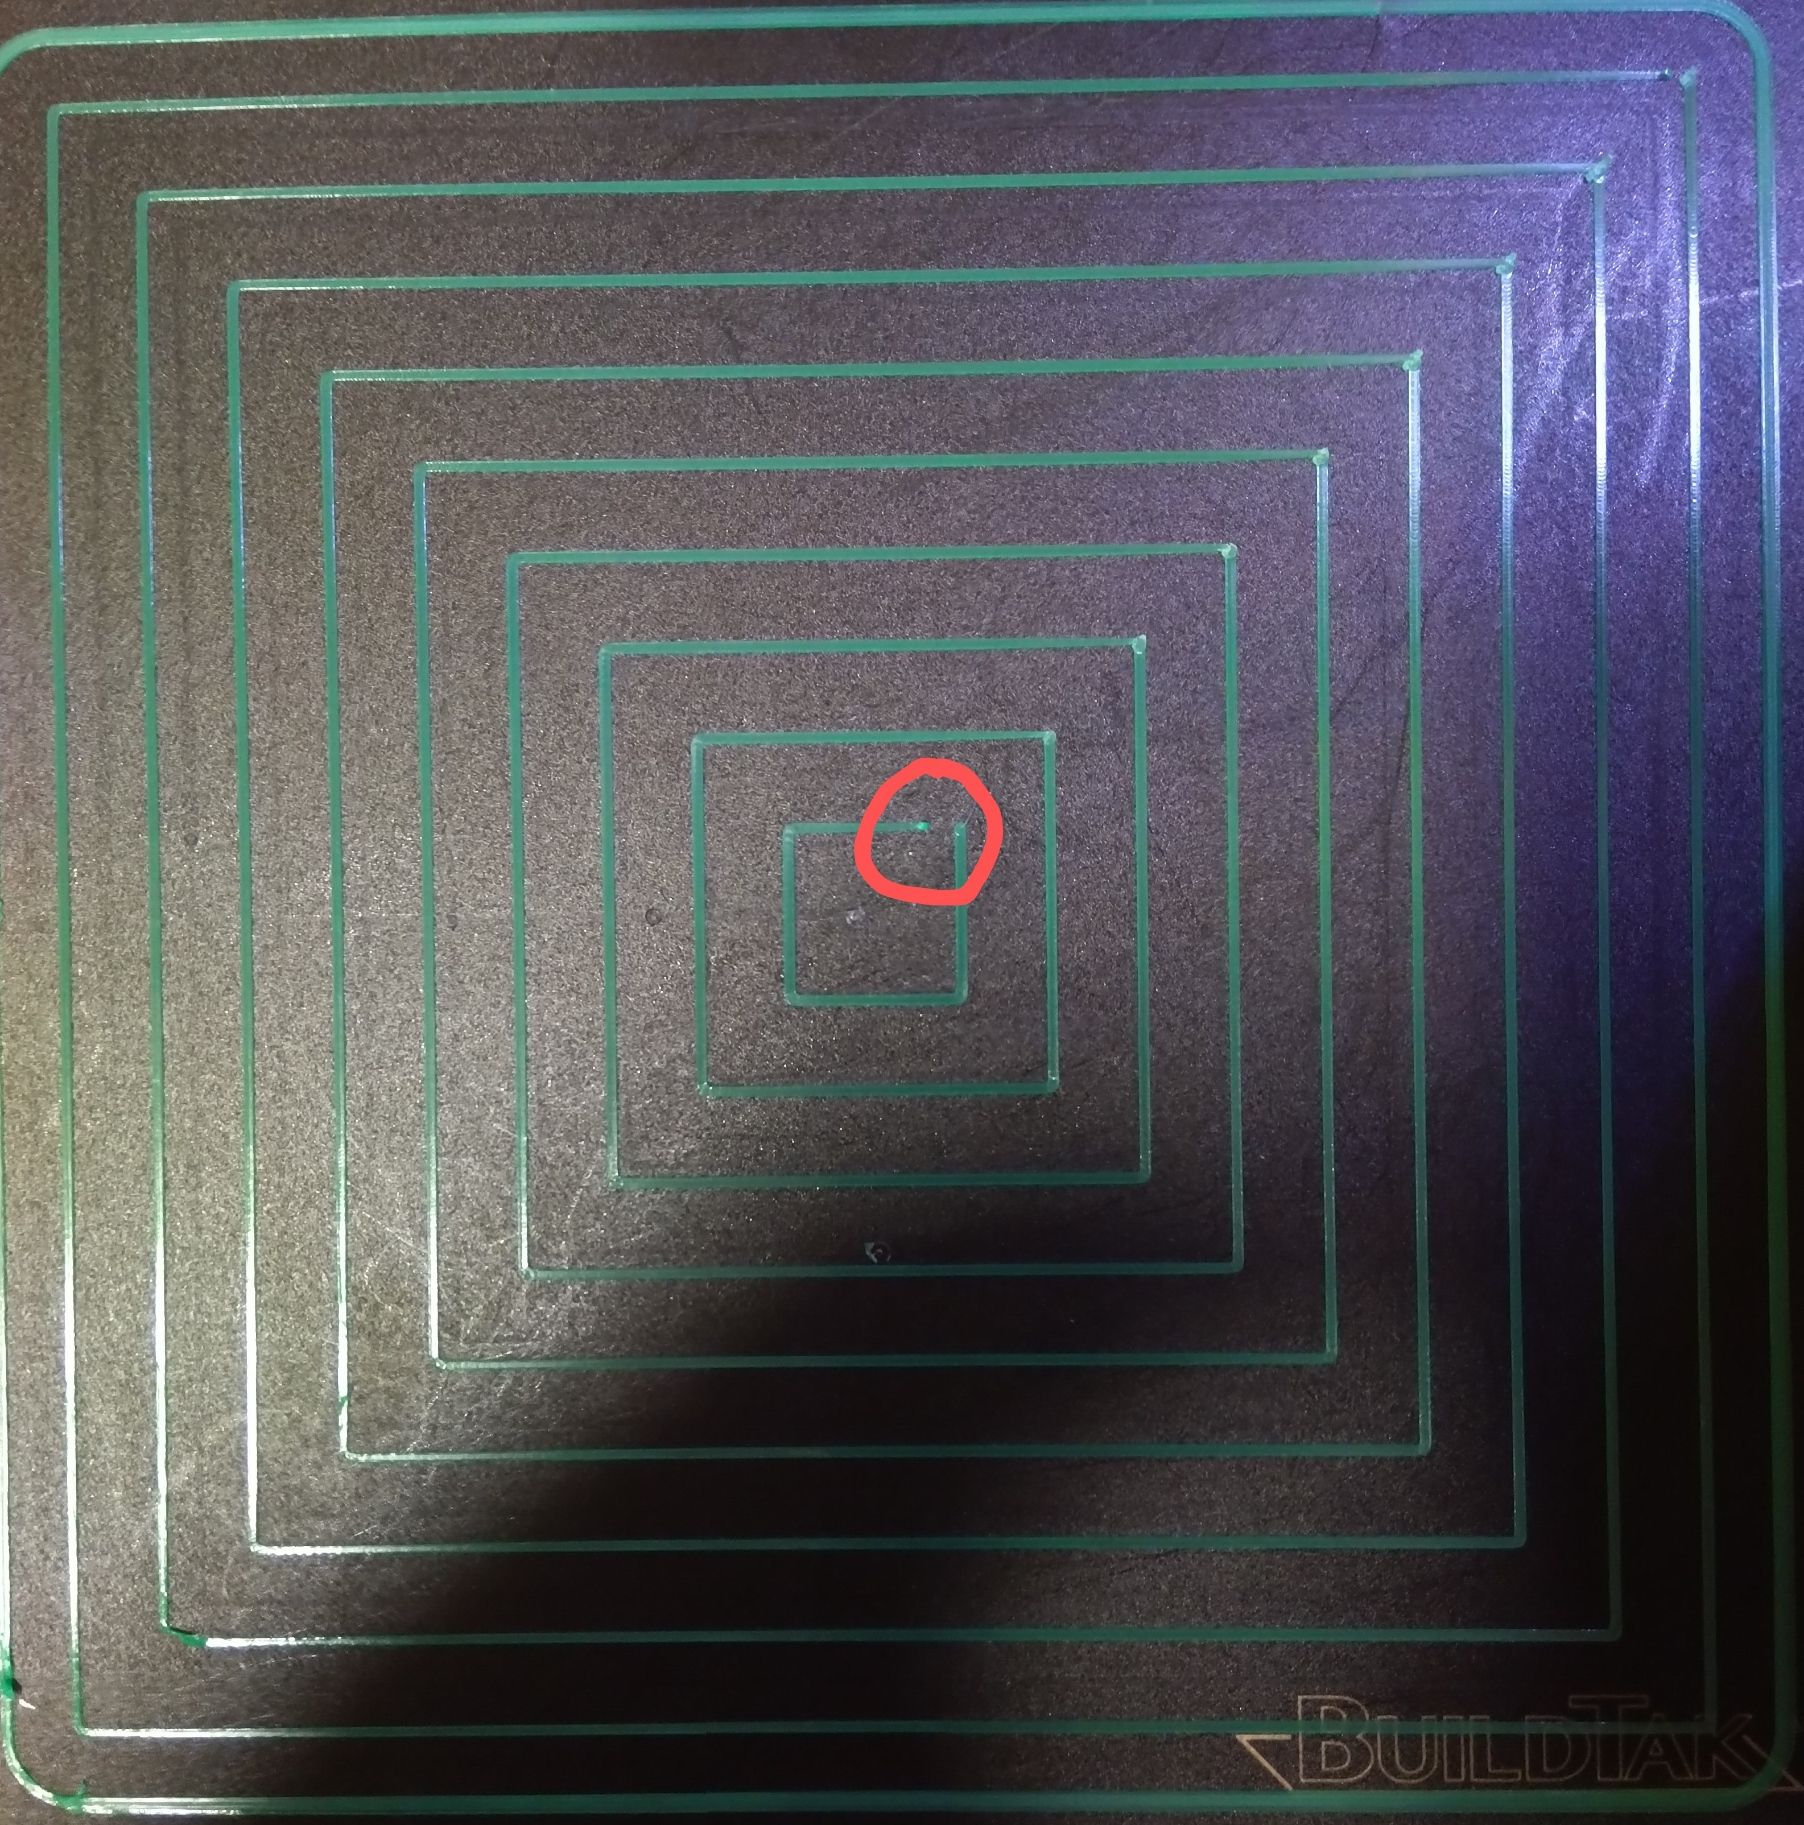
0.005all the way to the extreme0.7(increasing by0.005) but the gaps remain in the the same location and at roughly the same spacing.What I find interesting is the gap of the first square being printed is smaller than the next one (it printers from outside to inside). As the squares get smaller the gap gets bigger. What could be causing that?
-
@skezo My guess is your slicer's retraction settings. Looking at the g-code, I see the following which I believe is making the gap you see, or related.
Inner squares:
G10 ; retract
G1 F6240.000
G1 X87.337 Y2.538 E-0.95000Outter squares:
G10 ; retract
G1 F6240.000
G1 X-79.483 Y-79.599 E-0.04914I'm not a prusaslicer expert, but I'd check your retraction/wipe settings and do some experimenting/exploring. Maybe it's firmware enabled retraction? Try deselecting that box under Printer Settings -> General -> Use firmware retraction.
-
Thanks I have tried doing that. I currently have
use firmware retractionschecked in prusaslicer as I thought this would then hand off all retractions to the firmware. That way I can test retractions while it prints, correct? Using firmware or slicer retractions seems to have the same effect.Regardless I am going to re-slice with everything turned down and try again.
Thanks for all the help and suggestions. I really appreciate it.
-
@skezo Good luck with your troubleshooting. Post results/findings so others can aid.
-
Thanks. I removed wipe and the extrusion is now
E0.00854. The issue is slightly better but the smaller inner squares still have a gap. The pattern of the gap getting bigger as the squares get smaller is still present.Using slicer for retractions:
G1 E-1.00000 F2400.00000 G1 X-79.579 Y-79.579 F7800.000 G1 E1.00000 F2400.00000 G1 F1800.000 G1 X-79.483 Y-79.599 E0.00854 Using Firmware for retractions:
G10 ; retract G1 X-79.579 Y-79.579 F7800.000 G11 ; unretract G1 F1800.000 G1 X-79.483 Y-79.599 E0.00854 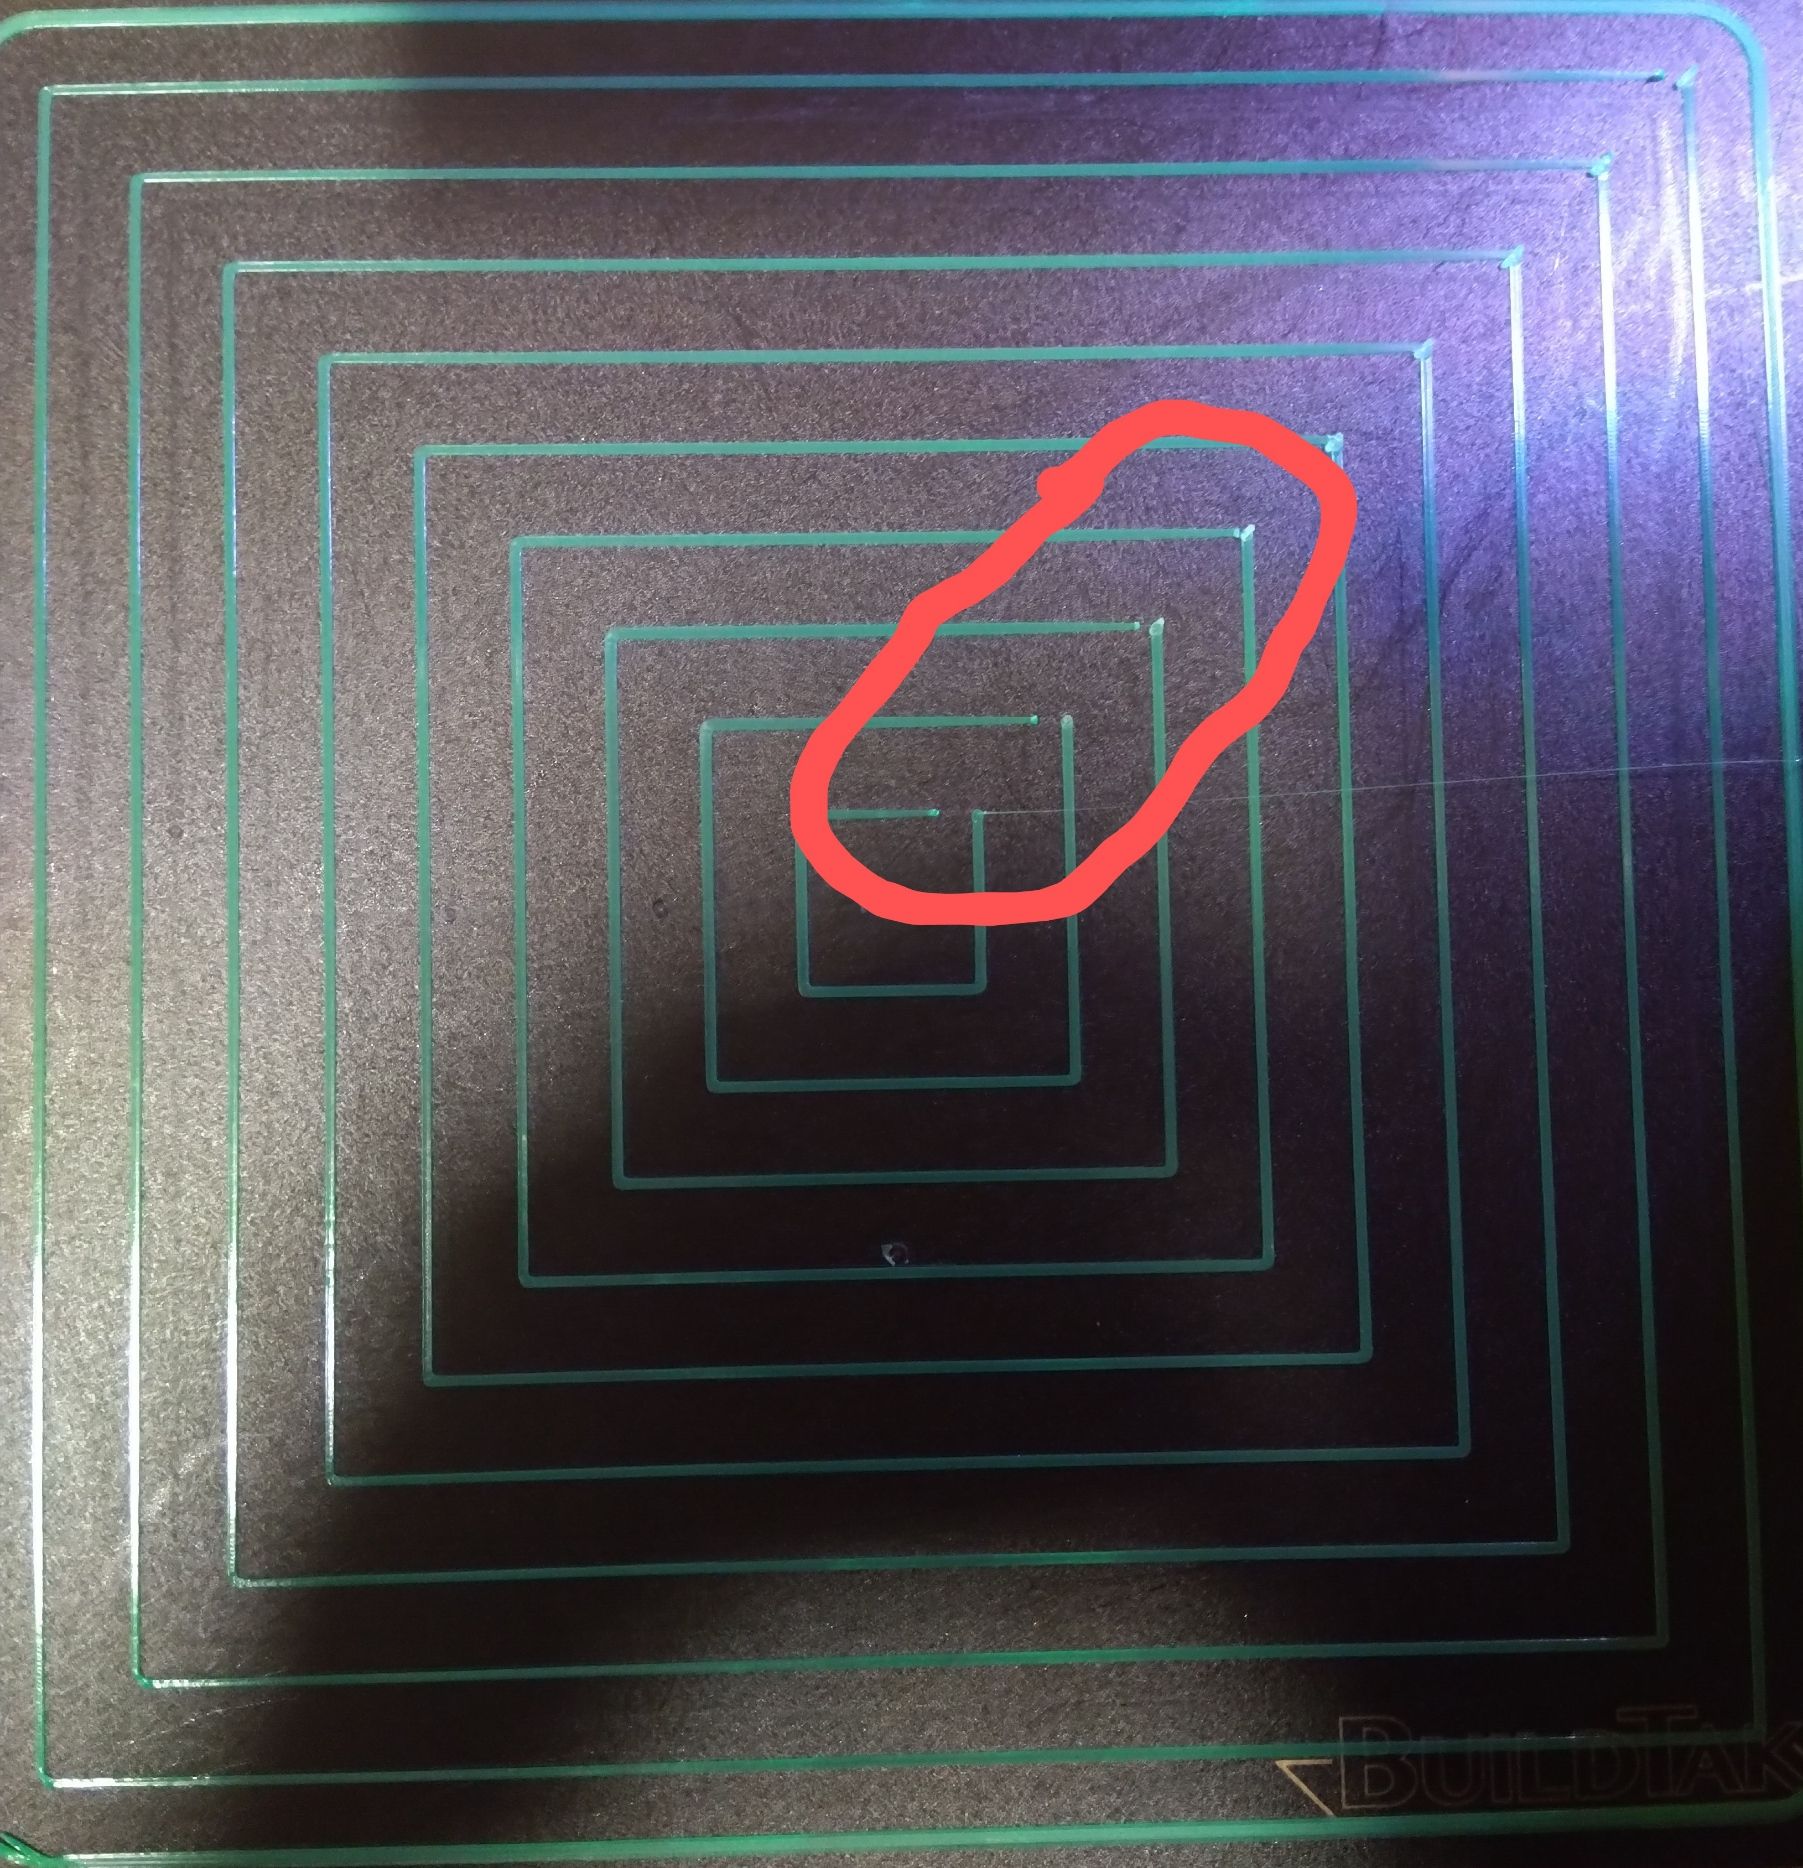
I also tried increasing the detraction speed to 60 mm/sec. This improved things but the issue was still present on the smallest square. It feels tempting to just keep upping the speed but I do not think this fix would scale well (please correct me if wrong). It would most likely be amplified when there are lots of retractions on a real print. (I pushed the detraction up to 80 mm /sec but this produced similar results to 60mm/sec)
Updated gcode with increased detraction speed: Leveling_test_v1.gcode
-
-
If using slicer-generated retraction, look for an "extra length on restart" or similar parameter in the retraction settings.
If using firmware retraction, you can use the M207 R parameter to re-prime a little more filament than was retracted.
-
@dc42 Thanks.
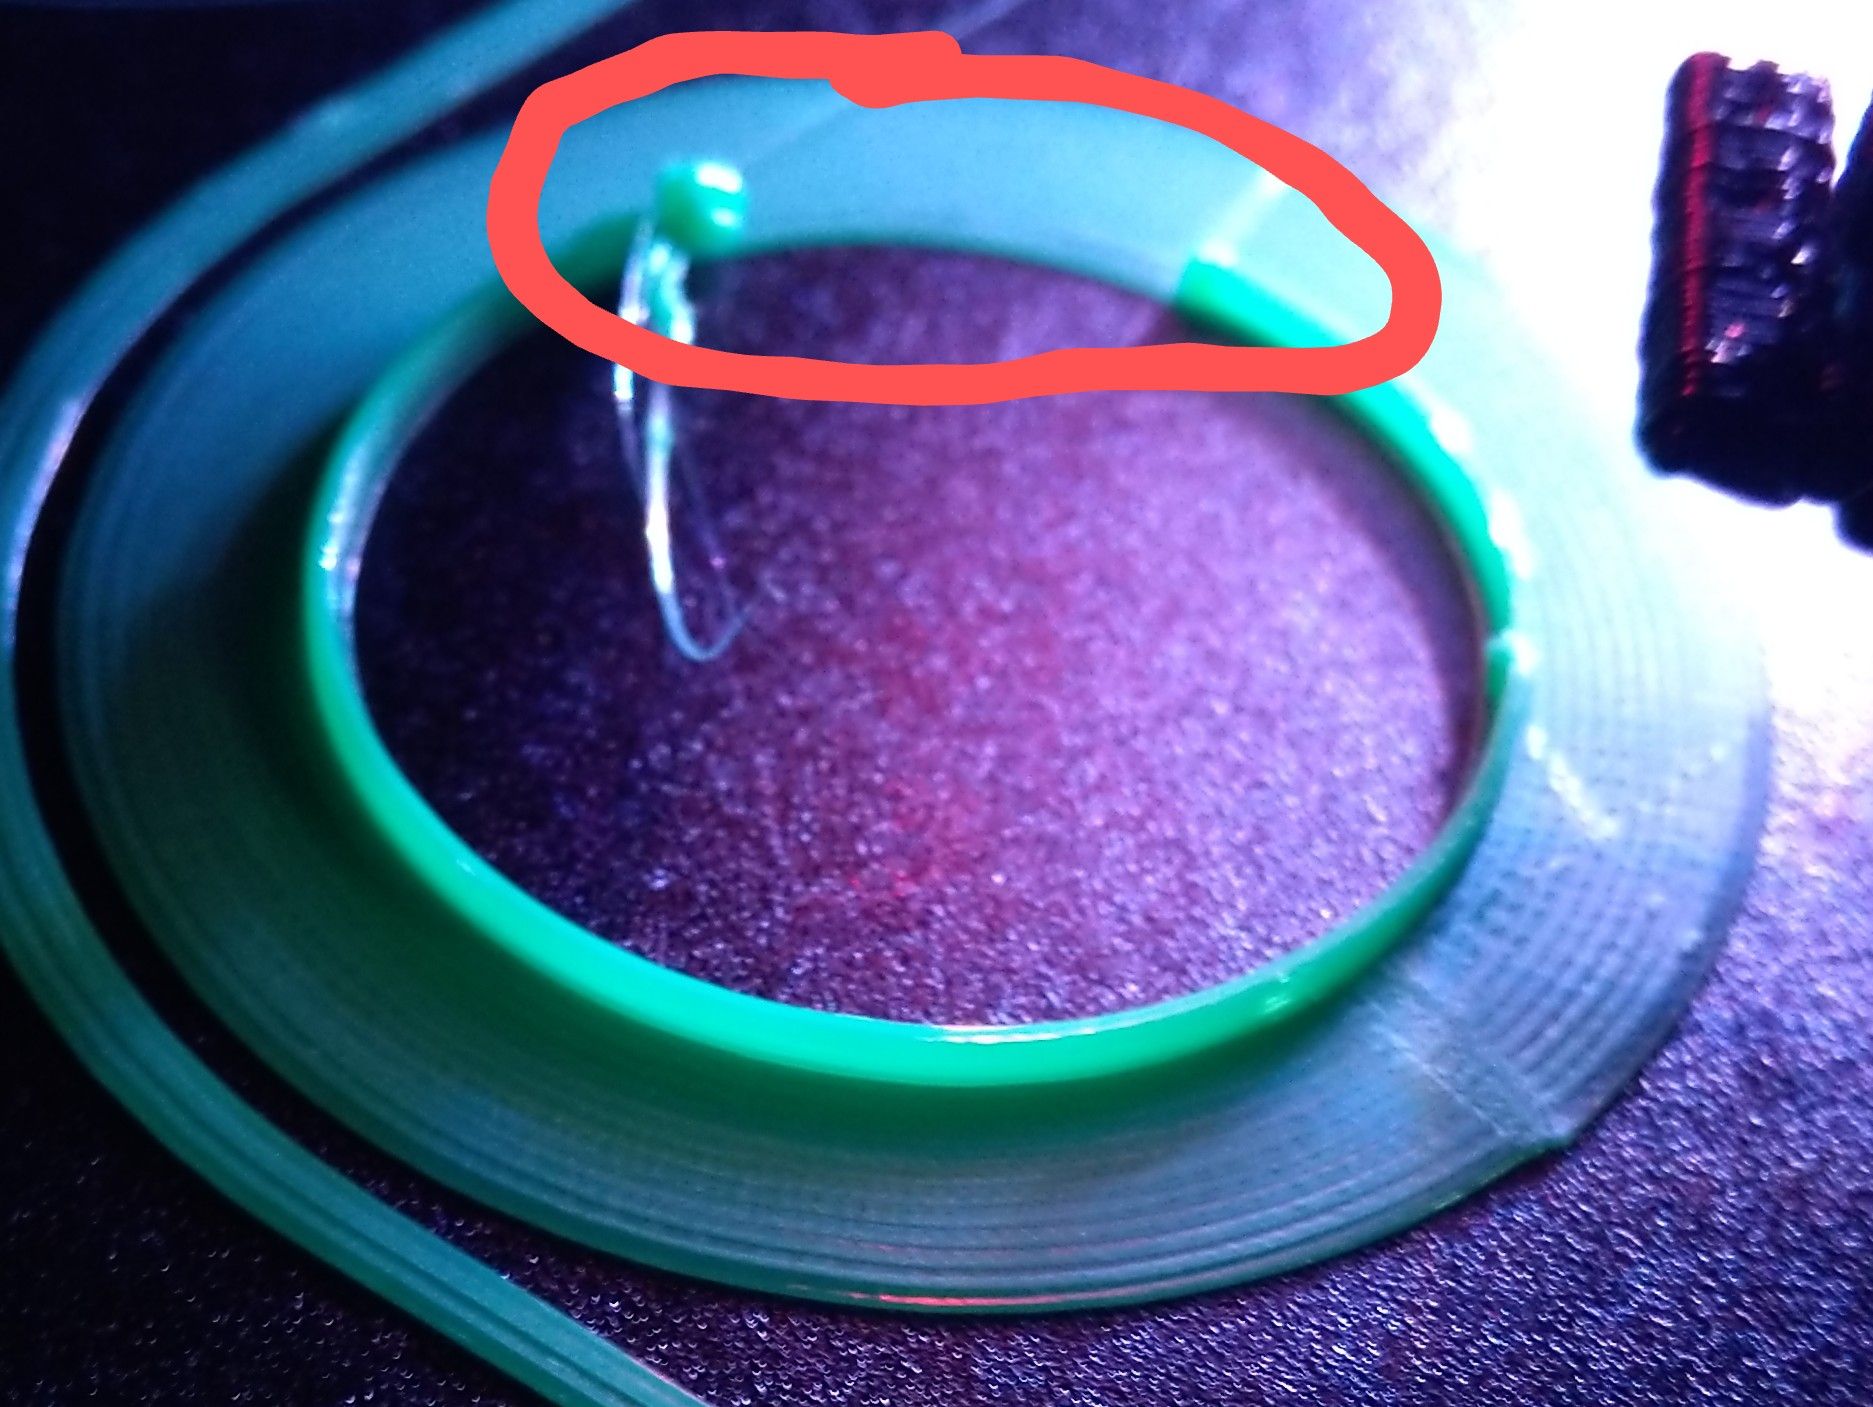
To get all squares connected it requiredM207 R0.68(see below image).
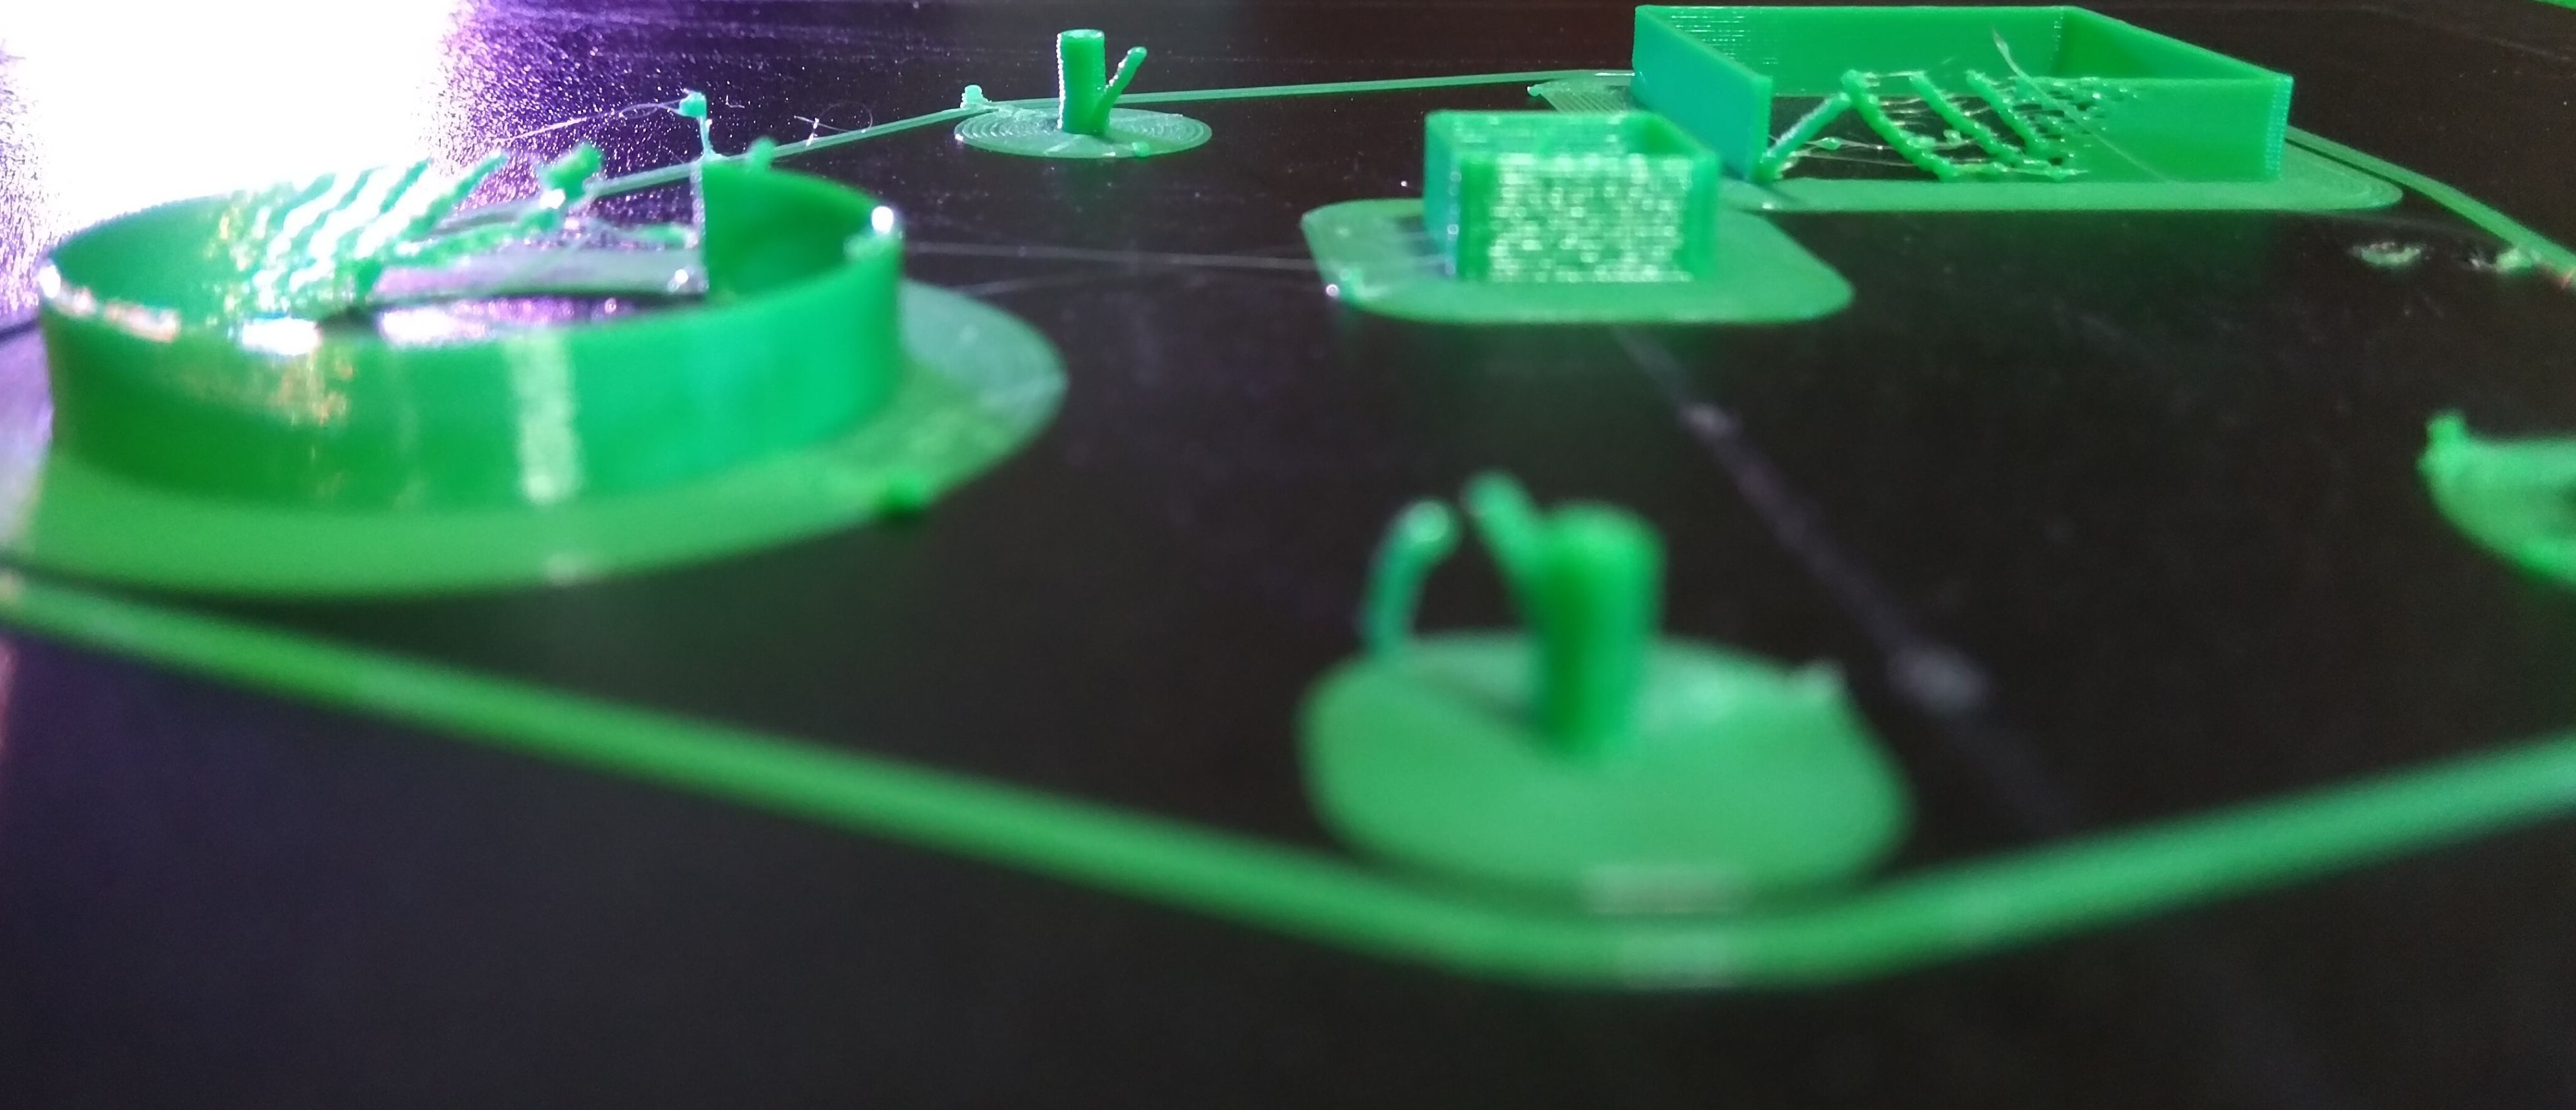
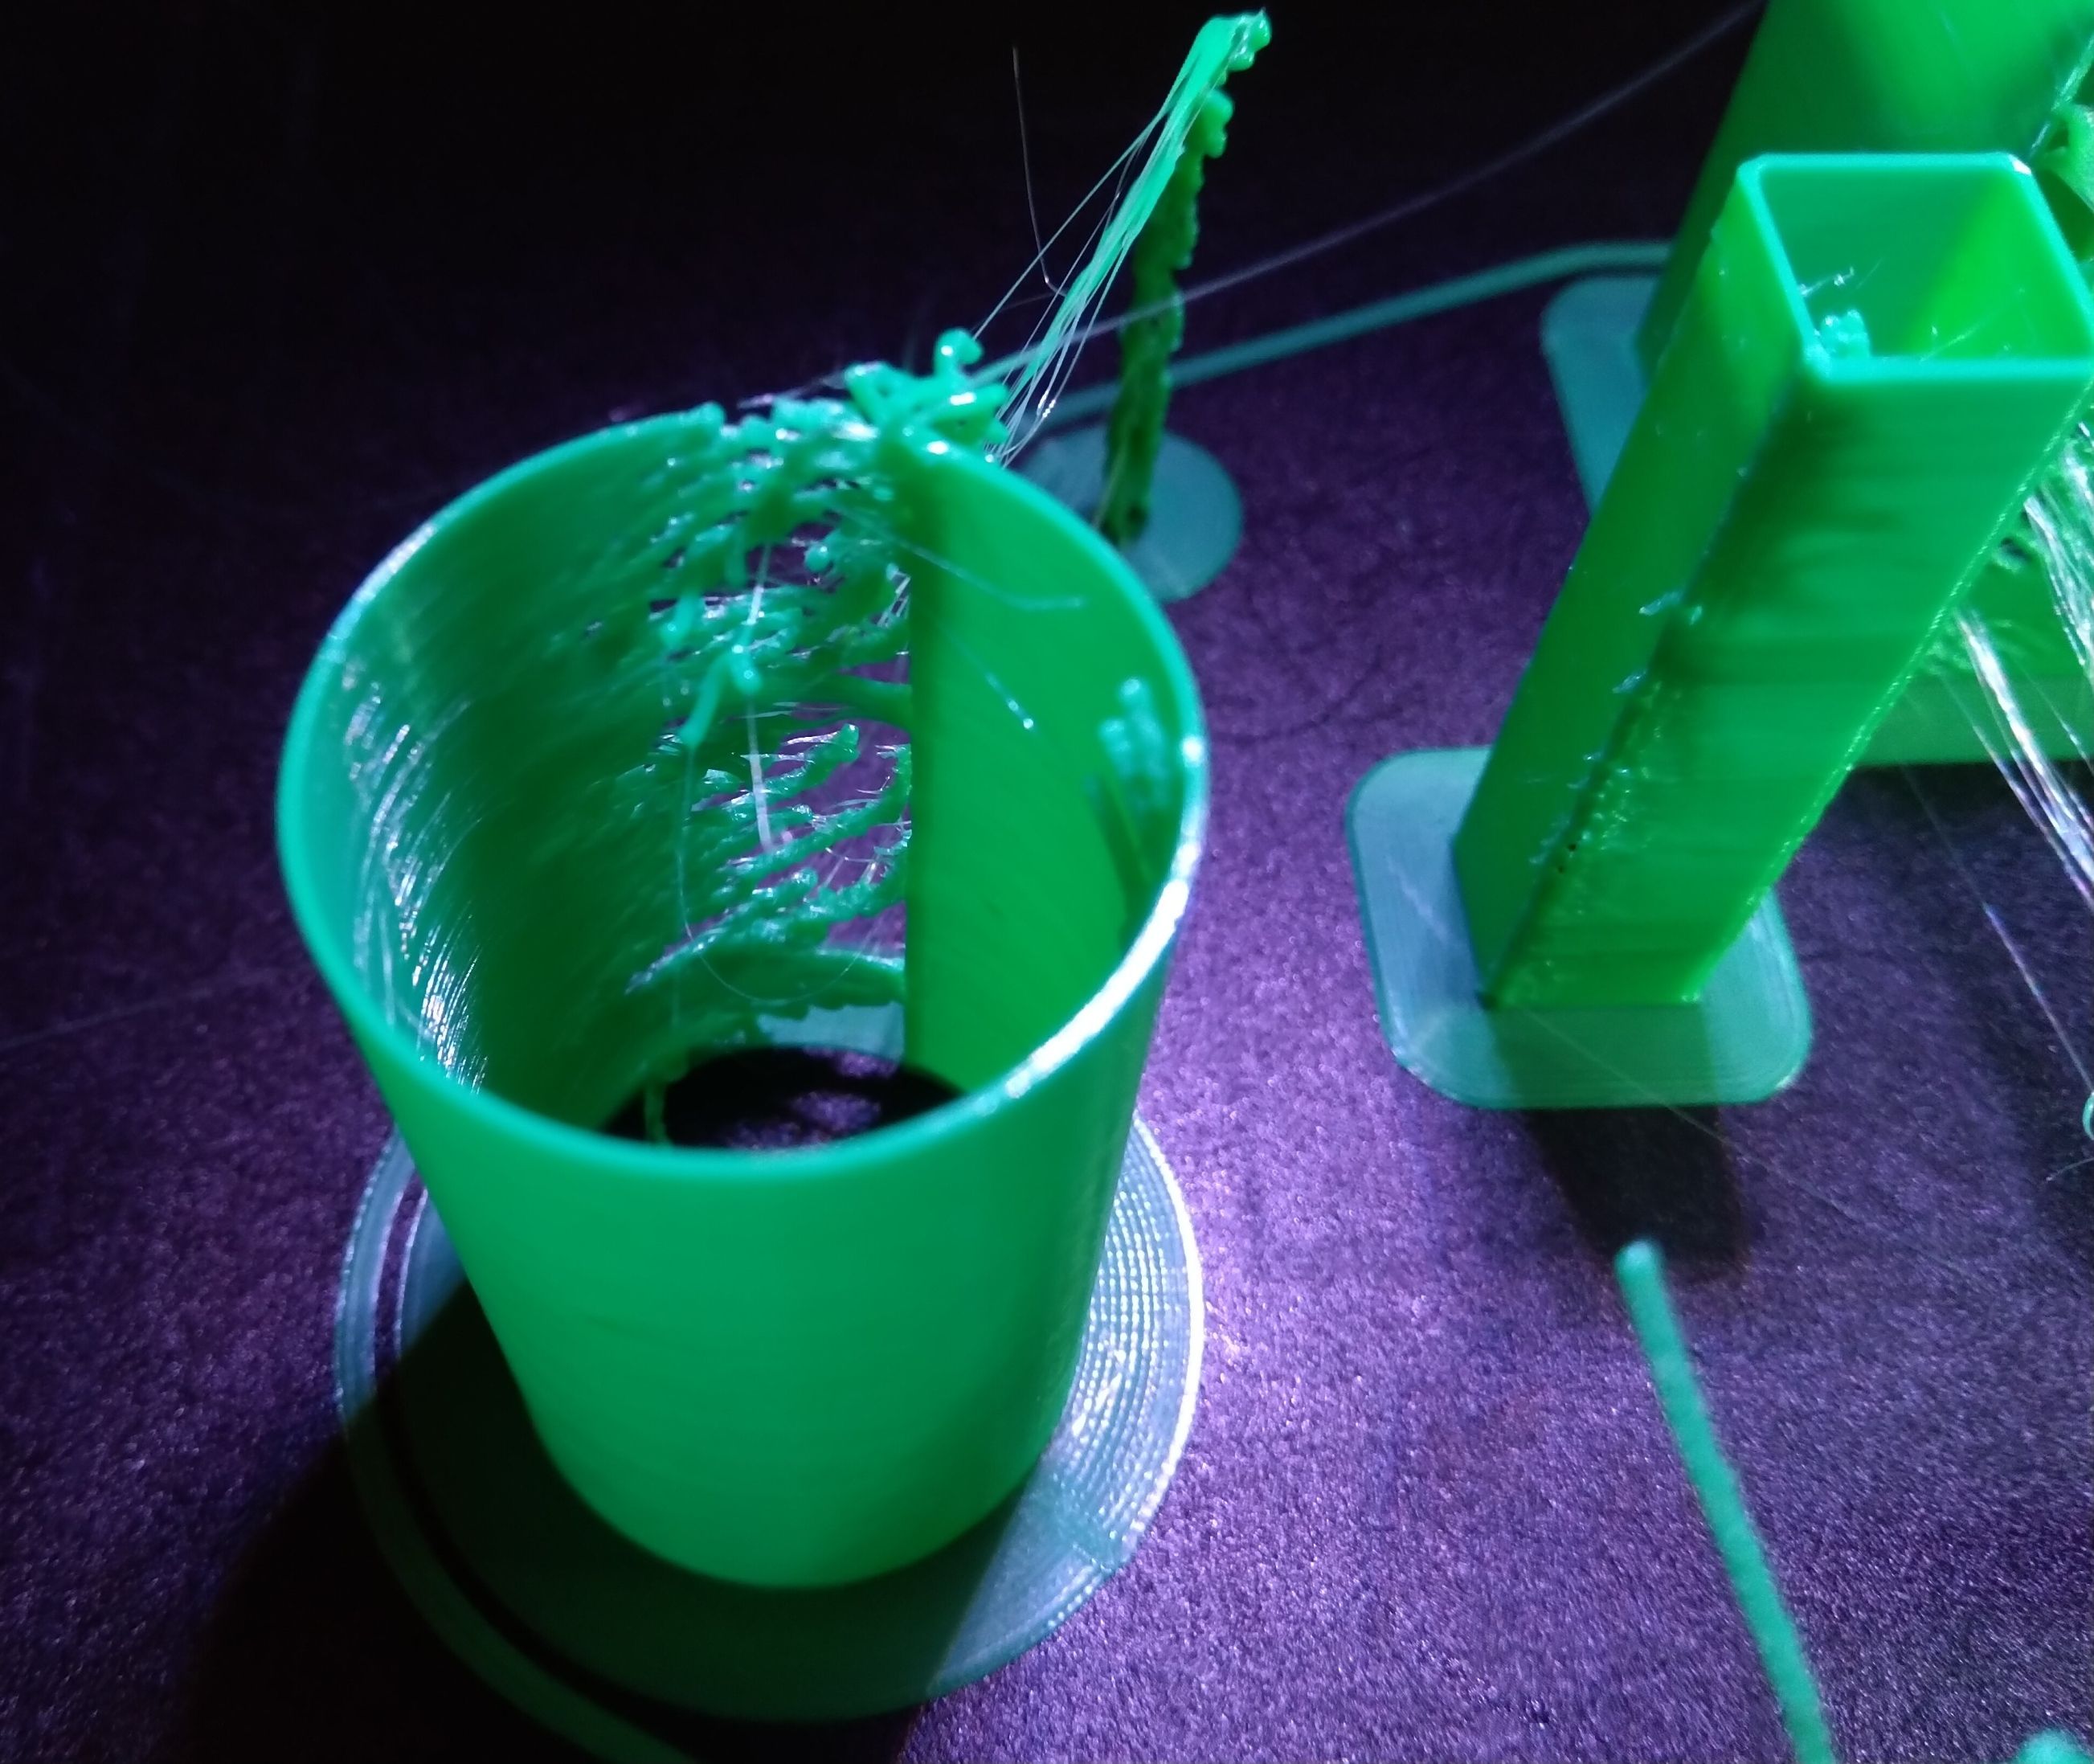
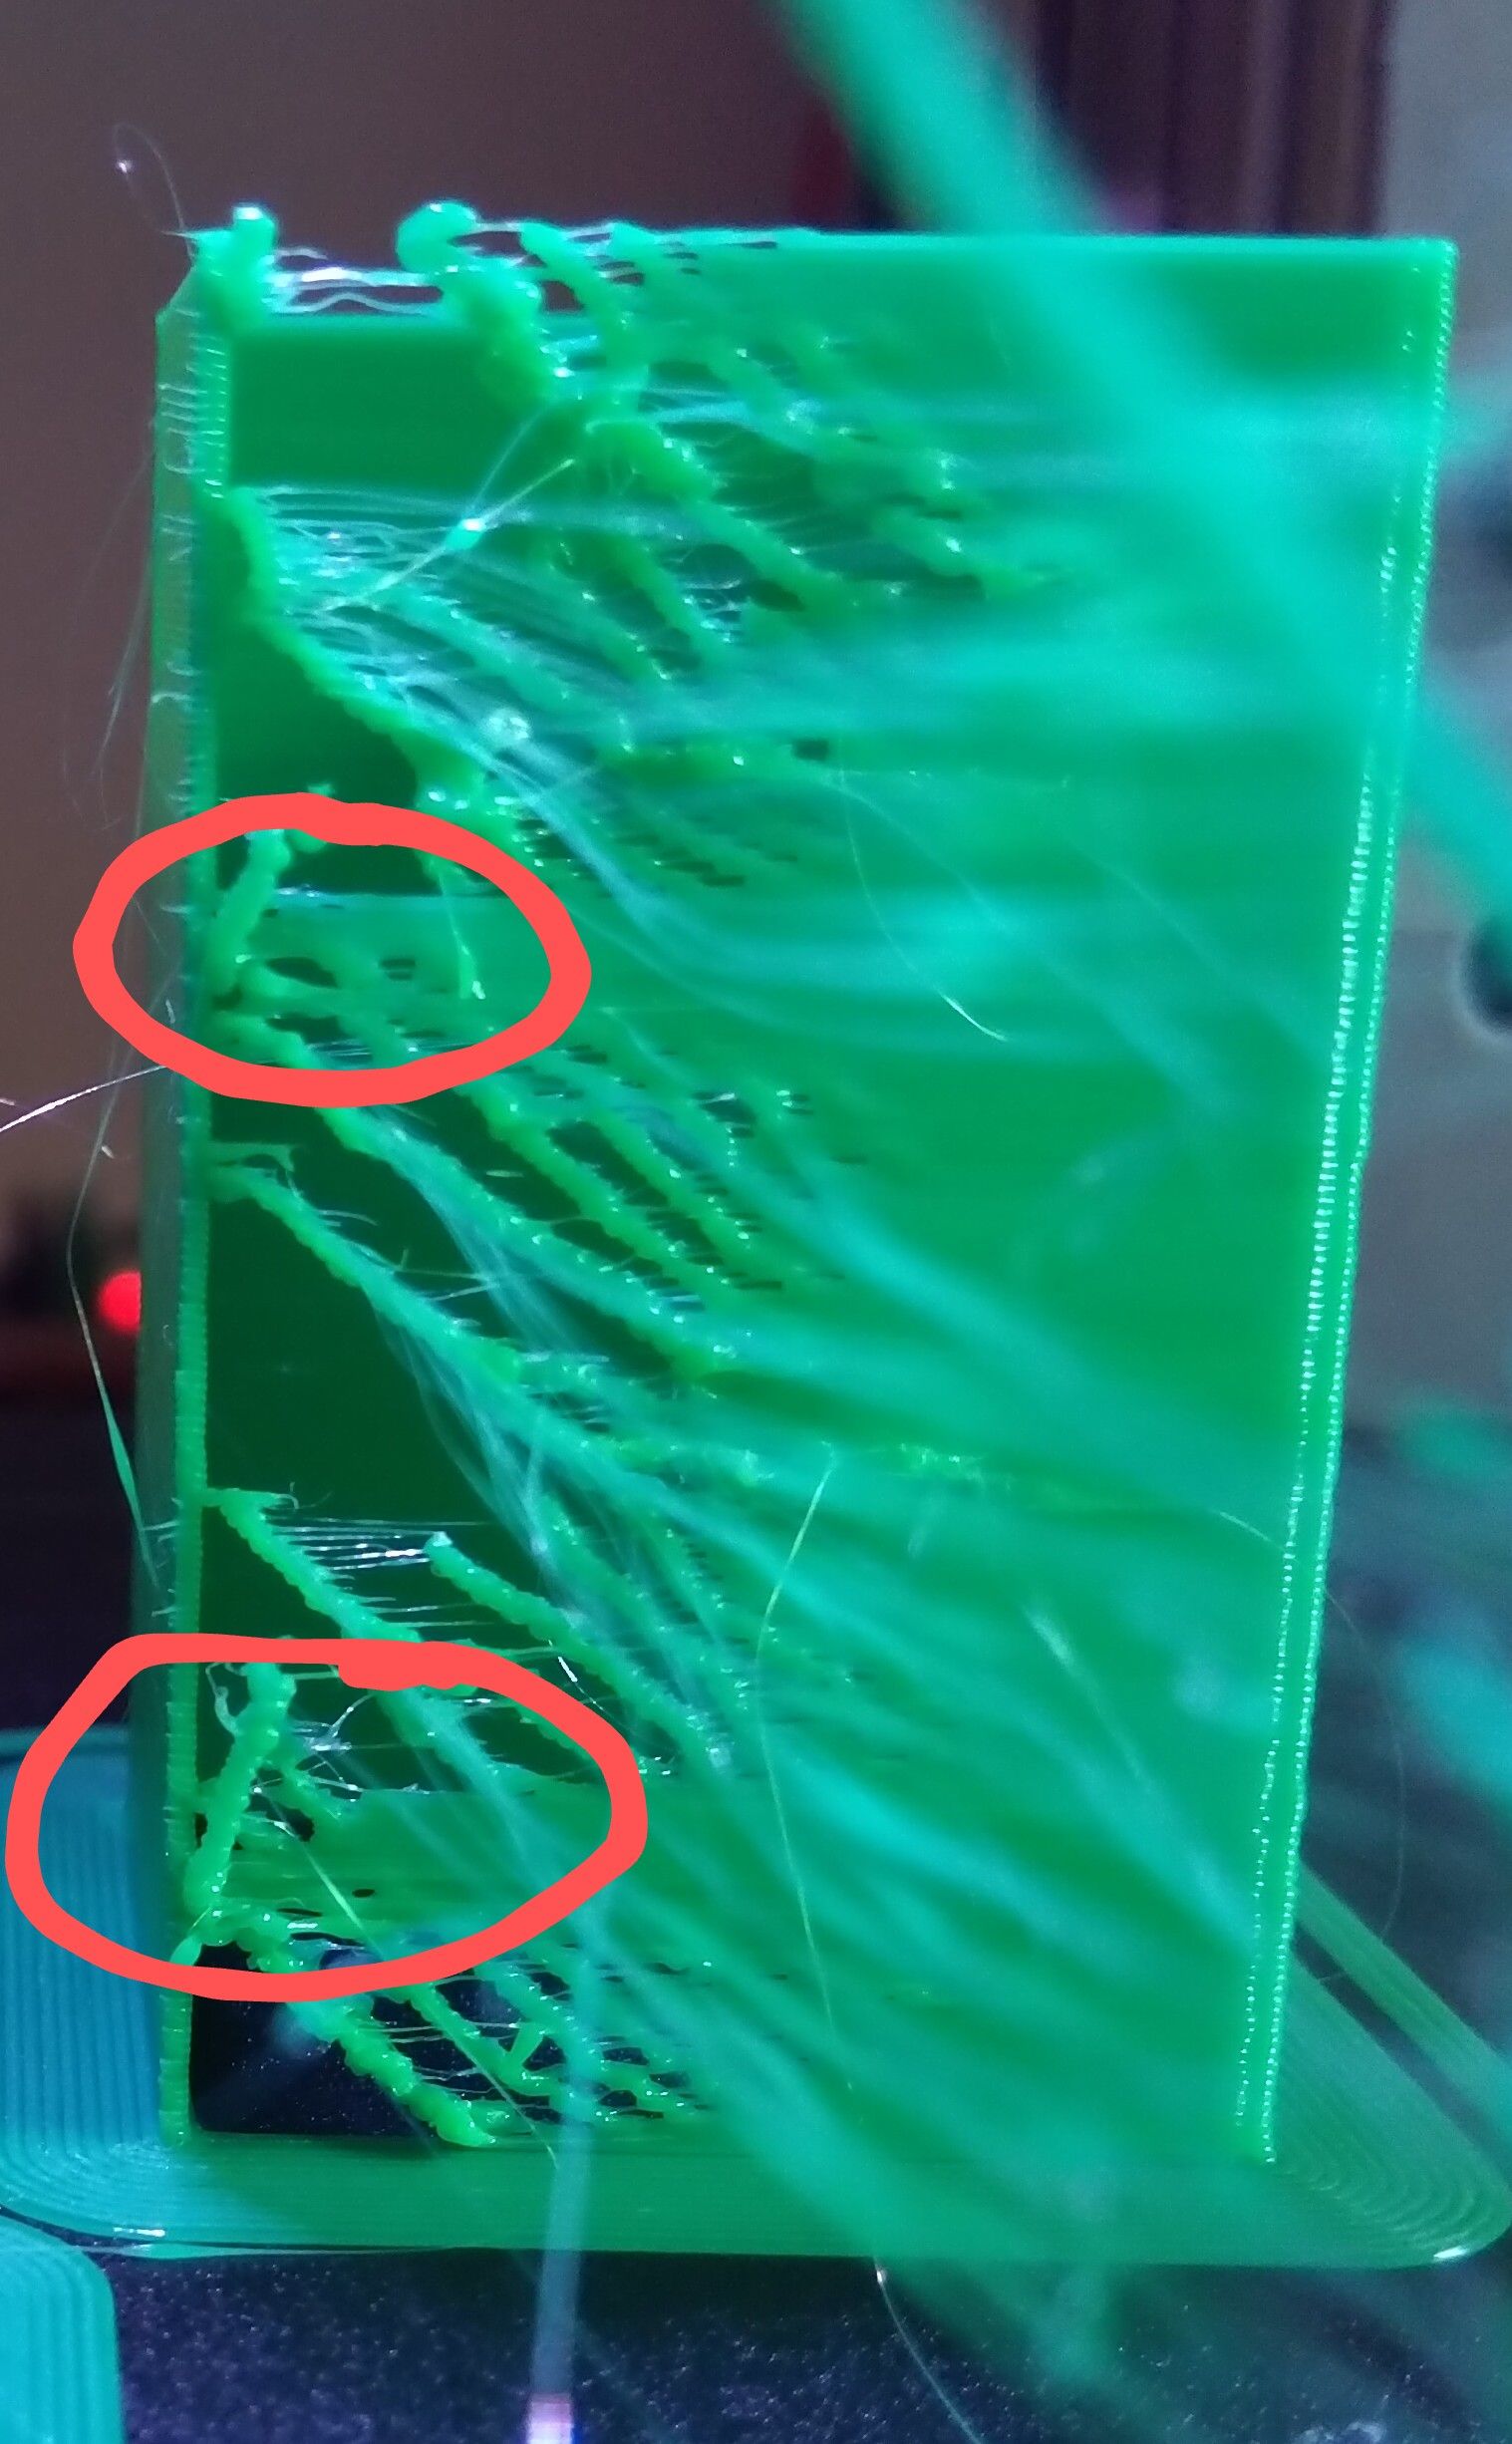
I then tried running a few more test on a more realistic print scenario and found that all the geometries beside the square in the center were missing the start parts of the print. I tried increasing and decreasing the e-acceleration, e-jerk and PA. I also did the same with retraction. Increasing and decreasing speeds, distance, un-retraction etc. All test prints generated similar results as the picture below.

-
What size nozzle are you using? I've seen that behavior with nozzles 0.6 mm and larger.
-
@mrehorstdmd
0.4mm nozzle -
I tried slowing everything down and the results were near identical to the above picture. You can see as the extruder retracts and moves to the next geometry and then de-retracts it just pushes out small blobs with spaces between them. It then seems to sort it self out after a little bit. I am not sure how else I can debug this.
M566 X56.25 Y56.25 Z56.25 E7.50 M203 X7800.00 Y7800.00 Z7800.00 E7800.00 M201 X93.75 Y93.75 Z93.75 E62.5 M207 S1.0 R0.2 F1800 T1800 Z0.0 -
M207 S1.10 R-0.000 F2400 T2400 Z0.0
Are you still using 1.1mm of retraction?
Maybe post your currently used settings for us to see.
Tuning something like retract based on the first layer is maybe not the best way to go.
I'd start with some neutral values and go from there.
M203 E6000 ; e speed
M201 E3000 ; e accel
M566 E3000 ; e jerk
M207 S1 R-0.000 F3000 T3000 Z0.0 ; retraction
M572 D0 S0.05 ; pressure advanceThat might give you a good enough starting point.
Fire up a tall print with some regular features and starting live tuning the values to see how it behaves. Watch it for a few layers before changing it again.A set of macros like these will help a lot, especially if you have a paneldue.
Alternatively, start with pressure advance off and do a retraction tuning test print to get an idea of how the changes to the different values in M207 have an effect. Then when you're happy with the results, tune pressure advance.
Also, if you're using a bowden tube make sure your couplings are secure and the tube isn't slipping or getting bent too much causing a restriction.
Make sure you have your slicer configured to retract on travel, and layer changes. And make your travel speed as quick as you can.
-
Thanks @Phaedrux
I have been using the macros you created to try tune the retraction (Thanks for creating them, they have helped a lot).
My setup is using a direct drive and slicer is configured to retract on travel and layer changes. Travel speed is 130mm/sec. I turned off PA and focused on retraction tuning. So far the results are pretty poor. The only time I can get enough filament down at the start of new layer is when I re-prime at set it something greater than
0.68.I am going to run some more test this evening.

-
@skezo I'm really taking a stab at this, but maybe try adding P1 flag to your M566 command.
The default jerk policy is 0, jerk is only applied between two printing moves, or between two travel moves, and only if they both involve XY movement or neither does. Changing the jerk policy to 1 allows jerk to be applied between any pair of moves.For example, mine is:
M566 X480.00 Y480.00 Z24.00 E1500.00 P1 ; Set maximum instantaneous speed changes (mm/min) -
There are all single wall objects, have you tried to print with multiple walls? Single wall is very difficult and unusual to do unless it's vase mode which is continuous extrusion. Using 2 walls means the seam has something to bond to.
Try using 2 walls and 10% infill on those objects and I think you'll find it's a bit better.
What is your extruder? It's possible something is mechanically off with it.
Can you make a video of it in action and share it?
-
I was able to get the first layer test to print full squares by reducing retraction speed (15mm/sec), retraction distance (0.5mm), layer-height (0.2mm), extrusion width (0.48mm) and increasing travel moves (260mm/sec) and pressure advance (0.7). This also helped with printing the single parameter geometries.
I think I still have a while to go to dialing this in but I will take it as progress. Thanks for all the help.