Switching from Duet Maestro to Duet WIFI
-
@Phaedrux said in Switching from Duet Maestro to Duet WIFI:
I wouldn't do that unless you don't care if you have to replace them. Just use a buck converter, fans aren't just resistors and there's a pretty good change the fans will be exposed to the full 24v at some point. Buck converter is cheap and easy to get. Amazon has 10 packs for $10.
Basically I'm not getting the nozzle fans to run and I want to make sure I hooked them up correctly from the Maestro to Wifi migration. I checked the fans and they work as well as the wiring. They worked when they were on the Maestro so I know the connection was solid. Temporarily I'm going to run the two 12v fans in series until the 24v fans get here, but in any event they should be running. The Wifi board has a fuse and the always on print head / extruder fan is working fine so I know the board should be working fine as well. I tried to heat the nozzle to make sure the fans would kick in and still nothing… I switch the fans to the F500 setting too… It’s almost like they are shut off?
[1:34 AM]
; --- SECTION: FANS ( ) ---M106 P0 S1 I0 F500 H-1 L0.3 ; Filter fan. Set fan 0 value, PWM signal inversion and frequency. Thermostatic control is turned off, Minimum fan value 0.3, Speed 100%
M106 P1 S0 I0 F500 H-1 L0.3 ; Set fan 1 value, PWM signal inversion and frequency. Thermostatic control is turned off, Minimum fan value 0.3, Speed 100%
M106 P2 S0 I0 F500 H-1 L0.3 ; Nozzle fan. Set fan 1 value, PWM signal inversion and frequency. Thermostatic control is turned off, Minimum fan value 0.3, Speed 100% -
@Stephenbright said in Switching from Duet Maestro to Duet WIFI:
M106 P1 S0 I0 F500 H-1 L0.3 ; Set fan 1 value, PWM signal inversion and frequency. Thermostatic control is turned off, Minimum fan value 0.3, Speed 100%
M106 P2 S0 I0 F500 H-1 L0.3 ; Nozzle fan. Set fan 1 value, PWM signal inversion and frequency. Thermostatic control is turned off, Minimum fan value 0.3, Speed 100%The comment says they are set to 100% speed, but the S0 parameter means they are turned off.
Duet WiFi hardware designer and firmware engineer
Please do not ask me for Duet support via PM or email, use the forum
http://www.escher3d.com, https://miscsolutions.wordpress.com -
@dc42 said in Switching from Duet Maestro to Duet WIFI:
@Stephenbright said in Switching from Duet Maestro to Duet WIFI:
M106 P1 S0 I0 F500 H-1 L0.3 ; Set fan 1 value, PWM signal inversion and frequency. Thermostatic control is turned off, Minimum fan value 0.3, Speed 100%
M106 P2 S0 I0 F500 H-1 L0.3 ; Nozzle fan. Set fan 1 value, PWM signal inversion and frequency. Thermostatic control is turned off, Minimum fan value 0.3, Speed 100%The comment says they are set to 100% speed, but the S0 parameter means they are turned off.
The confirm S1 will turn them on correct?
Thank you !
-
https://duet3d.dozuki.com/Wiki/Gcode#Section_M106_Fan_On
Yes, M106 S is for the speed. 0 is off, 1 is full on. decimal values between act like a percentage. 0.5 is 50%
-
@Phaedrux said in Switching from Duet Maestro to Duet WIFI:
https://duet3d.dozuki.com/Wiki/Gcode#Section_M106_Fan_On
Yes, M106 S is for the speed. 0 is off, 1 is full on. decimal values between act like a percentage. 0.5 is 50%
So the fans are still not on. I plugged them into a separate 12v and also into the 24v print head / extruder fan port and the fans and my temp wiring are working fine. I've switched them on via S1 in the config file as well. Am I missing something else? Is it possible that the connector needs flipped like most of the other had? Odd that the print head / extruder fan works fine and not the nozzle fan... Can I switch that to a different port? Thanks !
-
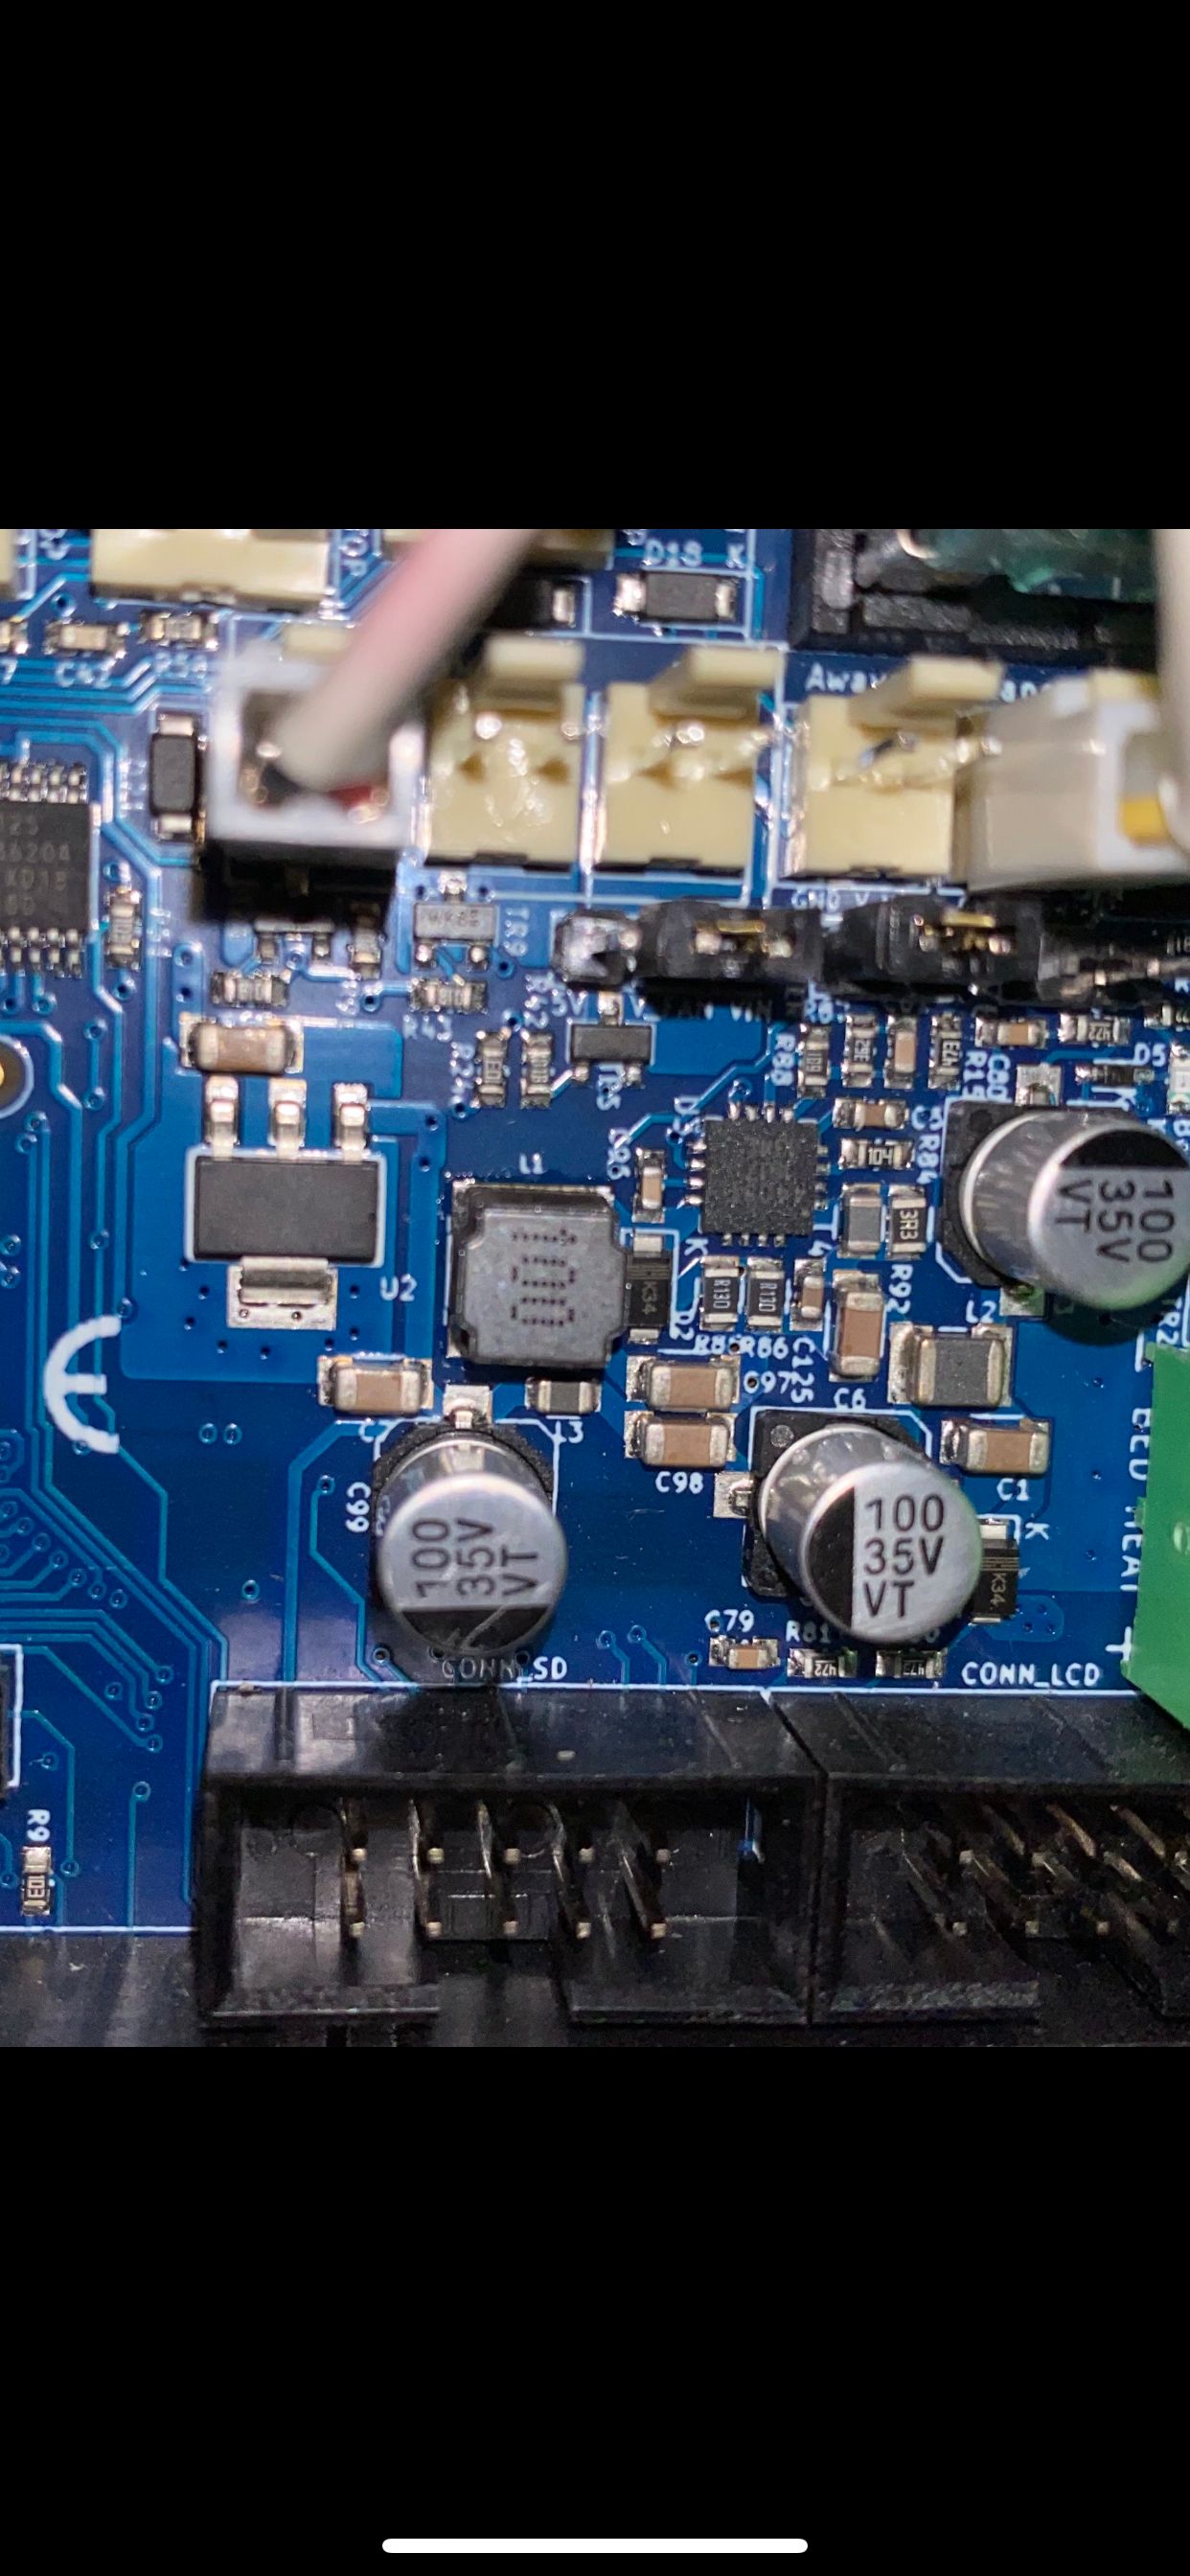
It's possible that the mosfet for that fan port has blown. Can you get a good close up photo of the area around the fan ports?
You can see an image of what a damaged mosfet looks like, though they don't always look like this.
https://duet3d.dozuki.com/Wiki/Connector_and_spare_part_numbers#Section_Fan_mosfet
-
@Phaedrux said in Switching from Duet Maestro to Duet WIFI:
It's possible that the mosfet for that fan port has blown. Can you get a good close up photo of the area around the fan ports?
You can see an image of what a damaged mosfet looks like, though they don't always look like this.
https://duet3d.dozuki.com/Wiki/Connector_and_spare_part_numbers#Section_Fan_mosfet
Its a brand new board so I hope that's not the case...

-
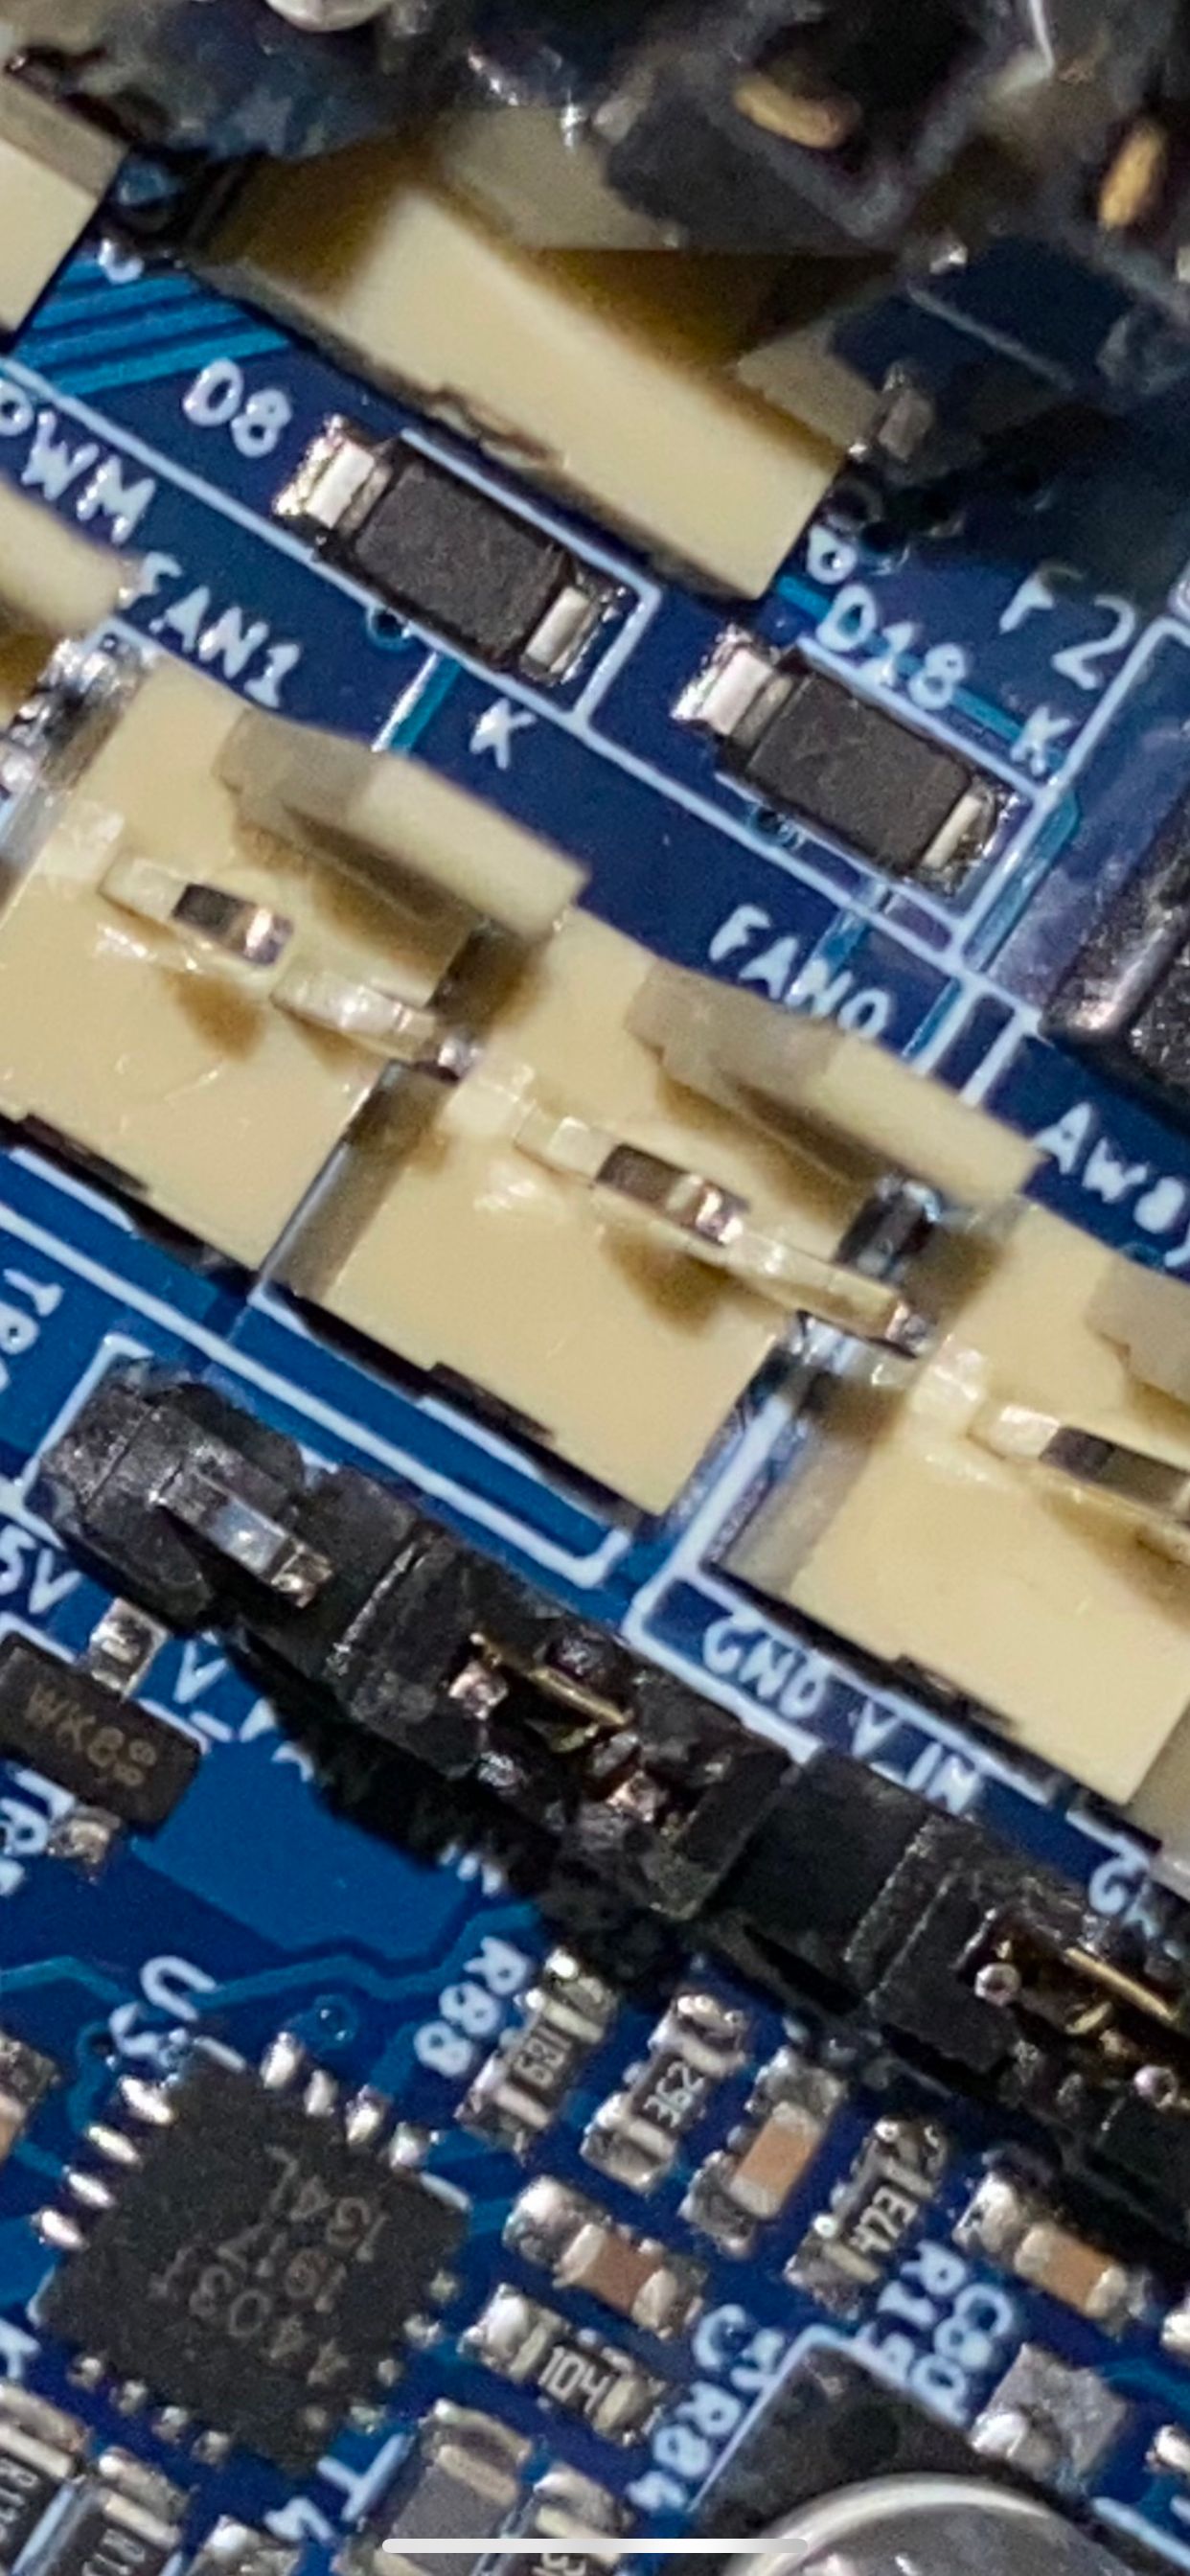
The plug is hiding one of them in shadow, so I can't see it. The others I think look ok, but it's a bit blurry. It can work best to get a good focus from a bit farther away and then zooming in a bit.
-
@Phaedrux said in Switching from Duet Maestro to Duet WIFI:
The plug is hiding one of them in shadow, so I can't see it. The others I think look ok, but it's a bit blurry. It can work best to get a good focus from a bit farther away and then zooming in a bit.
Where I have it placed I can can't move it that easily and I just got the bed leveled which is a nightmare in and of itself... But that last one looks okay too... It's a fused board so I thought if I had don't anything major it would have either popped the fuse or blew up that fans. Aforementioned the fans are confirmed to be working. I'm going to double check the wiring harness...
-
@Stephenbright said in Switching from Duet Maestro to Duet WIFI:
I thought if I had don't anything major it would have either popped the fuse or blew up that fans.
The fuse is a lot slower to pop than the mosfets.
Aforementioned the fans are confirmed to be working.
That's good. Now for the port.
If you switch one of the other 24v fans to the port and send M106 P1 S1 H-1 command to turn the fan on, where P is the fan number.
Can you post your config.g?
I'm also not sure how wiring the 2 fans in series will affect the PWM control. How exactly do you have the fans wired?
-
@Phaedrux From what I understand and what I've tested wiring the 2 - 12v fans in series to draw 24 v worked and does work for now. I plugged it into the always on port and it worked.
Is there something you can see in my config file Maestro related that I forgot to change or that I need to remove for the Wifi board to function properly? Fan or otherwise?
; CONFIGURATION FILE for Duet Maestro
; Compound Nozzle; Executed by the firmware on start-up
; Headers within parenthesis are headings in Duet3D documentation=https://duet3d.com/wiki/Configuring_RepRapFirmware_for_a_Cartesian_printer
; Visit https://reprap.org/wiki/G-code for an explanation of G-code commands; --- SECTION: GENERAL PREFERENCES ( ) ---
M564 S1 H1 ; Enables Homing Requirement For Motor Activation and set axes limits
; --- SECTION: Z-PROBE & MESH COMPENSATION ---
M98 Pmachine_zprobe.g ; configure the z probe
M98 Pmachine_bedmesh.g ; configure the bed mesh
G29 S1 ; Load heightmap after power cycle
; --- SECTION: DRIVES (MOVEMENT SECTION) & ENDSTOPS ---
M667 S1 ; Enable coreXY mode
M569 P0 S0 D2 ; Drive 0 goes forwards, CoreXY_1
M569 P1 S1 D2 ; Drive 1 goes forwards, CoreXY_2
M569 P2 S1 D2 ; Drive 2 goes forwards, Z Motor
M569 P3 S0 D2 ; Drive 3 goes forwards, Left Extruder
M569 P4 S1 D2 ; Drive 4 goes forwards, Right Extruder
M98 Pmachine_endstoptypes.g ; set endstop types
M98 Pmachine_steppercurrent.g ; set stepper currents
M98 Pmachine_stepperspeed.g ; set stepper speeds
M98 Pmachine_axisdimension.g ; configure the axes dimensions
M98 Pmachine_axissteps.g ; configure the axes steps per mm
M98 Pmachine_extruderstep.g ; configure the extruder steps
G21 ; Work in millimetres
G90 ; Set to absolute coordinates...
M84 S1 ; Set idle timeout; --- SECTION: HEATERS, BED & THERMISTOR ---
;H0 is bed
;H1 is left heater
;H2 is right heaterM570 H0 P25 T30 ; Allow heater to be off by as much as 30C for 25 seconds
M570 H1 P15 T30 ; Allow heater to be off by as much as 30C for 15 seconds
M570 H2 P15 T30 ; Allow heater to be off by as much as 30C for 15 seconds
M305 P0 T100000 B4138 C0 R4700 ; Set thermistor + ADC parameters for heater 0, For heated Bed thermistor
M305 P1 X501 R4700 ; Define left side extruder PT1000
; M305 P1 X201 ; Upgraded E3D Thermistor
M305 P2 X502 R4700 ; Define right side extruder PT1000
; M305 P2 X200 ; Upgraded E3D Thermistor
M307 H0 A78.9 C265.2 D9.5 S1.00 V24.0 B0 ; Forcing heated bed PID control after power-cycle. Basic bed heating auto-tune
M307 H1 A241.4 C104.5 D3.5 S1.00 V23.9 B0 ; Set PID values use M303 auto-tune calibration settings
M302 P1 ; Allow Cold extrudes
M98 Pmachine_maxtemp.g ; set bed and extruder max temperatures; --- SECTION: FANS ( ) ---
M106 P0 S1 I0 F500 H-1 L0.3 ; Filter fan. Set fan 0 value, PWM signal inversion and frequency. Thermostatic control is turned off, Minimum fan value 0.3, Speed 100%
M106 P1 S1 I0 F500 H-1 L0.3 ; Set fan 1 value, PWM signal inversion and frequency. Thermostatic control is turned off, Minimum fan value 0.3, Speed 100%
M106 P2 S1 I0 F500 H-1 L0.3 ; Nozzle fan. Set fan 1 value, PWM signal inversion and frequency. Thermostatic control is turned off, Minimum fan value 0.3, Speed 100%; --- SECTION: TOOLS ( ) ---
; Comment: Remember! H0 is the heated bed!
; Comment: D0 is the first driver after movement (X, Y and Z) drives, which is left extruder
; D1 is right extruderM98 Pmachine_ktana_tools.g ; Define ktana tools
T0 ; Automatic tool select
; --- SECTION: NETWORKS (PROLOGUE & COMMUNCATIONS SECTION) ---
M98 Pmachine_access.g ; set machine name and IP
M552 S1 ; Enable network
M586 P0 S1 ; Enable HTTP
M586 P1 S0 ; Disable FTP
M586 P2 S0 ; Disable Telnet; --- SECTION: MISCELLANEOUS ---
M572 D0:1 S0.07 ; Extruder Pressure Advance
-
@Phaedrux said in Switching from Duet Maestro to Duet WIFI:
M106 P1 S1 H-1
Do I insert that into the config file? I just sent the G code ( which gave me a java script error )
If for some reason that port was bad I can run it from fan F0 or F1 correct?
-
@Stephenbright Are you still using firmware 2.03 beta3? Please send M115 and post response. What DWC version are you using? This is shown in DWC in Settings > General in DWC v2 and v3, and in Settings > Software information in DWC v1.
It's quite possible that wiring two 12V fans together has or will cause a problem, and @Phaedrux has been clear it's not advised, and we do not recommend it. If you choose to do it, it's your responsibility.
M106 P1 S1 H-1
That looks like a perfectly valid Gcode to me, and you should be able to run it from the Gcode console in DWC, or send via a serial terminal if connected by USB. Did you type it into the browser address bar by mistake?
As @Phaedrux suggested, test all the fan connections with a 24V fan to check function. First check the fan works on the 'always on' fan connections, then plug it into fan0, fan1 and fan2. You should turn off power when you disconnect or connect a fan, as if the fan pins are turned on, it may damage the MOSFET. With the 24V fan connected to each fan output, send the following gcode to turn each on:
M106 P0 S1 H-1 ; Fan0
M106 P1 S1 H-1 ; Fan1
M106 P2 S1 H-1 ; Fan2Report back what does, or does not, work. Be aware that some two-wire fans don't work with PWM, though should all work with 100% PWM (ie S1).
I don't see any error in your config.g relating to the fans, and the code for Duet 2 Maestro is the same as for Duet 2 Wifi.
Ian
Bed-slinger - Mini5+ WiFi/1LC | RRP Fisher v1 - D2 WiFi | Polargraph - D2 WiFi | TronXY X5S - 6HC/Roto | CNC router - 6HC | Tractus3D T1250 - D2 Eth
-
Firmware: 2.05.1 (2020-02-09b1)
DWC: 1.22.1
None of the Mosfets look blown. Again it's a new board and I haven't printed anything as soon as I noticed that the nozzle fans were not on. I realize is can blow quick but with the fuses and the lower voltage fan, I would think the fuse or the fan would blow before anything else...
I had the 5v fans installed and I know those were probably blown due to the jumper not set the same as a Maestro from the factory...
No I did not type the gcode in the address bar...
I have 24v fans coming, but I wanted to make sure they were working so I am trying to work with the 2 - 12v fans. I thought they would at least work so I know the board is set up correctly. Long term yes I will use the 24v fans. I can install them and can report back then as I don't want to do any damage...
Until then I had tried to send the gcode you suggested while the fan was plugged into P2 only. I didn't want to try the other ports until I get the 24v fans **
When I type :
M106 P2 S1 H-1 ; Fan2
I get :
PMM106 P1 S0
PMM106 P0 S0
PMM106 S0Then a JAVA error and DWC disconnects?
Thank you !
-
@Stephenbright said in Switching from Duet Maestro to Duet WIFI:
DWC: 1.22.1
That's a pretty old version of the DWC, and even out of date for DWC v1, so I guess this is a bug in the old version of DWC, as it doesn't do this for me in DWC v1.22.6. On my test rig I have only one fan defined. When I send
M106 P0 S1 H-1 ; Fan0(the '; Fan0' part is just a comment, and can be removed) in DWC v1.22.6, if the fan is already defined (ie fan 0) it turns the fan on. If I sendM106 P2 S1 H-1 ; Fan2when I don't have a fan2 (P2) defined, a new fan is created on the Machine Control page (and turned on to 100%). I'd guess that this is what is not working in the old version of DWC, and causing the Java error. Alternatively, configure all fans in your config.g, so they all show at start up.So try updating to 1.22.6 (the last DWC v1 version) by downloading "DuetWebControl-1.22.6.zip" from https://github.com/Duet3D/RepRapFirmware/releases/tag/2.05.1
Then upload the zip file (don't decompress it) by going to Setting > General > File Upload and click on the big blue 'Upload File(s)' button.Is there any reason your are using DWC v1 rather than the newer version? To update to the latest, download "DuetWebControl-SD-3.1.1.zip" from https://github.com/Duet3D/RepRapFirmware/releases/tag/3.1.1 and follow the same process as above. Both versions of DWC can coexist, so you can switch between them. DWC v3.1.1 has a 'Revert to DWC1' link in 'Machine-Specific > Machine-Specific'. To go from DWC1 to DWC3, remove 'reprap.htm' from the end of the IP address of your printer in the browser's address bar.
Ian
Bed-slinger - Mini5+ WiFi/1LC | RRP Fisher v1 - D2 WiFi | Polargraph - D2 WiFi | TronXY X5S - 6HC/Roto | CNC router - 6HC | Tractus3D T1250 - D2 Eth
-
I didn't realize when I started to reconfigured my machine that I didn't update the DWC. I'll do that.
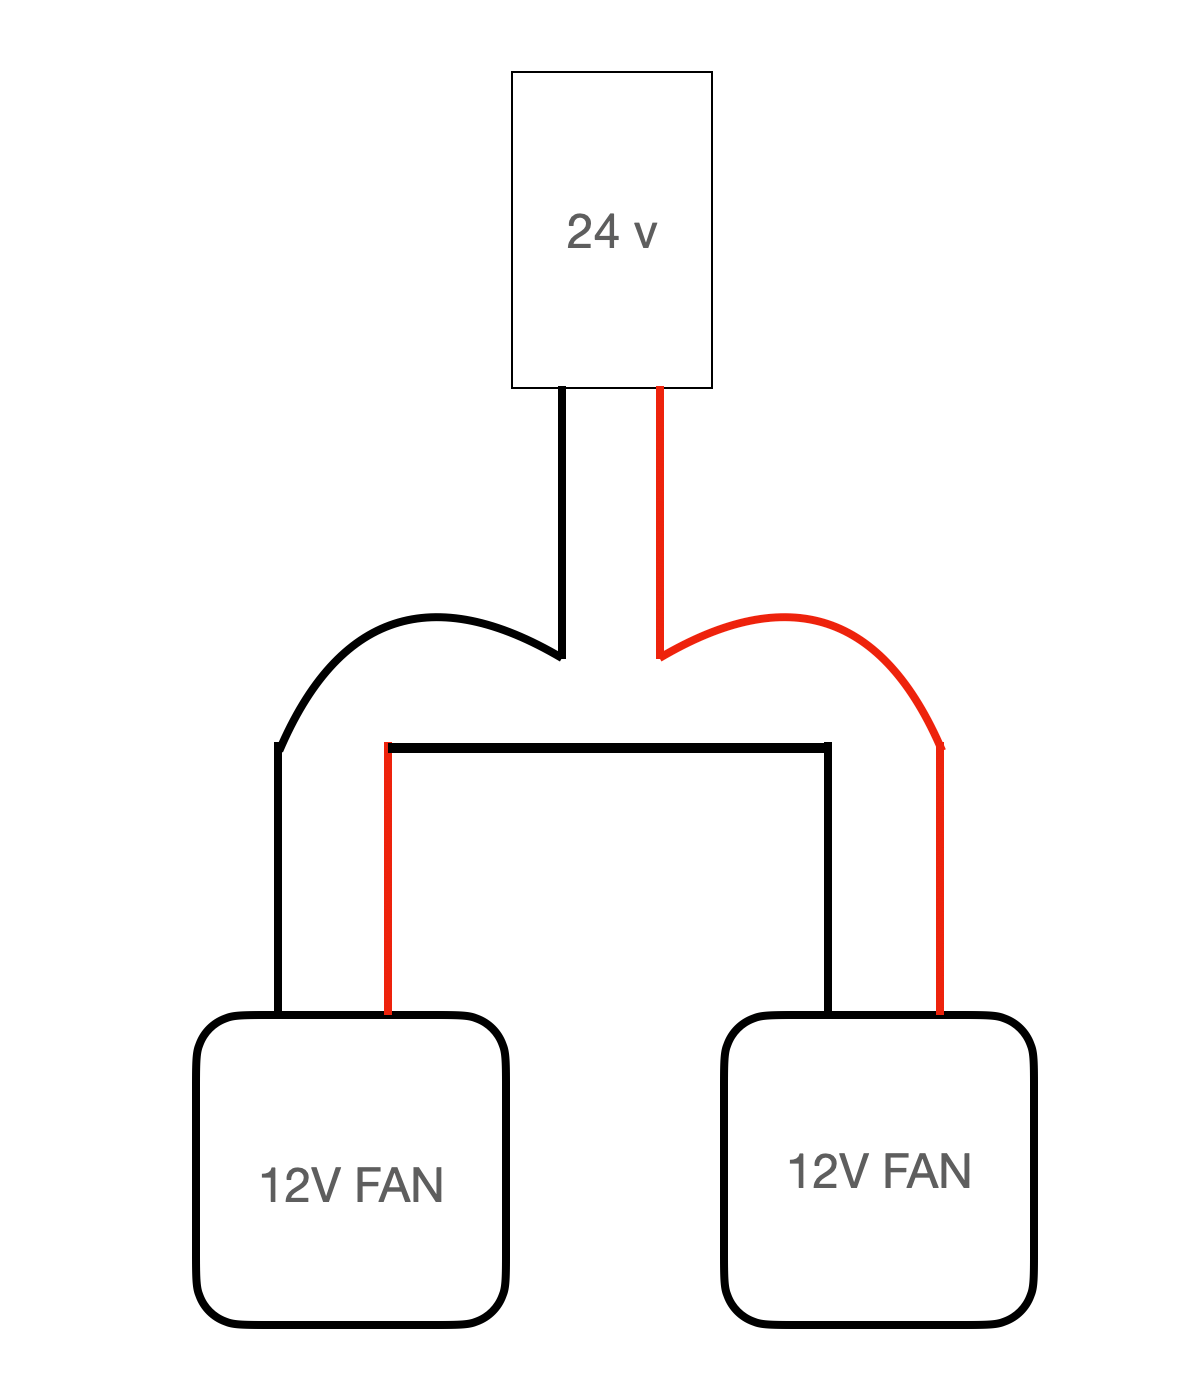
Also the 24v fans came in today. With my new 24v fans they are currently 2 separate fans, can I run those in parallel and they would both get 24v correct? Basically two fans into one port, red wire to red wire and black wire to black wire? Thoughts?
** The stock nozzle fans were 2 separate 5v fans in parallel into one port so I would guess they were both getting 5v?
Thoughts?
-
Running the fans in parallel is a bit better than running 2 in series. I've done it on occasion, but it does mean the fans may not behave exactly as they would plugged in solo.
In a parallel circuit, the voltage across each of the components is the same, and the total current is the sum of the currents flowing through each component.
So as long as your two fans aren't huge current draws (most fans aren't) you should be ok.
-
@Phaedrux The new fans are rated Voltage:24V 0.06A each for the two fans. It was a poor design on the part of the printer manufacturer to have the dual 5v fans on one port for such a large printer in the first place... I'll update the process soon. Thanks !
-
@Phaedrux said in Switching from Duet Maestro to Duet WIFI:
Running the fans in parallel is a bit better than running 2 in series. I've done it on occasion, but it does mean the fans may not behave exactly as they would plugged in solo.
In a parallel circuit, the voltage across each of the components is the same, and the total current is the sum of the currents flowing through each component.
So as long as your two fans aren't huge current draws (most fans aren't) you should be ok.
The fan still does not turn on after I tried sending the Gcode...
The new 24v fan is working 100% but not in port 0, 1 or 2. I'm only trying to run one fan at the moment not the two just to make sure I can get this working...
Until now I've never plugged anything in to port 0 or 1, so if I messed up Port 2 in the beginning it would mess up ports 0 and 1 as well?
Aforementioned the first set of fans were only 5v so it would be odd that this board is that sensitive and blown mosfet chip and damage the board vs just blowing up the fan???
Is there an issue with the F500 setting? From the factory is was set at F4, but on the mfg forum, everyone said to set that to F500...
M106 P2 S1 I0 F500 H-1 L0.3
If the mosfets are damaged ( in the picture they look fine ) what are the options? Can I just plug it into a always on port?
Also can I plug the fan directly into the board to make sure the cable isn't the issue correct? I'm going to use a multimeter as well, but I want to make sure the pins aren't coming out when I push the plug in...
-
Are you definitely still using RepRapFirmware 2.x, not 3.x ?
Duet WiFi hardware designer and firmware engineer
Please do not ask me for Duet support via PM or email, use the forum
http://www.escher3d.com, https://miscsolutions.wordpress.com