help to setup M557 Mesh size
-
-
material is Petg
-
Yes i have done the pid tuning nozzle and bed
-
yes i have recalibrated the Esteps.
EM is calibrated by this method:
https://help.prusa3d.com/en/article/extrusion-multiplier-calibration_2257
is this method ok or i must use an other method to calibrate the EM ?
no, i dont use pressure advance,i have read the thread that is for Bowden
i upload the gcode via webinterface
-
-
Give this one a try
https://duet3d.dozuki.com/Guide/Ender+3+Pro+and+Duet+Maestro+Guide+Part+4:+Calibration/40#s165
Pressure advance is for direct drive as well. Bowden users have more to gain from it, but it does help with direct as well.
-
now i have calibrated my printer with this method:
https://duet3d.dozuki.com/Guide/Ender+3+Pro+and+Duet+Maestro+Guide+Part+4:+Calibration/40#s165the layers looks smoother with pressure advance: 0.04
Esteps is perfect with 415 Stepsit will extrude 100mm
Petg EM is 93 no gaps and the 2 walls are perfect,no gaps betweens the wallsbut printing the cube the z-seam is broken take a look at the photo


-
@lui2004 said in help to setup M557 Mesh size:
but printing the cube the z-seam is broken take a look at the photo
Did you make any of the other retraction changes I suggested?
A broken wall like that on a 2 wall print with a stacked z seam isn't surprising. If there is a gap on the first layers it will continue to migrate upwards because there is nothing below it to build upon. You can't print in mid air.
Try a more complex test print like your original part. Set your seam position to nearest for petg to try to reduce stringing.
-
yes i have changed the retraction now i have :
Retraction Distance: 1.00 mm
Restraction Speed : 60 mm/si will reprint the Tensioner for my printer
i will post the result after the print
-
@Phaedrux said in help to setup M557 Mesh size:
uncheck only retract when crossing open spaces, check force retraction between layers, enable minimum travel for retraction, 3mm is fine, and uncheck wipe extruder for outer-most perimeters.
I meant these specifically.
-
yes i have changed this
-
I'm going to sleep now, good luck on your test print.
-
thanks mate !
have a good sleep
-
is it possible to save the pressuere advance ?
M572 D0 S0.04because i send everytime when i turn on printer the M572 Command
thanks
-
put it in your config.g
-
somewhere in the config.g ?
-
i have mine at the end after tool definition
-
-
Hi
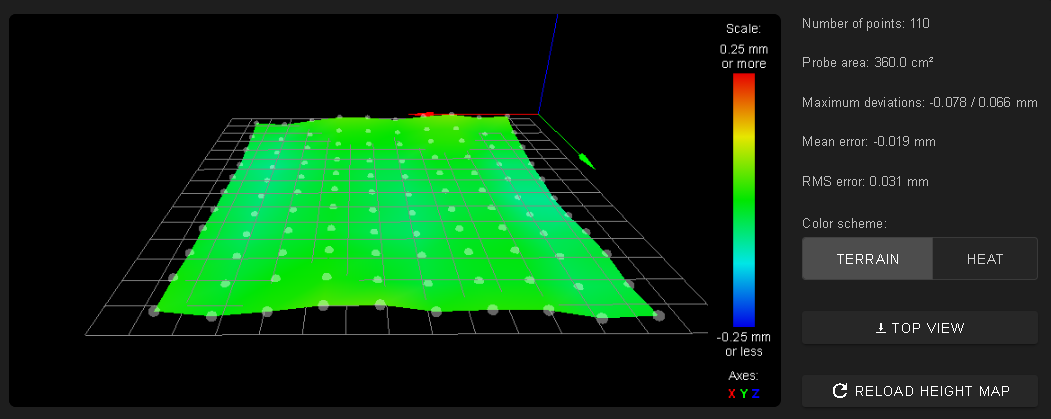
after i solved the issues above i have problem with G29 my bed is not flat or is it ok ?
my bltouch setup in config.g:
M558 P9 C"^zprobe.in" T8000 A5 R0.5            ; set Z probe type to bltouch and the dive height + speeds
M950 S0 C"exp.heater7"                         ; create servo pin 0 for BLTouch
G31 P25 X41.2 Y4.5 Z2.096                    ; set Z probe trigger value, offset and trigger height
M557 X41.2:221.2 Y4.5:219.5 S20                       ; define mesh grid
my results in hightmap.csv:
RepRapFirmware height map file v2 generated at 2020-10-06 10:18, min error -0.078, max error 0.066, mean -0.019, deviation 0.031 xmin,xmax,ymin,ymax,radius,xspacing,yspacing,xnum,ynum 41.20,221.20,4.50,219.50,-1.00,20.00,20.00,10,11 0.053, 0.040, 0.066, 0.051, 0.025, 0.042, 0.046, 0.021, -0.008, 0.004 0.003, -0.012, 0.030, 0.025, 0.002, 0.012, 0.016, -0.013, -0.048, -0.025 -0.022, -0.022, 0.020, 0.018, -0.004, -0.000, 0.001, -0.028, -0.060, -0.037 -0.053, -0.057, -0.008, -0.007, -0.035, -0.030, -0.021, -0.044, -0.075, -0.053 -0.060, -0.060, -0.021, -0.019, -0.044, -0.037, -0.019, -0.043, -0.066, -0.042 -0.078, -0.075, -0.028, -0.033, -0.053, -0.038, -0.018, -0.037, -0.063, -0.033 -0.068, -0.065, -0.024, -0.032, -0.054, -0.034, -0.016, -0.033, -0.058, -0.028 -0.041, -0.051, -0.017, -0.022, -0.052, -0.040, -0.018, -0.030, -0.052, -0.015 -0.024, -0.041, -0.007, -0.014, -0.033, -0.020, -0.002, -0.017, -0.035, -0.014 -0.034, -0.046, -0.012, -0.014, -0.028, -0.009, 0.008, -0.000, -0.025, 0.008 -0.012, -0.024, 0.015, 0.018, 0.010, 0.043, 0.041, 0.013, -0.008, 0.017 -
It would be easier for us to tell if you posted an image of the height map as displayed by DWC.
-
thats no problem

-
That looks good enough to print on to me!
-
ok i will give a try
-
bedlevel_nozzle_0.4_200x200-0.3-0.8.stl
Here's a good first layer test pattern.
Try it once with G29 S1 enabled, and once without.