Strange BLTouch issue. Hightmap it off while printing
-
Hey,
i upgraded my old Cr-10 Printer with linear rods, a BLTouch and the Duet 2 Wfii. Everything seems to be working fine, but if i start printing and the Hightmap was generated it dosen't seem to be correct. While printing the left side is higher and the right side is too low. But the motors are spinning slightly as if they try to follow the hightmap. Today i bought new Z motors and a new 2 leadscrews, beacuse the stock ones are not perfectly straight. Turns out, the problem staid the same. It almost looks like that the hightmap was fliped. I made some research on the internet and found out that quite a few people have this issue and cant get it right either. -
-
starting g-code, i am using the Prusa slicer
M107 ;M190 S45 ;set bed temperature and wait for it to be reached G28 ;Home axis G29 M109 S210 ; M107 ; Turn layer fan off G21 ; Set to metric change to G20 if you want Imperial G90 ; Force coordinates to be absolute relative to the origin G0 X0 Y0 F9000 ; Go to front G0 Z0.15 ; Drop to bed G92 E0 ; zero the extruded length G1 X80 E6 F780.000 ; Extrude filament in a 8cm line G92 E0 ; zero the extruded length G1 E-1 F780.000 ; Retract a little G1 X80 F4000 ; Quickly wipe away from the filament line G1 Z0.3 ; Raise and begin printing. config.g
; Configuration file for Duet WiFi (firmware version 3) ; executed by the firmware on start-up ; ; generated by RepRapFirmware Configuration Tool v3.1.4 on Sat Oct 03 2020 22:18:40 GMT+0200 (Mitteleuropäische Sommerzeit) ; General preferences G90 ; send absolute coordinates... M83 ; ...but relative extruder moves M550 P"Pat's Printer" ; set printer name ; Network M551 P"******" ; set password M552 S1 ; enable network M586 P0 S1 ; enable HTTP M586 P1 S0 ; disable FTP M586 P2 S0 ; disable Telnet ; Drives M569 P0 S0 ; physical drive 0 goes backwards M569 P1 S0 ; physical drive 1 goes backwards M569 P2 S0 ; physical drive 2 goes backwards M569 P3 S1 ; physical drive 3 goes forwards M584 X0 Y1 Z2 E3 ; set drive mapping M350 X16 Y16 Z16 E16 I1 ; configure microstepping with interpolation M92 X80.00 Y80.00 Z800.00 E830 ; set steps per mm M566 X900.00 Y900.00 Z12.00 E300.00 ; set maximum instantaneous speed changes (mm/min) M203 X6000.00 Y6000.00 Z180.00 E1500.00 ; set maximum speeds (mm/min) M201 X500.00 Y500.00 Z20.00 E5000.00 ; set accelerations (mm/s^2) M906 X600 Y600 Z600 E600 I30 ; set motor currents (mA) and motor idle factor in per cent M84 S300 ; Set idle timeout ; Axis Limits M208 X0 Y0 Z0 S1 ; set axis minima M208 X215 Y250 Z380 S0 ; set axis maxima ; Endstops M574 X1 S1 P"xstop" ; configure active-high endstop for low end on X via pin xstop M574 Y1 S1 P"ystop" ; configure active-high endstop for low end on Y via pin ystop M574 Z1 S2 ; configure Z-probe endstop for low end on Z ; Z-Probe M950 S0 C"exp.heater3" ; create servo pin 0 for BLTouch M558 P9 C"^zprobe.in" H5 F120 T6000 ; set Z probe type to bltouch and the dive height + speeds G31 P500 X-16 Y-42 Z2.38 ; set Z probe trigger value, offset and trigger height M557 X10:210 Y0:250 S50 ; define mesh grid ; Heaters M308 S0 P"bedtemp" Y"thermistor" T100000 B4138 ; configure sensor 0 as thermistor on pin bedtemp M950 H0 C"bedheat" T0 ; create bed heater output on bedheat and map it to sensor 0 ; enable bang-bang mode for the bed heater and set PWM limit M140 H0 ; map heated bed to heater 0 M143 H0 S60 ; set temperature limit for heater 0 to 60C M308 S1 P"e0temp" Y"thermistor" T100000 B4138 ; configure sensor 1 as thermistor on pin e0temp M950 H1 C"e0heat" T1 ; create nozzle heater output on e0heat and map it to sensor 1 M307 H1 B0 S1.00 ; disable bang-bang mode for heater and set PWM limit ; Fans M950 F0 C"fan0" Q100 ; create fan 0 on pin fan0 and set its frequency M106 P0 S0 H-1 ; set fan 0 value. Thermostatic control is turned off M950 F1 C"fan1" Q500 ; create fan 1 on pin fan1 and set its frequency M106 P1 S1 H1 T45 ; set fan 1 value. Thermostatic control is turned on ; Tools M563 P0 D0 H1 F0 ; define tool 0 G10 P0 X0 Y0 Z0 ; set tool 0 axis offsets G10 P0 R0 S0 ; set initial tool 0 active and standby temperatures to 0C ; Custom settings are not defined M575 P1 S1 B57600 ; enable support for PanelDue 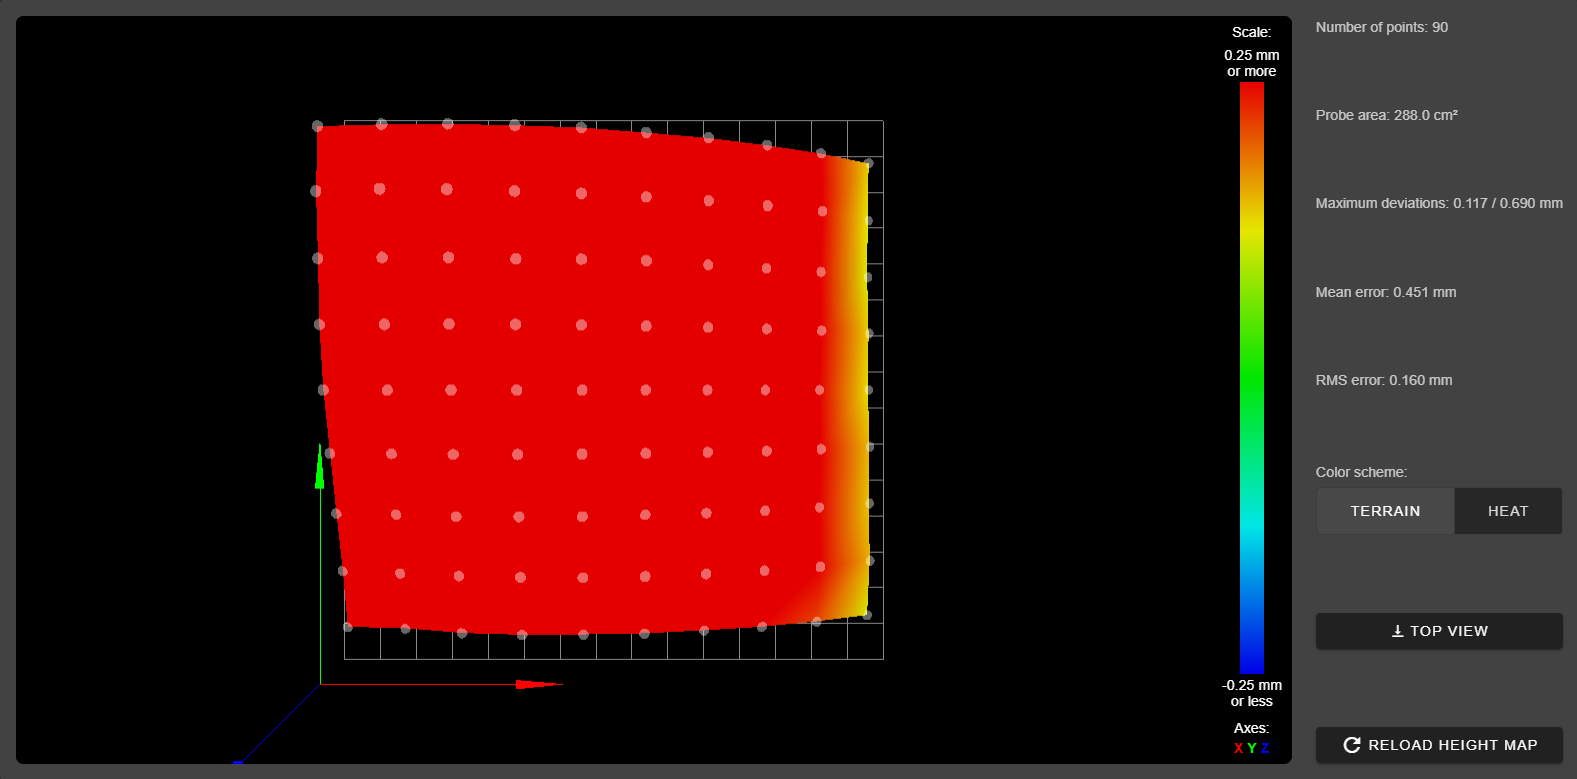
-
@RocketPat said in Strange BLTouch issue. Hightmap it off while printing:
G31 P500 X-16 Y-42 Z2.38 ; set Z probe trigger value, offset and trigger height
are you sure those coordinates are correct?
typical ender 3 settings are X-44 Y-17 and the cr-10 has the same style i believe.
post your homeall.g
-
yea i gues they are right, the BLtouch is infront and left of the nossle.
homeall.g
; homeall.g ; called to home all axes ; ; generated by RepRapFirmware Configuration Tool v3.1.4 on Sat Oct 03 2020 22:18:40 GMT+0200 (Mitteleuropäische Sommerzeit) G91 ; relative positioning G1 H2 Z5 F6000 ; lift Z relative to current position G1 H1 X-245 Y-285 F1800 ; move quickly to X and Y axis endstops and stop there (first pass) G1 H2 X5 Y5 F6000 ; go back a few mm G1 H1 X-245 Y-285 F360 ; move slowly to X and Y axis endstops once more (second pass) G90 ; absolute positioning G1 X118 Y185 F6000 ; go to first bed probe point and home Z G30 ; home Z by probing the bed ; Uncomment the following lines to lift Z after probing ;G91 ; relative positioning ;G1 Z5 F100 ; lift Z relative to current position ;G90 ; absolute positioning my first probe point i set to be the middle of the bed
-
i cant see anything strange in the config
G30 is called directly before G29.
but i have to say that are some strange modifications that you made to your cr10.
switching to linear rods from v-slot and going with a smaller bed.can you confirm the firmware version is 3.1.1? using m115
-
I did a new mesh bed test and the result is much better than what i had first... with less probe points and also its right what i get, the left side is higher, what causes the nossel to get higer and that is messing up my print because the printer moves to much up. Than the print dosent stick anymore. And on the right side its too low and crushes into the bed.
-
Yep i updated to the latest Version
M115
FIRMWARE_NAME: RepRapFirmware for Duet 2 WiFi/Ethernet FIRMWARE_VERSION: 3.1.1 ELECTRONICS: Duet WiFi 1.02 or later FIRMWARE_DATE: 2020-05-19b2 -
that would be the result of one side of the x gantry sagging.
when you did your linear rod conversion, did you convert the cr-10 to dual z?if yes, then you need to set up this
https://duet3d.dozuki.com/Wiki/Bed_levelling_using_multiple_independent_Z_motors -
@Veti yea i am using dual z leadscrew but the duet 2 wifi featured a second slot for both axes parallel so i am only using 1 z output for both
-
@RocketPat
your z leadscrews are out of sync. you can correct it manually, but the dual z setup is faster and more accurate.also unless you converted your cr 10 to 24v you are running your z motors at 6V, which might not be enough.
-
ah okey i am using a 12V PSU but if they run in parallel the voltage should be the same... only the current is dropping
-
the 2 z connectors on the duet actually run in series rather than in parallel.
from the linked site
Note that the Z driver (drive 2 on Duet2) has a dual socket wired in series for powering two z motors at once.
-
@Veti ohhh okey so that are some bad news i see haha okey. I will give the independent z setup a try.
-
@RocketPat said in Strange BLTouch issue. Hightmap it off while printing:
M584 X0 Y1 Z2 E3 ; set drive mapping
for now change this to
M584 X0 Y1 Z2:4 E3 ; set drive mappingconnect the second z motor to e1 and place the jumpers on the second z connector.
that way you are using 2 motors for now.
-
@Veti okey i only need to change that or do i have to do more suff i am reading that hole article for the frist time now and i am kinda scared to set up everythig new again. I will do a quick backup and give it a try.
-
that changes allows you to use 2 motors for now.
you still need to do the rest later.my guess for now is that you are losing steps because of the 6v dual z setup.
-
okey i am doing a quick first layer print and see what is happening, looking good so far. Nothing exploded.
-
So now i did quite a bit testing and i got a much better result.
Also the true leveling is working now. But i still have too low presure on the left side. I can get a print startet now and it would be working but maby my current is too low now.
-
did you measure the real offset of the probe?