Duet3D Logo Duet3D
    • Tags
    • Documentation
    • Order
    • Register
    • Login

    Strange BLTouch issue. Hightmap it off while printing

    Scheduled Pinned Locked Moved Solved
    Tuning and tweaking
    4
    40
    1.7k
    Loading More Posts
    • Oldest to Newest
    • Newest to Oldest
    • Most Votes
    Reply
    • Reply as topic
    Log in to reply
    This topic has been deleted. Only users with topic management privileges can see it.
    • Vetiundefined
      Veti
      last edited by

      that would be the result of one side of the x gantry sagging.
      when you did your linear rod conversion, did you convert the cr-10 to dual z?

      if yes, then you need to set up this
      https://duet3d.dozuki.com/Wiki/Bed_levelling_using_multiple_independent_Z_motors

      RocketPatundefined 1 Reply Last reply Reply Quote 0
      • RocketPatundefined
        RocketPat @Veti
        last edited by

        @Veti yea i am using dual z leadscrew but the duet 2 wifi featured a second slot for both axes parallel so i am only using 1 z output for both

        Vetiundefined 1 Reply Last reply Reply Quote 0
        • Vetiundefined
          Veti @RocketPat
          last edited by

          @RocketPat
          your z leadscrews are out of sync. you can correct it manually, but the dual z setup is faster and more accurate.

          also unless you converted your cr 10 to 24v you are running your z motors at 6V, which might not be enough.

          1 Reply Last reply Reply Quote 0
          • RocketPatundefined
            RocketPat
            last edited by

            ah okey i am using a 12V PSU but if they run in parallel the voltage should be the same... only the current is dropping

            1 Reply Last reply Reply Quote 0
            • Vetiundefined
              Veti
              last edited by

              the 2 z connectors on the duet actually run in series rather than in parallel.

              from the linked site

              Note that the Z driver (drive 2 on Duet2) has a dual socket wired in series for powering two z motors at once.

              RocketPatundefined 1 Reply Last reply Reply Quote 0
              • RocketPatundefined
                RocketPat @Veti
                last edited by

                @Veti ohhh okey so that are some bad news i see haha okey. I will give the independent z setup a try.

                1 Reply Last reply Reply Quote 0
                • Vetiundefined
                  Veti
                  last edited by

                  @RocketPat said in Strange BLTouch issue. Hightmap it off while printing:

                  M584 X0 Y1 Z2 E3 ; set drive mapping

                  for now change this to
                  M584 X0 Y1 Z2:4 E3 ; set drive mapping

                  connect the second z motor to e1 and place the jumpers on the second z connector.

                  that way you are using 2 motors for now.

                  RocketPatundefined 1 Reply Last reply Reply Quote 0
                  • RocketPatundefined
                    RocketPat @Veti
                    last edited by RocketPat

                    @Veti okey i only need to change that or do i have to do more suff i am reading that hole article for the frist time now and i am kinda scared to set up everythig new again. I will do a quick backup and give it a try.

                    Vetiundefined 1 Reply Last reply Reply Quote 0
                    • Vetiundefined
                      Veti @RocketPat
                      last edited by

                      @RocketPat

                      that changes allows you to use 2 motors for now.
                      you still need to do the rest later.

                      my guess for now is that you are losing steps because of the 6v dual z setup.

                      1 Reply Last reply Reply Quote 0
                      • RocketPatundefined
                        RocketPat
                        last edited by

                        okey i am doing a quick first layer print and see what is happening, looking good so far. Nothing exploded.

                        1 Reply Last reply Reply Quote 0
                        • RocketPatundefined
                          RocketPat
                          last edited by

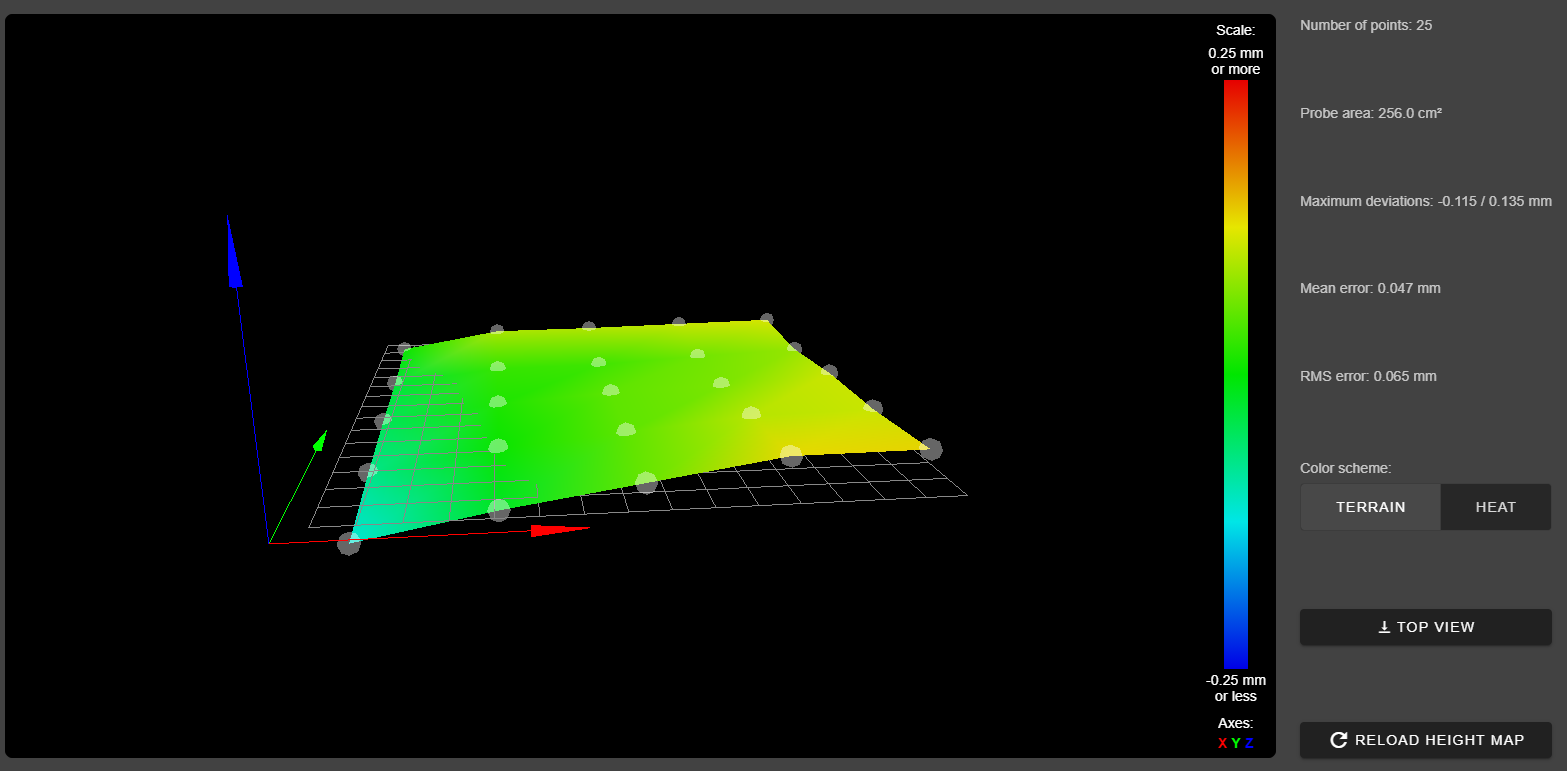
                          So now i did quite a bit testing and i got a much better result.
                          Test3.PNG

                          Also the true leveling is working now. But i still have too low presure on the left side. I can get a print startet now and it would be working but maby my current is too low now.

                          1 Reply Last reply Reply Quote 0
                          • Vetiundefined
                            Veti
                            last edited by

                            did you measure the real offset of the probe?

                            1 Reply Last reply Reply Quote 0
                            • RocketPatundefined
                              RocketPat
                              last edited by

                              yep i startet at x100 y100 and moved to x117 y143 what means that the offset should be -17 and -43

                              1 Reply Last reply Reply Quote 0
                              • RocketPatundefined
                                RocketPat
                                last edited by

                                okey now i got a new problem, after i restarted the board the hightmap is getting generated but is not used. The motors dosen't correct my print anymore.

                                Vetiundefined 1 Reply Last reply Reply Quote 0
                                • Phaedruxundefined
                                  Phaedrux Moderator
                                  last edited by

                                  Can you post your homeall/homez? Where are you probing on the bed to set z0? It looks like you're using a corner rather than the center of the bed.

                                  Z-Bot CoreXY Build | Thingiverse Profile

                                  RocketPatundefined 1 Reply Last reply Reply Quote 0
                                  • RocketPatundefined
                                    RocketPat
                                    last edited by

                                    this is my home all

                                    ; homeall.g
                                    ; called to home all axes
                                    ; generated by RepRapFirmware Configuration Tool v3.1.4 on Sat Oct 03 2020 22:18:40 
                                    
                                    GMT+0200 (Mitteleuropäische Sommerzeit)
                                    G91                     ; relative positioning
                                    G1 H2 Z5 F6000          ; lift Z relative to current position
                                    G1 H1 X-245 Y-285 F1800 ; move quickly to X and Y axis endstops and stop there (first pass)
                                    G1 H2 X5 Y5 F6000       ; go back a few mm
                                    G1 H1 X-245 Y-285 F360  ; move slowly to X and Y axis endstops once more (second pass)
                                    G90                     ; absolute positioning
                                    G1 X118 Y185 F6000      ; home Z
                                    G30                     ; home Z by probing the bed
                                    
                                    ; Uncomment the following lines to lift Z after probing
                                    ;G91                    ; relative positioning
                                    ;G1 Z5 F100             ; lift Z relative to current position
                                    ;G90                    ; absolute positioning
                                    

                                    and this is home z

                                    ; homez.g
                                    ; called to home the Z axis
                                    ;
                                    ; generated by RepRapFirmware Configuration Tool v3.1.4 on Sat Oct 03 2020 22:18:40 GMT+0200 (Mitteleuropäische Sommerzeit)
                                    G91                ; relative positioning
                                    G1 H2 Z5 F6000     ; lift Z relative to current position
                                    G90                ; absolute positioning
                                    G1 X20 Y55.5 F6000 ; go to first probe point
                                    G30                ; home Z by probing the bed
                                    
                                    ; Uncomment the following lines to lift Z after probing
                                    ;G91               ; relative positioning
                                    ;G1 Z5 F100        ; lift Z relative to current position
                                    ;G90               ; absolute positioning
                                    
                                    1 Reply Last reply Reply Quote 0
                                    • RocketPatundefined
                                      RocketPat @Phaedrux
                                      last edited by

                                      @Phaedrux in the home all i am using the middle of my bed

                                      1 Reply Last reply Reply Quote 0
                                      • Vetiundefined
                                        Veti @RocketPat
                                        last edited by

                                        @RocketPat

                                        do you still have the G29 in the start script?

                                        1 Reply Last reply Reply Quote 0
                                        • RocketPatundefined
                                          RocketPat
                                          last edited by

                                          yep right after i home all

                                          M107
                                          ;M190 S45	  ;set bed temperature and wait for it to be reached
                                          G28          ;Home axis
                                          G29
                                          
                                          M109 S210 ;
                                          M107         ; Turn layer fan off
                                          G21          ; Set to metric change to G20 if you want Imperial
                                          G90          ; Force coordinates to be absolute relative to the origin
                                          
                                          G0 X0 Y0 F9000 ; Go to front
                                          G0 Z0.15 ; Drop to bed
                                          G92 E0 ; zero the extruded length
                                          G1 X80 E6 F780.000 ; Extrude filament in a 8cm line
                                          G92 E0 ; zero the extruded length
                                          G1 E-1 F780.000 ; Retract a little
                                          G1 X80 F4000 ; Quickly wipe away from the filament line
                                          G1 Z0.3 ; Raise and begin printing.
                                          
                                          Vetiundefined 1 Reply Last reply Reply Quote 0
                                          • Vetiundefined
                                            Veti @RocketPat
                                            last edited by

                                            @RocketPat

                                            while printing use M122 to check if mesh compensation is active

                                            1 Reply Last reply Reply Quote 0
                                            • First post
                                              Last post
                                            Unless otherwise noted, all forum content is licensed under CC-BY-SA