Newbie: New Install on Ender 5 Plus---Willing to PAY$$$
-
Just wired up the Duet 2 Wifi. I just went thru the config wizard online. I am very unsure on what I did. I have an Ender 5 Plus with the Micro Swiss all metal direct drive setup. Thats the only mod I have so far. I need someone that is familiar with an Ender 5 Plus and obviously the software to look at my config.g and whatever else. I am scared to power on the board and possibly blow up my living room. I need someone to dedicate 30 min or so to go over everything with me before I turn it on. The E5+ comes with the BL Touch. Using 3.11 FW. Also have a Paneldue 5i. Please PM me if interested. You will be compensated for your time!!!
-
there is a guide for the ender 3 pro
the ender 5 pro is close enough that most of the guide still applies
https://duet3d.dozuki.com/Guide/Ender+3+Pro+and+Duet+Maestro+Guide+Part+1:+Wiring/37
the duet wifi uses R4700 for the thermistor instead of R2200
-
@Veti Wiring is done. I don't want to guess anymore. I just want someone to check it over and help me with issues I might have in the beginning. Its a 5 Plus.....not pro....Plus is 350x350x400.
-
@Veti I dont know what R4700 or R2200 is.
-
@shatty said in Newbie: New Install on Ender 5 Plus---Willing to PAY$$:
Its a 5 Plus.....not pro..
still a cartesian printer and just a bit bigger than the pro.
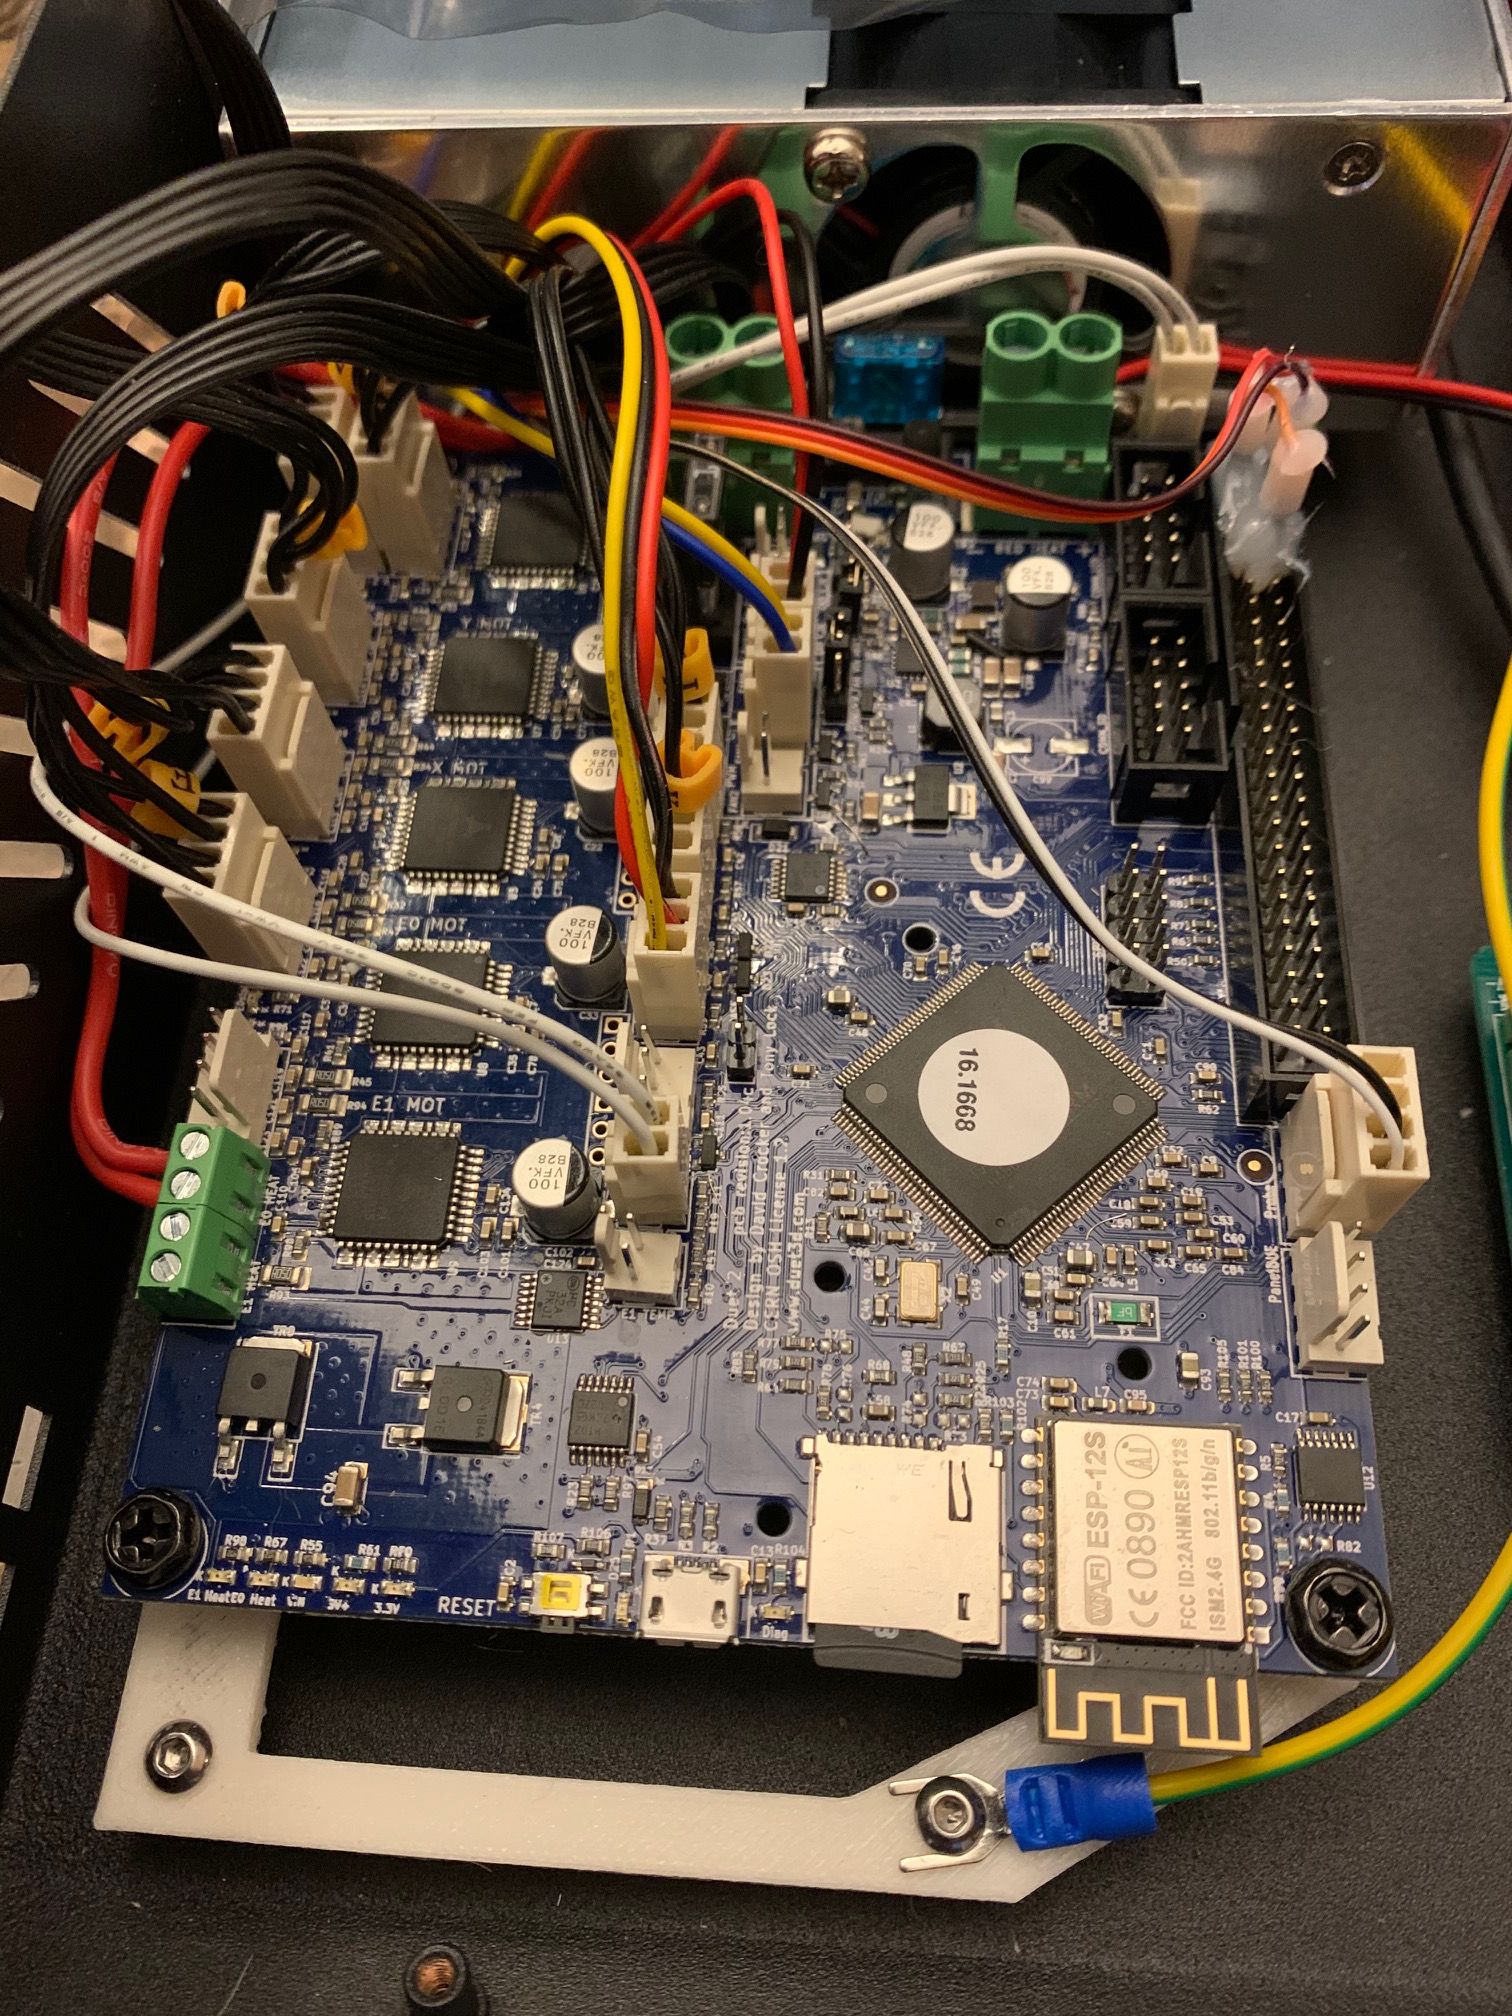
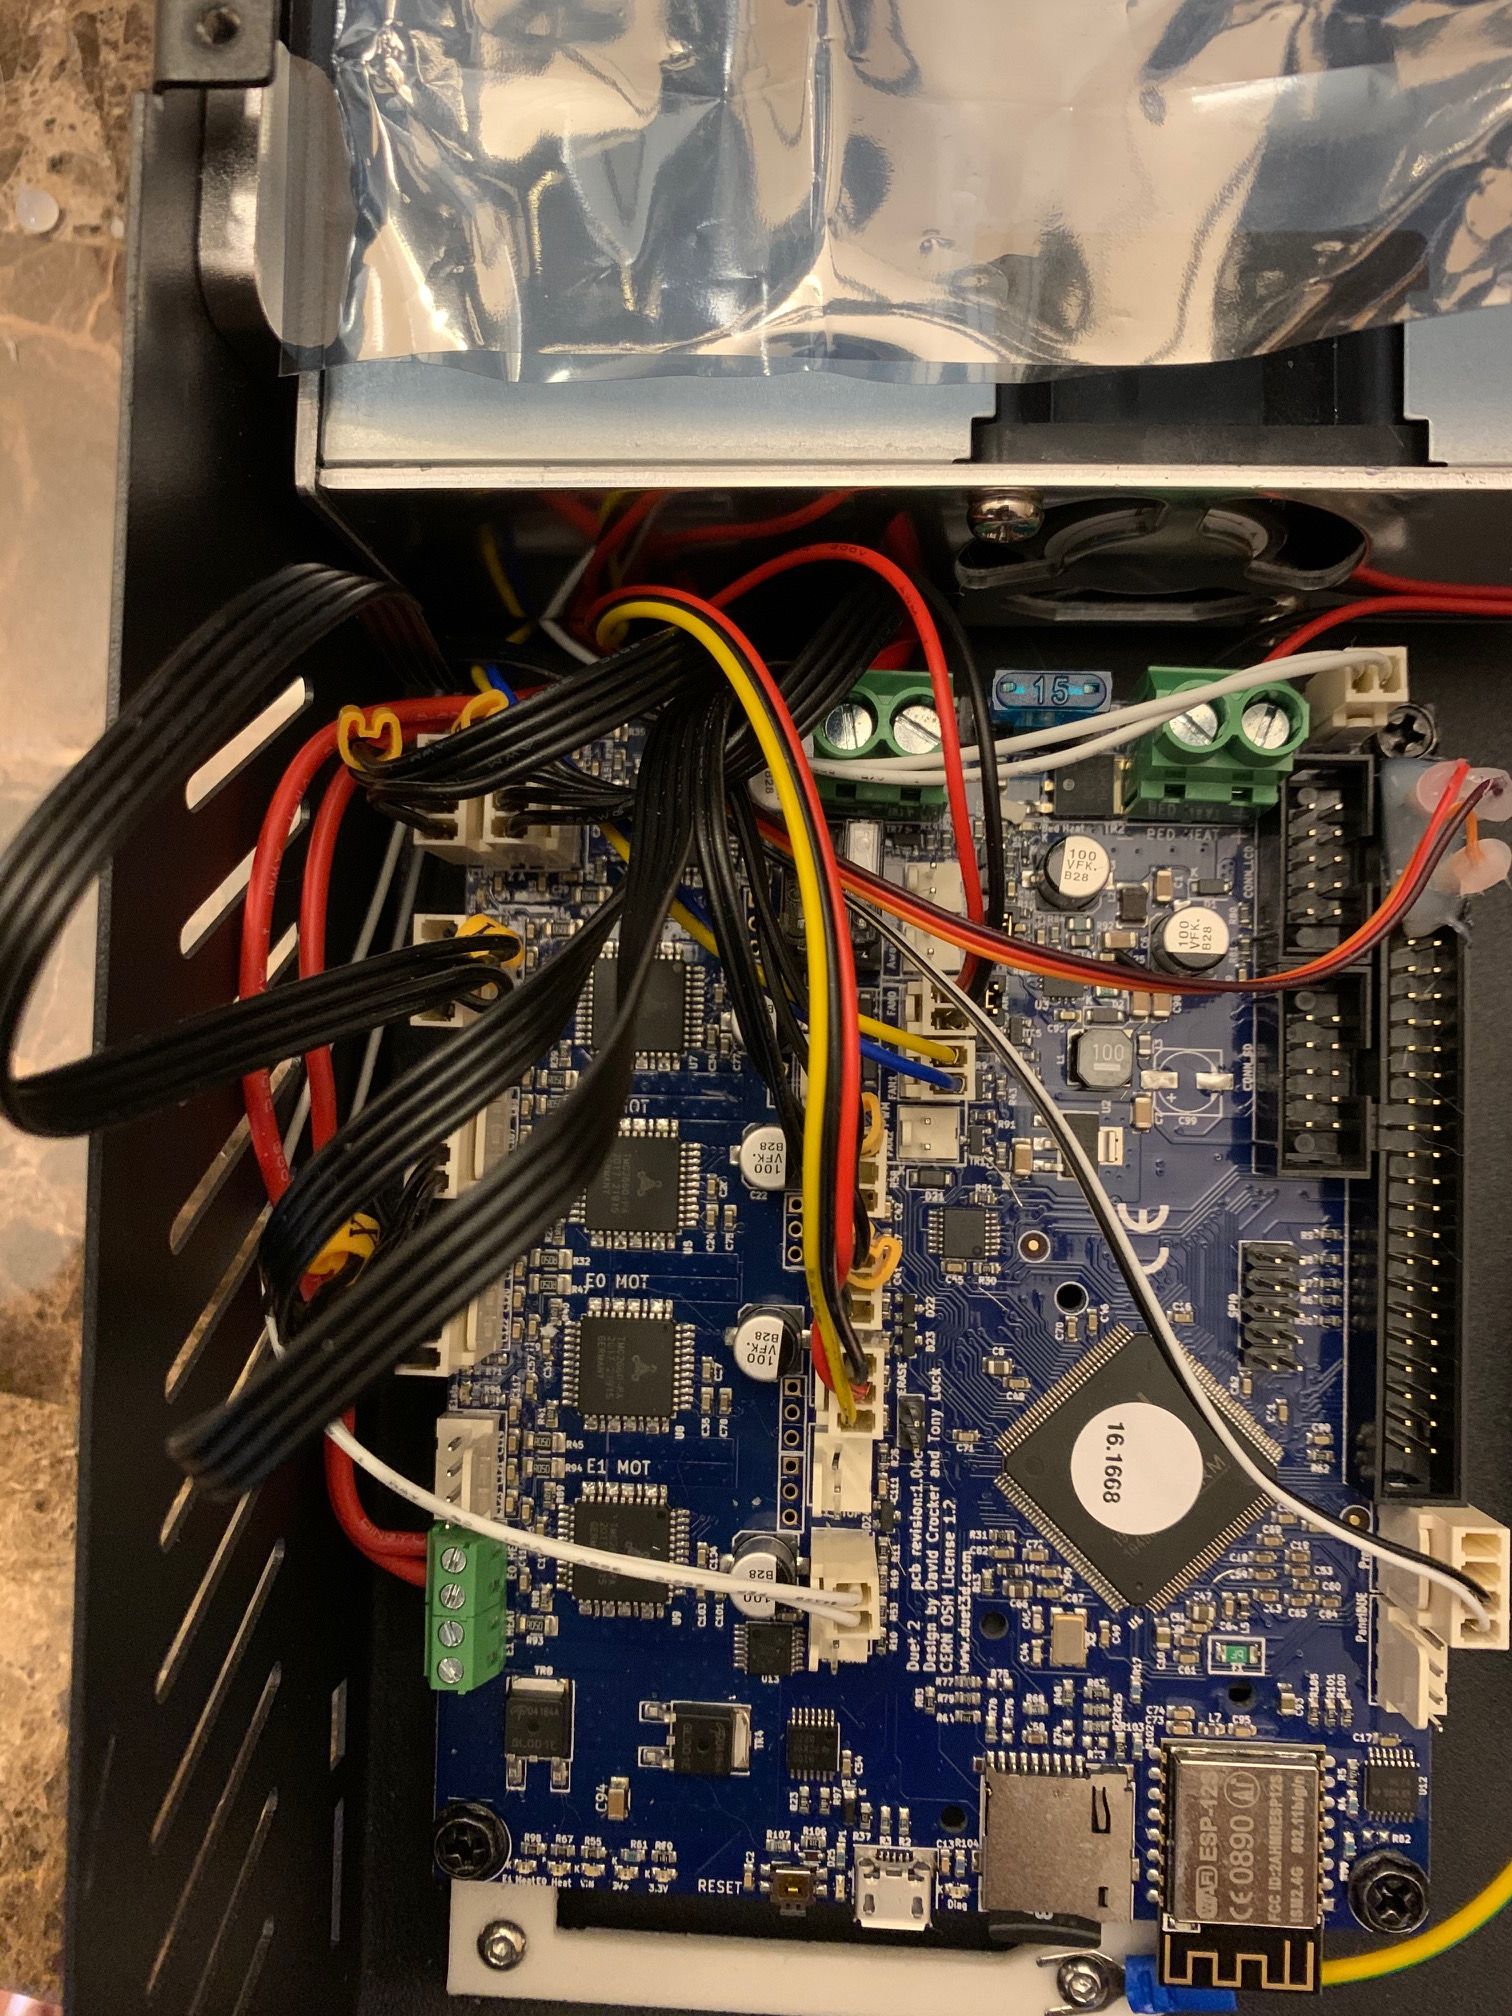
post some photos of the wiring and your config.g
-
; Configuration file for Duet WiFi (firmware version 3)
; executed by the firmware on start-up
;
; generated by RepRapFirmware Configuration Tool v3.1.4 on Sat Nov 14 2020 01:05:16 GMT-0500 (Eastern Standard Time); General preferences
G90 ; send absolute coordinates...
M83 ; ...but relative extruder moves
M550 P"E5Plus" ; set printer name; Network
M551 P"xxxxx" ; set password
M552 S1 ; enable network
M586 P0 S1 ; enable HTTP
M586 P1 S0 ; disable FTP
M586 P2 S0 ; disable Telnet; Drives
M569 P0 S1 ; physical drive 0 goes forwards
M569 P1 S1 ; physical drive 1 goes forwards
M569 P2 S1 ; physical drive 2 goes forwards
M569 P3 S1 ; physical drive 3 goes forwards
M584 X0 Y1 Z2 E3 ; set drive mapping
M350 X16 Y16 Z16 E16 I1 ; configure microstepping with interpolation
M92 X80.00 Y80.00 Z400.00 E130.00 ; set steps per mm
M566 X900.00 Y900.00 Z12.00 E120.00 ; set maximum instantaneous speed changes (mm/min)
M203 X6000.00 Y6000.00 Z180.00 E1200.00 ; set maximum speeds (mm/min)
M201 X500.00 Y500.00 Z20.00 E250.00 ; set accelerations (mm/s^2)
M906 X800 Y800 Z800 E800 I30 ; set motor currents (mA) and motor idle factor in per cent
M84 S30 ; Set idle timeout; Axis Limits
M208 X0 Y0 Z0 S1 ; set axis minima
M208 X350 Y350 Z400 S0 ; set axis maxima; Endstops
M574 X1 S1 P"xstop" ; configure active-high endstop for low end on X via pin xstop
M574 Y1 S1 P"ystop" ; configure active-high endstop for low end on Y via pin ystop
M574 Z1 S2 ; configure Z-probe endstop for low end on Z; Z-Probe
M950 S0 C"exp.heater3" ; create servo pin 0 for BLTouch
M558 P9 C"^!zprobe.in" H5 F120 T6000 ; set Z probe type to bltouch and the dive height + speeds
G31 P500 X0 Y0 Z2.5 ; set Z probe trigger value, offset and trigger height
M557 X15:215 Y15:195 S20 ; define mesh grid; Heaters
M308 S0 P"bedtemp" Y"thermistor" T100000 B4138 ; configure sensor 0 as thermistor on pin bedtemp
M950 H0 C"bedheat" T0 ; create bed heater output on bedheat and map it to sensor 0
M307 H0 B1 S1.00 ; enable bang-bang mode for the bed heater and set PWM limit
M140 H0 ; map heated bed to heater 0
M143 H0 S110 ; set temperature limit for heater 0 to 110C
M308 S1 P"e0temp" Y"thermistor" T100000 B4138 ; configure sensor 1 as thermistor on pin e0temp
M950 H1 C"e0heat" T1 ; create nozzle heater output on e0heat and map it to sensor 1
M307 H1 B0 S1.00 ; disable bang-bang mode for heater and set PWM limit; Fans
M950 F0 C"fan0" Q500 ; create fan 0 on pin fan0 and set its frequency
M106 P0 S1 H1 T45 ; set fan 0 value. Thermostatic control is turned on
M950 F1 C"fan1" Q500 ; create fan 1 on pin fan1 and set its frequency
M106 P1 S1 H1 T45 ; set fan 1 value. Thermostatic control is turned on; Tools
M563 P0 D0 H1 F0 ; define tool 0
G10 P0 X0 Y0 Z0 ; set tool 0 axis offsets
G10 P0 R0 S0 ; set initial tool 0 active and standby temperatures to 0C; Custom settings are not defined
; Miscellaneous
M575 P1 S1 B57600 ; enable support for PanelDue -

-
Also, what do you think about putting little heatsinks on the driver chips like the stock board has?
-
@shatty said in Newbie: New Install on Ender 5 Plus---Willing to PAY$$:
M558 P9 C"^!zprobe.in" H5 F120 T6000 ; set Z probe type to bltouch and the dive height + speeds
zprobe in does not normally need to be inverted for the bltouch.
G31 P500 X0 Y0 Z2.5 ; set Z probe trigger value, offset and trigger height
the offset x and y is missing
M308 S0 P"bedtemp" Y"thermistor" T100000 B4138 ; configure sensor 0 as thermistor on pin
M308 S1 P"e0temp" Y"thermistor" T100000 B4138 ; configure sensor 1 as thermistor on pin e0tempThen Beta value is incorrect, try the beta value from the guide, as creality tends to use the same thermistors
M950 F0 C"fan0" Q500 ; create fan 0 on pin fan0 and set its frequency
M106 P0 S1 H1 T45 ; set fan 0 value. Thermostatic control is turned on
M950 F1 C"fan1" Q500 ; create fan 1 on pin fan1 and set its frequency
M106 P1 S1 H1 T45 ; set fan 1 value. Thermostatic control is turned onyou configured both fans to be Thermostatic controled. this way you have no part cooling fan that can be controlled.
also add a T0 to the end of your config.
M906 X800 Y800 Z800 E800 I30 ; set motor currents (mA) and motor idle factor in per cent
do you have the motor specs for the ender 5 plus?
but you could test these values and check the motor temperature by hand during printing.
you might want to increase E800 to E900 as in the guideM92 X80.00 Y80.00 Z400.00 E130.00 ; set steps per mm
checking the marlin example config for the ender 5 plus
https://github.com/MarlinFirmware/Configurations/blob/import-2.0.x/config/examples/Creality/Ender-5 Plus/Configuration.h
#define DEFAULT_AXIS_STEPS_PER_UNIT { 80, 80, 800, 93.02 }
it seems you need Z800 -
Have you ever powered on the board with USB or anything yet?
Part 3 of the guide veti linked above goes over initial commissioning. Moving motors safely to test, that sort of thing. Try taking a look at that.
https://duet3d.dozuki.com/Guide/Ender+3+Pro+and+Duet+Maestro+Guide+Part+3:+Commissioning/39
The duet is pretty hard to kill, but there are a few wiring things you should absolutely double check.
First is your motor phase pairings. Failure to get the pairs right would probably just lead to an error message and the motors not working, but it could also damage the drivers, so best to get it sorted first. Here's how.
Second is the fan polarity. Positive and negative must be the right way round or you're likely to damage the fan or the fan mosfet on the board or both, so make sure you've got that sorted out before testing the fans.
-
@Phaedrux said in Newbie: New Install on Ender 5 Plus---Willing to PAY$$:
Have you ever powered on the board with USB or anything yet?
Yes -
@Veti
https://www.amazon.com/Aibecy-Creality-Stepping-Accessory-Replacement/dp/B07MVTFL3R/ref=sr_1_1_sspa?dchild=1&keywords=creality+stepper+motor&qid=1605337045&sr=8-1-spons&psc=1&spLa=ZW5jcnlwdGVkUXVhbGlmaWVyPUEzUjk2ME9MS0RHTTZJJmVuY3J5cHRlZElkPUEwMTk3MDI4MlRHWlVWQks3QU9ESyZlbmNyeXB0ZWRBZElkPUEwNjcyNDU0WjhHMEo4NEtaM1JVJndpZGdldE5hbWU9c3BfYXRmJmFjdGlvbj1jbGlja1JlZGlyZWN0JmRvTm90TG9nQ2xpY2s9dHJ1ZQ== -
@Veti said in Newbie: New Install on Ender 5 Plus---Willing to PAY$$:
@shatty said in Newbie: New Install on Ender 5 Plus---Willing to PAY$$:
M558 P9 C"^!zprobe.in" H5 F120 T6000 ; set Z probe type to bltouch and the dive height + speeds
zprobe in does not normally need to be inverted for the bltouch.
G31 P500 X0 Y0 Z2.5 ; set Z probe trigger value, offset and trigger height
the offset x and y is missing
M308 S0 P"bedtemp" Y"thermistor" T100000 B4138 ; configure sensor 0 as thermistor on pin
M308 S1 P"e0temp" Y"thermistor" T100000 B4138 ; configure sensor 1 as thermistor on pin e0tempThen Beta value is incorrect, try the beta value from the guide, as creality tends to use the same thermistors
M950 F0 C"fan0" Q500 ; create fan 0 on pin fan0 and set its frequency
M106 P0 S1 H1 T45 ; set fan 0 value. Thermostatic control is turned on
M950 F1 C"fan1" Q500 ; create fan 1 on pin fan1 and set its frequency
M106 P1 S1 H1 T45 ; set fan 1 value. Thermostatic control is turned onyou configured both fans to be Thermostatic controled. this way you have no part cooling fan that can be controlled.
also add a T0 to the end of your config.
M906 X800 Y800 Z800 E800 I30 ; set motor currents (mA) and motor idle factor in per cent
do you have the motor specs for the ender 5 plus?
but you could test these values and check the motor temperature by hand during printing.
you might want to increase E800 to E900 as in the guideM92 X80.00 Y80.00 Z400.00 E130.00 ; set steps per mm
checking the marlin example config for the ender 5 plus
https://github.com/MarlinFirmware/Configurations/blob/import-2.0.x/config/examples/Creality/Ender-5 Plus/Configuration.h
#define DEFAULT_AXIS_STEPS_PER_UNIT { 80, 80, 800, 93.02 }
it seems you need Z800I will go back in the configurator and post my fixes. Thanks! Most of what u said is chinese to me but I will do some googling and try
-
None of these values will autopopulate after I turn it on and auto homes itself and tests itself out?
-
which part did you not understand? please be specific, then we can further elaborate.
None of these values will autopopulate after I turn it on and auto homes itself and tests itself out?
no.
-
Did you ever learn how to ride a bicycle?
If so do you remember the leap of faith you had to make without the safety net of training wheels?
Follow the steps to get the printer running, check your wiring multiple times, and trust yourself and take the leap, and flip the switch.
-
@CaLviNx said in Newbie: New Install on Ender 5 Plus---Willing to PAY$$:
Did you ever learn how to ride a bicycle?
If so do you remember the leap of faith you had to make without the safety net of training wheels?
Follow the steps to get the printer running, check your wiring multiple times, and trust yourself and take the leap, and flip the switch.
LOL. I didnt think it would be this complicated before I installed it. I thought it would be a quick swap. Anyways theres no turning back now.
-
@Veti Hows this?
; Configuration file for Duet WiFi (firmware version 3)
; executed by the firmware on start-up
;
; generated by RepRapFirmware Configuration Tool v3.1.4 on Sun Nov 15 2020 03:22:47 GMT-0500 (Eastern Standard Time); General preferences
G90 ; send absolute coordinates...
M83 ; ...but relative extruder moves
M550 P"E5Plus" ; set printer name; Network
M551 P"xxxxx" ; set password
M552 S1 ; enable network
M586 P0 S1 ; enable HTTP
M586 P1 S0 ; disable FTP
M586 P2 S0 ; disable Telnet; Drives
M569 P0 S1 ; physical drive 0 goes forwards
M569 P1 S1 ; physical drive 1 goes forwards
M569 P2 S0 ; physical drive 2 goes backwards
M569 P3 S0 ; physical drive 3 goes backwards
M584 X0 Y1 Z2 E3 ; set drive mapping
M350 X16 Y16 Z16 E16 I1 ; configure microstepping with interpolation
M92 X80.00 Y80.00 Z400.00 E412.60 ; set steps per mm
M566 X1200.00 Y1200.00 Z60.00 E300.00 ; set maximum instantaneous speed changes (mm/min)
M203 X9000.00 Y9000.00 Z1200.00 E6000.00 ; set maximum speeds (mm/min)
M201 X500.00 Y500.00 Z100.00 E5000.00 ; set accelerations (mm/s^2)
M906 X800 Y800 Z1400 E1000 I50 ; set motor currents (mA) and motor idle factor in per cent
M84 S30 ; Set idle timeout; Axis Limits
M208 X0 Y0 Z0 S1 ; set axis minima
M208 X350 Y350 Z400 S0 ; set axis maxima; Endstops
M574 X1 S1 P"xstop" ; configure active-high endstop for low end on X via pin xstop
M574 Y1 S1 P"ystop" ; configure active-high endstop for low end on Y via pin ystop
M574 Z1 S2 ; configure Z-probe endstop for low end on Z; Z-Probe
M950 S0 C"exp.heater3" ; create servo pin 0 for BLTouch
M558 P9 C"^zprobe.in" H5 F600 T6000 ; set Z probe type to bltouch and the dive height + speeds
G31 P500 X16.3 Y14 Z1.7 ; set Z probe trigger value, offset and trigger height
M557 X15:190 Y15:190 S20 ; define mesh grid; Heaters
M308 S0 P"bedtemp" Y"thermistor" T100000 B4092 C4700 ; configure sensor 0 as thermistor on pin bedtemp
M950 H0 C"bedheat" T0 ; create bed heater output on bedheat and map it to sensor 0
M307 H0 B1 S1.00 ; enable bang-bang mode for the bed heater and set PWM limit
M140 H0 ; map heated bed to heater 0
M143 H0 S110 ; set temperature limit for heater 0 to 110C
M308 S1 P"e0temp" Y"thermistor" T100000 B4092 C4700 ; configure sensor 1 as thermistor on pin e0temp
M950 H1 C"e0heat" T1 ; create nozzle heater output on e0heat and map it to sensor 1
M307 H1 B0 S1.00 ; disable bang-bang mode for heater and set PWM limit; Fans
M950 F0 C"fan0" Q500 ; create fan 0 on pin fan0 and set its frequency
M106 P0 S1 H1 ; set fan 0 value. Thermostatic control is turned off
M950 F1 C"fan1" Q500 ; create fan 1 on pin fan1 and set its frequency
M106 P1 S1 H1 T45 ; set fan 1 value. Thermostatic control is turned on; Tools
M563 P0 D0 H1 F0 ; define tool 0
G10 P0 X0 Y0 Z0 ; set tool 0 axis offsets
G10 P0 R0 S0 ; set initial tool 0 active and standby temperatures to 0C; Custom settings are not defined
; Miscellaneous
M575 P1 S1 B57600 ; enable support for PanelDueI dont see where the Heater for the hot end should max at 280. Also there are 2 fans on the hot end. Shouldnt the values be identical? I got a lot of the fixes from someones 5 Pro config
-
@shatty said in Newbie: New Install on Ender 5 Plus---Willing to PAY$$:
I dont see where the Heater for the hot end should max at 280.
Add
M143 H1 S280at the end of the heater block under the M307.Otherwise I don't see any obvious issues.
You can send M98 P"config.g" in the console to see if there are any syntax errors.
Otherwise it's time to do some testing.
-
@shatty said in Newbie: New Install on Ender 5 Plus---Willing to PAY$$:
M92 X80.00 Y80.00 Z400.00 E412.60 ; set steps per mm
as i posted earlier the Z steps according to marlin are Z800
M308 S0 P"bedtemp" Y"thermistor" T100000 B4092 C4700 ; configure sensor 0 as thermistor on pin bedtemp
M950 H0 C"bedheat" T0 ; create bed heater output on bedheat and map it to sensor 0
M307 H0 B1 S1.00 ; enable bang-bang mode for the bed heater and set PWM limit
M140 H0 ; map heated bed to heater 0
M143 H0 S110 ; set temperature limit for heater 0 to 110C
M308 S1 P"e0temp" Y"thermistor" T100000 B4092 C4700 ; configure sensor 1 as thermistor on pin e0tempdelete the C4700 thats not the resistance. you can leave R empty and the correct default is choosen.