Duet 2 Ethernet no connection
-
@Veti I ran a comparison of the two config files after generating a new one. I've taken over someone else project but luckily I did find the previously used json. Going to boot up and see what happens.
; Configuration file for Duet WiFi (firmware version 3) ; executed by the firmware on start-up ; ; generated by RepRapFirmware Configuration Tool v3.1.4 on Sat Oct 10 2020 12:16:23 GMT-0700 (Pacific Daylight Time) ; General preferences G90 ; send absolute coordinates... M83 ; ...but relative extruder moves M550 P"The Beast" ; set printer name ; Network M552 S1 ; enable network M586 P0 S1 ; enable HTTP M586 P1 S0 ; disable FTP M586 P2 S0 ; disable Telnet ; Drives M569 P0 S1 ; physical drive 0 goes forwards M569 P1 S1 ; physical drive 1 goes forwards M569 P2 S1 ; physical drive 2 goes forwards M569 P3 S1 ; physical drive 3 goes forwards M569 P4 S1 ; physical drive 4 goes forwards M584 X0 Y1 Z2 E3:4 ; set drive mapping M350 X16 Y16 Z16 E16:16 I1 ; configure microstepping with interpolation M92 X400.00 Y400.00 Z400.00 E420.00:420.00 ; set steps per mm M566 X900.00 Y900.00 Z12.00 E120.00:120.00 ; set maximum instantaneous speed changes (mm/min) M203 X6000.00 Y6000.00 Z180.00 E1200.00:1200.00 ; set maximum speeds (mm/min) M201 X500.00 Y500.00 Z20.00 E250.00:250.00 ; set accelerations (mm/s^2) M906 X800 Y800 Z800 E800:800 I30 ; set motor currents (mA) and motor idle factor in per cent M84 S50 ; Set idle timeout ; Axis Limits M208 X0 Y0 Z0 S1 ; set axis minima M208 X210 Y260 Z500 S0 ; set axis maxima ; Endstops M574 X1 S1 P"xstop" ; configure active-high endstop for low end on X via pin xstop M574 Y1 S1 P"ystop" ; configure active-high endstop for low end on Y via pin ystop M574 Z1 S1 P"zstop" ; configure active-high endstop for low end on Z via pin zstop ; Z-Probe M950 S0 C"exp.heater3" ; create servo pin 0 for BLTouch M558 P9 C"^zprobe.in" H5 F120 T6000 ; set Z probe type to bltouch and the dive height + speeds G31 P500 X0 Y20 Z2.5 ; set Z probe trigger value, offset and trigger height M557 X10:200 Y10:200 S80 ; define mesh grid ; Heaters M308 S0 P"e0temp" Y"thermistor" T500000 B4723 C1.19622e-7 ; configure sensor 0 as thermistor on pin e0temp M950 H0 C"e0heat" T0 ; create nozzle heater output on e0heat and map it to sensor 0 M307 H0 B0 S1.00 ; disable bang-bang mode for heater and set PWM limit M308 S1 P"e1temp" Y"thermistor" T500000 B4723 C1.19622e-7 ; configure sensor 1 as thermistor on pin e1temp M950 H1 C"e1heat" T1 ; create nozzle heater output on e1heat and map it to sensor 1 M307 H1 B0 S1.00 ; disable bang-bang mode for heater and set PWM limit M308 S2 P"bedtemp" Y"thermistor" T100000 B4138 ; configure sensor 2 as thermistor on pin bedtemp M950 H2 C"bedheat" T2 ; create bed heater output on bedheat and map it to sensor 2 M307 H2 B0 S1.00 ; disable bang-bang mode for the bed heater and set PWM limit M140 H2 ; map heated bed to heater 2 M143 H2 S280 ; set temperature limit for heater 2 to 280C ; Fans M950 F0 C"fan0" Q500 ; create fan 0 on pin fan0 and set its frequency M106 P0 C"E0 Fan" S1 H1:2 T45 ; set fan 0 name and value. Thermostatic control is turned on M950 F1 C"fan1" Q500 ; create fan 1 on pin fan1 and set its frequency M106 P1 C"E1 Fan" S1 H1:2 T45 ; set fan 1 name and value. Thermostatic control is turned on M950 F2 C"fan2" Q500 ; create fan 2 on pin fan2 and set its frequency M106 P2 C"Layer Fan" S1 H-1 ; set fan 2 name and value. Thermostatic control is turned off ; Tools M563 P0 S"Extruder 0" D0 H1 F0:2 ; define tool 0 G10 P0 X0 Y0 Z0 ; set tool 0 axis offsets G10 P0 R0 S0 ; set initial tool 0 active and standby temperatures to 0C M563 P1 S"Extruder 1" D1 F0:2 ; define tool 1 G10 P1 X0 Y0 Z0 ; set tool 1 axis offsets G10 P1 R0 S0 ; set initial tool 1 active and standby temperatures to 0C ; Custom settings are not defined ; Miscellaneous M575 P1 S1 B57600 ; enable support for PanelDue -
you will need the new retract and deploy scripts as well
-
@Veti I have most of RR3 setup now, but I can not for the life of me get the BL Touch to deploy or retract or release it's alarm. I've been pulling my hair out over this.
-
Post your deploy and retract files.
M280 P0 S10 should work. If it does not, then perhaps you aren't using the pin you think you're using or the wire isn't making a connection.
; Z-Probe
M950 S0 C"exp.heater3"                         ; create servo pin 0 for BLTouch
M558 P9 C"^zprobe.in" H5 F120 T6000            ; set Z probe type to bltouch and the dive height + speeds
M280 P0 S10 ; deploy BLTouchM280 P0 S90 ; retract BLTouchAre you sure you're connected to expansion heater pin 3?
-
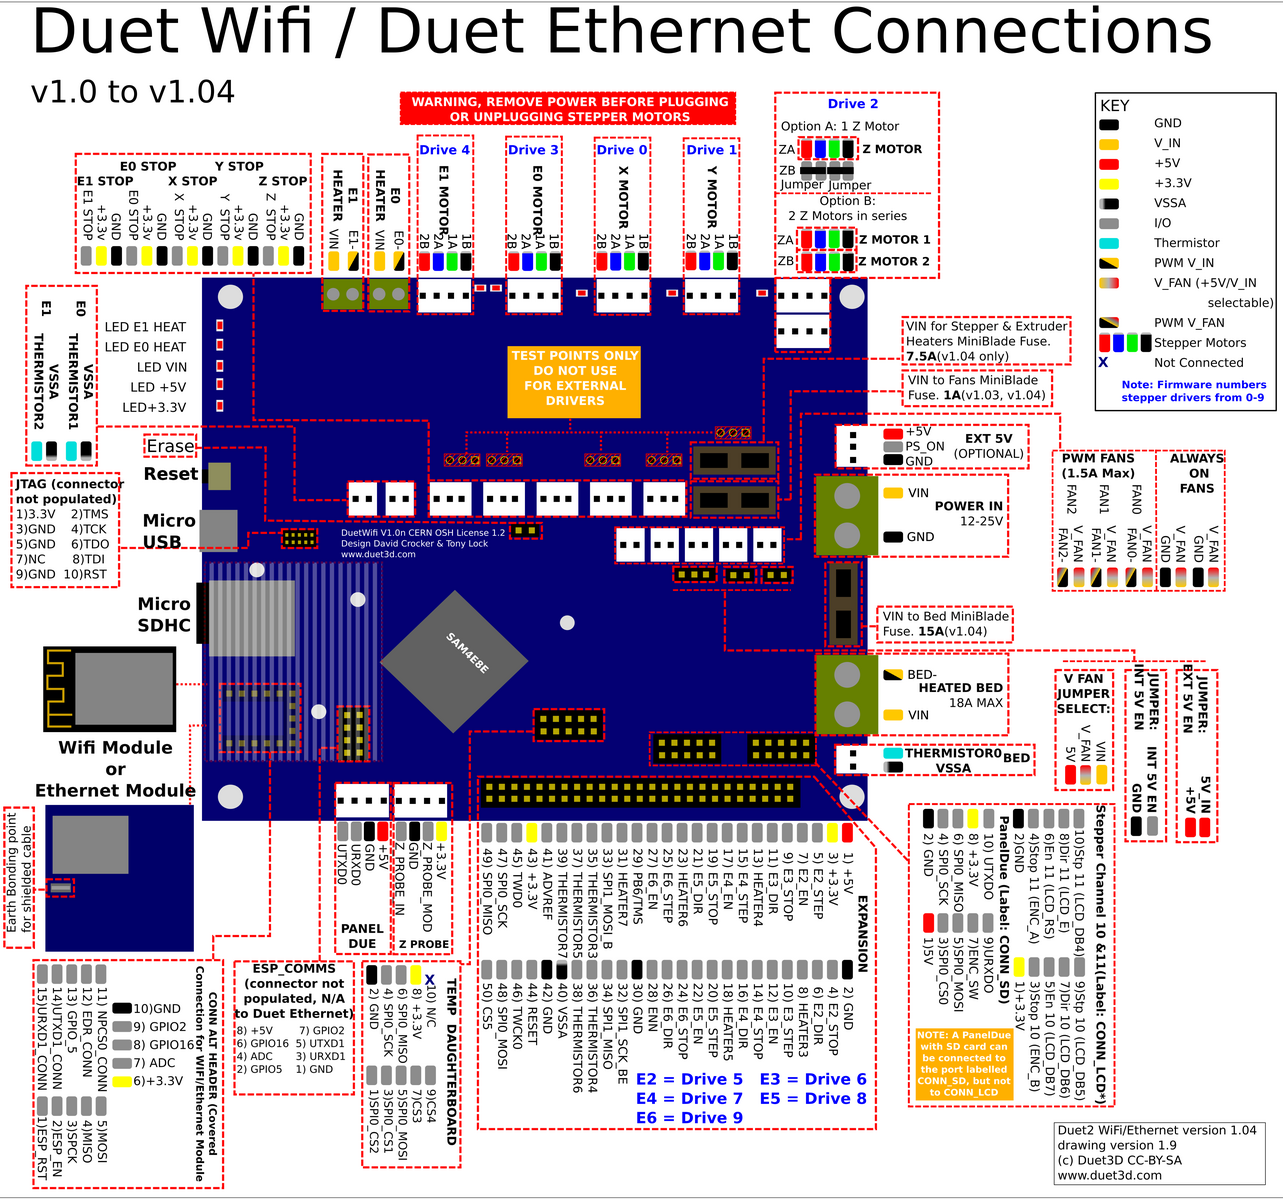
I have the printer up and running now thanks to all your help. Couple more questions for you- I have a 5v layer fan that I'd like to use as fan2. Fan0 and Fan1 are my 24v hotend fans. I understand I can use this by using a jumper. I'm not sure which jumper and how I would need to modify the config file.
Second question is, is it possible to run a 5v servo motor
with only the duet2 or do I need an expansion board? -
@camposm7 said in Duet 2 Ethernet no connection:
I have a 5v layer fan that I'd like to use as fan2. Fan0 and Fan1 are my 24v hotend fans. I understand I can use this by using a jumper. I'm not sure which jumper and how I would need to modify the config file.
You won't be able to use the jumper in this case, because it would change all of the fan ports to 5v. What you COULD do however, is use the 5v pin on that jumper block to power the fan and have the negative wire go to the Fan2 negative terminal. The fans are switched on the negative side.
This is similar to how you would run 12v fan on 24v PSU.
https://duet3d.dozuki.com/Wiki/Connecting_and_configuring_fans
As for the 5v servo, I'm not sure. Would need more information on the servo. You may be able to do something similar with 5v power provided to the servo and then the negative side switched by a heater terminal.
https://duet3d.dozuki.com/Wiki/Using_servos_and_controlling_unused_IO_pins
-
So last week I fried my board while trying to get a reading with my multimeter. It actually fried the micro SD card which is a first for me. Lost my config file that I of course did not have backed up. Today I installed a new board but now I am having several issues...
Firstly, my PanelDue 5i is not functioning at all and it is enabled in the config.
Secondly my z end stop seems to be the only functioning end stop. It is the only switch that lights up the LED.
Next, when trying to move an axis I am given the following error "Warning: motor phase B may be disconnected reported by driver(s) 2"
Last thing I am noticing is that the BL Touch is not deploying and retracting when I boot the machine up.
How about we just start with that. Where do I even begin??
-
New board as in new Duet, and still having the problems listed?
How is this being powered?
-
@bearer Yes, new Duet2 Ethernet V 1.04c. The previous board was v1.04b
It's being powered by a 24v Power supply
-
@camposm7 said in Duet 2 Ethernet no connection:
So last week I fried my board while trying to get a reading with my multimeter.
What were you trying to get a read of? What was shorted?
Any visible damage? Can you get a clear shot of the front of the board?
-
@Phaedrux I'm not worried about the old board, but I shorted it out trying to read a fan voltage. It's definitely toasted. The new board, though, that isn't working straight out of the box. This is the board I referred to above.
-
@camposm7 Would you be able to start a new thread for your new board? Let's leave your old thread behind. It took me a while to go through the whole thread to figure out where we are at.
In your new thread, include your duet board type, the firmware version installed, the results of M122 and M98 P"config.g" and a copy of your config.g and homing files. If there is a specific piece of hardware not working include details about how you have it wired. Photos/videos are also helpful.