how to purge the filament from the second extruder
-
Hi guys I don't understand how I can control the second extruder in order to purge the filament before processing. For the first time I use these commands:
G21
G90
G92 E0
G1 E150 F200
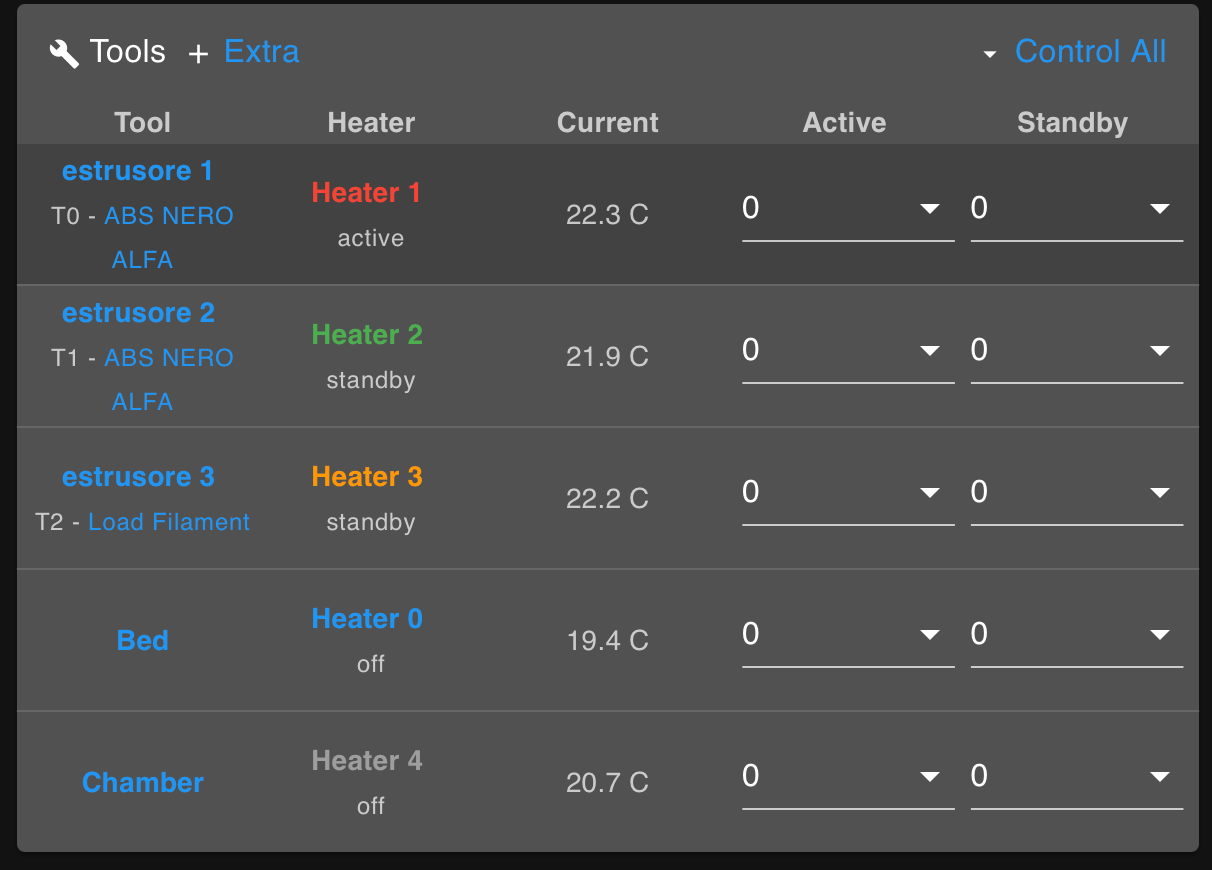
M400In Duet Web Control I set the temperature of the second extruder by activating it, but the first extruder always moves.
-
Post your config.g so we can see your tool and heater definitions.
-
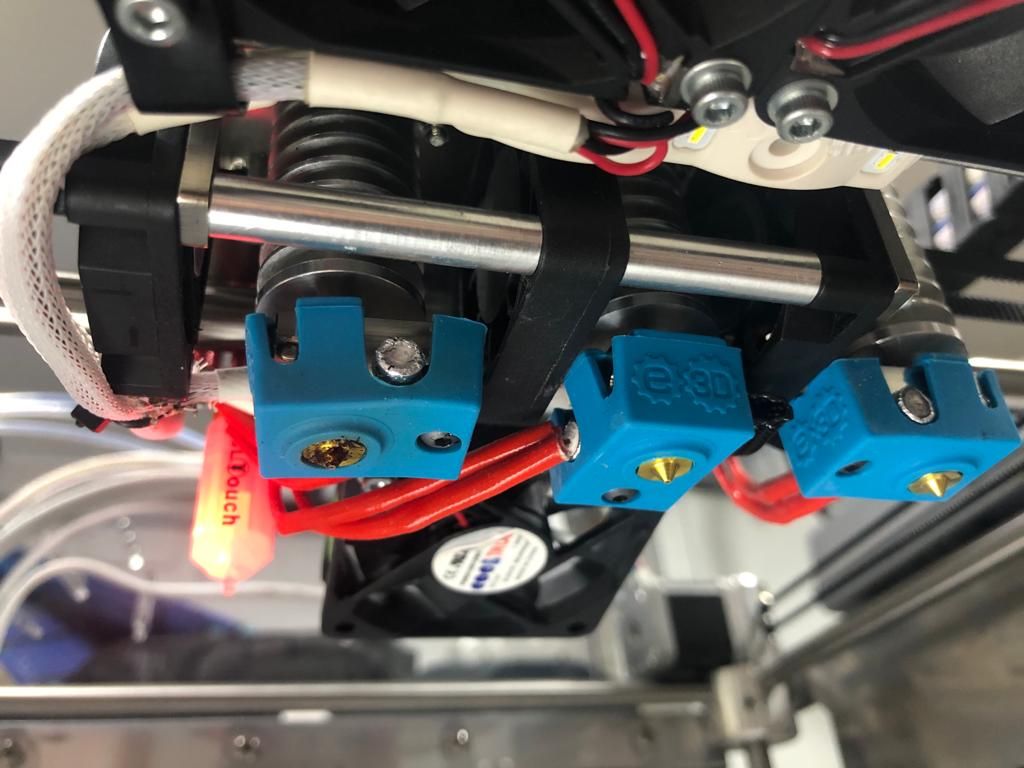
playing I noticed something that I don't think is regular, loading a filament in the first extruder loads it at the same time also on the second one, instead if I load it on the third extruder it loads it well.![alt text])
-
@Phaedrux ; Configuration file for Duet WiFi (firmware version 3)
; executed by the firmware on start-up
;
; generated by RepRapFirmware Configuration Tool v3.1.4 on Fri Jul 17 2020 20:24:58 GMT+0200 (CEST); General preferences
G90 ; send absolute coordinates...
M83 ; ...but relative extruder moves
M550 P" CUBE PRO TRIO" ; set printer name; Network
M552 S1 ; enable network
M586 P0 S1 ; enable HTTP
M586 P1 S0 ; disable FTP
M586 P2 S0 ; disable Telnet; Drives
M569 P0 S1 ; physical drive 0 goes forwards
M569 P1 S1 ; physical drive 1 goes forwards
M569 P2 S1 ; physical drive 2 goes forwards
M569 P3 S1 ; physical drive 3 goes forwards
M569 P4 S1 ; physical drive 4 goes forwards
M569 P9 S1 ; physical drive 9 goes forwards
M584 X0 Y1 Z2 E3:4:9 ; set drive mapping
M350 X16 Y16 Z16 E16:16:16 I1 ; configure microstepping with interpolation
M92 X87.35 Y87.43 Z1076.77 E82.09:82.09:82.09 ; set steps per mm
M566 X900.00 Y900.00 Z12.00 E120.00:120.00:120.00 ; set maximum instantaneous speed changes (mm/min)
M203 X15000.00 Y15000.00 Z1200.00 E600.00:600.00:600.00 ; set maximum speeds (mm/min)
M201 X500.00 Y500.00 Z250.00 E250.00:250.00:250.00 ; set accelerations (mm/s^2)
M906 X1500 Y1500 Z800 E1200:1200:1200 I30 ; set motor currents (mA) and motor idle factor in per cent (ho modficato la corrente dei motori dell'estrusore da 800 a 1200)
M84 S30 ; Set idle timeout; Axis Limits
M208 X0 Y0 Z0 S1 ; Imposta valore minimo deli assi
M208 X290 Y295.3 Z205 ; imposta il valore massimo degli assi ho tolto il valore S0 ALLA FINE DELLA RIGA; Endstops
M574 X1 S1 P"xstop" ; configure active-high endstop for low end on X via pin xstop
M574 Y1 S1 P"ystop" ; configure active-high endstop for low end on Y via pin ystop
M574 Z1 S1 P"zstop" ; configure active-high endstop for low end on Z via pin zstop; Z-Probe
M558 P0 H5 F120 T6000 ; disable Z probe but set dive height, probe speed and travel speed
M950 S0 C"duex.pwm5" ; creare il servo pin 0 per BLTouch
M558 P9 C"^zprobe.in" H5 F120 T6000 A10 R0.75 S0.02 ; set Z probe type to bltouch and the dive height + speeds
G31 P25 X-11.70 Y-51.2 Z2.75 ; impostare il valore del trigger della sonda Z, l'offset e l'altezza del trigger
M557 X12.3:290 Y24.80:295 S20 ; define mesh grid; Heaters
;Piatto riscaldato
;M570 H0 P90 T20 ; sto cercando di far aspettare fino che il piatto si riscaldi prima che mi dia errore
M308 S0 P"bedtemp" Y"thermistor" T100000 B3950 ; configure sensor 0 as thermistor on pin bedtemp ho modificato il valore dalla B4138 CON 3950
M950 H0 C"bedheat" T0 ; create bed heater output on bedheat and map it to sensor 0
M307 H0 B1 S1.00 ; enable bang-bang mode for the bed heater and set PWM limit
M140 H0 ; map heated bed to heater 0
M143 H0 S110 ; set temperature limit for heater 0 to 120C
;Estrusore numero 1
M308 S1 P"spi.cs1" Y"rtd-max31865" ; configure sensor 1 as thermistor on pin e0temp
M950 H1 C"e0heat" T1 ; create nozzle heater output on e0heat and map it to sensor 1
M307 H1 B0 S1.00 ; disable bang-bang mode for heater and set PWM limit
M143 H1 S290; set temperature limit for heater 0 to 120C
;Estrusore numero 2
M308 S2 P"spi.cs2" Y"rtd-max31865" ; configure sensor 2 as thermistor on pin e1temp
M950 H2 C"e1heat" T2 ; create nozzle heater output on e1heat and map it to sensor 2
M307 H2 B0 S1.00 ; disable bang-bang mode for heater and set PWM limit
M143 H2 S270
;Estrusore numero 3
M308 S3 P"spi.cs3" Y"rtd-max31865" ; M308 S3 P"duex.e2temp" Y"thermistor" T100000 B4725 ; configure sensor 3 as thermistor on pin duex.e2temp
M950 H3 C"duex.e2heat" T3 ; create nozzle heater output on duex.e2heat and map it to sensor 3
M143 H3 S270 ; set temperature limit for heater 0 to 120C
M307 H3 B0 S1.00 ; disable bang-bang mode for heater and set PWM limit
; Riscaldatore della camera
M141 H4 ; il riscaldatore 4 è il riscaldatore della camera
M950 H4 C"duex.e3heat" T4 ; configura l'uscita per il riscaldamento della camera sull pin e della scheda duex
M308 S4 P"duex.e3temp" Y"thermistor" T100000 B5500 C7.06Ee-8 ; configure sensor 4 as thermistor on pin duex.e2temp
M143 H4 S70 ; set temperature limit for heater 0 to 120C
M301 H4 B1 ; utilizzare il controllo bang-bang per il riscaldatore della camera; Fans
M950 F0 C"fan0" Q500 ; create fan 0 on pin fan0 and set its frequency
M106 P0 C"ESTRUSORI" S0 H3:2:1 T120 ; set fan 0 name and value. Thermostatic control is turned on
M950 F1 C"fan1" Q500 ; create fan 1 on pin fan1 and set its frequency
M106 P1 C"NOZZLE" S0 H1:2:3 T45 ; set fan 1 name and value. Thermostatic control is turned on
M950 F2 C"fan2" Q500 ; create fan 2 on pin fan2 and set its frequency
M106 P2 C"LUCI LED" S0 H-1 ; set fan 2 name and value. Thermostatic control is turned off
M950 F3 C"duex.fan6" Q500 ; create fan 3 on pin duex.fan6 and set its frequency
M106 P3 C"VENTOLA 6" S0 H-1 ; set fan 3 name and value. Thermostatic control is turned off
M950 F4 C"duex.fan7" Q500 ; create fan 4 on pin duex.fan7 and set its frequency
M106 P4 C"VENTOLA 7" S0 H-1 ; set fan 4 name and value. Thermostatic control is turned off; Tools monitoraggio del filamento
M563 P0 S"estrusore 1" D0 H1 F0:1 ; define tool 0
G10 P0 X0 Y0 Z0 ; set tool 0 axis offsets
G10 P0 R0 S0 ; set initial tool 0 active and standby temperatures to 0C
M563 P1 S"estrusore 2" D0 H2 F0:1 ; define tool 1
G10 P1 X0 Y0 Z0 ; set tool 1 axis offsets
G10 P1 R0 S0 ; set initial tool 1 active and standby temperatures to 0C
M563 P2 S"estrusore 3" D2 H3 F0:1 ; define tool 2
G10 P2 X0 Y0 Z0 ; set tool 2 axis offsets
G10 P2 R0 S0 ; set initial tool 2 active and standby temperatures to 0C; Sensori di folamento degli estrusori se imposto l'ultima S0 disabilita il confronto tra filamento aspetatto e quello realmente estruso,S1 abilita il controllo
M591 D0 P5 C"e0stop" R5:190 E3.0 S0 ; ho configurato il filamento del primo estrusore sull'uscita e0stop valori sensibilità filamneto originale R40:120
M591 D1 P5 C"connlcd.encb" R5:190 E3.0 S1 ; ho configurato il filamento del secondo estrusore sull'uscita stop10(ECN_B) valori sensibilità filamneto originale R40:120
M591 D2 P5 C"e1stop" R5:190 E3.0 S1 ; ho configurato il filamento del terzo estrusore sull'uscita e1stop valori sensibilità filamneto originale R40:120; Custom settings are not defined
M575 P1 S1 B57600 ;per abilitare lcd paneldue
M501
M500 -
@konte1978 said in how to purge the filament from the second extruder:
; Tools monitoraggio del filamento
M563 P0 S"estrusore 1" D0 H1 F0:1 ; define tool 0
G10 P0 X0 Y0 Z0 ; set tool 0 axis offsets
G10 P0 R0 S0 ; set initial tool 0 active and standby temperatures to 0C
M563 P1 S"estrusore 2" D0 H2 F0:1 ; define tool 1
G10 P1 X0 Y0 Z0 ; set tool 1 axis offsets
G10 P1 R0 S0 ; set initial tool 1 active and standby temperatures to 0C
M563 P2 S"estrusore 3" D2 H3 F0:1 ; define tool 2
G10 P2 X0 Y0 Z0 ; set tool 2 axis offsets
G10 P2 R0 S0 ; set initial tool 2 active and standby temperatures to 0CTool 0 is using Drive 0
Tool 1 is using Drive 0
Tool 2 is using Drive 2You probably should change Tool1 to use Drive 1.
M563 P1 S"estrusore 2" D0 H2 F0:1
Change to D1You're also using all the same fans for each tool. Is that correct?
@konte1978 said in how to purge the filament from the second extruder:
M500
Remove M500 from the end of config.g
-
First of all, thank you very much, with your help I solved the problem For the extruders I use three fans connected to the same outlet that automatically turns on at 120 degrees. If you see errors in my code or things to improve please tell me. I still have to correct several anomalies but I will ask in another dedicated topic.