Duet3D Logo Duet3D
    • Tags
    • Documentation
    • Order
    • Register
    • Login

    problems with pressure advance calibration

    Scheduled Pinned Locked Moved
    Tuning and tweaking
    3
    16
    2.1k
    Loading More Posts
    • Oldest to Newest
    • Newest to Oldest
    • Most Votes
    Reply
    • Reply as topic
    Log in to reply
    This topic has been deleted. Only users with topic management privileges can see it.
    • Vetiundefined
      Veti
      last edited by

      whats your e acceleration. pressure advance needs high numbers for that to work.

      also check out the guide i just posted

      https://forum.duet3d.com/topic/20558/pressure-advance-tuning-like-klipper

      nick9one1undefined 1 Reply Last reply Reply Quote 0
      • Vetiundefined
        Veti
        last edited by Veti

        also what kind of setup do you have?
        direct drive or bowden?

        1 Reply Last reply Reply Quote 0
        • nick9one1undefined
          nick9one1
          last edited by nick9one1

          thanks. about 650mm bowden.
          its a BLVMGN core XY

          20201226_143204.jpg

          M566 X820.00 Y820.00 Z24.00 E300.00            	; set maximum instantaneous speed changes (mm/min)
          M203 X20000.00 Y20000.00 Z600.00 E2000.00      	; set maximum speeds (mm/min)
          M201 X3000.00 Y3000.00 Z100.00 E5000.00        	; set accelerations (mm/s^2)
          M906 X1100 Y1100 Z1100 E1100 I30               	; set motor currents (mA) and motor idle factor in per cent
          

          3babb0ad-8b03-4a61-84f6-ed1af2db3cd8-image.png

          Phaedruxundefined 1 Reply Last reply Reply Quote 0
          • nick9one1undefined
            nick9one1 @Veti
            last edited by nick9one1

            @Veti Thanks. Printing your modified test cube now.

            I set M201 X500 Y500 in config.g

            Sliced the cube as per the instructions. 100mm/s, 0.3 layer height, 0% infill, and M572 D0 S{layer_z*0.02} in the layer change g-code.

            the only slight alteration I made was to ensure the later changes were in the middle fo a face, not at the corner. I think its easier to identify the correct pressure advance this way.

            debc1fb5-11f5-4fff-a557-e429f3ff8e0e-image.png

            1 Reply Last reply Reply Quote 0
            • Vetiundefined
              Veti
              last edited by Veti

              depending on the quality of your bowden tube you might need to go above 1 as 650mm is quite long

              and you dont need infill for the test qube

              nick9one1undefined 1 Reply Last reply Reply Quote 1
              • nick9one1undefined
                nick9one1 @Veti
                last edited by nick9one1

                @Veti

                thanks. It was just the top layers I forgot to set to 0. Infill is already 0 with 3 walls.

                1 Reply Last reply Reply Quote 0
                • nick9one1undefined
                  nick9one1
                  last edited by

                  ![alt text](image url20201226_170558.jpg )

                  1 Reply Last reply Reply Quote 0
                  • Vetiundefined
                    Veti
                    last edited by

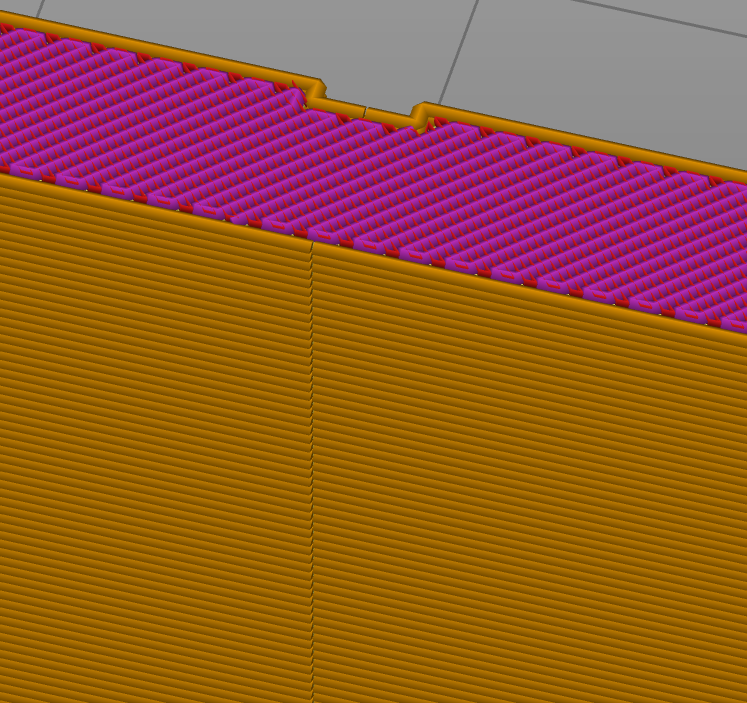
                    that doesnt look to good to begin with.

                    about the middle looks a bit better then the rest.

                    1 Reply Last reply Reply Quote 0
                    • Phaedruxundefined
                      Phaedrux Moderator @nick9one1
                      last edited by Phaedrux

                      @nick9one1 said in problems with pressure advance calibration:

                      M566 X820.00 Y820.00 Z24.00 E300.00

                      Increase your E jerk. Try 3000.

                      Z-Bot CoreXY Build | Thingiverse Profile

                      1 Reply Last reply Reply Quote 1
                      • nick9one1undefined
                        nick9one1
                        last edited by

                        thanks. Increased Ejerk to 3000 and printing again, but only 2 walls this time for speed.

                        The previous print was 100mm/s

                        80c20680-d691-45bd-83ed-0b4db0efccec-image.png

                        1 Reply Last reply Reply Quote 0
                        • nick9one1undefined
                          nick9one1
                          last edited by

                          Looking much better at 3000 e jerk. Thanks for that tip.

                          Around halfway looks about the best.
                          I can see the right side of each new layer is changes but not the end of previous layer -how do I tune this?

                          ![alt text](image url20201226_225533.jpg )

                          1 Reply Last reply Reply Quote 0
                          • Phaedruxundefined
                            Phaedrux Moderator
                            last edited by

                            Run another test but zero in on the area from the middle area and use finer steps between jumps.

                            For the bulge from layer change you can also increase your Z axis jerk and accel a bit more. Try M566 Z60 and M201 Z200 or higher.

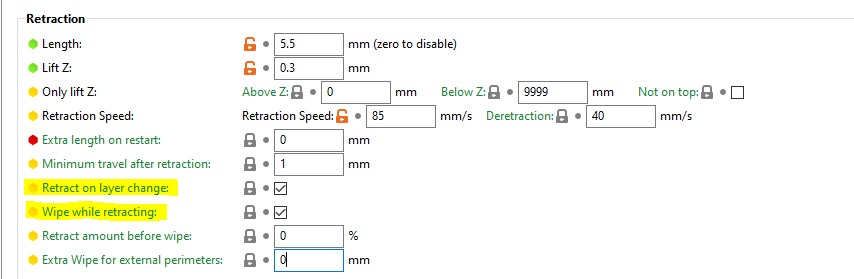
                            Do you have retract on layer change enabled in the slicer as well? That can help.

                            Z-Bot CoreXY Build | Thingiverse Profile

                            nick9one1undefined 1 Reply Last reply Reply Quote 0
                            • nick9one1undefined
                              nick9one1 @Phaedrux
                              last edited by nick9one1

                              @Phaedrux said in problems with pressure advance calibration:

                              retract on layer change

                              Thank you. Yes I have retract on layer change enabled
                              f56890b9-ed4a-4117-8a7e-fc64af13cebb-image.png

                              I've changed the z values you suggested and set the slicer to start the pressure advance at 0.035 in increments to 0.055. Printing now 🙂

                              1 Reply Last reply Reply Quote 1
                              • nick9one1undefined
                                nick9one1
                                last edited by nick9one1

                                I'm definitely getting closer..

                                I think pressure advance is well tuned now, but I still have extra extrusion on the left.

                                This is with ;
                                M566 Z90
                                M201 Z300

                                my original settings were;
                                M566 Z24
                                M201 Z100

                                20201227_123318~2.jpg

                                1 Reply Last reply Reply Quote 0
                                • Phaedruxundefined
                                  Phaedrux Moderator
                                  last edited by

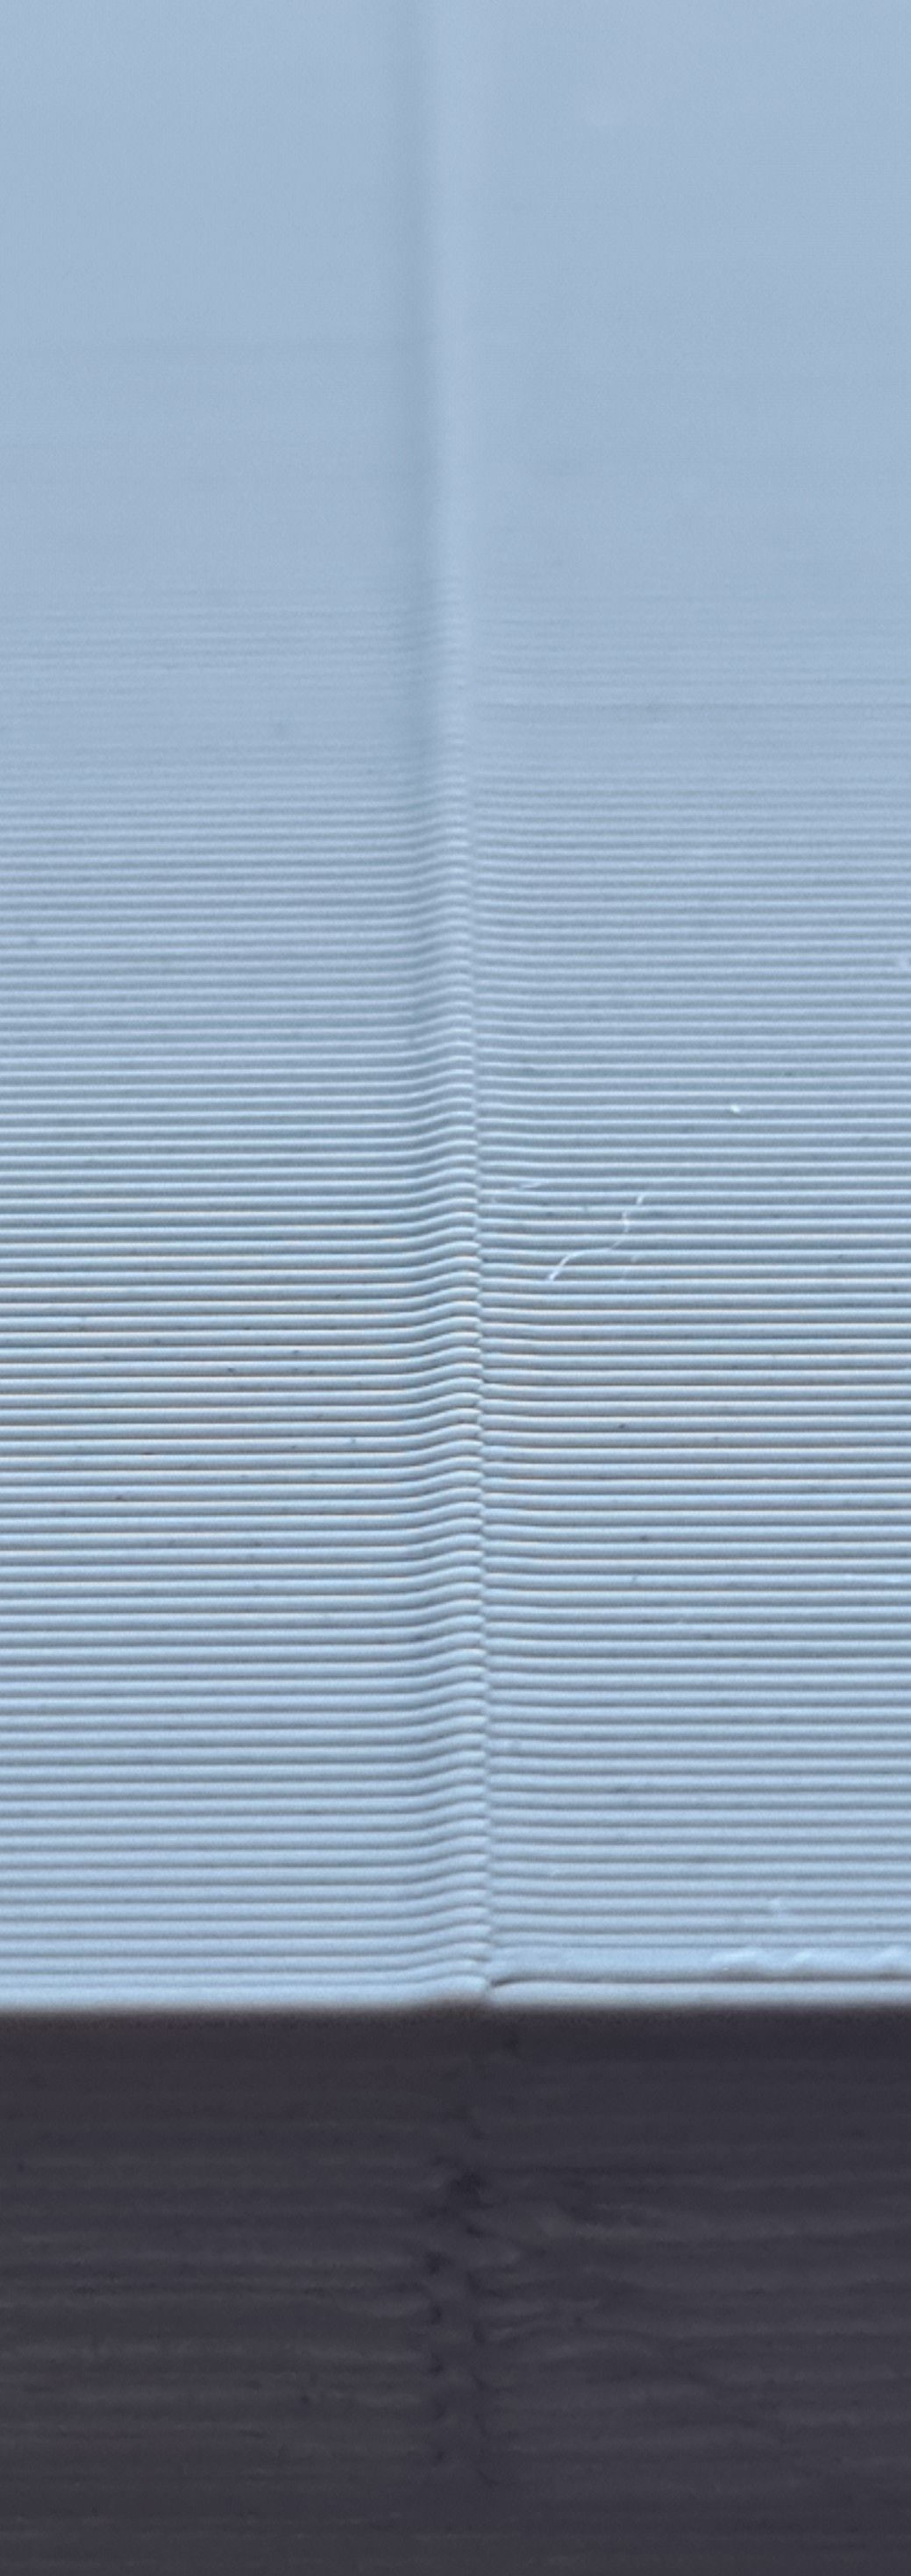
                                  Turn off wipe while retracting and re-run the test.

                                  Z-Bot CoreXY Build | Thingiverse Profile

                                  1 Reply Last reply Reply Quote 0
                                  • First post
                                    Last post
                                  Unless otherwise noted, all forum content is licensed under CC-BY-SA