Did I fry my new board....
-
@Phaedrux I made it through all of the first link a couple of times. I searched for the info in the 2nd link, but could not find it. Thank you for providing that.
-
@Harvdog1 said in Did I fry my new board....:
Error: Heater 1 fault: temperature rising much more slowly than the expected 1.8°C/sec
This means you haven't PID tuned the heater.
@Harvdog1 said in Did I fry my new board....:
Error: G0/G1: insufficient axes homed
This means you're trying to move an axis before it's been homed.
@Harvdog1 said in Did I fry my new board....:
Error: Homing failed
This means an axis failed to trigger an endstop.
@Harvdog1 said in Did I fry my new board....:
Error: short-to-ground reported by driver(s) 2
That means either the wiring for driver 2 has the motor phase pairs miss-matched or the driver is damaged.
-
@Phaedrux That sounds right, and regarding the possible damaged driver, is there a way to test that to see if I fried anything?
-
Have you used this to generate your first config set?
https://configtool.reprapfirmware.org/Start
Tuning heaters: https://duet3d.dozuki.com/Wiki/Tuning_the_heater_temperature_control
Identify stepper motor phases: https://duet3d.dozuki.com/Wiki/Choosing_and_connecting_stepper_motors#Section_Identifying_the_stepper_motor_phases
M122 will give a diagnostic report. Can you please provide that here?
M98 P"config.g" will check for any syntax errors in the config.g file that may not show up at startup. Post that as well.
-
@Phaedrux M122
=== Diagnostics ===
RepRapFirmware for Duet 2 WiFi/Ethernet version 3.1.1 running on Duet WiFi 1.02 or later
Board ID: 0JD0M-9P6M2-NW4SJ-6J9DL-3SN6N-9TSRK
Used output buffers: 3 of 24 (21 max)
=== RTOS ===
Static ram: 27980
Dynamic ram: 93648 of which 192 recycled
Exception stack ram used: 264
Never used ram: 8988
Tasks: NETWORK(ready,384) HEAT(blocked,536) MAIN(running,1840) IDLE(ready,80)
Owned mutexes: WiFi(NETWORK)
=== Platform ===
Last reset 00:17:05 ago, cause: power up
Last software reset at 2021-01-03 02:15, reason: User, spinning module GCodes, available RAM 8836 bytes (slot 0)
Software reset code 0x0003 HFSR 0x00000000 CFSR 0x00000000 ICSR 0x0441f000 BFAR 0xe000ed38 SP 0xffffffff Task MAIN
Error status: 0
MCU temperature: min 21.6, current 23.2, max 23.7
Supply voltage: min 24.1, current 24.2, max 24.4, under voltage events: 0, over voltage events: 0, power good: yes
Driver 0: standstill, SG min/max not available
Driver 1: standstill, SG min/max not available
Driver 2: standstill, SG min/max not available
Driver 3: standstill, SG min/max not available
Driver 4: standstill, SG min/max not available
Date/time: 2021-01-03 13:26:56
Cache data hit count 1752787848
Slowest loop: 11.05ms; fastest: 0.13ms
I2C nak errors 0, send timeouts 0, receive timeouts 0, finishTimeouts 0, resets 0
=== Storage ===
Free file entries: 10
SD card 0 detected, interface speed: 20.0MBytes/sec
SD card longest read time 3.7ms, write time 2.7ms, max retries 0
=== Move ===
Hiccups: 0(0), FreeDm: 169, MinFreeDm: 169, MaxWait: 0ms
Bed compensation in use: none, comp offset 0.000
=== MainDDARing ===
Scheduled moves: 0, completed moves: 0, StepErrors: 0, LaErrors: 0, Underruns: 0, 0 CDDA state: -1
=== AuxDDARing ===
Scheduled moves: 0, completed moves: 0, StepErrors: 0, LaErrors: 0, Underruns: 0, 0 CDDA state: -1
=== Heat ===
Bed heaters = 0 -1 -1 -1, chamberHeaters = -1 -1 -1 -1
=== GCodes ===
Segments left: 0
Movement lock held by null
HTTP is idle in state(s) 0
Telnet is idle in state(s) 0
File is idle in state(s) 0
USB is idle in state(s) 0
Aux is idle in state(s) 0
Trigger is idle in state(s) 0
Queue is idle in state(s) 0
Daemon is idle in state(s) 0
Autopause is idle in state(s) 0
Code queue is empty.
=== Network ===
Slowest loop: 201.68ms; fastest: 0.09ms
Responder states: HTTP(2) HTTP(0) HTTP(0) HTTP(0) FTP(0) Telnet(0), 0 sessions
HTTP sessions: 1 of 8- WiFi -
Network state is active
WiFi module is connected to access point
Failed messages: pending 0, notready 0, noresp 1
WiFi firmware version 1.23
WiFi MAC address f4:cf:a2:e2:ea:ef
WiFi Vcc 3.46, reset reason Unknown
WiFi flash size 4194304, free heap 25432
WiFi IP address 192.168.1.200
WiFi signal strength -32dBm, reconnections 0, sleep mode modem
Socket states: 4 0 0 0 0 0 0 0
=== Filament sensors ===
Extruder 0 sensor: no filament
- WiFi -
-
@Harvdog1 said in Did I fry my new board....:
is there a way to test that to see if I fried anything?
Well yes, first check that you have the phase pairs correct and then test that motor on another driver to make sure it works, then try a different motor on driver 2 and see if it works.
Posting your config.g and homing files would be a good idea too so we can see what's going on.
-
@Phaedrux ; Configuration file for Duet WiFi (firmware version 3)
; executed by the firmware on start-up
;
; generated by RepRapFirmware Configuration Tool v3.2.0 on Sat Jan 02 2021 04:57:58 GMT-0800 (Pacific Standard Time); General preferences
G90 ; send absolute coordinates...
M83 ; ...but relative extruder moves
M550 P"LoanHarvey" ; set printer name; Network
M552 S1 ; enable network
M586 P0 S1 ; enable HTTP
M586 P1 S0 ; disable FTP
M586 P2 S0 ; disable Telnet; Drives
M569 P0 S0 ; physical drive 0 goes backwards
M569 P1 S0 ; physical drive 1 goes backwards
M569 P2 S1 ; physical drive 2 goes forwards
M569 P3 S0 ; physical drive 3 goes backwards
M584 X0 Y1 Z2 E3 ; set drive mapping
M350 X16 Y16 Z16 E16 I1 ; configure microstepping with interpolation
M92 X80.00 Y80.00 Z400.00 E80.00 ; set steps per mm
M566 X1200.00 Y1200.00 Z24.00 E300.00 ; set maximum instantaneous speed changes (mm/min)
M203 X30000.00 Y30000.00 Z300.00 E4800.00 ; set maximum speeds (mm/min)
M201 X500.00 Y500.00 Z100.00 E5000.00 ; set accelerations (mm/s^2)
M906 X400 Y400 Z400 E800 I30 ; set motor currents (mA) and motor idle factor in per cent
M84 S300 ; Set idle timeout; Axis Limits
M208 X0 Y0 Z0 S1 ; set axis minima
M208 X235 Y235 Z240 S0 ; set axis maxima; Endstops
M574 X1 S1 P"xstop" ; configure active-high endstop for low end on X via pin xstop
M574 Y1 S1 P"ystop" ; configure active-high endstop for low end on Y via pin ystop
M574 Z1 S1 P"zstop" ; configure active-high endstop for low end on Z via pin zstop; Z-Probe
;M558 P0 H2.5 F0 T6000 ; disable Z probe but set dive height, probe speed and travel speed
;M557 X20:215 Y20:215 S64 ; define mesh grid; Heaters
M308 S0 P"bedtemp" Y"thermistor" T98801 B4185 ; configure sensor 0 as thermistor on pin bedtemp
M950 H0 C"bedheat" T0 ; create bed heater output on bedheat and map it to sensor 0
M307 H0 B0 S1.00 ; disable bang-bang mode for the bed heater and set PWM limit
M140 H0 ; map heated bed to heater 0
M143 H0 S120 ; set temperature limit for heater 0 to 120C
M308 S1 P"e0temp" Y"thermistor" T98801 B4185 ; configure sensor 1 as thermistor on pin e0temp
M950 H1 C"e0heat" T1 ; create nozzle heater output on e0heat and map it to sensor 1
M307 H1 B0 S1.00 ; disable bang-bang mode for heater and set PWM limit
M143 H1 S300 ; set temperature limit for heater 1 to 300C; Fans
M950 F0 C"fan0" Q500 ; create fan 0 on pin fan0 and set its frequency
M106 P0 S0 H-1 ; set fan 0 value. Thermostatic control is turned off
M950 F1 C"fan1" Q500 ; create fan 1 on pin fan1 and set its frequency
M106 P1 S1 H1 T45 ; set fan 1 value. Thermostatic control is turned on
M950 F2 C"fan1" Q500 ; create fan 2 on pin fan1 and set its frequency
M106 P2 S1 H0:1 T45 ; set fan 2 value. Thermostatic control is turned on; Tools
M563 P0 D0 H1 F0 ; define tool 0
G10 P0 X0 Y0 Z0 ; set tool 0 axis offsets
G10 P0 R0 S0 ; set initial tool 0 active and standby temperatures to 0C; Custom settings
M591 D0 C3 P1 E1 S1 ; Turn on functionality for a filament run-out switch; Miscellaneous
M575 P1 S1 B57600 ; enable support for PanelDue
M911 S10 R11 P"M913 X0 Y0 G91 M83 G1 Z3 E-5 F1000" ; set voltage thresholds and actions to run on power loss -
Do you have 2 Z motors connected or just one? If only 1, do you have the jumpers installed on the second motor connector?
If you have only one Z stepper motor, plug it in to the ZA connector, and plug two jumpers into the ZB connector. Duet 2 boards are normally supplied with these jumpers already fitted.
-
@Harvdog1 ; homeall.g
; called to home all axes
;
; generated by RepRapFirmware Configuration Tool v3.2.0 on Sat Jan 02 2021 04:57:58 GMT-0800 (Pacific Standard Time)
G91 ; relative positioning
G1 H2 Z2.5 F6000 ; lift Z relative to current position
G1 H1 X-240 Y-240 F1800 ; move quickly to X and Y axis endstops and stop there (first pass)
G1 H2 X5 Y5 F6000 ; go back a few mm
G1 H1 X-240 Y-240 F360 ; move slowly to X and Y axis endstops once more (second pass)
G1 H1 Z-245 F360 ; move Z down stopping at the endstop
G90 ; absolute positioning
G92 Z0 ; set Z position to axis minimum (you may want to adjust this); Uncomment the following lines to lift Z after probing
;G91 ; relative positioning
;G1 Z2.5 F100 ; lift Z relative to current position
;G90 ; absolute positioninghomex.g
; called to home the X axis
;
; generated by RepRapFirmware Configuration Tool v3.2.0 on Sat Jan 02 2021 04:57:58 GMT-0800 (Pacific Standard Time)
G91 ; relative positioning
G1 H2 Z4.5 F6000 ; lift Z relative to current position
G1 H1 X-240 F1800 ; move quickly to X axis endstop and stop there (first pass)
G1 H2 X5 F6000 ; go back a few mm
G1 H1 X-240 F360 ; move slowly to X axis endstop once more (second pass)
G1 H2 Z-2.5 F6000 ; lower Z again
G90 ; absolute positioning
; homey.g
; called to home the Y axis
;
; generated by RepRapFirmware Configuration Tool v3.2.0 on Sat Jan 02 2021 04:57:58 GMT-0800 (Pacific Standard Time)
G91 ; relative positioning
G1 H2 Z2.5 F6000 ; lift Z relative to current position
G1 H1 Y-240 F1800 ; move quickly to Y axis endstop and stop there (first pass)
G1 H2 Y5 F6000 ; go back a few mm
G1 H1 Y-240 F360 ; move slowly to Y axis endstop once more (second pass)
G1 H2 Z-2.5 F6000 ; lower Z again
G90 ; absolute positioning; homez.g
; called to home the Z axis
;
; generated by RepRapFirmware Configuration Tool v3.2.0 on Sat Jan 02 2021 04:57:58 GMT-0800 (Pacific Standard Time)
G91 ; relative positioning
G1 H2 Z2.5 F6000 ; lift Z relative to current position
G1 H1 Z-245 F1800 ; move Z down until the endstop is triggered
G92 Z0 ; set Z position to axis minimum (you may want to adjust this); Uncomment the following lines to lift Z after probing
;G91 ; relative positioning
;G1 Z2.5 F100 ; lift Z relative to current position
;G90 ; absolute positioning -
@Phaedrux One Z motor and the jumper is installed.
-
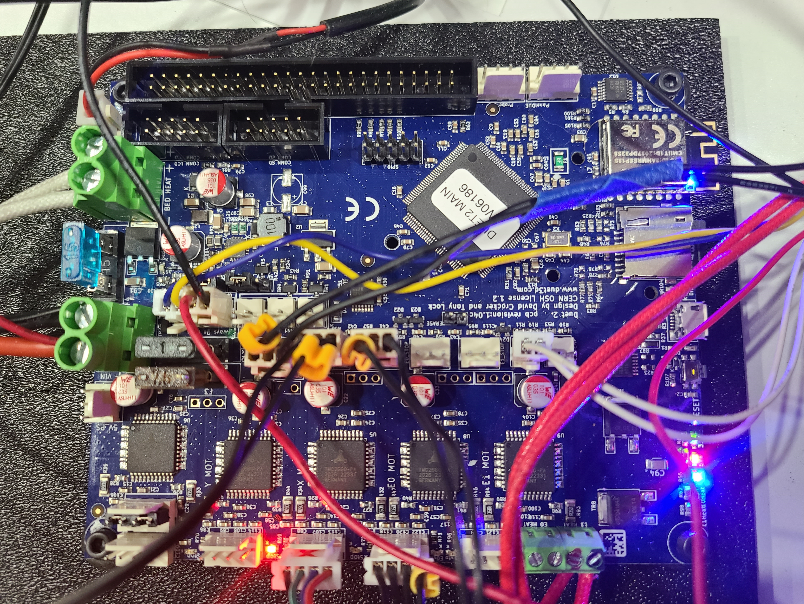
Can you post a photo of driver 2 in case there's some damage visible?
If the driver is damaged and you have a free extruder driver you can remap it to the z axis to get up and running.
M584 X0 Y1 Z2 E3 ; set drive mapping
would become
M584 X0 Y1 Z4 E3 ; set drive mapping
What are the specs of your motors? What is the rated current?
M906 X400 Y400 Z400 E800 I30 ; set motor currents (mA) and motor idle factor in per cent
It's recommended to set the current to 60-85% of the motors rated current.
Do the other drivers work?
-
@Phaedrux I had been working on this exact thing, I finally got the X going, I could issue it a command to move left or right and it started working. Prior to that it and the other 2 would just make horrible noises. Once it was working on the X, i checked the connections on the wiring, meaning how the wires were plugged into the little plastic things. The others were not matching that one, so I started moving wires around trying to replicate the one what was working. That did not work, now that one good wire will not work on the x axis...
-
do not just randomly try wire position
please follow this guide
-
-
@Harvdog1 said in Did I fry my new board....:
M950 H1 C"e0heat" T1 ; create nozzle heater output on e0heat and map it to sensor 1
you configured e0heat but connected the heater to e1
you really should be recrimping those connectors.
-
@Veti The crimper is in route. The hot end was connected like it is because I did it like one of the you tubers, he had his there. I see it now in position 1 and should be moved over to the left to zero.
Thank you -
@Harvdog1 said in Did I fry my new board....:
The hot end was connected like it is because I did it like one of the you tubers,
if you follow a guide please have a look at
https://duet3d.dozuki.com/Guide/Ender+3+Pro+and+Duet+Maestro+Guide+Part+1:+Wiring/37it should be mostly be the same
-
@Veti The micro swiss hotend is working now, thank you. Is there a way to find out if the drivers are all ok?
-
you said you had one that is working already.
you can move that one to the different ports to test each driver.
only move the connector when the duet is powered off. -
@Veti I did try that with the known good wire, and the others did not work. When I plugged it back into the X, it no longer worked. So they are all down at the moment.