Heated Chamber BLtouch wiring issues.
-
@jallen810 I can take a picture but you are not going to like it
 it's really an ugly solution
 ") ... just need to wait till kids are asleap as need to shift some stuff around in the workshop to get to that machine as it's out of commission attm... expect pictures in 10-15min
... just need to wait till kids are asleap as need to shift some stuff around in the workshop to get to that machine as it's out of commission attm... expect pictures in 10-15min -
@arhi You da man thank you sir!
-
@jallen810 here
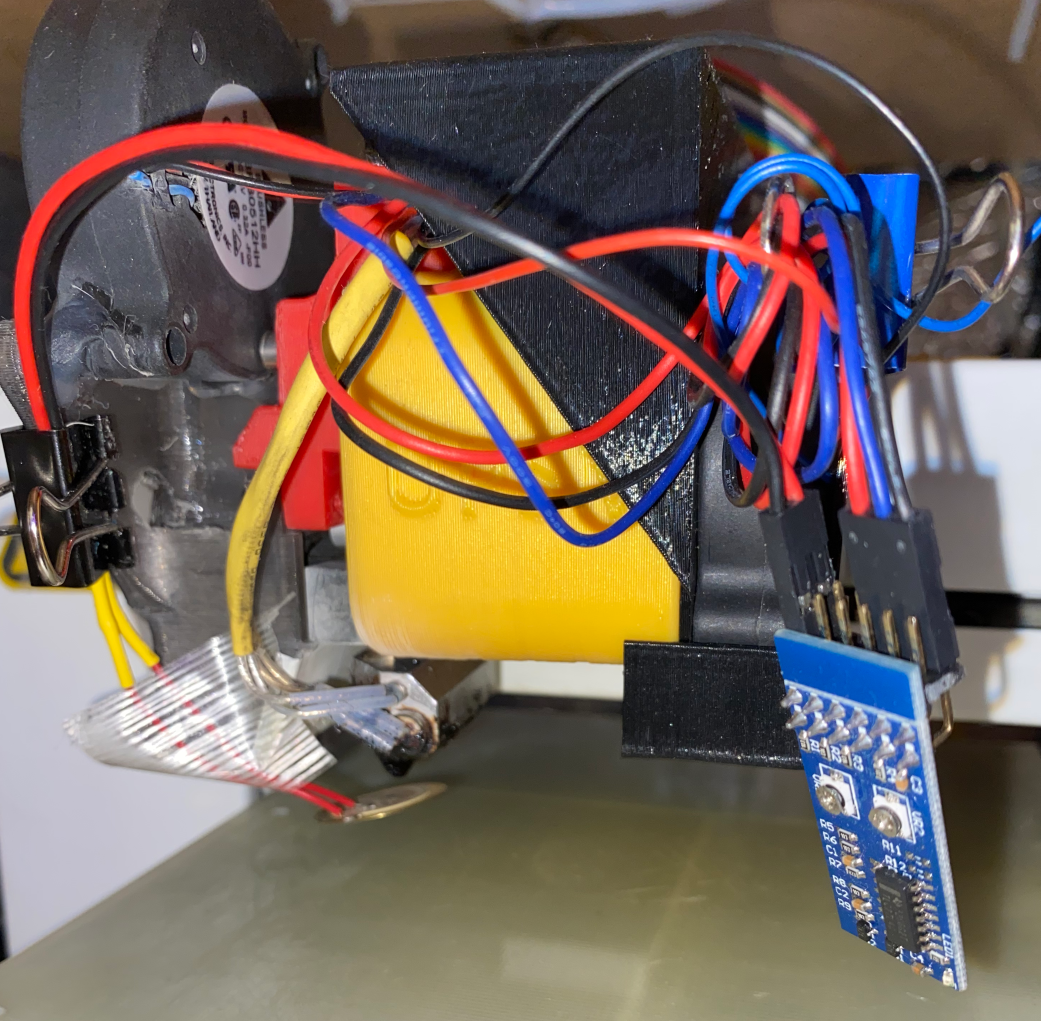
as you can see it is a McGiver solution, but works, that header just plugs into el-cheapo PRC board that's an opamp for the piezo disk that's already plugged in and that has "pull to ground" signal output, you see that piezo disk wires are temporary attached with a clip and a piece of tape so that disk is "about below nozzle" the whole contraption will move and disk will be between tip and bed and will trigger ... this, as ugly and flimzy and disgusting as is works amazingly precise.
I have cold air blowing trough the case of that printer keeping all the belts cool, but attm printer is out of comission (otherwise I'd show you video of how it does the mesh calibration) as after almost 10 years a flat cable going to the head is somewhere loosing connection (12V and PT100 wires are dead) so I need to replace it, but it requires a whole printer disassembly to replace it so it's waiting for "free time"
-
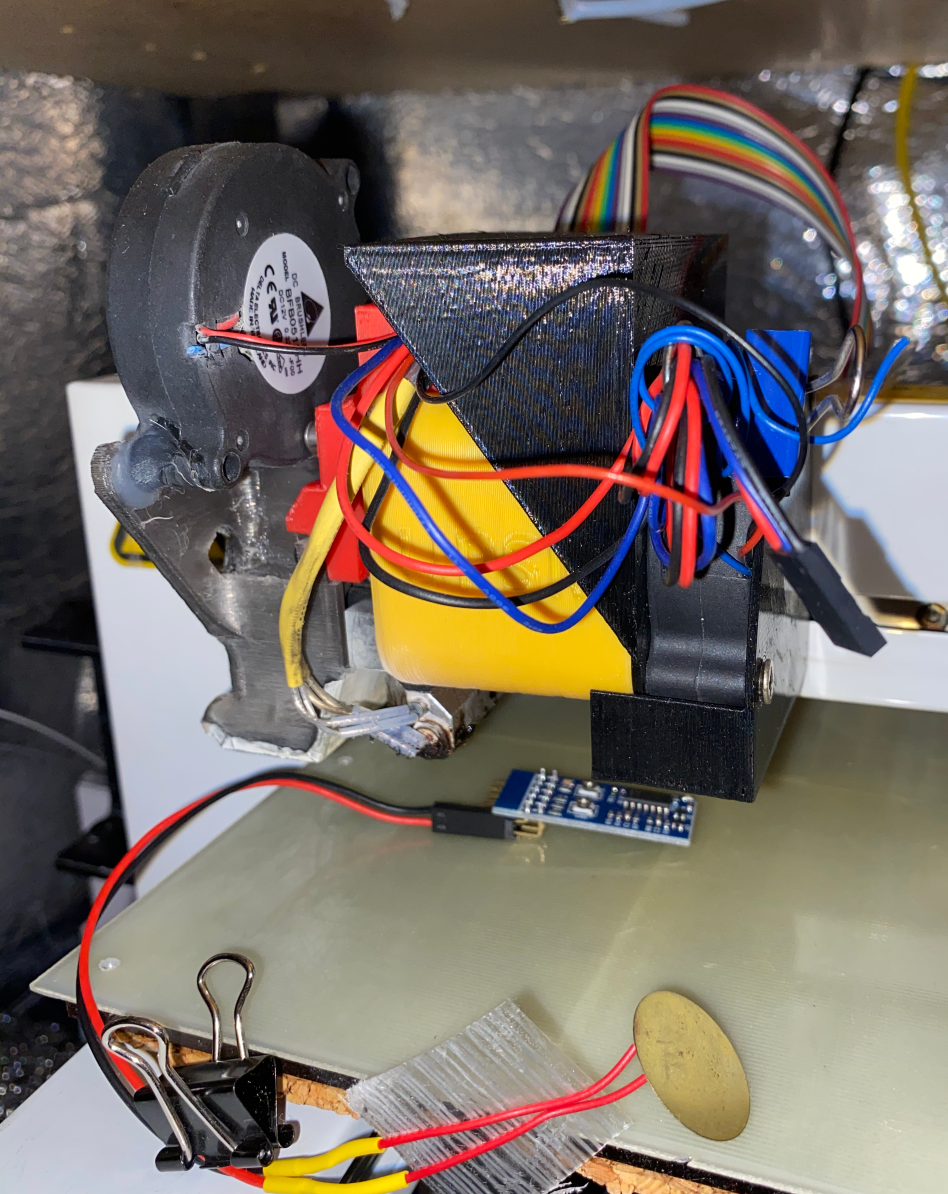
and here you see it "disconnected" so printer can work (yes, I know, I should shorten the wires hanging on the extruder but ..) ... the sensor is on the table so you can see what part is disconnected, this I now put in the drawer until next time I need to calibrate mesh... I normally calibrate mesh if I replace the bed or every 2-3 months (and yes, that colorfull flat cable that you see behind, that's what's dead, probbly from being only part of "regular" wiring exposed to heat/cool cycles but it held up many years)
-
@arhi said in Heated Chamber BLtouch wiring issues.:
PRC board
Cool so I would need a piezo and this special board? I google PRR board and couldn't find anything. Is it referred to as something else?
-
@jallen810 it is precisionpiezo clone from aliexpress or original one I don't remember i have 4 or 5 originals and 4 or 5 ones from aliexpress ... I have both original and prc versions 1.x so old ones. New 2.x are supposedly better but I prefer the old ones.
this is PRC version: https://www.aliexpress.com/item/32832426899.html
original of this type of pcb
https://www.precisionpiezo.co.uk/product-page/universal-piezo-z-probe-pcb-v2-x-for-1-2-3-or-more-piezosNow, I suggest you go for original, price is more/less same but with original you get superb support from PP guy's while with PRC version you get nothing. Also original is properly soldered and tested, PRC version I had to "touch up" few of them to get working
this is the kit I'd use "today" if I'm buying for new printer to use in this type of fashion I'm using here.
https://www.precisionpiezo.co.uk/product-page/copy-of-precision-piezo-universal-z-probe-kit
mind, in "not enclosed" printers like my ender5 I use their
https://www.precisionpiezo.co.uk/product-page/precision-piezo-orion-kit
embedded in the printhead .. and while it's super convenient, I kinda prefer that mcgyver way -
I am impressed with your solution! I have several piezo sensors kicking about as I first tried that solution before gong to the BLTouch. I really liked the idea of not having to set the offset - the measurement as taken was perfect. Alas, it wasn't all cream and honey. There was a big fat fly right smack dab in the middle paddling around in the cream and honey. The problem was (IMHO) the way the piezo was mounted to the hot end. The piezo was incredibly accurate and unbelievable sensitive .... but while some spots produced a perfect sense result, in other spots the bed was pushed down by a huge amount before the sensor would trip. It was utterly useless!
I spent a LOT of time getting it to work right before I gave up to preserve my sanity.
With your solution, which I am sure could be made 'pretty' you have the best of all worlds - you got accuracy, no offset to figure out (and to change every time you change nozzles) and something that works everywhere on the bed.
I am puzzled/surprised that it works so well because I was under the impression that the piezo disc needed to flex in order to generate an output. In your setup the piezo is flat on the bed before the nozzle touches it and generates the output pulse. I am also a bit surprised you don't get noise issues / false triggers as the nozzle comes down and there is the settling of the piezo against the bed.
Anyway, I like it and might try to emulate along those lines but prettier because we all know that prettier works better -
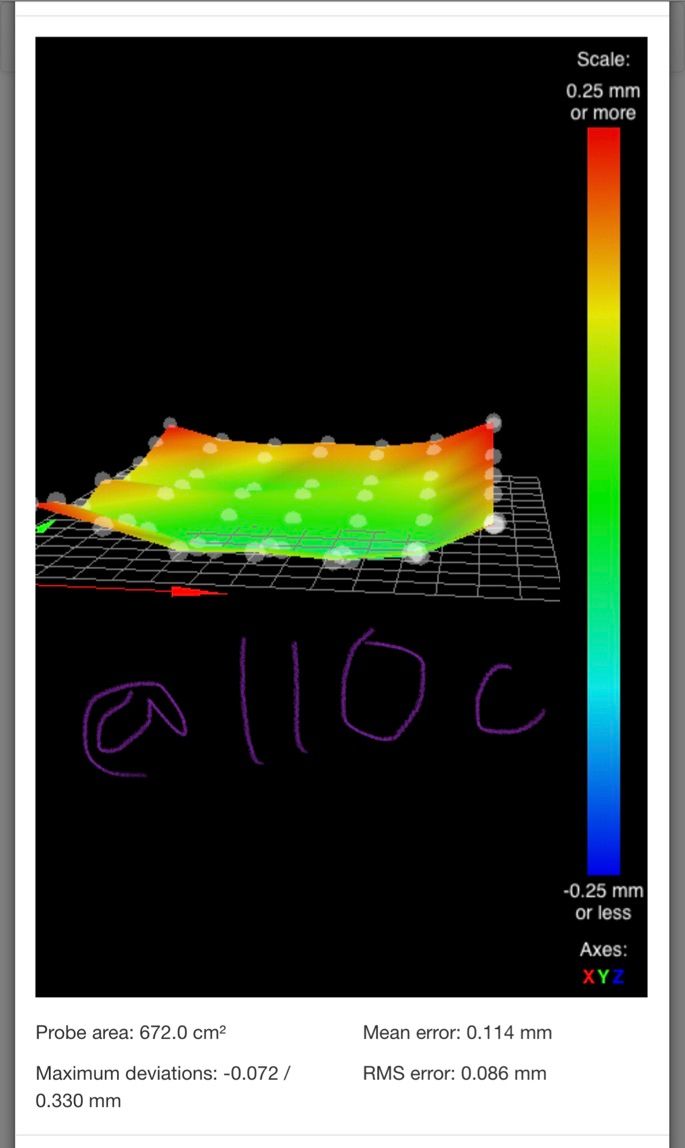
Update: So on the off chance it worked I tried cutting my Artillery Sidewinders Z-endstop off and put in on my probe mount to see if it would work. It's a SunX GL-8H NPN-NO inductive sensor so I wired it up as such and here are the results. It's rated up to 70c so ill try it and see how it holds up over time. Only concern is the 2.5mm max sense distance
If it fails I may try one of these SICK engineering hi temp 8mm distance M12 probesBLtouch at 100mm/min speed:

GL8H @600mm/min probe speed:
-
Hi everyone, I'm sorry for my English but I'm Italian and I use Google translate

I had many problems related to bltouch and the high temperature (> 80 °), in practice I noticed that the stick being made of plastic, it embarks.
If you've ever bought an inexpensive bl-touch, you may have noticed that the stick is made of aluminum, which doesn't mess with temperature.
The simple solution I found:- take original bltouch stick (plastic), cut the magnet and keep it for later.
- take aluminum stick, remove magnet and hold stick.
- with pliers, squeeze the stick to create the thickness that stops the stick from falling (the precise height of the enlargement, see Original Stick).
-limate the face of the magnet to be attached and the face of the stock to be attached. - attaches original magnet with aluminum Stick, using Attack (they must be perfectly aligned).
- now put all this, in the original bl-touch.
PS. I shortened the aluminum stick to make it lighter, I don't know if it is essential.
 -
@babetto-matteo i don't know how the pictures are attached sorry
-
@babetto-matteo You should be able to copy and paste or drag and drop the image into the post window.