Duet 2 Wifi TronXY X5SA Z probe setup 2
-
@phaedrux
The errors I get are:
G28 Error: in the macro line 15: G30 Z probe 0 not foundError: in the macro line 9: G30: Z probe 0 not found
Error: Homing failedHere is my config.g
; Configuration file for Duet WiFi (firmware version 3)
; executed by the firmware on start-up
;
; generated by RepRapFirmware Configuration Tool v3.2.3 on Sat May 29 2021 18:31:29 GMT-0500 (Central Daylight Time)

; General preferences
G90                                                ; send absolute coordinates...
M83                                                ; ...but relative extruder moves
M550 P"TronXY X5SA-500-Pro"                        ; set printer name
M669 K1                                            ; select CoreXY mode

; Network
M552 S1                                            ; enable network
M586 P0 S1                                         ; enable HTTP
M586 P1 S0                                         ; disable FTP
M586 P2 S0                                         ; disable Telnet

; Drives
M569 P0 S1                                         ; physical drive 0 goes forwards
M569 P1 S1                                         ; physical drive 1 goes forwards
M569 P2 S1                                         ; physical drive 2 goes forwards
M569 P3 S1                                         ; physical drive 3 goes forwards
M584 X0 Y1 Z2 E3                                   ; set drive mapping
M350 X16 Y16 Z16 E16 I1                            ; configure microstepping with interpolation
M92 X80.00 Y80.00 Z400.00 E92.60                   ; set steps per mm
M566 X900.00 Y900.00 Z60.00 E120.00                ; set maximum instantaneous speed changes (mm/min)
M203 X6000.00 Y6000.00 Z180.00 E1200.00            ; set maximum speeds (mm/min)
M201 X500.00 Y500.00 Z20.00 E250.00                ; set accelerations (mm/s^2)
M906 X1200 Y1200 Z1700 E1000 I30                   ; set motor currents (mA) and motor idle factor in per cent
M84 S30                                            ; Set idle timeout

; Axis Limits
M208 X0 Y0 Z0 S1                                   ; set axis minima
M208 X500 Y500 Z600 S0                             ; set axis maxima

; Endstops
M574 X1 S1 P"xstop"                                ; configure active-high endstop for low end on X via pin xstop
M574 Y1 S1 P"ystop"                                ; configure active-high endstop for low end on Y via pin ystop
M574 Z2 S2                                         ; configure Z-probe endstop for high end on Z

; Z-Probe
M574 Z1 Z2 S2 										; Set endstops controlled by probe
M558 P5 I1 H5 F120 T6000 A10 R0.5 S0.005 B0 		; Set Z probe type to modulated and the dive height + speeds
G31 P500 X-35 Y0 Z0.26 								; Set Z probe trigger value, offset and trigger height
M557 X10:300 Y20:310 S50 							; Define mesh grid

; Heaters
M308 S0 P"bedtemp" Y"thermistor" T100000 B4138     ; configure sensor 0 as thermistor on pin bedtemp
M950 H0 C"bedheat" T0                              ; create bed heater output on bedheat and map it to sensor 0
M307 H0 B1 S1.00                                   ; enable bang-bang mode for the bed heater and set PWM limit
M140 H0                                            ; map heated bed to heater 0
M143 H0 S120                                       ; set temperature limit for heater 0 to 120C
M308 S1 P"e0temp" Y"thermistor" T100000 B4138      ; configure sensor 1 as thermistor on pin e0temp
M950 H1 C"e0heat" T1                               ; create nozzle heater output on e0heat and map it to sensor 1
M307 H1 B0 S1.00                                   ; disable bang-bang mode for heater  and set PWM limit
M143 H1 S280                                       ; set temperature limit for heater 1 to 280C

; Fans
M950 F0 C"fan0" Q500                               ; create fan 0 on pin fan0 and set its frequency
M106 P0 S0 H-1                                     ; set fan 0 value. Thermostatic control is turned off
M950 F1 C"fan1" Q500                               ; create fan 1 on pin fan1 and set its frequency
M106 P1 S1 H1 T45                                  ; set fan 1 value. Thermostatic control is turned on

; Tools
M563 P0 D0 H1 F0                                   ; define tool 0
G10 P0 X0 Y0 Z0                                    ; set tool 0 axis offsets
G10 P0 R0 S0                                       ; set initial tool 0 active and standby temperatures to 0C

; Custom settings are not defined

; Miscellaneous
M575 P1 S1 B57600                                  ; enable support for PanelDue
M911 S10 R11 P"M913 X0 Y0 G91 M83 G1 Z3 E-5 F1000" ; set voltage thresholds and actions to run on power loss
I will see if I can get a picture. It isn't pretty (still proto-wiring)
-
@pyper said in Duet 2 Wifi TronXY X5SA Z probe setup 2:
G28 Error: in the macro line 15: G30 Z probe 0 not found
Error: in the macro line 9: G30: Z probe 0 not found
Error: Homing failedPost your homing files. That seems to be where the problem is.
-
@phaedrux
Home All:; homeall.g ; called to home all axes ; ; generated by RepRapFirmware Configuration Tool v3.2.3 on Sat May 29 2021 18:31:30 GMT-0500 (Central Daylight Time) G91 ; relative positioning G1 H2 Z5 F6000 ; lift Z relative to current position G1 H1 X-505 Y-505 F1800 ; move quickly to X or Y endstop and stop there (first pass) G1 H1 X-505 ; home X axis G1 H1 Y-505 ; home Y axis G1 X5 Y5 F6000 ; go back a few mm G1 H1 X-505 F360 ; move slowly to X axis endstop once more (second pass) G1 H1 Y-505 ; then move slowly to Y axis endstop G90 ; absolute positioning G1 X15 Y15 F6000 ; go to first bed probe point and home Z G30 ; home Z by probing the bed ; Uncomment the following lines to lift Z after probing ;G91 ; relative positioning ;G1 Z5 F100 ; lift Z relative to current position ;G90 ; absolute positioningHomeX.G
; homex.g
; called to home the X axis
;
; generated by RepRapFirmware Configuration Tool v3.2.3 on Sat May 29 2021 18:31:30 GMT-0500 (Central Daylight Time)
G91               ; relative positioning
G1 H2 Z5 F6000    ; lift Z relative to current position
G1 H1 X-505 F1800 ; move quickly to X axis endstop and stop there (first pass)
G1 X5 F6000       ; go back a few mm
G1 H1 X-505 F360  ; move slowly to X axis endstop once more (second pass)
G1 H2 Z-5 F6000   ; lower Z again
G90               ; absolute positioning
HomeY.G
; homey.g
; called to home the Y axis
;
; generated by RepRapFirmware Configuration Tool v3.2.3 on Sat May 29 2021 18:31:30 GMT-0500 (Central Daylight Time)
G91               ; relative positioning
G1 H2 Z5 F6000    ; lift Z relative to current position
G1 H1 Y-505 F1800 ; move quickly to Y axis endstop and stop there (first pass)
G1 Y5 F6000       ; go back a few mm
G1 H1 Y-505 F360  ; move slowly to Y axis endstop once more (second pass)
G1 H2 Z-5 F6000   ; lower Z again
G90               ; absolute positioning
HomeZ.G
; homez.g ; called to home the Z axis ; ; generated by RepRapFirmware Configuration Tool v3.2.3 on Sat May 29 2021 18:31:30 GMT-0500 (Central Daylight Time) G91 ; relative positioning G1 H2 Z5 F6000 ; lift Z relative to current position G90 ; absolute positioning G1 X15 Y15 F6000 ; go to first probe point G30 ; home Z by probing the bed ; Uncomment the following lines to lift Z after probing ;G91 ; relative positioning ;G1 Z5 F100 ; lift Z relative to current position ;G90 ; absolute positioning -
@phaedrux said in Duet 2 Wifi TronXY X5SA Z probe setup 2:
RRF 2 I assume?
Can you send M122 and post the results? Your config has a mix of RRF2 and RRF3 syntax. Which firmware version are you actually running?
-
@pyper as @Phaedrux said, your probe config is for RRF 2, while the rest is for RRF 3. As it’s the probe that’s not working, I’m going to assume you are running RRF3.
In your config.g, delete this line, it is incorrect, and using the probe for Z endstop is already defined a couple of lines earlier:
M574 Z1 Z2 S2 ; Set endstops controlled by probe
This line is also wrong for RRF3:
M558 P5 I1 H5 F120 T6000 A10 R0.5 S0.005 B0 ; Set Z probe type to modulated and the dive height + speeds
You need to define the pin the probe is connected to. You also have ‘I1’ set, which inverts the probe signal in RRF2, but not in RRF3. Try:
M558 P5 C"!^zprobe.in" H5 F120 T6000 A10 R0.5 S0.005 B0The ! character inverts the signal, and the ^ character activates the pull up resistor, which should help prevent spurious readings. You may need to add/remove one or both of these if the probe reading goes the wrong way; check in DWC dashboard for Z-probe reading, should be 0 when not triggered, and 1000 when triggered.
FYI NPN probe wiring is described here: https://duet3d.dozuki.com/Wiki/Connecting_a_Z_probe#Section_NPN_output_normally_open_inductive_or_capacitive_sensor
Ian
-
Here is everything but the network info:
M122 === Diagnostics === RepRapFirmware for Duet 2 WiFi/Ethernet version 3.2.2 running on Duet WiFi 1.02 or later Board ID: 08DJM-9178L-L2MS8-6JKF0-3SN6Q-TTFYR Used output buffers: 3 of 24 (12 max) === RTOS === Static ram: 23460 Dynamic ram: 73124 of which 24 recycled Never used RAM 15472, free system stack 193 words Tasks: NETWORK(ready,180) HEAT(blocked,310) MAIN(running,451) IDLE(ready,20) Owned mutexes: === Platform === Last reset 00:00:47 ago, cause: power up Last software reset at 2021-05-31 18:23, reason: User, GCodes spinning, available RAM 15320, slot 0 Software reset code 0x0003 HFSR 0x00000000 CFSR 0x00000000 ICSR 0x0041f000 BFAR 0xe000ed38 SP 0x00000000 Task MAIN Freestk 0 n/a Error status: 0x00 Aux0 errors 0,0,0 MCU temperature: min 25.3, current 29.4, max 29.6 Supply voltage: min 24.1, current 24.2, max 24.3, under voltage events: 0, over voltage events: 0, power good: yes Driver 0: position 0, standstill, SG min/max not available Driver 1: position 0, standstill, SG min/max not available Driver 2: position 0, standstill, SG min/max not available Driver 3: position 0, standstill, SG min/max not available Driver 4: position 0, standstill, SG min/max not available Driver 5: position 0 Driver 6: position 0 Driver 7: position 0 Driver 8: position 0 Driver 9: position 0 Driver 10: position 0 Driver 11: position 0 Date/time: 2021-06-02 13:56:58 Cache data hit count 56058210 Slowest loop: 4.05ms; fastest: 0.21ms I2C nak errors 0, send timeouts 0, receive timeouts 0, finishTimeouts 0, resets 0 === Storage === Free file entries: 10 SD card 0 detected, interface speed: 20.0MBytes/sec SD card longest read time 1.0ms, write time 0.0ms, max retries 0 === Move === DMs created 83, maxWait 0ms, bed compensation in use: none, comp offset 0.000 === MainDDARing === Scheduled moves 0, completed moves 0, hiccups 0, stepErrors 0, LaErrors 0, Underruns [0, 0, 0], CDDA state -1 === AuxDDARing === Scheduled moves 0, completed moves 0, hiccups 0, stepErrors 0, LaErrors 0, Underruns [0, 0, 0], CDDA state -1 === Heat === Bed heaters = 0 -1 -1 -1, chamberHeaters = -1 -1 -1 -1 === GCodes === Segments left: 0 Movement lock held by null HTTP is idle in state(s) 0 Telnet is idle in state(s) 0 File is idle in state(s) 0 USB is idle in state(s) 0 Aux is idle in state(s) 0 Trigger is idle in state(s) 0 Queue is idle in state(s) 0 LCD is idle in state(s) 0 Daemon is idle in state(s) 0 Autopause is idle in state(s) 0 Code queue is empty. -
So as suspected, you have RRF3 installed. And most of your config is using the RRF3 syntax, however your probe configuration is for RRF2. So try the M558 line given by @droftarts and see how it goes.
-
@droftarts
Thank youI made the changes but the movements are still the same.
If I manually hit my endstops, I can see the X and Y light up on the Duet and the Z-Probe goes to 1000 on the dashboard and Panel Due when I hold a piece of metal under it.Perhaps my wiring is wrong? Or does it remember where the print head is (manually hitting the endstops switch = bad idea)?
On my motors I have a black/green/red/blue wire. I flip red and blue before plugging into the Duet, correct? The Duet shows black/green/blue/red. But I can hit 10mm X or Y and it does move correctly. -
@pyper said in Duet 2 Wifi TronXY X5SA Z probe setup 2:
G28 Error: in the macro line 15: G30 Z probe 0 not found
Error: in the macro line 9: G30: Z probe 0 not found
Error: Homing failedAre you still getting these errors?
Can you post your config.g now that you've made changed?
If you send M98 P"config.g" what errors does it report if any?@pyper said in Duet 2 Wifi TronXY X5SA Z probe setup 2:
If I manually hit my endstops, I can see the X and Y light up on the Duet
Use M119 to get the status of the endstops. When unpressed they should report untriggered. When depressed they should report as triggered.
-
@phaedrux said in Duet 2 Wifi TronXY X5SA Z probe setup 2:
I am getting no errors.
I think the Z motors are homing in the wrong direction.
If I use M564 S0 H0 I can hit Z+ in the dashboard and it does in fact move up correctly. But when I home, it goes down. Should I remove that '!' in the line droftarts posted?Here is my current config.g:
; Configuration file for Duet WiFi (firmware version 3)
; executed by the firmware on start-up
;
; generated by RepRapFirmware Configuration Tool v3.2.3 on Sat May 29 2021 18:31:29 GMT-0500 (Central Daylight Time)

; General preferences
G90                                                ; send absolute coordinates...
M83                                                ; ...but relative extruder moves
M550 P"TronXY X5SA-500-Pro"                        ; set printer name
M669 K1                                            ; select CoreXY mode

; Network
M552 S1                                            ; enable network
M586 P0 S1                                         ; enable HTTP
M586 P1 S0                                         ; disable FTP
M586 P2 S0                                         ; disable Telnet

; Drives
M569 P0 S1                                         ; physical drive 0 goes forwards
M569 P1 S1                                         ; physical drive 1 goes forwards
M569 P2 S1                                         ; physical drive 2 goes forwards
M569 P3 S1                                         ; physical drive 3 goes forwards
M584 X0 Y1 Z2 E3                                   ; set drive mapping
M350 X16 Y16 Z16 E16 I1                            ; configure microstepping with interpolation
M92 X80.00 Y80.00 Z400.00 E92.60                   ; set steps per mm
M566 X900.00 Y900.00 Z60.00 E120.00                ; set maximum instantaneous speed changes (mm/min)
M203 X6000.00 Y6000.00 Z180.00 E1200.00            ; set maximum speeds (mm/min)
M201 X500.00 Y500.00 Z20.00 E250.00                ; set accelerations (mm/s^2)
M906 X1200 Y1200 Z1700 E1000 I30                   ; set motor currents (mA) and motor idle factor in per cent
M84 S30                                            ; Set idle timeout

; Axis Limits
M208 X0 Y0 Z0 S1                                   ; set axis minima
M208 X500 Y500 Z600 S0                             ; set axis maxima

; Endstops
M574 X1 S1 P"xstop"                                ; configure active-high endstop for low end on X via pin xstop
M574 Y1 S1 P"ystop"                                ; configure active-high endstop for low end on Y via pin ystop
M574 Z2 S2                                         ; configure Z-probe endstop for high end on Z

; Z-Probe
M558 P5 C"!^zprobe.in" H5 F120 T6000 A10 R0.5 S0.005 B0  		; Set Z probe type to modulated and the dive height + speeds
G31 P500 X-35 Y0 Z0.26 								; Set Z probe trigger value, offset and trigger height
M557 X10:300 Y20:310 S50 							; Define mesh grid

; Heaters
M308 S0 P"bedtemp" Y"thermistor" T100000 B4138     ; configure sensor 0 as thermistor on pin bedtemp
M950 H0 C"bedheat" T0                              ; create bed heater output on bedheat and map it to sensor 0
M307 H0 B1 S1.00                                   ; enable bang-bang mode for the bed heater and set PWM limit
M140 H0                                            ; map heated bed to heater 0
M143 H0 S120                                       ; set temperature limit for heater 0 to 120C
M308 S1 P"e0temp" Y"thermistor" T100000 B4138      ; configure sensor 1 as thermistor on pin e0temp
M950 H1 C"e0heat" T1                               ; create nozzle heater output on e0heat and map it to sensor 1
M307 H1 B0 S1.00                                   ; disable bang-bang mode for heater  and set PWM limit
M143 H1 S280                                       ; set temperature limit for heater 1 to 280C

; Fans
M950 F0 C"fan0" Q500                               ; create fan 0 on pin fan0 and set its frequency
M106 P0 S0 H-1                                     ; set fan 0 value. Thermostatic control is turned off
M950 F1 C"fan1" Q500                               ; create fan 1 on pin fan1 and set its frequency
M106 P1 S1 H1 T45                                  ; set fan 1 value. Thermostatic control is turned on

; Tools
M563 P0 D0 H1 F0                                   ; define tool 0
G10 P0 X0 Y0 Z0                                    ; set tool 0 axis offsets
G10 P0 R0 S0                                       ; set initial tool 0 active and standby temperatures to 0C

; Custom settings are not defined

; Miscellaneous
M575 P1 S1 B57600                                  ; enable support for PanelDue
M911 S10 R11 P"M913 X0 Y0 G91 M83 G1 Z3 E-5 F1000" ; set voltage thresholds and actions to run on power loss
Lord have mercy I think my end stops are reversed...! I can move the print head until it touches the X and Y endstops (I see the lights on the Duet), but when I run M119 like you said, I get "M119
Endstops - X: not stopped, Y: not stopped, Z: not stopped, Z probe: not stopped". If I move the print head off the end stops (no endstop lights are lit), I get "M119
Endstops - X: at min stop, Y: at min stop, Z: not stopped, Z probe: not stopped" -
@pyper said in Duet 2 Wifi TronXY X5SA Z probe setup 2:
If I use M564 S0 H0 I can hit Z+ in the dashboard and it does in fact move up correctly. But when I home, it goes down.
I'm confused. Or maybe you're confused.
Z+ should move the bed and nozzle farther apart.
Z- should move them closer together.If you need to change the direction of the Z motors use the M569 S to change direction right at the driver settings.
-
@pyper moving the bed in a positive direction should increase the distance between the nozzle and bed, so move the bed down, and a negative move reduces the distance between bad and nozzle, so the bed goes up. So sounds like your Z motors are going the wrong way. You can flip the direction by changing the S parameter in the M569 command that relates to the Z axis in config.g.
The comments in the commands are, unfortunately, a little confusing, as they assume the machine is a Prusa-style bed slinger, where the X axis is mounted on the Z, so the nozzle moves ‘up’ with positive Z move.
Edit: ninja’d (again) by @Phaedrux !
Ian
-
@phaedrux
Perhaps I am confused. I assumed Z+ moved the bed UP and Z- moved the bed DOWN.. for a CoreXY? -
@pyper said in Duet 2 Wifi TronXY X5SA Z probe setup 2:
I think my end stops are reversed...! I can move the print head until it touches the X and Y endstops (I see the lights on the Duet), but when I run M119 like you said, I get "M119
Endstops - X: not stopped, Y: not stopped, Z: not stopped, Z probe: not stopped". If I move the print head off the end stops (no endstop lights are lit), I get "M119
Endstops - X: at min stop, Y: at min stop, Z: not stopped, Z probe: not stopped"In that case you invert the signal by adding a
!to the pin name.ex:
M574 X1 S1 P"xstop"becomesM574 X1 S1 P"!xstop" -
@pyper said in Duet 2 Wifi TronXY X5SA Z probe setup 2:
@phaedrux
Perhaps I am confused. I assumed Z+ moved the bed UP and Z- moved the bed DOWN.. for a CoreXY?No. Think of it as the distance between the bed and nozzle becoming larger or smaller.
-
@phaedrux
Ok, after reversing the Z motor and the endstops, it homed on all axis!
Thank you so much, I'm sure everyone is thinking "how does this guy drive a car?" haha
Onward! -
@pyper the micro switches used as endstops on my TronXY X5S were wired NO (normally open); wires connected to the centre pin and the common pin (one of the outer pins) on the micro switch. I expect your X5SA is the same. We recommend wiring micro switch endstops as NC (normally closed) as it reduces false triggering. To do this, simply move the wire connected to the centre pin to the other outside pin (there are only three pins). You also then don’t need to invert the endstop signal with the ! character. I have done this on my machine See https://duet3d.dozuki.com/Wiki/Connecting_endstop_switches#Section_Microswitch
Ian
Bed-slinger - Mini5+ WiFi/1LC | RRP Fisher v1 - D2 WiFi | Polargraph - D2 WiFi | TronXY X5S - 6HC/Roto | CNC router - 6HC | Tractus3D T1250 - D2 Eth
-
@droftarts
Ian,
I checked my switches and the outer pin does nothing that I can see. I used a multi meter and checked continuity on the outer-outer and inner-outer for that pin, and it never had any continuity for any switch setting. Should I get new end stop switches? -
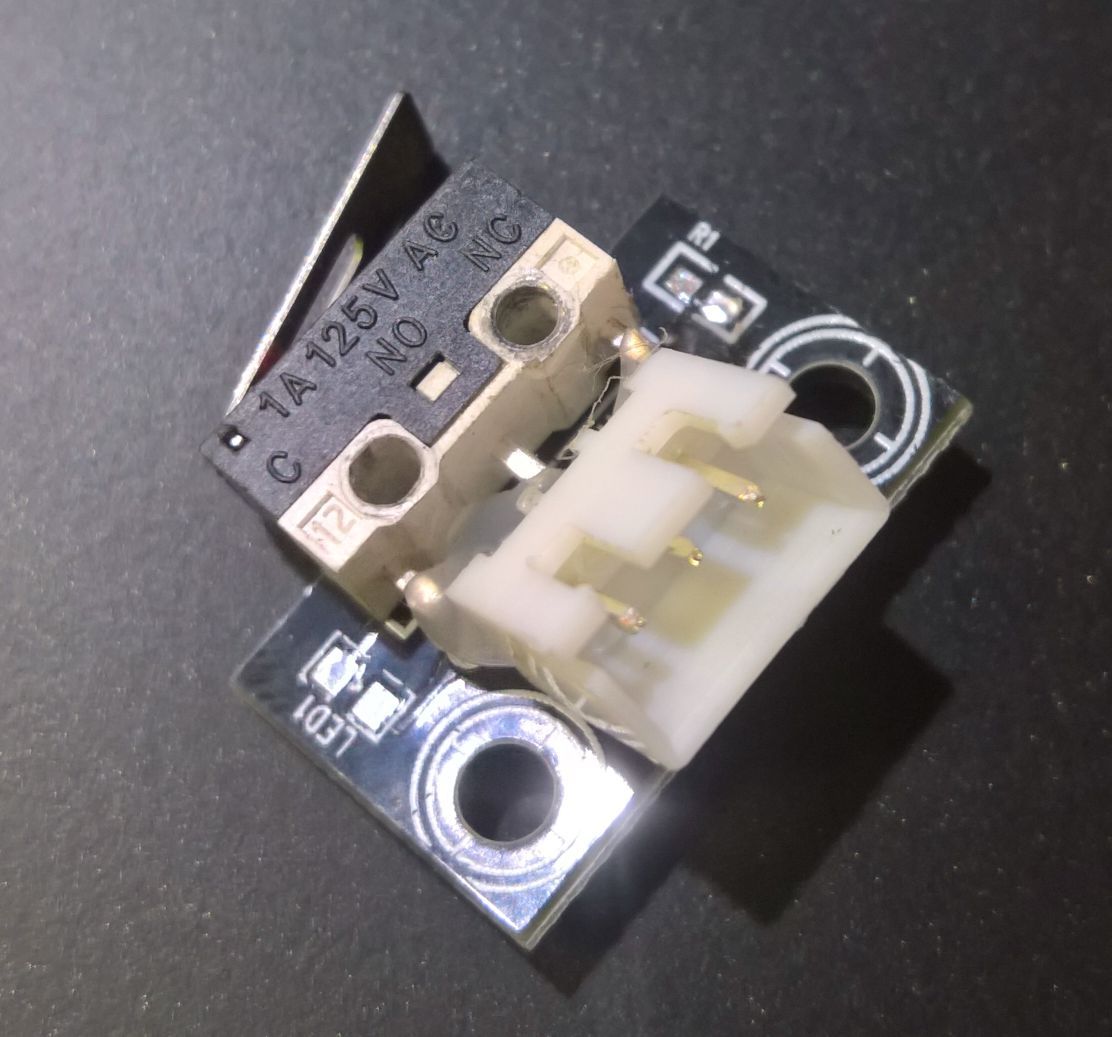
@pyper The pins should be labelled C (Common), NO (normally open, centre pin) and NC (normally closed). You should have continuity between NC and C when switch is not depressed, and continuity between NO and C when not depressed. There is no continuity between NO and NC. If you don't have continuity between NC and C, then possibly it's just a really cheap switch packaged as a microswitch!
It's usually not too much of a problem having the microswitches wired NO, but the voltage is floating, so any interference (eg from high voltage such as heater wires or stepper motor wires) can possibly trigger the endstop. This doesn't happen when wired NC.
Here's mine, wire NC, pin labels just about visible:
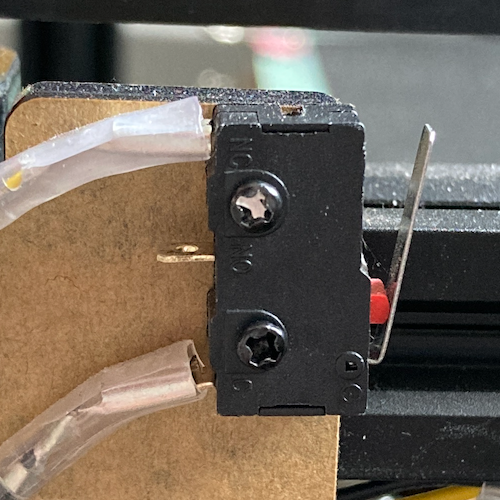
Ian
-
@droftarts
Ahh, I see you wired up directly to the switch.
I was probing through the 3-wire jack. I guess they didn't even run traces for NC.
Will check on that.