Automatic Bed Tilt Calibration, G30 S4, and G30 S-2
-
@bstump none of my macro will work for you then. Its for rrf 3.2 and above.
You may want to look at upgrading as its so much easier to accomplish in RRF 3. The latest is RRF 3.3.0to quote @Phaedrux
Upload these 3 zip files, one at a time in the system tab. Don't extract them. Reboot after each. Use M115 to verify the firmware has been applied. https://github.com/Duet3D/RepRapFirmware/releases/download/2.05.1/Duet2Firmware-2.05.1.zip https://github.com/Duet3D/RepRapFirmware/releases/download/3.0/Duet2and3Firmware-3.0.zip https://github.com/Duet3D/RepRapFirmware/releases/download/3.3/Duet2and3Firmware-3.3.zip That will get your firmware and DWC up to date. You can see the change logs here: https://github.com/Duet3D/RepRapFirmware/wiki/Changelog-RRF-3.x For your config, might be a good idea to run through the configurator tool and generate a fresh set for RRF3. https://configtool.reprapfirmware.org/Start Backup your existing config files in the sys folder in case you want to switch back to RRF3. IT’s easy to switch back and forth, just upload the zip file for the version you want and then upload your config files. These documents will come in handy during the conversion. https://duet3d.dozuki.com/Wiki/RepRapFirmware_3_overview https://duet3d.dozuki.com/Wiki/Gcode``` -
@jay_s_uk said in Automatic Bed Tilt Calibration, G30 S4, and G30 S-2:
@bstump none of my macro will work for you then. Its for rrf 3.2 and above.
You may want to look at upgrading as its so much easier to accomplish in RRF 3. The latest is RRF 3.3.0to quote @Phaedrux
Upload these 3 zip files, one at a time in the system tab. Don't extract them. Reboot after each. Use M115 to verify the firmware has been applied.
https://github.com/Duet3D/RepRapFirmware/releases/download/2.05.1/Duet2Firmware-2.05.1.zip
https://github.com/Duet3D/RepRapFirmware/releases/download/3.0/Duet2and3Firmware-3.0.zip
https://github.com/Duet3D/RepRapFirmware/releases/download/3.3/Duet2and3Firmware-3.3.zip
That will get your firmware and DWC up to date.

You can see the change logs here:
https://github.com/Duet3D/RepRapFirmware/wiki/Changelog-RRF-3.x

For your config, might be a good idea to run through the configurator tool and generate a fresh set for RRF3.
https://configtool.reprapfirmware.org/Start

Backup your existing config files in the sys folder in case you want to switch back to RRF3. IT’s easy to switch back and forth, just upload the zip file for the version you want and then upload your config files.

These documents will come in handy during the conversion.
https://duet3d.dozuki.com/Wiki/RepRapFirmware_3_overview
https://duet3d.dozuki.com/Wiki/Gcode```
We are on 2.05.1. Do we need to implement that first file? Looks to be the current RRF.
-
@bstump 2.05.1 is not the current RRF and hasn't been for ~18 months
-
@jay_s_uk said in Automatic Bed Tilt Calibration, G30 S4, and G30 S-2:
@bstump 2.05.1 is not the current RRF and hasn't been for ~18 months
I mean our current RRF
-
@bstump said in Automatic Bed Tilt Calibration, G30 S4, and G30 S-2:
@jay_s_uk said in Automatic Bed Tilt Calibration, G30 S4, and G30 S-2:
@bstump 2.05.1 is not the current RRF and hasn't been for ~18 months
I mean our current RRF

-
One question: do you have a printer with multiple tools?
One suggestion: take the time to update to the current v3 firmware - there are many, many improvements and fixes. It involves some changes to your configuration files but it takes less time than you might think. I put it off for a long time only to find it wasn't that much work.
Frederick
-
@fcwilt Dual extruder, 4 Z steppers, LEDs, and even and external air filter tried to the contoller
-
Were there I/O mapping changes from 2.05.1 to 3.3? We have an error coming up with regards to the LED Current callout is M42 P27 S100 but it says the P is too high.
-
@bstump said in Automatic Bed Tilt Calibration, G30 S4, and G30 S-2:
Were there I/O mapping changes from 2.05.1 to 3.3? We have an error coming up with regards to the LED Current callout is M42 P27 S100 but it says the P is too high.
Did you see this regards v2 to v3:
In RRF3, before you can use M42 you must create a GPIO port using M950. Then in the M42 command, the P parameter is the GPIO port number, not the logical pin number. Duet 2 supports up to 10 GPIO ports, numbered 0 to 9. No GPIO ports are allocated by default.
In RRF3, the F and I parameters are no longer supported in M42. Instead, use the F and I parameters in M950 when you create the GPIO port.
Example - RRF2 code:
M42 P3 I1 S0.5 F500 ; set Heater 3 pin to 50% PWM at 500Hz
Example - RRF3 code:
M950 P0 C"exp.heater3" Q500 ; allocate GPIO port 0 to heater3 on expansion connector, 500Hz
M42 P0 S0.5 ; set 50% PWM on GPIO port 0
Printers: a small Utilmaker style, a small CoreXY and a E3D MS/TC setup. Various hotends. Using Duet 3 hardware running 3.4.6
-
@bstump said in Automatic Bed Tilt Calibration, G30 S4, and G30 S-2:
@fcwilt Dual extruder, 4 Z steppers, LEDs, and even and external air filter tried to the contoller
Does each extruder have it's own Z probe?
Frederick
Printers: a small Utilmaker style, a small CoreXY and a E3D MS/TC setup. Various hotends. Using Duet 3 hardware running 3.4.6
-
@fcwilt We found the change logs https://github.com/Duet3D/RepRapFirmware/wiki/Changelog-RRF-3.x#reprapfirmware-30 and https://duet3d.dozuki.com/Wiki/RepRapFirmware_3_overview, and are going thru them to adjust our macros.
-
@fcwilt said in Automatic Bed Tilt Calibration, G30 S4, and G30 S-2:
@bstump said in Automatic Bed Tilt Calibration, G30 S4, and G30 S-2:
@fcwilt Dual extruder, 4 Z steppers, LEDs, and even and external air filter tried to the contoller
Does each extruder have it's own Z probe?
Frederick
No, it is shared between the primary and secondary extruders.
-
@bstump said in Automatic Bed Tilt Calibration, G30 S4, and G30 S-2:
No, it is shared between the primary and secondary extruders.
Thanks.
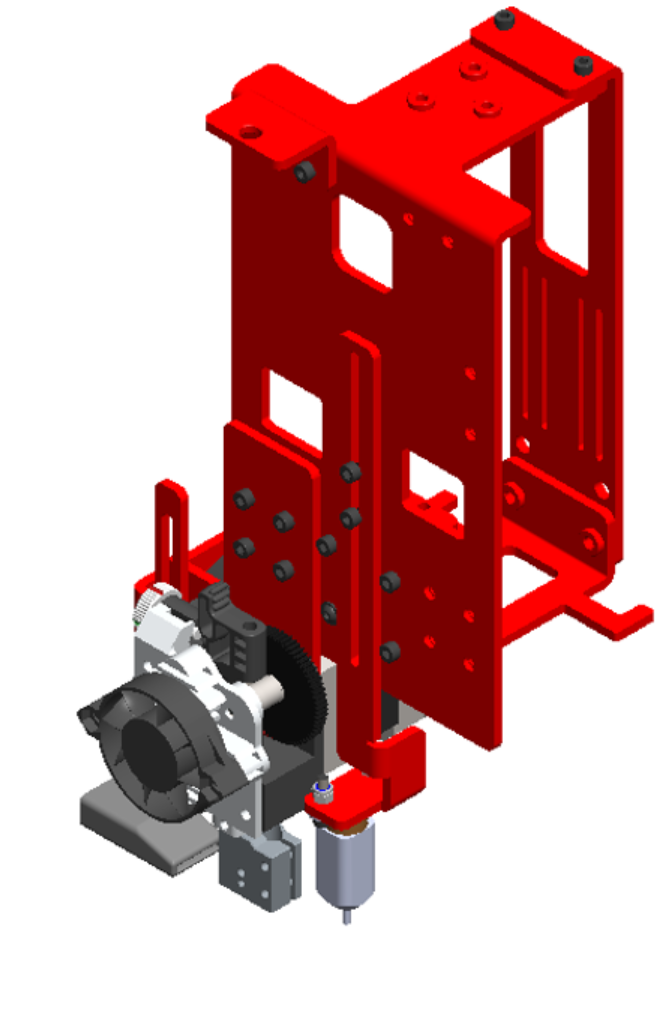
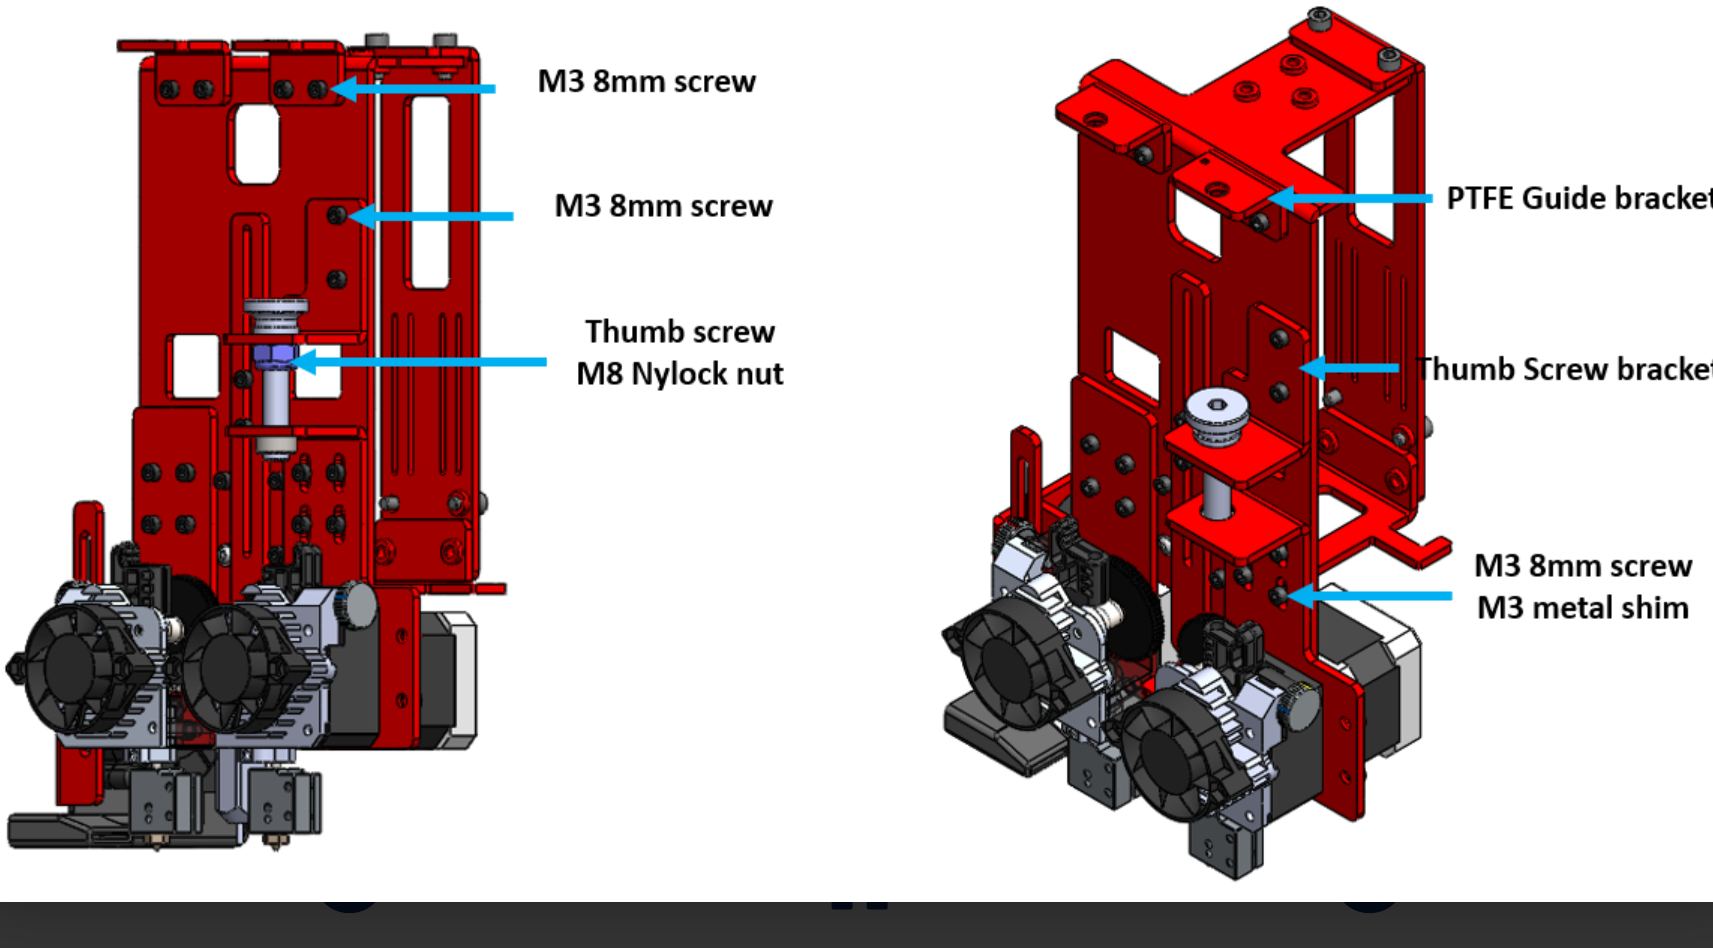
Nice drawings.
-
@fcwilt said in Automatic Bed Tilt Calibration, G30 S4, and G30 S-2:
@bstump said in Automatic Bed Tilt Calibration, G30 S4, and G30 S-2:
No, it is shared between the primary and secondary extruders.
Thanks.
Nice drawings.
Not my models. They are Modix's
-
@bstump said in Automatic Bed Tilt Calibration, G30 S4, and G30 S-2:
Not my models. They are Modix's
He's one of the Marvel Comic good guys?
-
@bstump said in Automatic Bed Tilt Calibration, G30 S4, and G30 S-2:
M375 ; Loads the grid matrix file (Heightmap)
Best not to load the heightmap before you do the tilt correction. So remove that from homeall and add it to your slicer start gcode instead so that the heightmap is loaded before a print.
Also don't call M584 inside of homeall unless you need to split and join drivers to axis.
Also, I don't think you need to use G30 S-2 at all. You are using G28 to home all, and that will do a G30 to set Z0 based on your probe trigger offset.
I strongly suggest you use the config tool to generate a fresh example config for RRF3. You can compare it to your current one and modify it to suit. But at least that way you'll be starting with the correct RRF3 syntax.
You say you have dual extruders, but I only see one E drive created.
What is the U drive?
-
@phaedrux said in Automatic Bed Tilt Calibration, G30 S4, and G30 S-2:
@bstump said in Automatic Bed Tilt Calibration, G30 S4, and G30 S-2:
M375 ; Loads the grid matrix file (Heightmap)
Best not to load the heightmap before you do the tilt correction. So remove that from homeall and add it to your slicer start gcode instead so that the heightmap is loaded before a print.
Also don't call M584 inside of homeall unless you need to split and join drivers to axis.
Also, I don't think you need to use G30 S-2 at all. You are using G28 to home all, and that will do a G30 to set Z0 based on your probe trigger offset.
I strongly suggest you use the config tool to generate a fresh example config for RRF3. You can compare it to your current one and modify it to suit. But at least that way you'll be starting with the correct RRF3 syntax.
You say you have dual extruders, but I only see one E drive created.
What is the U drive?
The Config.g is for RRF 2.05.1 so it likely does not have the extra extuder defined properly for RRF 3.3
-
Extruders are defined the same in RRF2 and RRF3. M584 E3:4 for example maps drivers 3 and 4 as extruders.
-
@phaedrux said in Automatic Bed Tilt Calibration, G30 S4, and G30 S-2:
Extruders are defined the same in RRF2 and RRF3. M584 E3:4 for example maps drivers 3 and 4 as extruders.
I have not dug into those settings yes as many were defined by Modix, but maybe for the single extruder only.
-
Well we have upgraded the firmware to RRF 3.3 and the config.g has the correct settings now.
; Configuration file for Duet WiFi (firmware version 3)
; executed by the firmware on start-up
;
; generated by RepRapFirmware Configuration Tool v3.2.3 on Thu Jun 24 2021 09:31:20 GMT-0600 (Central Standard Time)

; General preferences
G90                                                    ; send absolute coordinates...
M83                                                    ; ...but relative extruder moves
M550 P"modix_big_meter"                                ; set printer name

; Network
M552 P0.0.0.0 S1                                       ; enable network and acquire dynamic address via DHCP
M586 P0 S1                                             ; enable HTTP
M586 P1 S0                                             ; disable FTP
M586 P2 S0                                             ; disable Telnet

; Drives
M569 P0 S0                                             ; physical drive 0	X1				reverse
M569 P1 S1                                             ; physical drive 1	X2				forward
M569 P2 R-1                                            ; Physical drive 2	not used
M569 P3 S1                                             ; physical drive 3	E0				forward
M569 P4 S0                                             ; physical drive 4	E1				reverse
; additional drives on duex5 expansion board
M569 P5 S0                                             ; Physical drive 5	Y				reverse
M569 P6 S0                                             ; Physical drive 6	Z1 (0,1000)		reverse
M569 P7 S0                                             ; Physical drive 7	Z2 (0,0) 		reverse
M569 P8 S0                                             ; Physical drive 8	Z3 (1000,0)		reverse
M569 P9 S0                                             ; Physical drive 9	Z4 (1000,1000)	reverse


;M584 X0 Y1 Z7 E3:4                                     ; set drive mapping
M584 X0:1 Y5 Z6:7:8:9 U1 E3:4 P3						; map motors to axis
M671 X-181:-181:1049:1049 Y1066:-58:-58:1066 S10	  	; CCW positions of Z motors

;~ M350 X16 Y16 Z16 E16:16 I1                             ; configure microstepping with interpolation
;~ M92 X100.00 Y100.00 Z2000.00 E412.00:412.00            ; set steps per mm
;~ M566 X240.00 Y360.00 Z30.00 E120.00:120.00             ; set maximum instantaneous speed changes (mm/min)
;~ M203 X9000.00 Y9000.00 Z199.80 E1200.00:1200.00        ; set maximum speeds (mm/min)
;~ M201 X1000.00 Y1000.00 Z120.00 E250.00:250.00          ; set accelerations (mm/s^2)
;~ M906 X1800 Y1800 Z1800 E1000:1000 I30                  ; set motor currents (mA) and motor idle factor in per cent
;~ M84 S30                                                ; Set idle timeout

M350 X16 Y16 Z16 E16 U16 I1								; Configure microstepping with interpolation
M92 X100.00 Y100.00 Z2000.00 E412.32 U100.00			; Set steps per mm
M566 X240 Y360 Z30.00 E120.00 U240 P1					; Set maximum instantaneous speed changes (mm/min)
M203 X9000.00 Y9000.00 Z200.00 E1200.00 U9000.00		; Set maximum speeds (mm/min)
M201 X1000 Y1000 Z120.00 E250.00 U1000					; Set accelerations (mm/s^2)
M204 P500 T1000											; Set print and travel accelerations  (mm/s^2)
M906 X1800 Y1800.00 E1000.00 U1800 I30 					; Set motor currents (mA) and motor idle factor in per cent
M906 Z1800.00 I50 										; Set motor currents (mA) and motor idle factor in per cent
M84 S60 X Y U E0 E1										; Set idle timeout - one minute

; Axis Limits
M208 X0 Y0 Z0 U0 S1										; set axis minima
M208 X1000 Y1000 Z1000 U1000 S0							; set axis maxima

; Endstops
;~ M574 X1 S1 P"xstop"                                    ; configure active-high endstop for low end on X via pin xstop
;~ M574 Y2 S1 P"ystop"                                    ; configure active-high endstop for high end on Y via pin ystop
; X1 = X end stop low end
; Y2 = Y end stop high end
; U1 = U end stop low end (U is second X)
; S1 = all active high
; M574 X1 Y2 U1 S1										; Set active low and disabled endstops
; Z end stop is actually a probe, high limit
; M574 Z2 S2
M574 X1 S1 P"xstop"
M574 Y2 S1 P"ystop"
M574 U1 S1 P"e0stop"
; Z-Probe

M950 S0 C"duex.e6heat"                                 ; create servo pin 0 for BLTouch
;~ M558 P9 C"^zprobe.in" H5 F120 T6000                    ; set Z probe type to bltouch and the dive height + speeds
M558 P9 C"^zprobe.in" H5 F120 T9000 R0.7                   ; set Z probe type to bltouch and the dive height + speeds
;~ G31 P500 X-14 Y21 Z1.081                               ; set Z probe trigger value, offset and trigger height
;~ M557 X0:974 Y21:1000 S52                               ; define mesh grid

                                                     		; Set endstops controlled by probe
; heater 7 output used for PWM of BL touch (e6 heat)
;~ M307 H7 A-1 C-1 D-1                                     			; Disable heater on PWM channel for BLTouch
;~ M558 P9 H5 F120 T9000 A1 R0.7            			       			; Set Z probe type to bltouch and the dive height + speeds
G31 P500 X-14 Y21 Z1.031                    		     			; Set Z probe trigger value, offset and trigger height(Z-offset)
;M557 X-14:974 Y21:1009 S52 		                        			; Define mesh grid. 400 Points - no longer works with v3, no offset outside of maxima
M557 X30:970 Y30:970 S49 		            						; Define mesh grid. 400 Points
M376 H10			                    							; Height (mm) over which to taper off the bed compensation

; Heaters
M140 H-1                                               ; disable heated bed (overrides default heater mapping)
;~ M308 S0 P"e0temp" Y"thermistor" T100000 B4138          ; configure sensor 0 as thermistor on pin e0temp
;~ M950 H0 C"e0heat" T0                                   ; create nozzle heater output on e0heat and map it to sensor 0
;~ M308 S0 P"e0temp" Y"pt1000"
;~ M950 H0 C"e0heat" T0                                   ; create nozzle heater output on e0heat and map it to sensor 0

M308 S0 P"spi.cs1" Y"rtd-max31865" R395 F60
M950 H1 C"e0heat" T0          							; heater 0 uses the e0_heat pin and sensor 1
M307 H1 B0 S1.00                                       ; disable bang-bang mode for heater  and set PWM limit
M143 H1 S285                                           ; set temperature limit for heater 0 to 285C


M308 S1 P"e1temp" Y"thermistor" T100000 B4725 C7.06e-8 ; configure sensor 1 as thermistor on pin e1temp
M950 H2 C"e1heat" T1                                   ; create nozzle heater output on e1heat and map it to sensor 1
M307 H2 B0 S1.00                                       ; disable bang-bang mode for heater  and set PWM limit
M143 H2 S285                                           ; set temperature limit for heater 1 to 285C

; Fans
M950 F0 C"fan0" Q500      ; T0                             ; create fan 0 on pin fan0 and set its frequency
M106 P0 S0 H-1                                         ; set fan 0 value. Thermostatic control is turned off
M950 F1 C"fan1" Q500      ; T1                             ; create fan 1 on pin fan1 and set its frequency
M106 P1 S0 H-1                                         ; set fan 1 value. Thermostatic control is turned off
M950 F2 C"fan2" Q500                                   ; create fan 2 on pin fan2 and set its frequency
M106 P2 S0 H-1                                         ; set fan 2 value. Thermostatic control is turned off
M950 F3 C"duex.fan3" Q500                              ; create fan 3 on pin duex.fan3 and set its frequency
M106 P3 I-1                                        ; set fan 3 value. Thermostatic control is turned off
M950 F4 C"duex.fan4" Q500                              ; create fan 4 on pin duex.fan4 and set its frequency
M106 P4 I-1                                        ; set fan 4 value. Thermostatic control is turned off
M950 F5 C"duex.fan5" Q500                              ; create fan 5 on pin duex.fan5 and set its frequency
M106 P5 S1 H0 T46              ; extruder 0                        ; set fan 5 value. Thermostatic control is turned on
M950 F6 C"duex.fan6" Q500                              ; create fan 6 on pin duex.fan6 and set its frequency
M106 P6 S1 H1 T46              ; extruder 1                        ; set fan 6 value. Thermostatic control is turned on
; apparently these disabled defines still seize the IO; don't define so we can use for LED later
;M950 F7 C"duex.fan7" Q500                              ; create fan 7 on pin duex.fan7 and set its frequency
;M106 P7 I-1                                         ; set fan 7 value. Thermostatic control is turned off
M950 F8 C"duex.fan8" Q500                              ; create fan 8 on pin duex.fan8 and set its frequency
M106 P8 I-1                                         ; set fan 8 value. Thermostatic control is turned off

; Tools
M563 P0 S"E0 Primary" D0 H1 F0                         ; define tool 0, E0 drive, heater 1, fan 0
G10 P0 X0 Y0 Z0                                        ; set tool 0 axis offsets
G10 P0 R0 S0                                           ; set initial tool 0 active and standby temperatures to 0C
M563 P1 S"E1 SEcondary" D1 H2 F1                       ; define tool 1
G10 P1 X-0.2 Y52.5 Z0                                   ; set tool 1 axis offsets
G10 P1 R0 S0                                           ; set initial tool 1 active and standby temperatures to 0C

; Custom settings are not defined

; Miscellaneous
M575 P1 S1 B57600                                      ; enable support for PanelDue
M501                                                   ; load saved parameters from non-volatile memory


; Automatic power saving____________________________________________
M911 S22.5 R29.0 P"M913 X0 Y0 G91 M83 G1 Z3 E-5 F1000"              ; Set voltage thresholds and actions to run on power loss. Power Failure Pause

; Custom settings___________________________________________________
;M591 D0:1 P1 C4 S1		   			       	    					; Regular filament sensor for E0 and E1
; disabled, fixme


; _______________GPIOs____________________
; LED strip on GPIO 'P1', duex fan7 output
M950 P1 C"duex.fan7" Q500