• Tags
  • Documentation
  • Order
  • Register
  • Login
Duet3D Logo Duet3D
  • Tags
  • Documentation
  • Order
  • Register
  • Login

Strange hight map

Scheduled Pinned Locked Moved
Duet Web Control
5
19
783
Loading More Posts
  • Oldest to Newest
  • Newest to Oldest
  • Most Votes
Reply
  • Reply as topic
Log in to reply
This topic has been deleted. Only users with topic management privileges can see it.
  • undefined
    hsverre
    last edited by 10 Sept 2021, 15:35

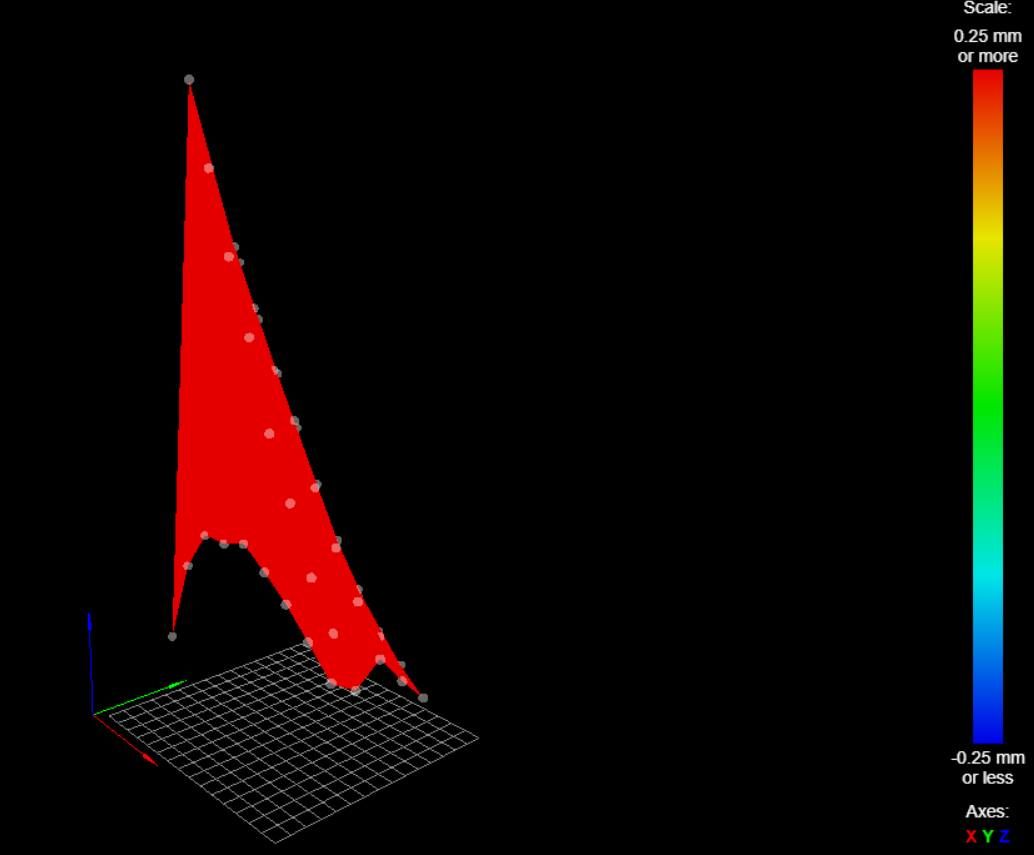
    Hi. Im trying to figure out the hight map, it all show red and i dont understand why. Isnt there supposed to be som blue and green areas as well? I dont get it. And the bed is not that skewed as the picture shows. The hight map does not visualize the bed very well. Anyone know why?hightmap.jpg

    undefined 1 Reply Last reply 10 Sept 2021, 16:39 Reply Quote 0
    • undefined
      fcwilt @hsverre
      last edited by 10 Sept 2021, 16:39

      @hsverre

      Hi,

      Regards being all red:

      Before creating/loading a height map you have to set the Z=0 Datum using a single G30 at some fixed XY location.

      Some folks use a specific point on the "height map" grid, other folks (like me) use the center of the bed.

      Your height map image suggests you did not set the Z=0 Datum or it did not work correctly.

      Regards the shape:

      It's a bit hard to tell without being able to view the height map from different angles.

      If you post the file here we can download and view it.

      Until then I'm guessing your bed is not level.

      Frederick

      Printers: a small Utilmaker style, a small CoreXY and a E3D MS/TC setup. Various hotends. Using Duet 3 hardware running 3.4.6

      undefined 1 Reply Last reply 10 Sept 2021, 16:59 Reply Quote 1
      • undefined
        hsverre @fcwilt
        last edited by 10 Sept 2021, 16:59

        @fcwilt Thanks a lot for your reply 🙂
        I dont get how the "G31 P500 X0 Y0 Z1.95" in the z-probe section in config.g, is related to the Z=0 Datum?

        undefined undefined 2 Replies Last reply 10 Sept 2021, 17:16 Reply Quote 0
        • undefined
          fcwilt @hsverre
          last edited by 10 Sept 2021, 17:16

          @hsverre said in Strange hight map:

          @fcwilt Thanks a lot for your reply 🙂
          I dont get how the "G31 P500 X0 Y0 Z1.95" in the z-probe section in config.g, is related to the Z=0 Datum?

          Let's assume you decide to use the center of the bed as the Z=0 reference point.

          Assume:

          • the bed is 300 x 300
          • the X axis is 0 to 300
          • the Y axis is 0 to 300
          • probe X offset is 5
          • probe Y offset is 10

          Thus the center of the bed is at X=150, Y=150.

          To position the probe at the center of the bed you need to account for the probe X and Y offsets.

          So the command G1 X145 Y140 would move the probe to X=150, Y=150.

          So to set the Z=0 Datum:

          G29 S2 ; cancel mesh bed compensation
          M290 R0 S0 ; cancel baby stepping
          G1 X145 Y140 ; move probe to bed center
          G30 ; do single probe - sets Z to probe trigger height - if trigger height is wrong Z position will be wrong

          Having set the Z=0 Datum you can now use G29 to create the height map

          Frederick

          Printers: a small Utilmaker style, a small CoreXY and a E3D MS/TC setup. Various hotends. Using Duet 3 hardware running 3.4.6

          undefined 1 Reply Last reply 10 Sept 2021, 17:20 Reply Quote 1
          • undefined
            hsverre @fcwilt
            last edited by 10 Sept 2021, 17:20

            @fcwilt Is it still the same procedure when i have four independent z-axis leadscrews?

            undefined 1 Reply Last reply 10 Sept 2021, 17:24 Reply Quote 0
            • undefined
              fcwilt @hsverre
              last edited by 10 Sept 2021, 17:24

              @hsverre said in Strange hight map:

              @fcwilt Is it still the same procedure when i have four independent z-axis leadscrews?

              Setting the Z=0 Datum?

              Yes it is.

              The independent Z steppers are involved in auto-bed leveling which also requires setting the Z=0 datum after the leveling is done.

              But auto-leveling is not related to mesh bed compensation.

              Frederick

              Printers: a small Utilmaker style, a small CoreXY and a E3D MS/TC setup. Various hotends. Using Duet 3 hardware running 3.4.6

              undefined 1 Reply Last reply 10 Sept 2021, 18:23 Reply Quote 0
              • undefined
                hsverre @fcwilt
                last edited by 10 Sept 2021, 18:23

                @fcwilt Where can i see what z=datum level is set? How do i figure out if it is set or not?

                undefined 1 Reply Last reply 10 Sept 2021, 18:55 Reply Quote 0
                • undefined
                  fcwilt @hsverre
                  last edited by fcwilt 9 Oct 2021, 22:00 10 Sept 2021, 18:55

                  @hsverre said in Strange hight map:

                  @fcwilt Where can i see what z=datum level is set? How do i figure out if it is set or not?

                  You cannot. You just have to perform the Z=0 Datum setting at certain times:

                  • after homing Z using endstops (if it will not be done later by one of the items below)
                  • after auto-leveling the bed (if you printer has the ability)
                  • before creating the height map
                  • before loading the height map

                  The G30 command just sets the current logical Z position (what the firmware "thinks" the Z position is) to match the Z Trigger Height parameter in your G31 command.

                  Assume the probe triggers at exactly 5mm above the bed and the G31 Z Trigger Height parameter is set to that value, 5.

                  You probe the bed with a G30, the probe triggers, therefore the current physical Z position is Z=5 and the logical Z position is set to Z=5.

                  Now the logical Z position matches the physical Z position and everything is in sync.

                  Frederick

                  Printers: a small Utilmaker style, a small CoreXY and a E3D MS/TC setup. Various hotends. Using Duet 3 hardware running 3.4.6

                  undefined 1 Reply Last reply 10 Sept 2021, 19:02 Reply Quote 0
                  • undefined
                    hsverre @fcwilt
                    last edited by 10 Sept 2021, 19:02

                    @fcwilt I cant make this fit with whats said at the Duet Wiki https://duet3d.dozuki.com/Wiki/Using_mesh_bed_compensation section "Establish a Z=0 datum using the Z probe". ...
                    To establish a Z=0 datum by one of the following methods: "Alternatively, if the printer has multiple independent Z leadscrews and you have set up leadscrew bed levelling, run leadscrew bed levelling (G32)"

                    Im running G32, why do all the other stuff?

                    undefined undefined 2 Replies Last reply 10 Sept 2021, 19:28 Reply Quote 0
                    • undefined
                      DIY-O-Sphere @hsverre
                      last edited by 10 Sept 2021, 19:28

                      @hsverre said in Strange hight map:

                      Im running G32, why do all the other stuff?

                      The other stuff is only required when the bed is not planar.
                      You don't necessarily need that with a high quality print bed.

                      (UTC+1)

                      1 Reply Last reply Reply Quote 0
                      • undefined
                        fcwilt @hsverre
                        last edited by 10 Sept 2021, 19:30

                        @hsverre said in Strange hight map:

                        @fcwilt I cant make this fit with whats said at the Duet Wiki https://duet3d.dozuki.com/Wiki/Using_mesh_bed_compensation section "Establish a Z=0 datum using the Z probe". ...
                        To establish a Z=0 datum by one of the following methods: "Alternatively, if the printer has multiple independent Z leadscrews and you have set up leadscrew bed levelling, run leadscrew bed levelling (G32)"

                        Im running G32, why do all the other stuff?

                        Well I use the center of the bed as my reference point for setting the Z=0 Datum.

                        Auto-leveling the bed can change the Z position of the center of the bed so I follow the bed leveling procedure with the Z=0 Datum procedure.

                        I don't worry about setting the Z=0 Datum more often then necessary. I simply make sure that it is done when it must be done.

                        Frederick

                        Printers: a small Utilmaker style, a small CoreXY and a E3D MS/TC setup. Various hotends. Using Duet 3 hardware running 3.4.6

                        1 Reply Last reply Reply Quote 0
                        • undefined
                          engikeneer @hsverre
                          last edited by 10 Sept 2021, 21:57

                          @hsverre said in Strange hight map:

                          @fcwilt Thanks a lot for your reply 🙂
                          I dont get how the "G31 P500 X0 Y0 Z1.95" in the z-probe section in config.g, is related to the Z=0 Datum?

                          This says that the probe has a zero X/Y offset from the nozzle, is considered 'triggered' when the analogue input reaches 500, and when it is triggered the nozzle is 1.95mm above the bed (I.e. it knows that z=0 is 1.95mm below where it triggered).

                          As @fcwilt says, you need to do a single G30 probe at a known location (typically the centre of the bed) after a G32 levelling, and before creating or loading a heightmap.

                          E3D TC with D3Mini and Toolboards.
                          Home-built CoreXY, Duet Wifi, Chimera direct drive, 2x BMG, 300x300x300 build volume
                          i3 clone with a bunch of mods

                          undefined 1 Reply Last reply 10 Sept 2021, 22:05 Reply Quote 2
                          • undefined
                            hsverre @engikeneer
                            last edited by 10 Sept 2021, 22:05

                            @engikeneer The G32, doesnt it do the G30, why do it again? Whats the difference between the G30 done in the beg.g and the G30 you are talking about?

                            Im sorry for the lack of knowledge, trying to learn 🙂

                            The beg.g file:
                            ; bed.g
                            ; called to perform automatic bed compensation via G32
                            ;
                            ; generated by RepRapFirmware Configuration Tool v3.2.3 on Fri Jul 30 2021 22:46:27 GMT+0200 (sentraleuropeisk sommertid)
                            ;M561 ; clear any bed transform
                            ;G29 ; probe the bed and enable compensation
                            G28 ; home
                            ;M401 ; deploy Z probe (omit if using bltouch)
                            G30 P0 X700 Y400 Z-99999 ; probe near a leadscrew
                            G30 P1 X700 Y5 Z-99999 ; probe near a leadscrew
                            G30 P2 X5 Y5 Z-99999 ; probe near a leadscrew
                            G30 P3 X5 Y400 Z-99999 S4 ; probe near a leadscrew and calibrate 4 motors
                            ;M402 ; retract probe (omit if using bltouch)

                            undefined 1 Reply Last reply 10 Sept 2021, 22:21 Reply Quote 0
                            • undefined
                              fcwilt @hsverre
                              last edited by fcwilt 9 Oct 2021, 22:48 10 Sept 2021, 22:21

                              @hsverre said in Strange hight map:

                              @engikeneer The G32, doesnt it do the G30, why do it again? Whats the difference between the G30 done in the beg.g and the G30 you are talking about?

                              Im sorry for the lack of knowledge, trying to learn 🙂

                              The beg.g file:
                              ; bed.g
                              ; called to perform automatic bed compensation via G32
                              ;
                              ; generated by RepRapFirmware Configuration Tool v3.2.3 on Fri Jul 30 2021 22:46:27 GMT+0200 (sentraleuropeisk sommertid)
                              ;M561 ; clear any bed transform
                              ;G29 ; probe the bed and enable compensation
                              G28 ; home
                              ;M401 ; deploy Z probe (omit if using bltouch)
                              G30 P0 X700 Y400 Z-99999 ; probe near a leadscrew
                              G30 P1 X700 Y5 Z-99999 ; probe near a leadscrew
                              G30 P2 X5 Y5 Z-99999 ; probe near a leadscrew
                              G30 P3 X5 Y400 Z-99999 S4 ; probe near a leadscrew and calibrate 4 motors
                              ;M402 ; retract probe (omit if using bltouch)

                              Yes G32 does 2,3 or 4 G30 commands but it doesn't do one at the center of the bed which I use as my Z=0 reference point.

                              You can use one of the G32 points as your Z=0 reference point but I simply prefer the center of the bed.

                              Regardless of the points I probe with G32 or G29 the center of the bed is always in the same XY location.

                              So I have one file with just the commands needed to perform the Z=0 Datum setting procedure. I call that file from other files as needed.

                              Frederick

                              Printers: a small Utilmaker style, a small CoreXY and a E3D MS/TC setup. Various hotends. Using Duet 3 hardware running 3.4.6

                              1 Reply Last reply Reply Quote 0
                              • Phaedruxundefined
                                Phaedrux Moderator
                                last edited by 10 Sept 2021, 22:39

                                Please tell us what firmware version you're using. Show us your config.g, homeall.g, homez.g, bed.g, and slicer start gcode. We need to know what's going on before the heightmap is created.

                                Z-Bot CoreXY Build | Thingiverse Profile

                                undefined 1 Reply Last reply 10 Sept 2021, 22:41 Reply Quote 0
                                • undefined
                                  hsverre @Phaedrux
                                  last edited by hsverre 9 Oct 2021, 22:45 10 Sept 2021, 22:41

                                  @phaedrux
                                  FIRMWARE_NAME: RepRapFirmware for Duet 2 WiFi/Ethernet FIRMWARE_VERSION: 3.3 ELECTRONICS: Duet WiFi 1.02 or later + DueX5 FIRMWARE_DATE: 2021-06-15 21:45:03

                                  CONFIG.G:
                                  ; Configuration file for Duet WiFi (firmware version 3)
                                  ; executed by the firmware on start-up
                                  ;
                                  ; generated by RepRapFirmware Configuration Tool v3.2.3 on Fri Jul 30 2021 22:46:27 GMT+0200 (sentraleuropeisk sommertid)

                                  ; General preferences
                                  G90 ; send absolute coordinates...
                                  M83 ; ...but relative extruder moves
                                  M550 P"Voron24" ; set printer name
                                  M669 K1 ; select CoreXY mode

                                  ; Network
                                  M552 S1 ; enable network
                                  M586 P0 S1 ; enable HTTP
                                  M586 P1 S0 ; disable FTP
                                  M586 P2 S0 ; disable Telnet

                                  ; Drives
                                  M569 P1 S0 ; z drive 1
                                  M569 P2 S1 ; z drive 2
                                  M569 P3 S0 ; z drive 3
                                  M569 P4 S1 ; z drive 4
                                  M569 P5 S1 ; a drive 5
                                  M569 P6 S1 ; b drive 6
                                  M569 P7 S0 ; ex drive 7
                                  M584 X5 Y6 Z1:2:3:4 E7
                                  M671 X815:815:-125:-125 Y500:-130:-130:500 S20 ; leadscrews at rear left, front middle and rear right
                                  M350 X16 Y16 Z16 E16 I1 ; configure microstepping with interpolation
                                  M92 X80.00 Y80.00 Z400.00 E420.00 ; set steps per mm
                                  M566 X900.00 Y900.00 Z60.00 E120.00 ; set maximum instantaneous speed changes (mm/min)
                                  M203 X6000.00 Y6000.00 Z180.00 E1200.00 ; set maximum speeds (mm/min)
                                  M201 X500.00 Y500.00 Z20.00 E250.00 ; set accelerations (mm/s^2)
                                  M906 X800 Y800 Z800 E800 I30 ; set motor currents (mA) and motor idle factor in per cent
                                  M84 S30 ; Set idle timeout

                                  ; Axis Limits
                                  M208 X0 Y0 Z0 S1 ; set axis minima
                                  M208 X700 Y400 Z500 S0 ; set axis maxima

                                  ; Endstops
                                  M574 X1 S1 P"xstop" ; configure active-high endstop for low end on X via pin xstop
                                  M574 Y1 S1 P"ystop" ; configure active-high endstop for low end on Y via pin ystop
                                  M574 Z1 S2 ; configure Z-probe endstop for low end on Z

                                  ; Z-Probe
                                  M558 P1 C"zprobe.in" H20 F2000 T6000 ; set Z probe type to unmodulated and the dive height + speeds
                                  G31 P1000 X0 Y0 Z1.995 ; set Z probe trigger value, offset and trigger height
                                  M557 X15:700 Y15:400 S80 ; define mesh grid

                                  ; Heaters
                                  M308 S0 P"bedtemp" Y"thermistor" T100000 B4138 ; configure sensor 0 as thermistor on pin bedtemp
                                  M950 H0 C"bedheat" T0 ; create bed heater output on bedheat and map it to sensor 0
                                  M307 H0 B1 S1.00 ; enable bang-bang mode for the bed heater and set PWM limit
                                  M140 H0 ; map heated bed to heater 0
                                  M143 H0 S120 ; set temperature limit for heater 0 to 120C
                                  M308 S1 P"e0temp" Y"thermistor" T100000 B4138 ; configure sensor 1 as thermistor on pin e0temp
                                  M950 H1 C"e0heat" T1 ; create nozzle heater output on e0heat and map it to sensor 1
                                  M307 H1 B0 S1.00 ; disable bang-bang mode for heater and set PWM limit
                                  M143 H1 S280 ; set temperature limit for heater 1 to 280C

                                  ; Fans
                                  M950 F0 C"fan0" Q500 ; create fan 0 on pin fan0 and set its frequency
                                  M106 P0 S0 H-1 ; set fan 0 value. Thermostatic control is turned off
                                  M950 F1 C"fan1" Q500 ; create fan 1 on pin fan1 and set its frequency
                                  M106 P1 S1 H1 T45 ; set fan 1 value. Thermostatic control is turned on

                                  ; Tools
                                  M563 P0 D0 H1 F0 ; define tool 0
                                  G10 P0 X0 Y0 Z0 ; set tool 0 axis offsets
                                  G10 P0 R0 S0 ; set initial tool 0 active and standby temperatures to 0C

                                  ; Custom settings are not defined

                                  HOMEALL.G:

                                  Voron24
                                  m115
                                  Status
                                  Idle
                                  Mode: FFF
                                  Tool Position
                                  X
                                  655.0
                                  Y
                                  335.0
                                  Z
                                  22.00
                                  Extruder Drives
                                  Drive 0
                                  0.0
                                  Speeds
                                  Requested Speed
                                  0 mm/s
                                  Top Speed
                                  0 mm/s
                                  Sensors
                                  Vin
                                  12.4 V
                                  MCU Temperature
                                  26.3 °C
                                  Z-Probe
                                  0
                                  Tools
                                  Extra
                                  Control Heaters
                                  Tool Heater Current Active Standby
                                  Tool 0
                                  T0 - PLA Heater 1
                                  off 19.0 °C
                                  0
                                  0
                                  Bed Heater 0
                                  off -273.1 °C
                                  0
                                  0
                                  Temperature Chart
                                  System Directory
                                  0:/sys/homeall.g
                                  ; homeall.g
                                  ; called to home all axes
                                  ;
                                  ; generated by RepRapFirmware Configuration Tool v3.2.3 on Fri Jul 30 2021 22:46:27 GMT+0200 (sentraleuropeisk sommertid)
                                  G91 ; relative positioning
                                  G1 H2 Z5 F6000 ; lift Z relative to current position
                                  G1 H1 X-705 Y-405 F1800 ; move quickly to X or Y endstop and stop there (first pass)
                                  G1 H1 X-705 ; home X axis
                                  G1 H1 Y-405 ; home Y axis
                                  G1 X5 Y5 F6000 ; go back a few mm
                                  G1 H1 X-705 F360 ; move slowly to X axis endstop once more (second pass)
                                  G1 H1 Y-405 ; then move slowly to Y axis endstop
                                  G90 ; absolute positioning
                                  G1 X15 Y15 F6000 ; go to first bed probe point and home Z
                                  G30 ; home Z by probing the bed

                                  ; Uncomment the following lines to lift Z after probing
                                  ;G91 ; relative positioning
                                  ;G1 Z5 F100 ; lift Z relative to current position
                                  ;G90 ; absolute positioning

                                  HOMEZ.G:
                                  ; homez.g
                                  ; called to home the Z axis
                                  ;
                                  ; generated by RepRapFirmware Configuration Tool v3.2.3 on Fri Jul 30 2021 22:46:27 GMT+0200 (sentraleuropeisk sommertid)
                                  G91 ; relative positioning
                                  G1 H2 Z5 F6000 ; lift Z relative to current position
                                  G90 ; absolute positioning
                                  G1 X15 Y15 F6000 ; go to first probe point
                                  G30 ; home Z by probing the bed

                                  ; Uncomment the following lines to lift Z after probing
                                  ;G91 ; relative positioning
                                  ;G1 Z5 F100 ; lift Z relative to current position
                                  ;G90 ; absolute positioning

                                  BED.G:; bed.g
                                  ; called to perform automatic bed compensation via G32
                                  ;
                                  ; generated by RepRapFirmware Configuration Tool v3.2.3 on Fri Jul 30 2021 22:46:27 GMT+0200 (sentraleuropeisk sommertid)
                                  ;M561 ; clear any bed transform
                                  ;G29 ; probe the bed and enable compensation
                                  G28 ; home
                                  ;M401 ; deploy Z probe (omit if using bltouch)
                                  G30 P0 X700 Y400 Z-99999 ; probe near a leadscrew
                                  G30 P1 X700 Y5 Z-99999 ; probe near a leadscrew
                                  G30 P2 X5 Y5 Z-99999 ; probe near a leadscrew
                                  G30 P3 X5 Y400 Z-99999 S4 ; probe near a leadscrew and calibrate 4 motors
                                  ;M402 ; retract probe (omit if using bltouch)

                                  Some lines from a gcode file im trying to print. I dont have any startcode defined in particular:
                                  ;FLAVOR:RepRap
                                  ;TIME:2808
                                  ;Filament used: 4.52013m
                                  ;Layer height: 0.3
                                  ;MINX:25.485
                                  ;MINY:43.136
                                  ;MINZ:0.3
                                  ;MAXX:65.436
                                  ;MAXY:83.089
                                  ;MAXZ:30.2
                                  ;Generated with Cura_SteamEngine 4.11.0
                                  T0
                                  M104 S200
                                  M109 S200
                                  M82 ;absolute extrusion mode
                                  print_start
                                  M83 ;relative extrusion mode
                                  G1 F4800 E-6.5
                                  ;LAYER_COUNT:100
                                  ;LAYER:0
                                  M107
                                  G1 F600 Z0.5
                                  G0 F7200 X33.265 Y44.154 Z0.5
                                  ;TYPE:SKIRT
                                  G1 F600 Z0.3
                                  G1 F1920 E6.5
                                  G1 F1200 X33.795 Y43.806 E0.03559
                                  G1 X34.364 Y43.528 E0.03554
                                  G1 X34.964 Y43.323 E0.03559
                                  G1 X35.584 Y43.195 E0.03553
                                  G1 X36.106 Y43.149 E0.02941

                                  1 Reply Last reply Reply Quote 0
                                  • Phaedruxundefined
                                    Phaedrux Moderator
                                    last edited by Phaedrux 9 Oct 2021, 23:02 10 Sept 2021, 23:02

                                    If you put your mouse cursor over that errant point in the grid it will give you the xy coordinate. Is there anything strange or unique about that point? Is the probe triggering early there for some reason?

                                    What type of probe is it?

                                    Z-Bot CoreXY Build | Thingiverse Profile

                                    undefined 1 Reply Last reply 10 Sept 2021, 23:17 Reply Quote 0
                                    • undefined
                                      hsverre @Phaedrux
                                      last edited by 10 Sept 2021, 23:17

                                      @phaedrux The coordinates for the errant point is X15 Y95 Z5,76 the next point is X15 Y15 Z0.575. And its not a difference like nearly half a cm. The build plate looks perfectly flat, its a milled 8mm cast aluminium plate.

                                      The probe is a "PL-08N2 8mm sensing DC NPN NC Cube shell inductive Screen shield type proximity switch LP08 proximity sensor 171735"

                                      When i try to print the printer starts to print about 10 mm above the build plate when I have Mesh Compensation on. When Mesh Comp is off the nozzle scraps the plate.

                                      Whene i use the G32 True Bed Leveling it corrects axis 1 and 3 consistently. As if the Leveling prosess itself un-corrects the leveling.

                                      1 Reply Last reply Reply Quote 0
                                      • Phaedruxundefined
                                        Phaedrux Moderator
                                        last edited by 10 Sept 2021, 23:26

                                        Test the trigger height of the probe at that point. It looks like it's triggering too early.

                                        Z-Bot CoreXY Build | Thingiverse Profile

                                        1 Reply Last reply Reply Quote 0
                                        3 out of 19
                                        • First post
                                          3/19
                                          Last post
                                        Unless otherwise noted, all forum content is licensed under CC-BY-SA