Delta effector weight, predator conversion
-
I am in the process of converting my Anycubic Predator and need a bit of design input.
Essentially I bought it for the frame and base as I get really good results with PETG on the ultrabase.
So I have linear rails on the way and magball arms will be done at the same time.
It already has a Duet 3 mini at the controlls and a duet effector on the way.
I have printed and assembled
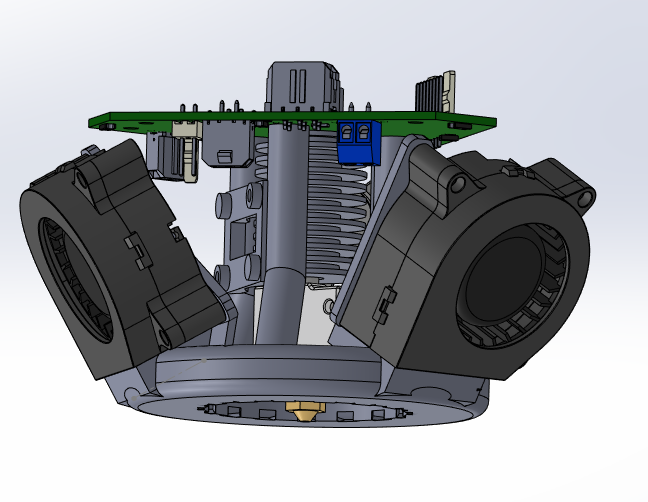
https://www.thingiverse.com/thing:3603550Hopefully while this lets me connect to the stock arms in the short term the part cooling fans will still attach without the adapter once I change the arms.
Any better alternative would be welcome as this serms like a crazy volume of print cooling for my needs.
I really need some guidance on the extruder. This is currently a BMG type.
Is the short bowden flying extruder design worth keeping? Would a direct drive really harm things with the extra moving mass? Is remote mounting with a long bowden a better solution given I mainly print PETG.
I can see a use for printing flexible fillament and everything is a compromise so I hope you wise folks can steer me in the right direction.
-
@opentoideas I installed this mount on my Predator long time ago before I got the magballs - It works fine for the few months I used them.
As for the cooling, I'm pretty sure the fans were set to approx. 35-40% most of the time.
The BMG extruder is fine, I'm currently using the Sailfin (remix of the Sherpa) but still with the springs (flying extruder), have also tried to install different options as direct drive on the Smart Effector but I'm not convinced of the benefits - When I have (a lot of) time I will try to compare the impact with my accelerometer.
If you want to try the Sherpa as flying extruder, I published a bracket on Thingiverse, I have also on unpublished for the Sailfin - just let me know.I won't recommend using a long bowden as the retraction will have to be fairly long moreover if you want to use some flexible filaments.
About printing PETG on the ultrabase, I would be careful as it might stick too much and damage the coating.
-
@opentoideas @jay_s_uk could say more i think
-
@opentoideas I use a different fan mount now. Haven't posted it to thingiverse yet though
-
thank you for the input.
for the moment I think I will keep the flying extruder setup.
my delta effector should be arriving today so I will finally get to see how things fit and a better idea how the hotend fan might fit.
@Fred-Y - I have been using the ultrabase for a couple of years now and have damaged them in a couple of ways but not yet had any issues with sticking other than my own error. keeping the ultrabase clean I find helps and I give it a wipe over with isopropyl most prints and a good clean as soon as I see any marks. Dragging the nozzle after incorrect levelling and pulling a part off before it cools are both great ways to damage the surface but I find printing at 70C as long as I let the ultrabase cool to under 45C then the part is fully released from the bed before I get there.
I see so many people that dont get on with the ultrabase but for some reason it was one of those "eureka" moments for me. I had nothing but problems with all the different surfaces that I tried. I have damaged the 2 I used on my CR10 but that was mainly due to probe reliability problems.
@jay_s_uk - if you are the same person as jayuk.org then thank you - the predator blog was one of many sites I have used for inspiration. any chance of a peek at your current fan setup?
-
@opentoideas yes, thats me
I use this design Cooling Duct.STL
uses 2 x 4020 blowers and allows one of PCR's accelerometer boards to be attached.
its designed for a volcano
-
@jay_s_uk said in Delta effector weight, predator conversion:
@opentoideas yes, thats me
I use this design Cooling Duct.STL
uses 2 x 4020 blowers and allows one of PCR's accelerometer boards to be attached.
its designed for a volcano
thank you, I also use a volcano so this will be added to the print list.
-
@jay_s_uk - accelerometer....... oh dear I feel another rabbit hole coming on....
I can see that adding one is of potential benefit.. while I am figuring out the wiring would seem like a good time to add it so I guess Ineed to do more research. any tips for a newb?
-
@opentoideas i used an amazon basics USB-C cable 2.7m in length.
theres an image kicking around on here for wiring it up.
then depending on your board depends on how you wire it up. I use a fly-e3-pro so the wiring for me will be different
definitely worth while once all the input shaping stuff comes into stable -
@PCR do you still have any of the accelerometers?
@jay_s_uk like the USB cable. probably have a few with damaged connectors I could use. So tempting to buy a toolboard to simplify the wiring for good.
My smart effector has arrived so I am in the process of getting it all built and have your cooling duct printing at the moment. looking good so far and love the design.
typically I have to wait for cable as it was backordered at RS but fingers crossed it should arrive by the end of the week as I dont want to cobble together the wiring.
-
@opentoideas yes! Write a PM
-
@pcr sent thank you
The more I think about it the better the toolboard is sounding.... just ordered one so off on the hunt for mounting solutions.
-
@pcr is there any reason I couldn't use your accelerometer connected to a 1LC toolboard?
my thinking is that the toolboard is simpler and more sensibly mounted to the extruder but thats no use for the accelerometer which needs to be on the print head.
if I can use your accelerometer on the print head connecting to the toolboard at the extruder then as long as the toolboards internal accelerometer can be ignored that would be the best of both......
I suspect that there will likely be a reason it wont work that way though
-
@opentoideas
Having two accel-sensors was part of an earlier discussion. The toolboard sensor mounted to the frame and another on the toolhead/effector. The shaper-plugin should build the difference of both curves.
Not sure how much has been implemented yet, I still use the Caliper method